Page 2206 of 3419
POWER WINDOW SYSTEM
GW-51
C
D
E
F
G
H
J
K
L
MA
B
GW
Revision: October 20052005 QX56
Front Door Lock Assembly LH (Key Cylinder Switch) CheckEIS005Y8
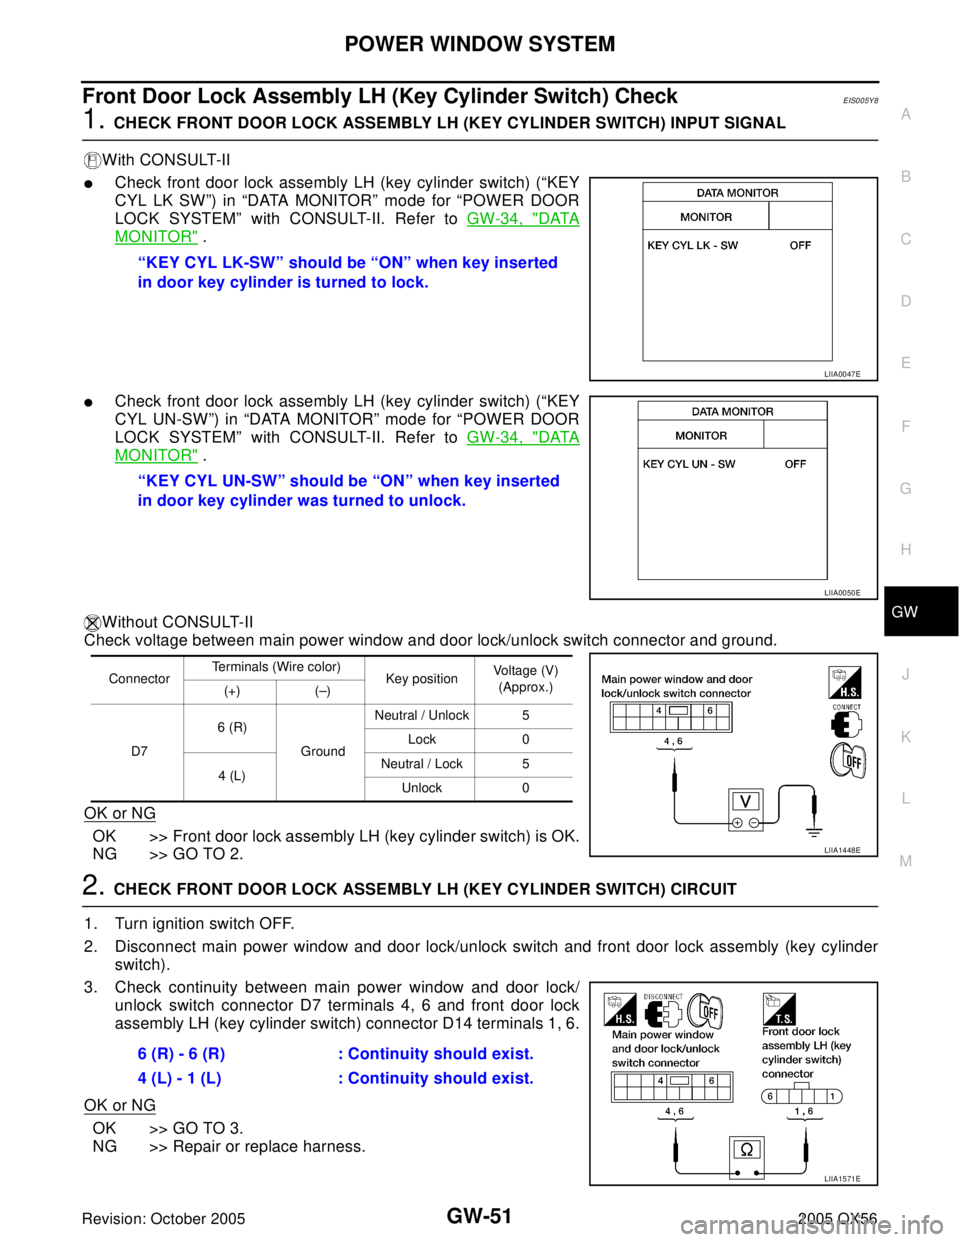
1. CHECK FRONT DOOR LOCK ASSEMBLY LH (KEY CYLINDER SWITCH) INPUT SIGNAL
With CONSULT-II
�Check front door lock assembly LH (key cylinder switch) (“KEY
CYL LK SW”) in “DATA MONITOR” mode for “POWER DOOR
LOCK SYSTEM” with CONSULT-II. Refer to GW-34, "
DATA
MONITOR" .
�Check front door lock assembly LH (key cylinder switch) (“KEY
CYL UN-SW”) in “DATA MONITOR” mode for “POWER DOOR
LOCK SYSTEM” with CONSULT-II. Refer to GW-34, "
DATA
MONITOR" .
Without CONSULT-II
Check voltage between main power window and door lock/unlock switch connector and ground.
OK or NG
OK >> Front door lock assembly LH (key cylinder switch) is OK.
NG >> GO TO 2.
2. CHECK FRONT DOOR LOCK ASSEMBLY LH (KEY CYLINDER SWITCH) CIRCUIT
1. Turn ignition switch OFF.
2. Disconnect main power window and door lock/unlock switch and front door lock assembly (key cylinder
switch).
3. Check continuity between main power window and door lock/
unlock switch connector D7 terminals 4, 6 and front door lock
assembly LH (key cylinder switch) connector D14 terminals 1, 6.
OK or NG
OK >> GO TO 3.
NG >> Repair or replace harness.“KEY CYL LK-SW” should be “ON” when key inserted
in door key cylinder is turned to lock.
LIIA0047E
“KEY CYL UN-SW” should be “ON” when key inserted
in door key cylinder was turned to unlock.
LIIA0050E
ConnectorTerminals (Wire color)
Key position Voltage (V)
(Approx.)
(+) (–)
D76 (R)
GroundNeutral / Unlock 5
Lock 0
4 (L)Neutral / Lock 5
Unlock 0
LIIA1448E
6 (R) - 6 (R) : Continuity should exist.
4 (L) - 1 (L) : Continuity should exist.
LIIA1571E
Page 2207 of 3419
GW-52
POWER WINDOW SYSTEM
Revision: October 20052005 QX56
3. CHECK FRONT DOOR LOCK ASSEMBLY LH (KEY CYLINDER SWITCH) GROUND
Check continuity between front door lock assembly LH (key cylinder switch) connector D14 terminal 5 and
ground.
OK or NG
OK >> GO TO 4.
NG >> Repair or replace harness.
4. CHECK FRONT DOOR LOCK ASSEMBLY LH (KEY CYLINDER SWITCH)
Check continuity between front door lock assembly LH (key cylinder switch) connector D14 terminals 1, 6 and
5.
OK or NG
OK >> Replace main power window and door lock/unlock
switch.
NG >> Replace front door lock assembly LH (key cylinder
switch). 5 (B) - Ground : Continuity should exist.
LIIA1572E
Terminals Key position Continuity
6
5Neutral / Unlock No
Lock Yes
1Neutral / Lock No
Unlock Yes
LIIA1573E
Page 2208 of 3419
POWER WINDOW SYSTEM
GW-53
C
D
E
F
G
H
J
K
L
MA
B
GW
Revision: October 20052005 QX56
Power Window Serial Link Check Front LH and RHEIS005Y9
1. CHECK SERIAL LINK OUTPUT SIGNAL
With CONSULT-II
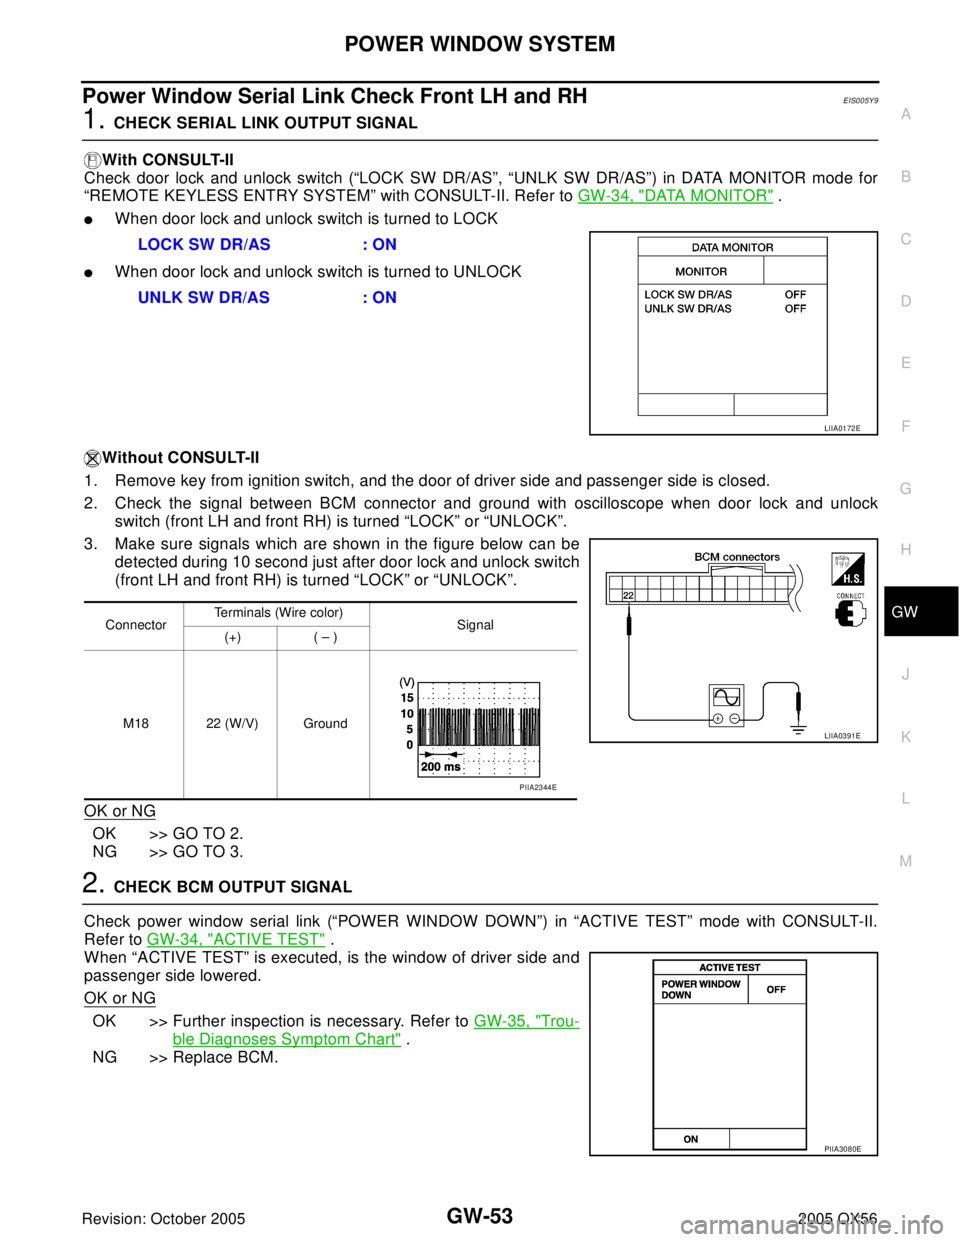
Check door lock and unlock switch (“LOCK SW DR/AS”, “UNLK SW DR/AS”) in DATA MONITOR mode for
“REMOTE KEYLESS ENTRY SYSTEM” with CONSULT-II. Refer to GW-34, "
DATA MONITOR" .
�When door lock and unlock switch is turned to LOCK
�When door lock and unlock switch is turned to UNLOCK
Without CONSULT-II
1. Remove key from ignition switch, and the door of driver side and passenger side is closed.
2. Check the signal between BCM connector and ground with oscilloscope when door lock and unlock
switch (front LH and front RH) is turned “LOCK” or “UNLOCK”.
3. Make sure signals which are shown in the figure below can be
detected during 10 second just after door lock and unlock switch
(front LH and front RH) is turned “LOCK” or “UNLOCK”.
OK or NG
OK >> GO TO 2.
NG >> GO TO 3.
2. CHECK BCM OUTPUT SIGNAL
Check power window serial link (“POWER WINDOW DOWN”) in “ACTIVE TEST” mode with CONSULT-II.
Refer to GW-34, "
ACTIVE TEST" .
When “ACTIVE TEST” is executed, is the window of driver side and
passenger side lowered.
OK or NG
OK >> Further inspection is necessary. Refer to GW-35, "Trou-
ble Diagnoses Symptom Chart" .
NG >> Replace BCM.LOCK SW DR/AS : ON
UNLK SW DR/AS : ON
LIIA0172E
ConnectorTerminals (Wire color)
Signal
(+) ( – )
M18 22 (W/V) Ground
LIIA0391E
PIIA2344E
PIIA3080E
Page 2209 of 3419
GW-54
POWER WINDOW SYSTEM
Revision: October 20052005 QX56
3. CHECK POWER WINDOW SWITCH GROUND
1. Turn ignition switch OFF.
2. Disconnect main power window and door lock/unlock switch and power window and door lock/unlock
switch RH.
3. Check continuity between main power window and door lock/unlock switch connector D8 terminal 17 and
ground.
4. Check continuity between power window and door lock/unlock switch RH connector D105 terminal 11 and
ground.
OK or NG
OK >> GO TO 4.
NG >> Repair or replace harness.17 (B) - Ground : Continuity should exist.
LIIA0392E
11 (B) - Ground : Continuity should exist.
LIIA1270E
Page 2210 of 3419
POWER WINDOW SYSTEM
GW-55
C
D
E
F
G
H
J
K
L
MA
B
GW
Revision: October 20052005 QX56
4. CHECK POWER WINDOW SERIAL LINK CIRCUIT
1. Disconnect BCM.
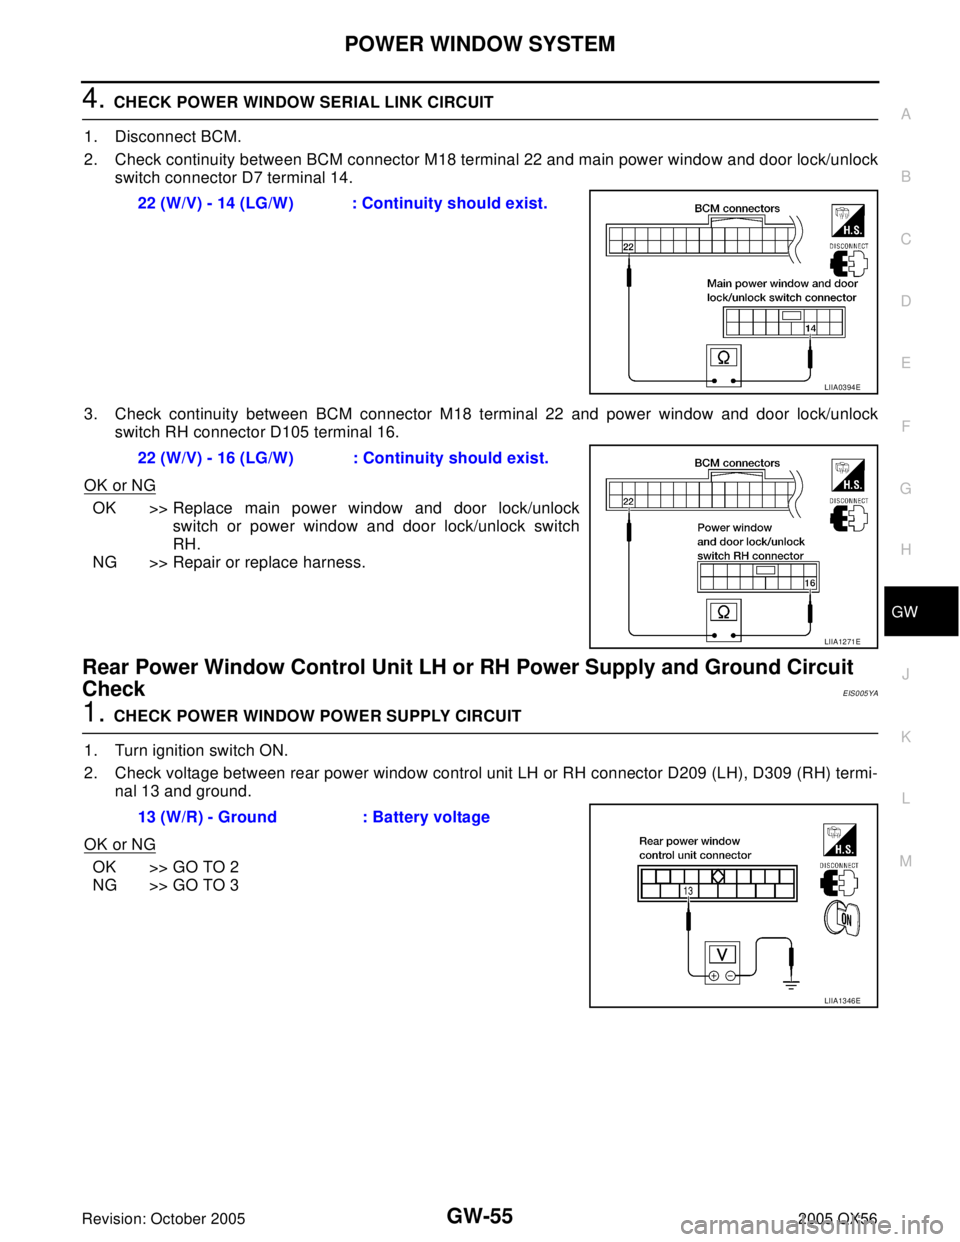
2. Check continuity between BCM connector M18 terminal 22 and main power window and door lock/unlock
switch connector D7 terminal 14.
3. Check continuity between BCM connector M18 terminal 22 and power window and door lock/unlock
switch RH connector D105 terminal 16.
OK or NG
OK >> Replace main power window and door lock/unlock
switch or power window and door lock/unlock switch
RH.
NG >> Repair or replace harness.
Rear Power Window Control Unit LH or RH Power Supply and Ground Circuit
Check
EIS005YA
1. CHECK POWER WINDOW POWER SUPPLY CIRCUIT
1. Turn ignition switch ON.
2. Check voltage between rear power window control unit LH or RH connector D209 (LH), D309 (RH) termi-
nal 13 and ground.
OK or NG
OK >> GO TO 2
NG >> GO TO 322 (W/V) - 14 (LG/W) : Continuity should exist.
LIIA0394E
22 (W/V) - 16 (LG/W) : Continuity should exist.
LIIA1271E
13 (W/R) - Ground : Battery voltage
LIIA1346E
Page 2218 of 3419
POWER WINDOW SYSTEM
GW-63
C
D
E
F
G
H
J
K
L
MA
B
GW
Revision: October 20052005 QX56
6. CHECK HARNESS CONTINUITY
1. Turn ignition switch OFF.
2. Disconnect rear power window control unit LH or RH and rear power window motor LH or RH.
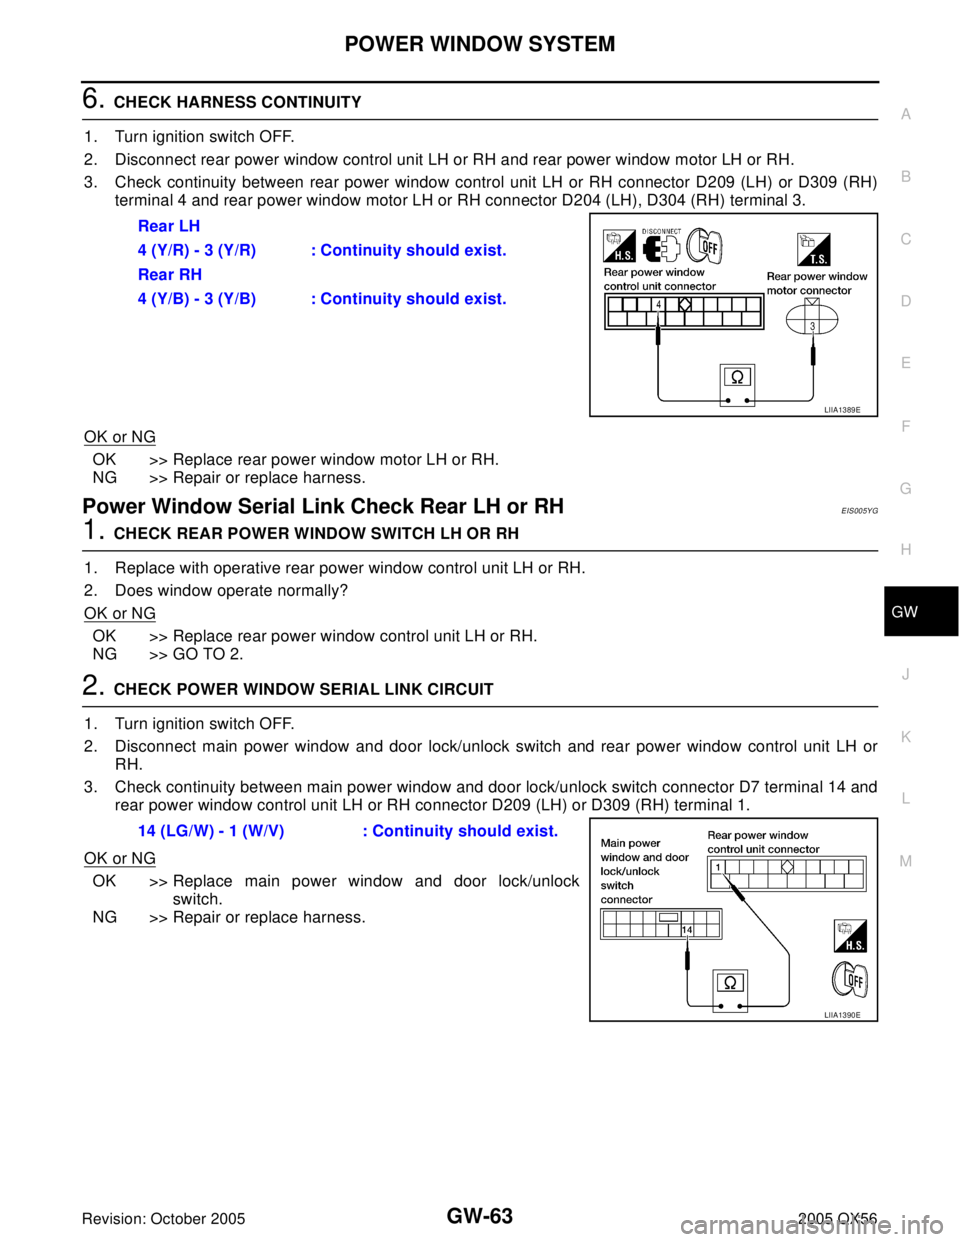
3. Check continuity between rear power window control unit LH or RH connector D209 (LH) or D309 (RH)
terminal 4 and rear power window motor LH or RH connector D204 (LH), D304 (RH) terminal 3.
OK or NG
OK >> Replace rear power window motor LH or RH.
NG >> Repair or replace harness.
Power Window Serial Link Check Rear LH or RHEIS005YG
1. CHECK REAR POWER WINDOW SWITCH LH OR RH
1. Replace with operative rear power window control unit LH or RH.
2. Does window operate normally?
OK or NG
OK >> Replace rear power window control unit LH or RH.
NG >> GO TO 2.
2. CHECK POWER WINDOW SERIAL LINK CIRCUIT
1. Turn ignition switch OFF.
2. Disconnect main power window and door lock/unlock switch and rear power window control unit LH or
RH.
3. Check continuity between main power window and door lock/unlock switch connector D7 terminal 14 and
rear power window control unit LH or RH connector D209 (LH) or D309 (RH) terminal 1.
OK or NG
OK >> Replace main power window and door lock/unlock
switch.
NG >> Repair or replace harness.Rear LH
4 (Y/R) - 3 (Y/R) : Continuity should exist.
Rear RH
4 (Y/B) - 3 (Y/B) : Continuity should exist.
LIIA1389E
14 (LG/W) - 1 (W/V) : Continuity should exist.
LIIA1390E
Page 2232 of 3419
REAR WINDOW DEFOGGER
GW-77
C
D
E
F
G
H
J
K
L
MA
B
GW
Revision: October 20052005 QX56
REAR WINDOW DEFOGGERPFP:25350
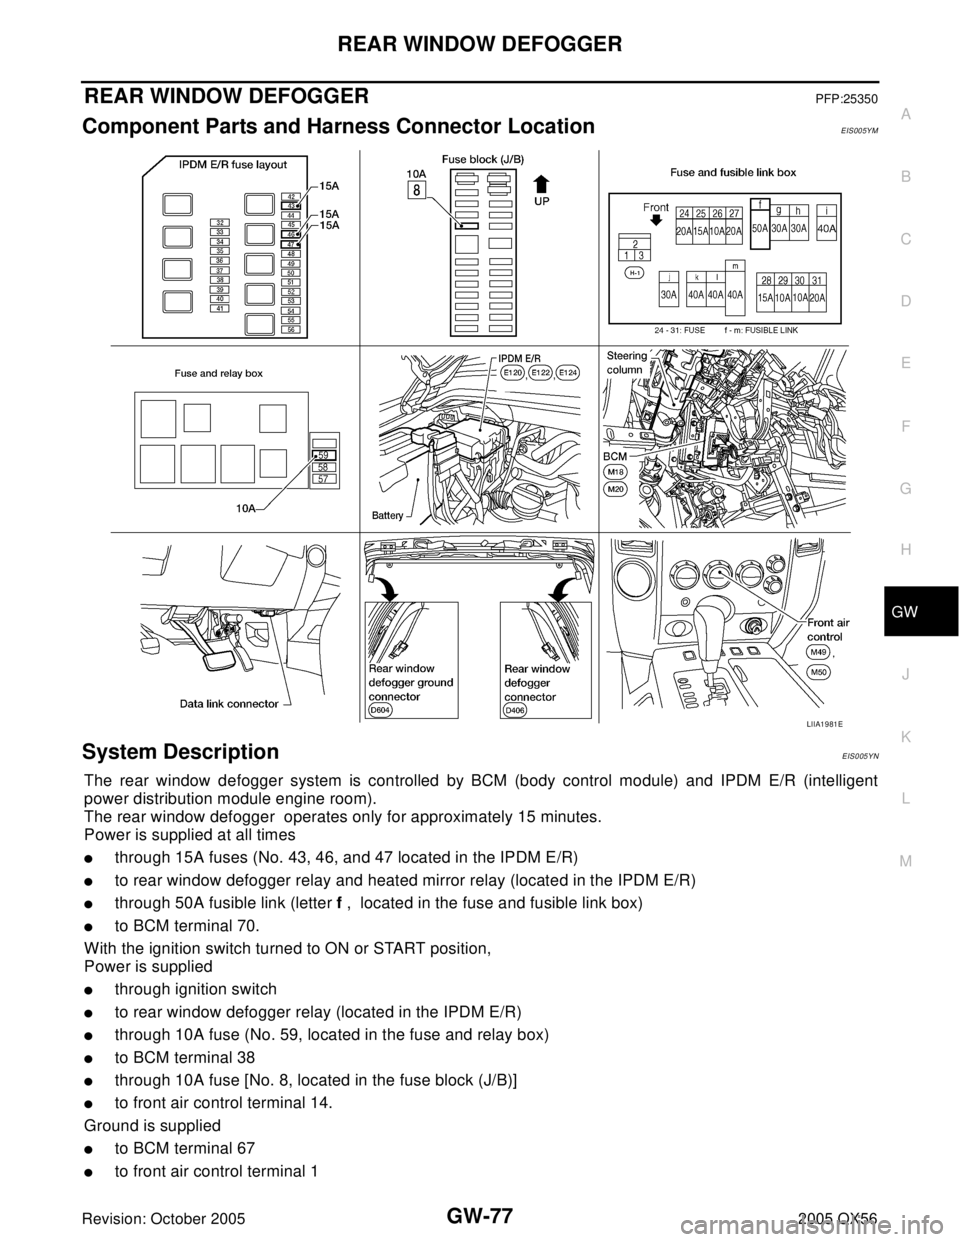
Component Parts and Harness Connector LocationEIS005YM
System DescriptionEIS005YN
The rear window defogger system is controlled by BCM (body control module) and IPDM E/R (intelligent
power distribution module engine room).
The rear window defogger operates only for approximately 15 minutes.
Power is supplied at all times
�through 15A fuses (No. 43, 46, and 47 located in the IPDM E/R)
�to rear window defogger relay and heated mirror relay (located in the IPDM E/R)
�through 50A fusible link (letter f , located in the fuse and fusible link box)
�to BCM terminal 70.
With the ignition switch turned to ON or START position,
Power is supplied
�through ignition switch
�to rear window defogger relay (located in the IPDM E/R)
�through 10A fuse (No. 59, located in the fuse and relay box)
�to BCM terminal 38
�through 10A fuse [No. 8, located in the fuse block (J/B)]
�to front air control terminal 14.
Ground is supplied
�to BCM terminal 67
�to front air control terminal 1
LIIA1981E
Page 2242 of 3419
REAR WINDOW DEFOGGER
GW-87
C
D
E
F
G
H
J
K
L
MA
B
GW
Revision: October 20052005 QX56
BCM Power Supply and Ground Circuit CheckEIS005YW
1. CHECK FUSES AND FUSIBLE LINK
�Check 10A fuse (No. 8, located in the fuse block (J/B)]
�Check 10A fuse (No. 59, located in the fuse and relay box)
�Check 50A fusible link (letter f located in the fuse and fusible link box)
NOTE:
Refer to GW-77, "
Component Parts and Harness Connector Location" .
OK or NG
OK >> GO TO 2.
NG >> If fuse is blown, be sure to eliminate cause of malfunction before installing new fuse. Refer to PG-
4, "POWER SUPPLY ROUTING CIRCUIT" .
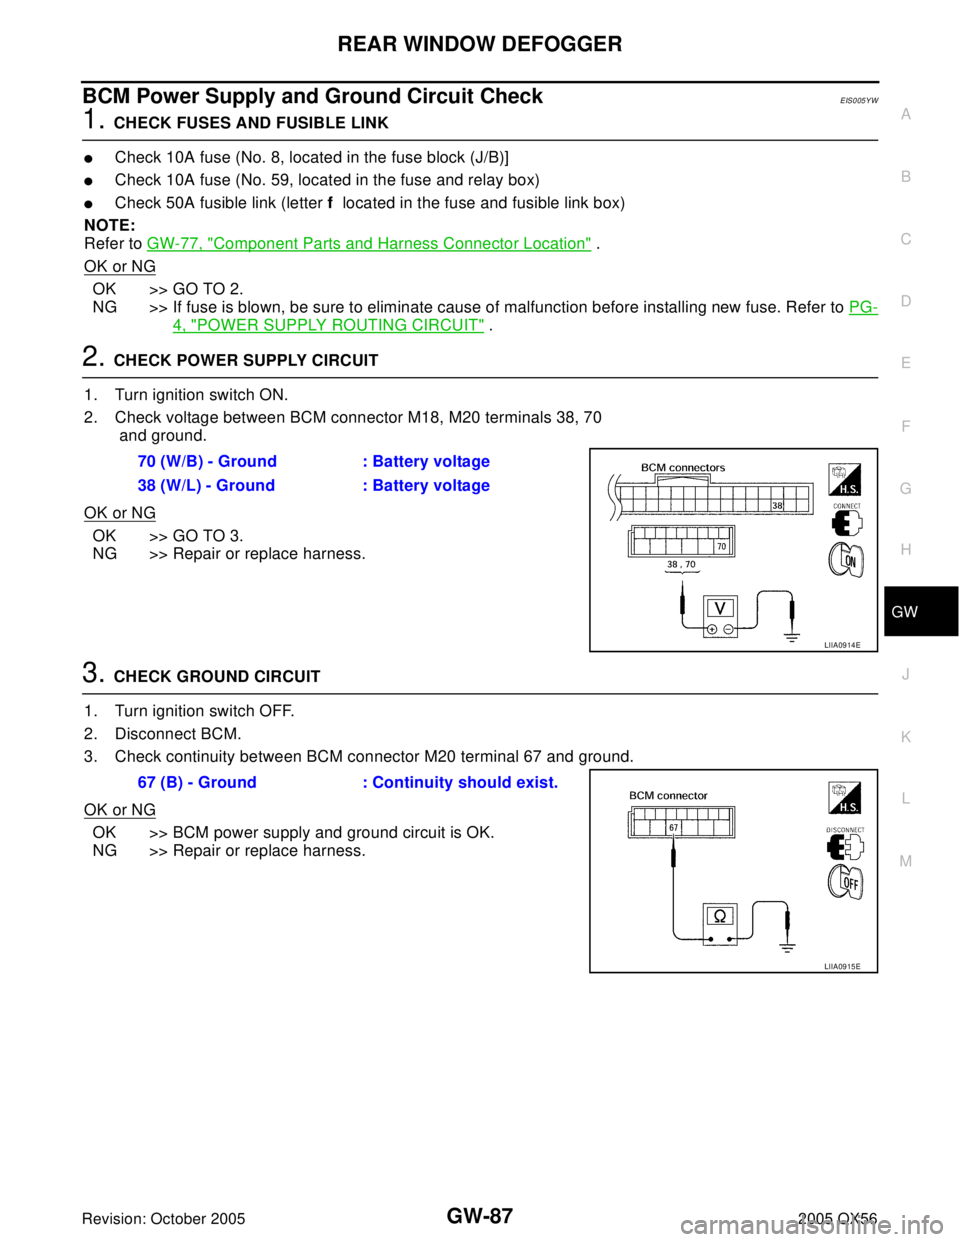
2. CHECK POWER SUPPLY CIRCUIT
1. Turn ignition switch ON.
2. Check voltage between BCM connector M18, M20 terminals 38, 70
and ground.
OK or NG
OK >> GO TO 3.
NG >> Repair or replace harness.
3. CHECK GROUND CIRCUIT
1. Turn ignition switch OFF.
2. Disconnect BCM.
3. Check continuity between BCM connector M20 terminal 67 and ground.
OK or NG
OK >> BCM power supply and ground circuit is OK.
NG >> Repair or replace harness.70 (W/B) - Ground : Battery voltage
38 (W/L) - Ground : Battery voltage
LIIA0914E
67 (B) - Ground : Continuity should exist.
LIIA0915E