Page 3972 of 4731
FRONT FOG LAMP LT-83
C
D E
F
G H
I
J
L
M A
B
LT
Revision: 2005 July 2005 FX
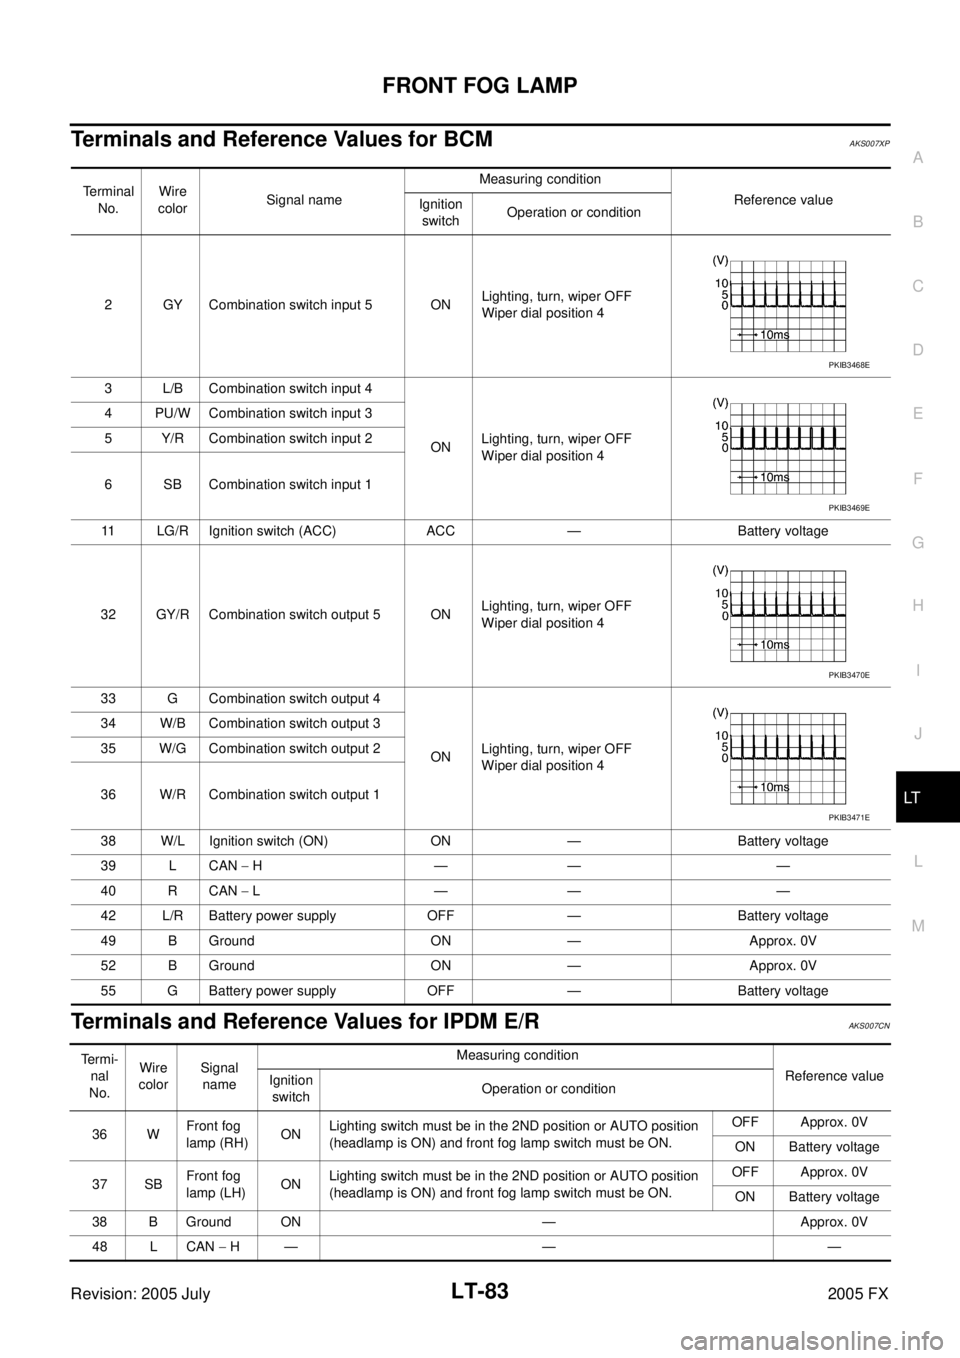
Terminals and Reference Values for BCMAKS007XP
Terminals and Reference Values for IPDM E/RAKS007CN
Terminal
No. Wire
color Signal name Measuring condition
Reference value
Ignition
switch Operation or condition
2 GY Combination switch input 5 ON Lighting, turn, wiper OFF
Wiper dial position 4
3 L/B Combination switch input 4 ON Lighting, turn, wiper OFF
Wiper dial position 4
4 PU/W Combination switch input 3
5 Y/R Combination switch input 2
6 SB Combination switch input 1
11 LG/R Ignition switch (ACC) ACC — Battery voltage
32 GY/R Combination switch output 5 ON Lighting, turn, wiper OFF
Wiper dial position 4
33 G Combination switch output 4 ON Lighting, turn, wiper OFF
Wiper dial position 4
34 W/B Combination switch output 3
35 W/G Combination switch output 2
36 W/R Combination switch output 1
38 W/L Ignition switch (ON) ON — Battery voltage
39 L CAN − H—— —
40 R CAN − L—— —
42 L/R Battery power supply OFF — Battery voltage
49 B Ground ON — Approx. 0V
52 B Ground ON — Approx. 0V
55 G Battery power supply OFF — Battery voltage
PKIB3468E
PKIB3469E
PKIB3470E
PKIB3471E
Termi- nal
No. Wire
color Signal
name Measuring condition
Reference value
Ignition
switch Operation or condition
36 W Front fog
lamp (RH) ONLighting switch must be in the 2ND position or AUTO position
(headlamp is ON) and front fog lamp switch must be ON. OFF Approx. 0V
ON Battery voltage
37 SB Front fog
lamp (LH) ONLighting switch must be in the 2ND position or AUTO position
(headlamp is ON) and front fog lamp switch must be ON. OFF Approx. 0V
ON Battery voltage
38 B Ground ON — Approx. 0V
48 L CAN − H— — —
Page 3973 of 4731
LT-84
FRONT FOG LAMP
Revision: 2005 July 2005 FX
How to Proceed With Trouble DiagnosisAKS007CO
1. Confirm the symptom or customer complaint.
2. Understand operation description and function description. Refer to LT- 7 9 , "
System Description" .
3. Perform Preliminary Check. Refer to LT- 8 4 , "
Preliminary Check" .
4. Check symptom and repair or replace the cause of malfunction.
5. Does front fog lamp operate normally? If YES, GO TO 6. If NO, GO TO 4.
6. INSPECTION END
Preliminary CheckAKS007CP
CHECK POWER SUPPLY AND GROUND CIRCUIT
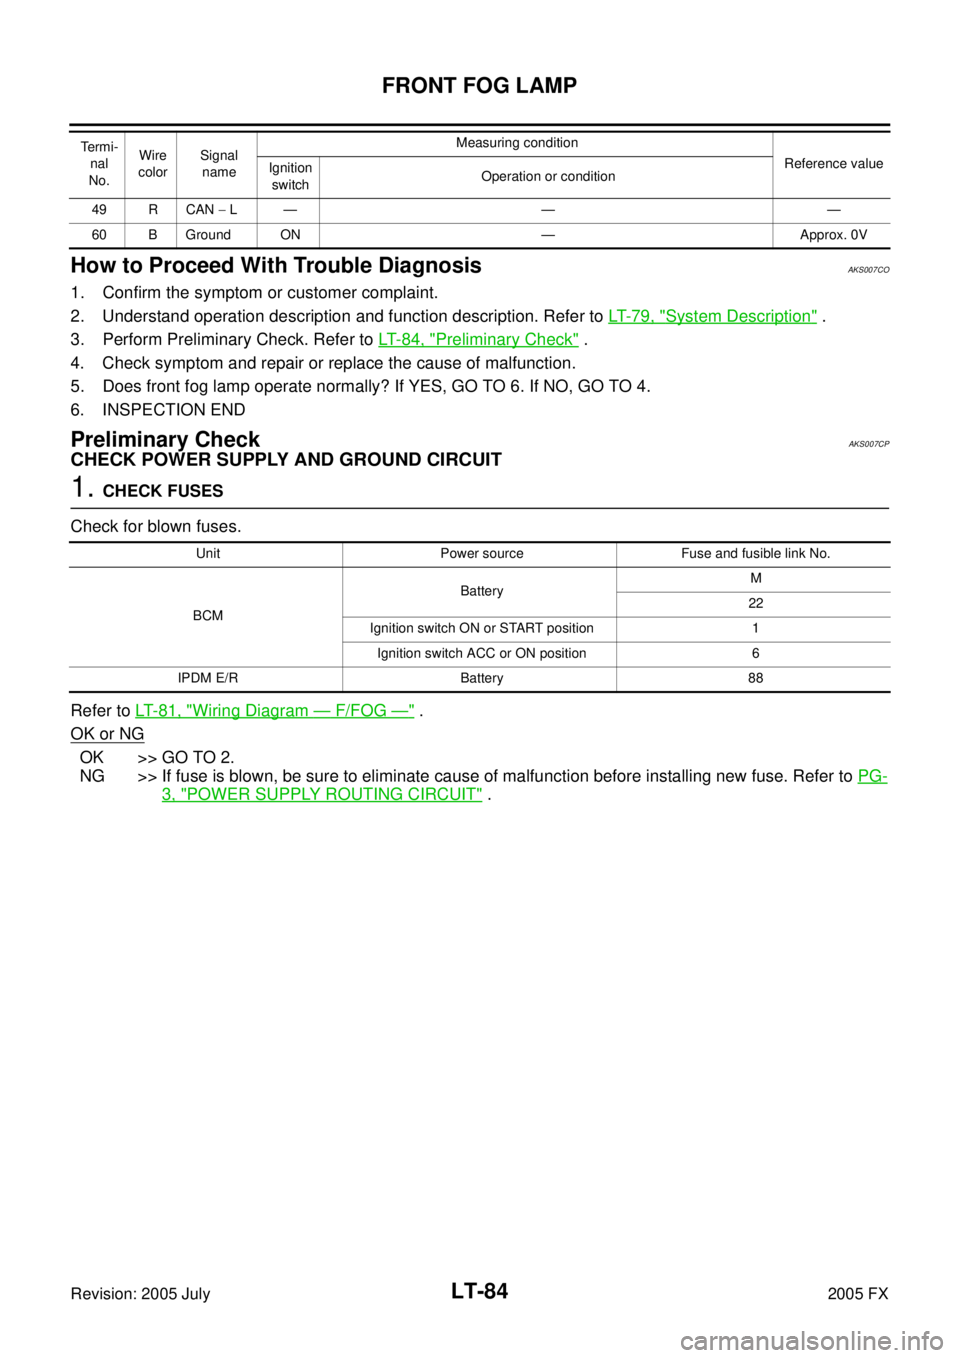
1. CHECK FUSES
Check for blown fuses.
Refer to LT- 8 1 , "
Wiring Diagram — F/FOG —" .
OK or NG
OK >> GO TO 2.
NG >> If fuse is blown, be sure to eliminate cause of malfunction before installing new fuse. Refer to PG-
3, "POWER SUPPLY ROUTING CIRCUIT" .
49 R CAN − L— — —
60 B Ground ON — Approx. 0V
Te r m i -
nal
No. Wire
color Signal
name Measuring condition
Reference value
Ignition
switch Operation or condition
Unit Power source Fuse and fusible link No.
BCM Battery
M
22
Ignition switch ON or START position 1 Ignition switch ACC or ON position 6
IPDM E/R Battery 88
Page 3974 of 4731
FRONT FOG LAMP LT-85
C
D E
F
G H
I
J
L
M A
B
LT
Revision: 2005 July 2005 FX
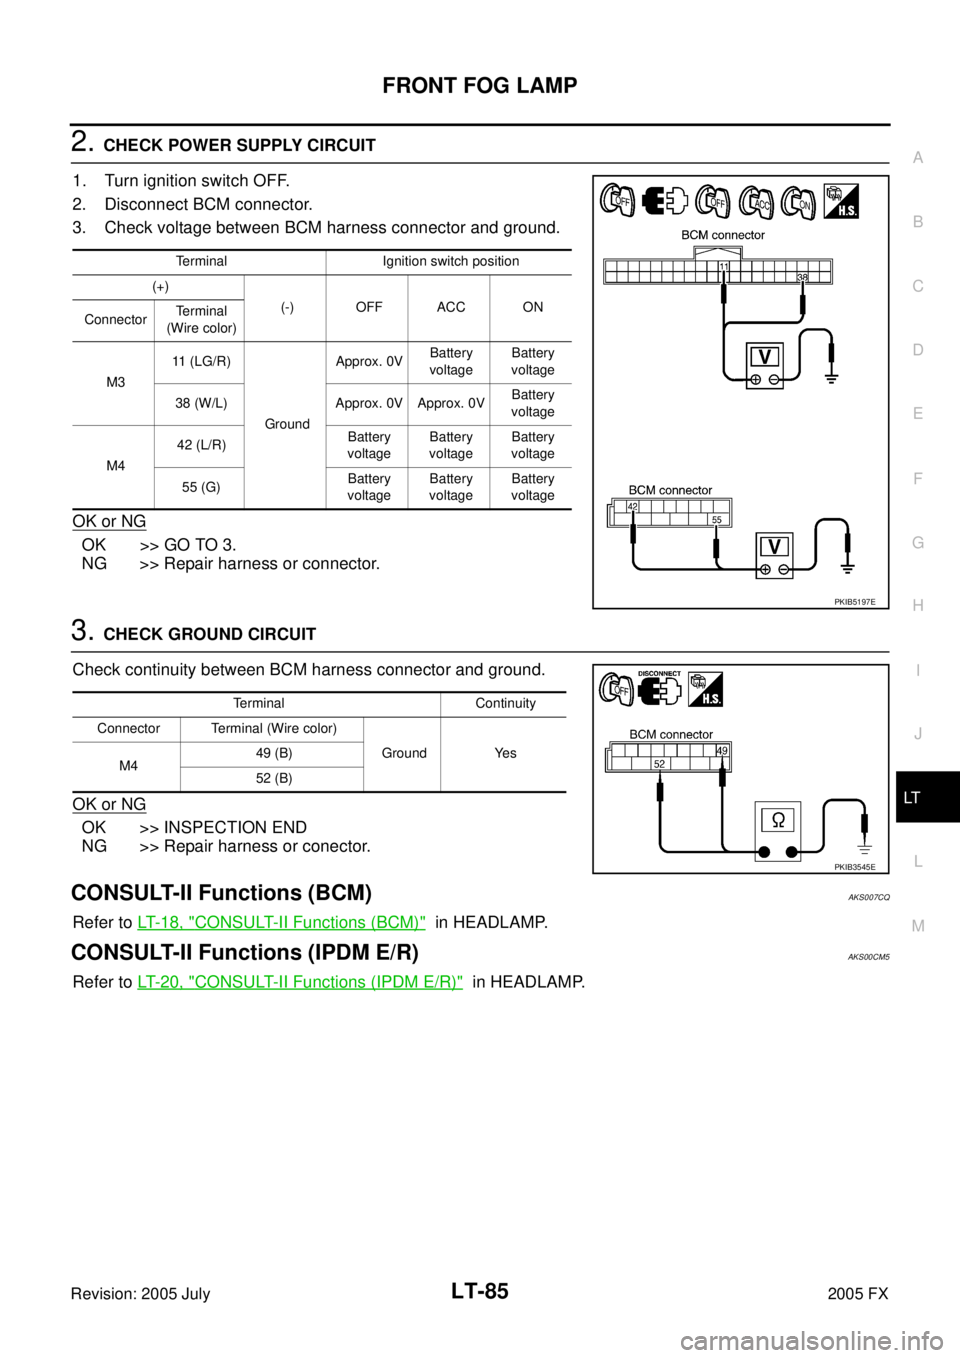
2. CHECK POWER SUPPLY CIRCUIT
1. Turn ignition switch OFF.
2. Disconnect BCM connector.
3. Check voltage between BCM harness connector and ground.
OK or NG
OK >> GO TO 3.
NG >> Repair harness or connector.
3. CHECK GROUND CIRCUIT
Check continuity between BCM harness connector and ground.
OK or NG
OK >> INSPECTION END
NG >> Repair harness or conector.
CONSULT-II Functions (BCM)AKS007CQ
Refer to LT- 1 8 , "CONSULT-II Functions (BCM)" in HEADLAMP.
CONSULT-II Functions (IPDM E/R)AKS00CM5
Refer to LT- 2 0 , "CONSULT-II Functions (IPDM E/R)" in HEADLAMP.
Terminal Ignition switch position
(+) (-) OFF ACC ON
Connector Terminal
(Wire color)
M3 11 (LG/R)
Ground Approx. 0V
Battery
voltage Battery
voltage
38 (W/L) Approx. 0V Approx. 0V Battery
voltage
M4 42 (L/R)
Battery
voltage Battery
voltage Battery
voltage
55 (G) Battery
voltage Battery
voltage Battery
voltage
PKIB5197E
Terminal Continuity
Connector Terminal (Wire color) Ground Yes
M4 49 (B)
52 (B)
PKIB3545E
Page 3976 of 4731
FRONT FOG LAMP LT-87
C
D E
F
G H
I
J
L
M A
B
LT
Revision: 2005 July 2005 FX
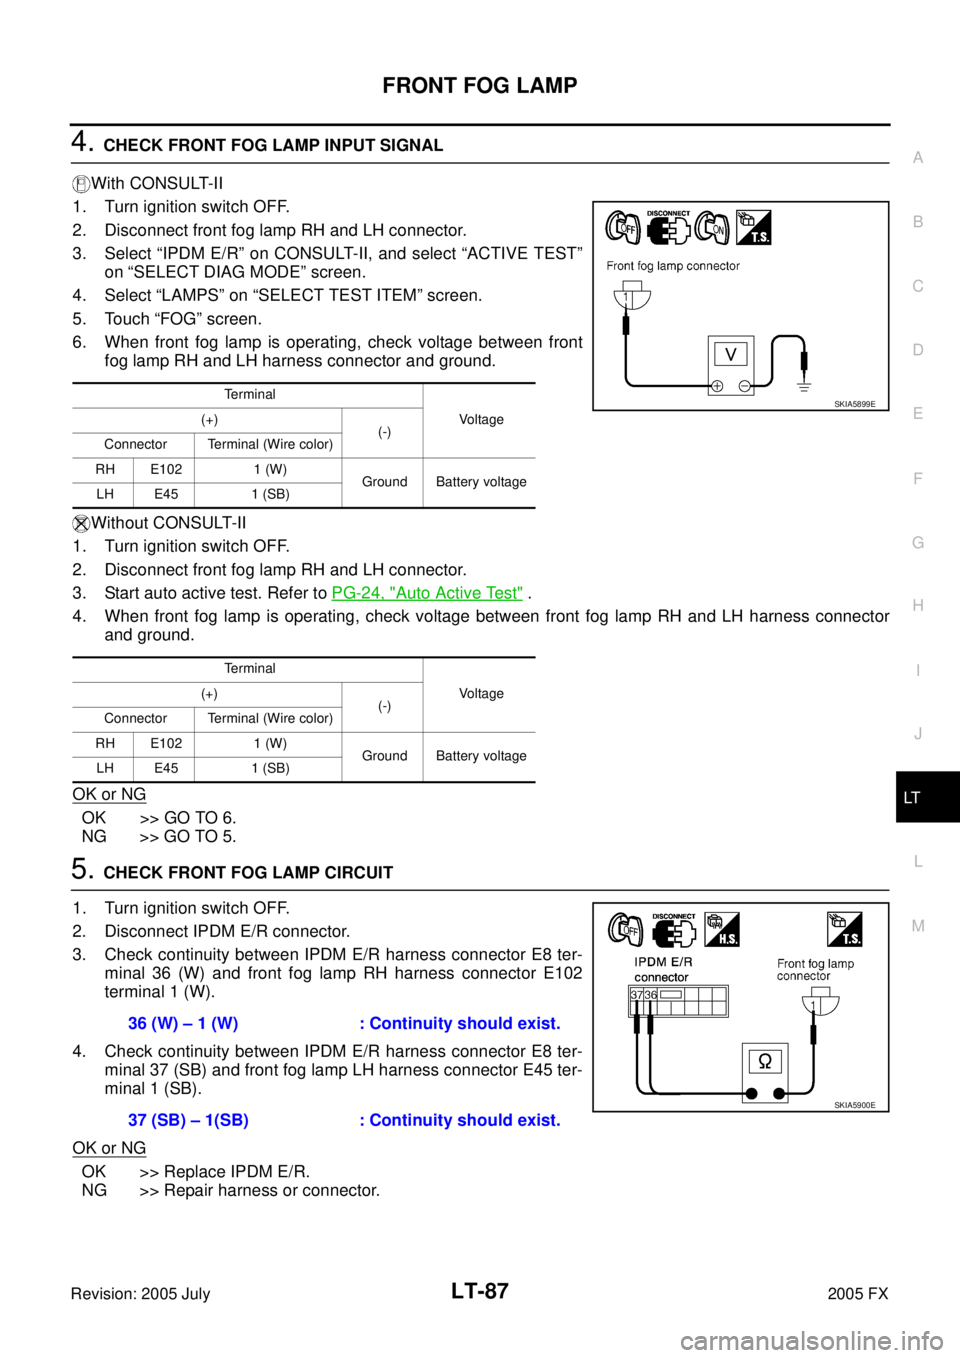
4. CHECK FRONT FOG LAMP INPUT SIGNAL
With CONSULT-II
1. Turn ignition switch OFF.
2. Disconnect front fog lamp RH and LH connector.
3. Select “IPDM E/R” on CONSULT-II, and select “ACTIVE TEST” on “SELECT DIAG MODE” screen.
4. Select “LAMPS” on “SELECT TEST ITEM” screen.
5. Touch “FOG” screen.
6. When front fog lamp is operating, check voltage between front fog lamp RH and LH harness connector and ground.
Without CONSULT-II
1. Turn ignition switch OFF.
2. Disconnect front fog lamp RH and LH connector.
3. Start auto active test. Refer to PG-24, "
Auto Active Test" .
4. When front fog lamp is operating, check voltage between front fog lamp RH and LH harness connector and ground.
OK or NG
OK >> GO TO 6.
NG >> GO TO 5.
5. CHECK FRONT FOG LAMP CIRCUIT
1. Turn ignition switch OFF.
2. Disconnect IPDM E/R connector.
3. Check continuity between IPDM E/R harness connector E8 ter- minal 36 (W) and front fog lamp RH harness connector E102
terminal 1 (W).
4. Check continuity between IPDM E/R harness connector E8 ter- minal 37 (SB) and front fog lamp LH harness connector E45 ter-
minal 1 (SB).
OK or NG
OK >> Replace IPDM E/R.
NG >> Repair harness or connector.
Terminal
Voltage
(+)
(-)
Connector Terminal (Wire color)
RH E102 1 (W) Ground Battery voltage
LH E45 1 (SB)
Terminal Voltage
(+)
(-)
Connector Terminal (Wire color)
RH E102 1 (W) Ground Battery voltage
LH E45 1 (SB)SKIA5899E
36 (W) – 1 (W) : Continuity should exist.
37 (SB) – 1(SB) : Continuity should exist.
SKIA5900E
Page 3988 of 4731
TURN SIGNAL AND HAZARD WARNING LAMPS LT-99
C
D E
F
G H
I
J
L
M A
B
LT
Revision: 2005 July 2005 FX
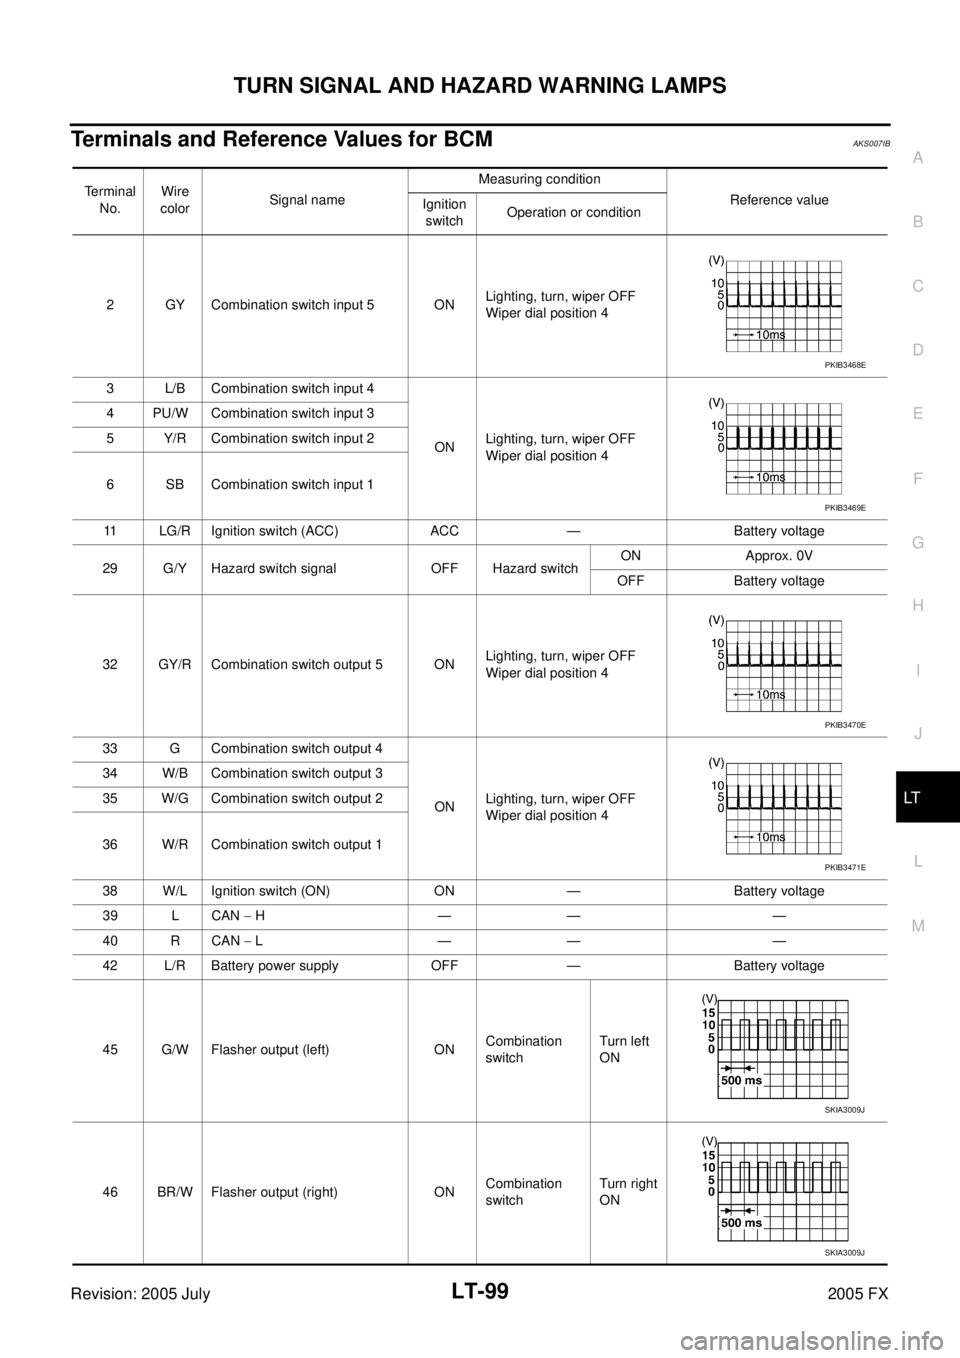
Terminals and Reference Values for BCMAKS007IB
Terminal
No. Wire
color Signal name Measuring condition
Reference value
Ignition
switch Operation or condition
2 GY Combination switch input 5 ON Lighting, turn, wiper OFF
Wiper dial position 4
3 L/B Combination switch input 4 ON Lighting, turn, wiper OFF
Wiper dial position 4
4 PU/W Combination switch input 3
5 Y/R Combination switch input 2
6 SB Combination switch input 1
11 LG/R Ignition switch (ACC) ACC — Battery voltage
29 G/Y Hazard switch signal OFF Hazard switch ON Approx. 0V
OFF Battery voltage
32 GY/R Combination switch output 5 ON Lighting, turn, wiper OFF
Wiper dial position 4
33 G Combination switch output 4 ON Lighting, turn, wiper OFF
Wiper dial position 4
34 W/B Combination switch output 3
35 W/G Combination switch output 2
36 W/R Combination switch output 1
38 W/L Ignition switch (ON) ON — Battery voltage
39 L CAN − H—— —
40 R CAN − L—— —
42 L/R Battery power supply OFF — Battery voltage
45 G/W Flasher output (left) ON Combination
switch Turn left
ON
46 BR/W Flasher output (right) ON Combination
switch Turn right
ON
PKIB3468E
PKIB3469E
PKIB3470E
PKIB3471E
SKIA3009J
SKIA3009J
Page 3989 of 4731
LT-100
TURN SIGNAL AND HAZARD WARNING LAMPS
Revision: 2005 July 2005 FX
How to Proceed With Trouble DiagnosisAKS007D2
1. Confirm the symptom or customer complaint.
2. Understand operation description and function description. Refer to LT- 9 1 , "
System Description" .
3. Perform preliminary check. Refer to LT- 1 0 0 , "
Preliminary Check" .
4. Check symptom and repair or replace the cause of malfunction.
5. Do turn signal and hazard warning lamps operate normally? If YES, GO TO 6. If NO, GO TO 4.
6. INSPECTION END
Preliminary CheckAKS007D3
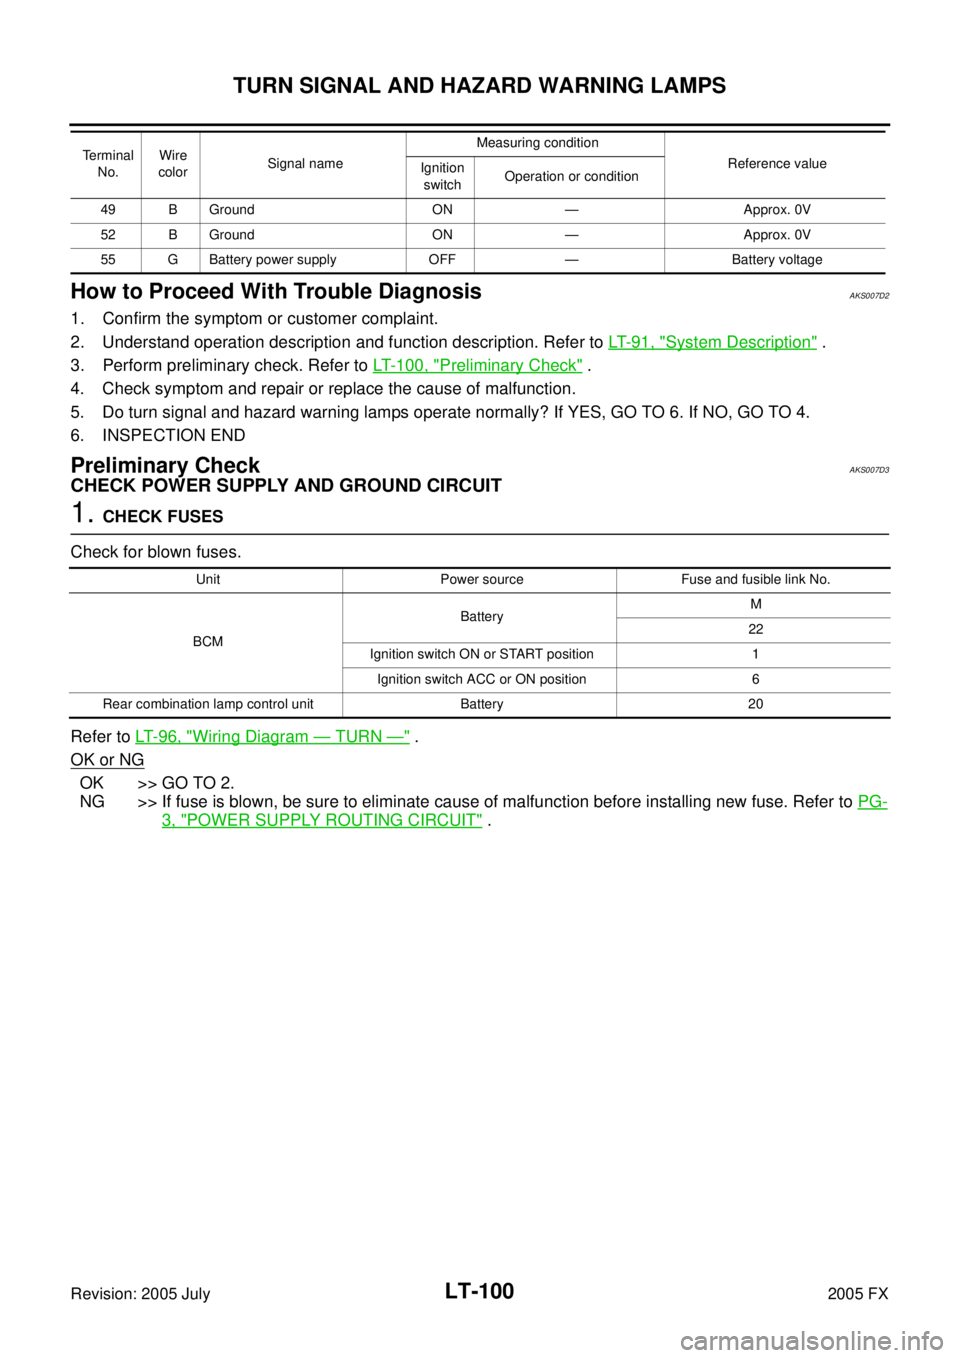
CHECK POWER SUPPLY AND GROUND CIRCUIT
1. CHECK FUSES
Check for blown fuses.
Refer to LT- 9 6 , "
Wiring Diagram — TURN —" .
OK or NG
OK >> GO TO 2.
NG >> If fuse is blown, be sure to eliminate cause of malfunction before installing new fuse. Refer to PG-
3, "POWER SUPPLY ROUTING CIRCUIT" .
49 B Ground ON — Approx. 0V
52 B Ground ON — Approx. 0V
55 G Battery power supply OFF — Battery voltage
Terminal
No. Wire
color Signal name Measuring condition
Reference value
Ignition
switch Operation or condition
Unit Power source Fuse and fusible link No.
BCM Battery
M
22
Ignition switch ON or START position 1 Ignition switch ACC or ON position 6
Rear combination lamp control unit Battery 20
Page 3990 of 4731
TURN SIGNAL AND HAZARD WARNING LAMPS LT-101
C
D E
F
G H
I
J
L
M A
B
LT
Revision: 2005 July 2005 FX
2. CHECK POWER SUPPLY CIRCUIT
1. Turn ignition switch OFF.
2. Disconnect BCM connector.
3. Check voltage between BCM harness connector and ground.
OK or NG
OK >> GO TO 3.
NG >> Repair harness or connector.
3. CHECK GROUND CIRCUIT
Check continuity between BCM harness connector and ground.
OK or NG
OK >> INSPECTION END
NG >> Repair harness or connector.
Terminal Ignition switch position
(+) (-) OFF ACC ON
Connector Terminal
(Wire color)
M3 11 (LG/R)
Ground Approx. 0V
Battery
voltage Battery
voltage
38 (W/L) Approx. 0V Approx. 0V Battery
voltage
M4 42 (L/R)
Battery
voltage Battery
voltage Battery
voltage
55 (G) Battery
voltage Battery
voltage Battery
voltage
PKIB5197E
Terminal Continuity
Connector Terminal (Wire color) Ground Yes
M4 49 (B)
52 (B)
PKIB3545E
Page 3995 of 4731
LT-106
TURN SIGNAL AND HAZARD WARNING LAMPS
Revision: 2005 July 2005 FX
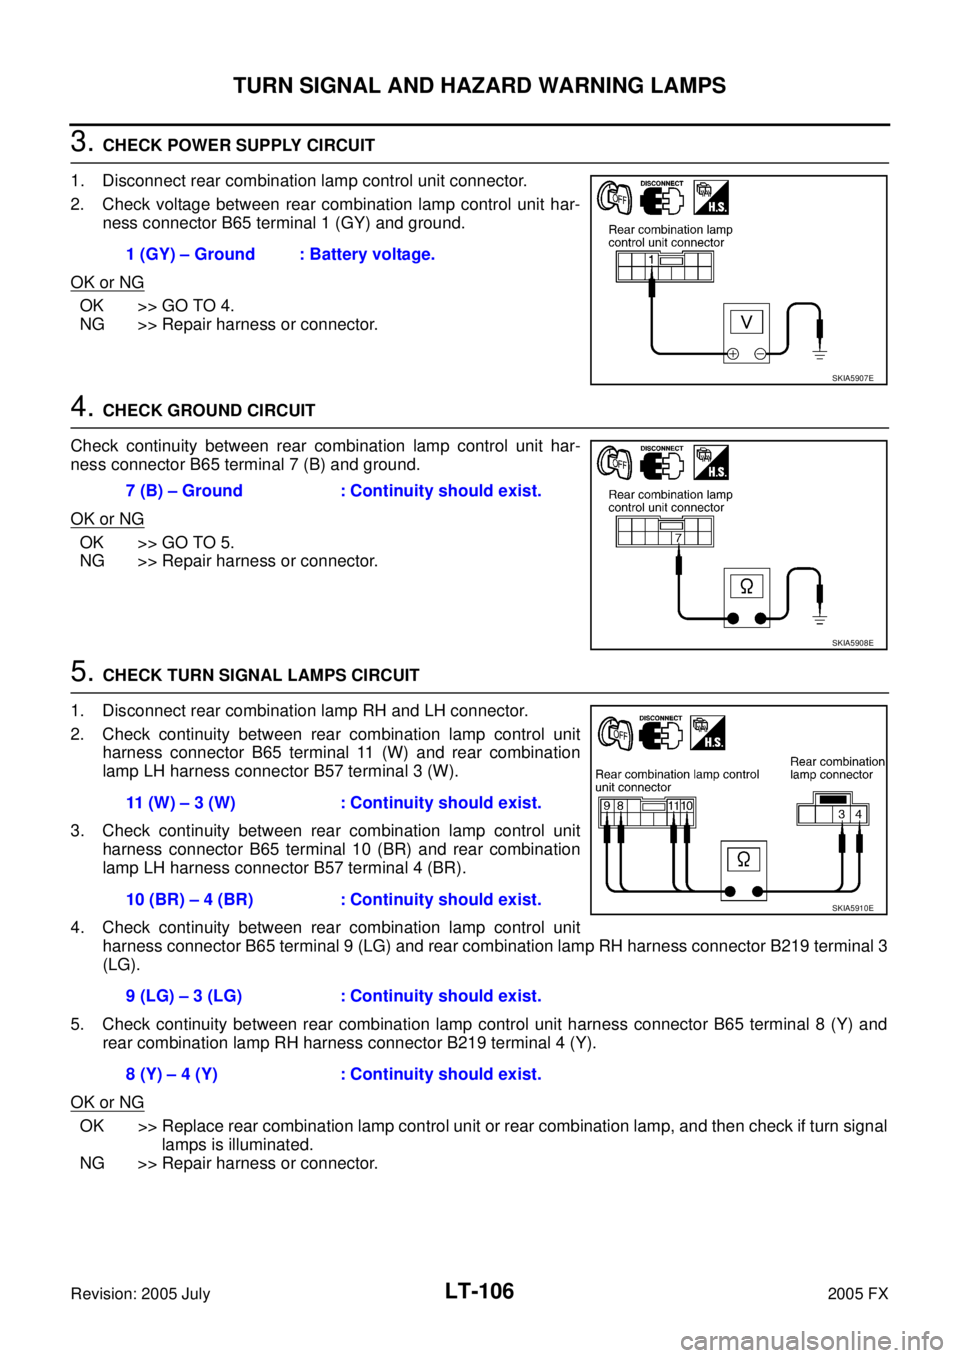
3. CHECK POWER SUPPLY CIRCUIT
1. Disconnect rear combination lamp control unit connector.
2. Check voltage between rear combination lamp control unit har- ness connector B65 terminal 1 (GY) and ground.
OK or NG
OK >> GO TO 4.
NG >> Repair harness or connector.
4. CHECK GROUND CIRCUIT
Check continuity between rear combination lamp control unit har-
ness connector B65 terminal 7 (B) and ground.
OK or NG
OK >> GO TO 5.
NG >> Repair harness or connector.
5. CHECK TURN SIGNAL LAMPS CIRCUIT
1. Disconnect rear combination lamp RH and LH connector.
2. Check continuity between rear combination lamp control unit harness connector B65 terminal 11 (W) and rear combination
lamp LH harness connector B57 terminal 3 (W).
3. Check continuity between rear combination lamp control unit harness connector B65 terminal 10 (BR) and rear combination
lamp LH harness connector B57 terminal 4 (BR).
4. Check continuity between rear combination lamp control unit harness connector B65 terminal 9 (LG) and rear combination lamp RH harness connector B219 terminal 3
(LG).
5. Check continuity between rear combination lamp control unit harness connector B65 terminal 8 (Y) and rear combination lamp RH harness connector B219 terminal 4 (Y).
OK or NG
OK >> Replace rear combination lamp control unit or rear combination lamp, and then check if turn signal lamps is illuminated.
NG >> Repair harness or connector. 1 (GY) – Ground : Battery voltage.
SKIA5907E
7 (B) – Ground : Continuity should exist.
SKIA5908E
11 (W) – 3 (W) : Continuity should exist.
10 (BR) – 4 (BR) : Continuity should exist.
9 (LG) – 3 (LG) : Continuity should exist.
8 (Y) – 4 (Y) : Continuity should exist.
SKIA5910E