Page 251 of 4731

AT-168
DTC P1774 LOW COAST BRAKE SOLENOID VALVE FUNCTION
Revision: 2005 July 2005 FX
DTC P1774 LOW COAST BRAKE SOLENOID VALVE FUNCTIONPFP:31940
DescriptionACS002Q5
�Low coast brake solenoid valve is turned ON or OFF by the TCM in response to signals sent from the
PNP switch, vehicle speed sensor and accelerator pedal position sensor (throttle position sensor). Gears
will then be shifted to the optimum position.
�This is not only caused by electrical malfunction (circuits open or shorted) but also by mechanical mal-
function such as control valve sticking, improper solenoid valve operation.
CONSULT-II Reference ValueACS003KQ
On Board Diagnosis LogicACS002Q6
�This is an OBD-II self-diagnostic item.
�Diagnostic trouble code “P1774 LC/B SOLENOID FNCT” with CONSULT-II or 7th judgement flicker with-
out CONSULT-II is detected under the following conditions.
–When TCM detects that actual gear ratio is irregular, and relation between gear position and condition of
ATF pressure switch 2 is irregular during depressing accelerator pedal. (Other than during shift change)
–When TCM detects that relation between gear position and condition of ATF pressure switch 2 is irregular
during releasing accelerator pedal. (Other than during shift change)
Possible CauseACS002Q7
�Harness or connectors
(Solenoid and switch circuits are open or shorted.)
�Low coast brake solenoid valve
�ATF pressure switch 2
DTC Confirmation ProcedureACS002Q8
CAUTION:
Always drive vehicle at a safe speed.
NOTE:
If “DTC Confirmation Procedure” has been previously performed, always turn ignition switch “OFF”
and wait at least 10 seconds before performing the next test.
After the repair, perform the following procedure to confirm the malfunction is eliminated.
WITH CONSULT-II
1. Start engine.
2. Accelerate vehicle to maintain the following conditions. Selector lever: “M” position
Gear position: “M1-1st” or “M2-2nd” gear (LC/B ON/OFF)
3. Perform step “2” again.
4. Turn ignition switch OFF, then perform step “1” to “3” again.
5. Check “SELF-DIAG RESULTS” mode for “A/T” with CONSULT- II. If DTC (P1774) is detected, go to AT- 1 6 9 , "
Diagnostic Proce-
dure" .
If DTC (P1772) is detected, go to AT- 1 6 7 , "
Diagnostic Proce-
dure" .
WITH GST
Follow the procedure “WITH CONSULT-II”.
Item name Condition Display value
ON OFF SOL Low coast brake engaged. Refer to
AT- 2 1
.ON
Low coast brake disengaged. Refer to AT- 2 1
.OFF
ATF PRES SW 2 Low coast brake engaged. Refer to
AT- 2 1
.ON
Low coast brake disengaged. Refer to AT- 2 1
.OFF
BCIA0031E
Page 460 of 4731
REFRIGERATION SYSTEM ATC-23
C
D E
F
G H
I
K L
M A
B
AT C
Revision: 2005 July 2005 FX
DESCRIPTION
General
The variable compressor is basically a swash plate type that changes piston stroke in response to the required
cooling capacity.
The tilt of the wobble (swash) plate allows the piston’s stroke to change so that refrigerant discharge can be
continuously changed from 14.5 to 184 cm
3 (0.885 to 11.228 cu. in).
RJIA1260E
Page 467 of 4731

ATC-30
AIR CONDITIONER CONTROL
Revision: 2005 July 2005 FX
AIR CONDITIONER CONTROLPFP:27500
Description of Air Conditioner LAN Control SystemAJS0014A
The LAN (Local Area Network) system consists of unified meter and A/C amp., mode door motor, air mix door
motor and intake door motor.
A configuration of these components is shown in the diagram below.
System ConstructionAJS0014B
A small network is constructed between the unified meter and A/C amp., air mix door motor, mode door motor
and intake door motor. The unified meter and A/C amp. and motors are connected by data transmission lines
and motor power supply lines. The LAN network is built through the ground circuits of each door motor.
Addresses, motor opening angle signals, motor stop signals and error checking messages are all transmitted
through the data transmission lines connecting the unified meter and A/C amp. and each door motor.
The following functions are contained in LCUs built into the air mix door motor, the mode door motor and the
intake door motor.
�Address
�Motor opening angle signals
�Data transmission
�Motor stop and drive decision
�Opening angle sensor (PBR function)
�Comparison
�Decision (Unified meter and A/C amp. indicated value and motor opening angle comparison)
OPERATION
The unified meter and A/C amp. receives data from each of the sensors. The unified meter and A/C amp.
sends mode door, air mix door and intake door opening angle data to the mode door motor LCU, air mix door
motor LCU and intake door motor LCU.
The mode door motor, air mix door motor and intake door motor read their respective signals according to the
address signal. Opening angle indication signals received from the unified meter and A/C amp. and each of
the motor position sensors is compared by the LCUs in each motor with the existing decision and opening
angles. Subsequently, HOT/COLD, DEF/VENT and FRESH/RECIRCULATION operation is selected. The new
selection data is returned to the unified meter and A/C amp.
SJIA0262E
RJIA1747E
Page 494 of 4731

TROUBLE DIAGNOSIS ATC-57
C
D E
F
G H
I
K L
M A
B
AT C
Revision: 2005 July 2005 FX
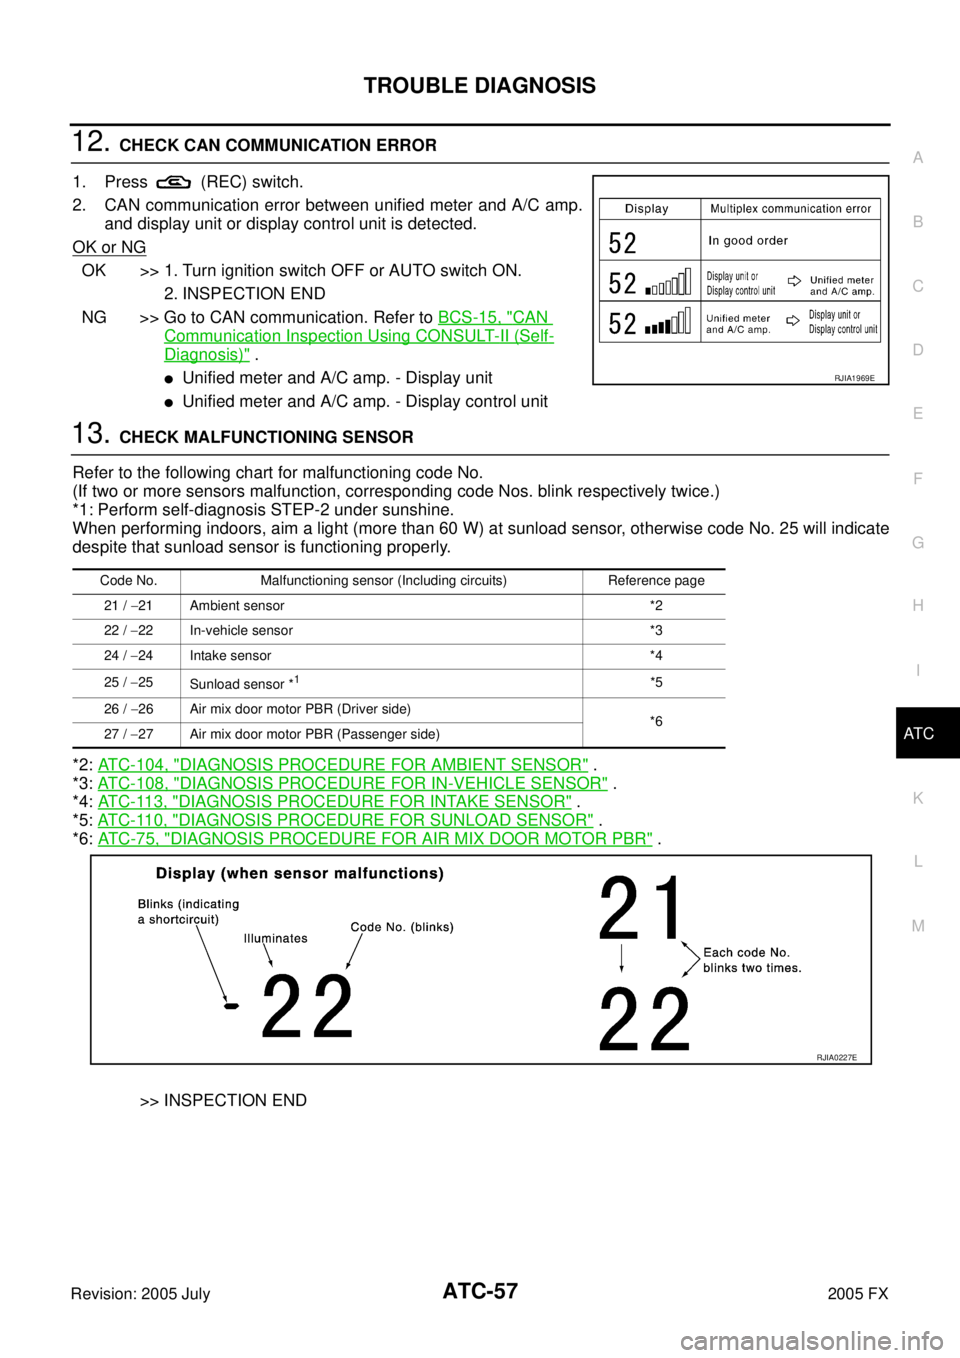
12. CHECK CAN COMMUNICATION ERROR
1. Press (REC) switch.
2. CAN communication error between unified meter and A/C amp. and display unit or display control unit is detected.
OK or NG
OK >> 1. Turn ignition switch OFF or AUTO switch ON. 2. INSPECTION END
NG >> Go to CAN communication. Refer to BCS-15, "
CAN
Communication Inspection Using CONSULT-II (Self-
Diagnosis)" .
�Unified meter and A/C amp. - Display unit
�Unified meter and A/C amp. - Display control unit
13. CHECK MALFUNCTIONING SENSOR
Refer to the following chart for malfunctioning code No.
(If two or more sensors malfunction, corresponding code Nos. blink respectively twice.)
*1: Perform self-diagnosis STEP-2 under sunshine.
When performing indoors, aim a light (more than 60 W) at sunload sensor, otherwise code No. 25 will indicate
despite that sunload sensor is functioning properly.
*2: ATC-104, "
DIAGNOSIS PROCEDURE FOR AMBIENT SENSOR" .
*3: ATC-108, "
DIAGNOSIS PROCEDURE FOR IN-VEHICLE SENSOR" .
*4: AT C - 11 3 , "
DIAGNOSIS PROCEDURE FOR INTAKE SENSOR" .
*5: AT C - 11 0 , "
DIAGNOSIS PROCEDURE FOR SUNLOAD SENSOR" .
*6: AT C - 7 5 , "
DIAGNOSIS PROCEDURE FOR AIR MIX DOOR MOTOR PBR" .
>> INSPECTION END
RJIA1969E
Code No. Malfunctioning sensor (Including circuits) Reference page 21 / −21 Ambient sensor *2
22 / −22 In-vehicle sensor *3
24 / −24 Intake sensor *4
25 / −25
Sunload sensor *
1*5
26 / −26 Air mix door motor PBR (Driver side)
*6
27 / −27 Air mix door motor PBR (Passenger side)
RJIA0227E
Page 495 of 4731

ATC-58
TROUBLE DIAGNOSIS
Revision: 2005 July 2005 FX
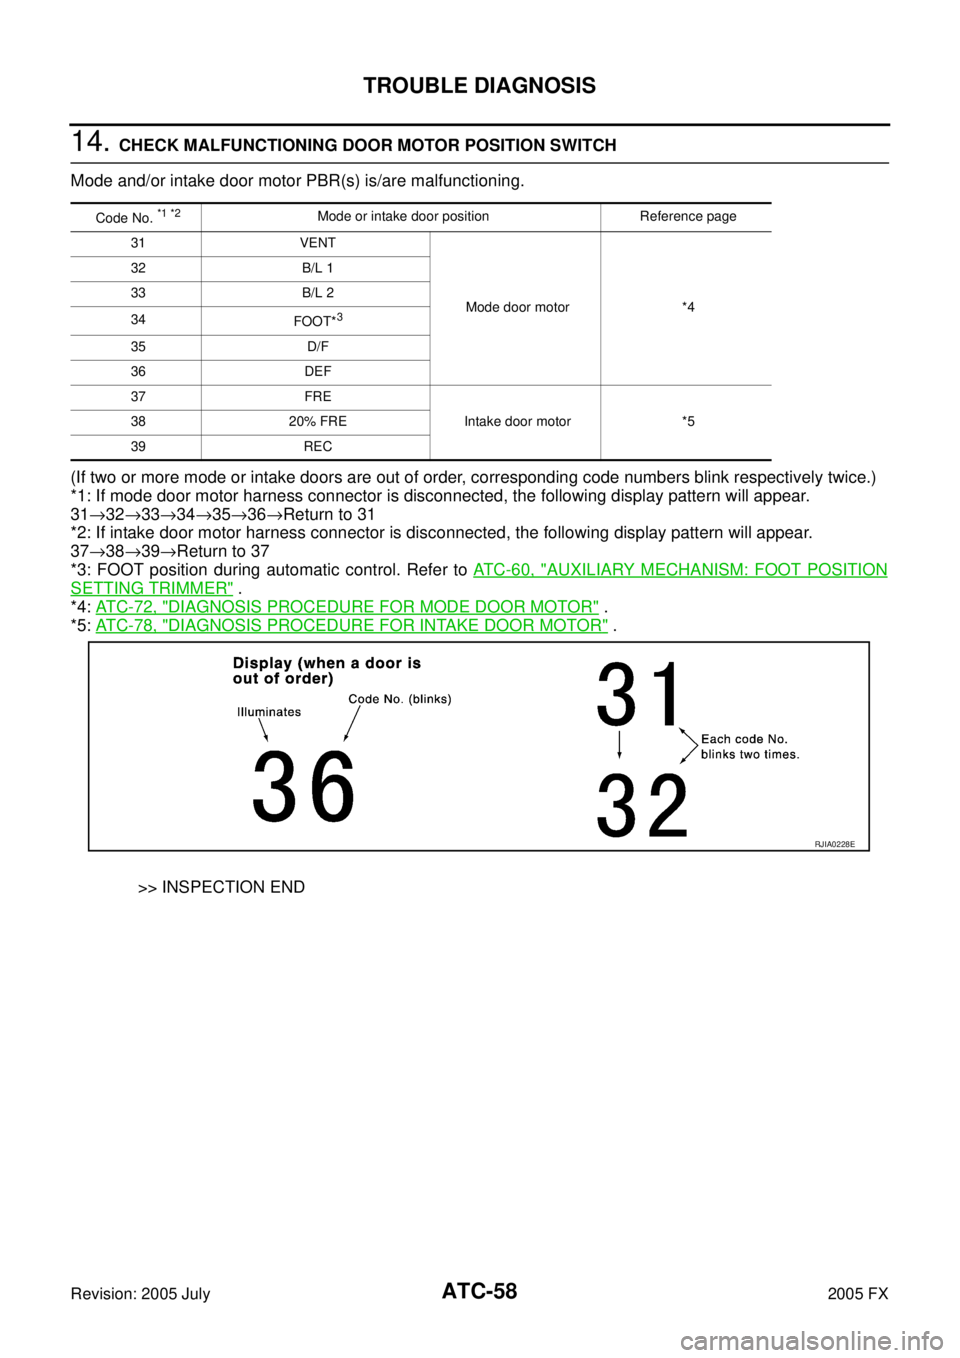
14. CHECK MALFUNCTIONING DOOR MOTOR POSITION SWITCH
Mode and/or intake door motor PBR(s) is/are malfunctioning.
(If two or more mode or intake doors are out of order, corresponding code numbers blink respectively twice.)
*1: If mode door motor harness connector is disconnected, the following display pattern will appear.
31 →32 →33 →34 →35 →36 →Return to 31
*2: If intake door motor harness connector is disconnected, the following display pattern will appear.
37 →38 →39 →Return to 37
*3: FOOT position during automatic control. Refer to AT C - 6 0 , "
AUXILIARY MECHANISM: FOOT POSITION
SETTING TRIMMER" .
*4: AT C - 7 2 , "
DIAGNOSIS PROCEDURE FOR MODE DOOR MOTOR" .
*5: AT C - 7 8 , "
DIAGNOSIS PROCEDURE FOR INTAKE DOOR MOTOR" .
>> INSPECTION END
Code No. *1 *2Mode or intake door position Reference page
31 VENT
Mode door motor *4
32 B/L 1
33 B/L 2
34 FOOT*
3
35 D/F
36 DEF
37 FRE
Intake door motor *5
38 20% FRE
39 REC
RJIA0228E
Page 508 of 4731

TROUBLE DIAGNOSIS ATC-71
C
D E
F
G H
I
K L
M A
B
AT C
Revision: 2005 July 2005 FX
SYSTEM DESCRIPTION
Component Parts
Mode door control system components are:
�Unified meter and A/C amp.
�Mode door motor (LCU)
�A/C LAN system (PBR built-in mode door motor, air mix door motor and intake door motor)
�In-vehicle sensor
�Ambient sensor
�Sunload sensor
�Intake sensor
System Operation
The unified meter and A/C amp. receives data from each of the sensors. The unified meter and A/C amp.
sends air mix door, mode door and intake door opening angle data to the air mix door motor LCU, mode door
motor LCU and intake door motor LCU.
The air mix door motor, mode door motor and intake door motor read their respective signals according to the
address signal. Opening angle indication signals received from the unified meter and A/C amp. and each of
the motor position sensors are compared by the LCUs in each door motor with the existing decision and open-
ing angles. Subsequently, HOT/COLD, DEF/VENT and FRESH/RECIRCULATION operation is selected. The
new selection data are returned to the unified meter and A/C amp.
RJIA1777E
Page 511 of 4731

ATC-74
TROUBLE DIAGNOSIS
Revision: 2005 July 2005 FX
SYSTEM DESCRIPTION
Component Parts
Air mix door control system components are:
�Unified meter and A/C amp.
�Air mix door motor (LCU)
�A/C LAN system (PBR built-in mode door motor, air mix door motor and intake door motor)
�In-vehicle sensor
�Ambient sensor
�Sunload sensor
�Intake sensor
System Operation
The unified meter and A/C amp. receives data from each of the sensors. The unified meter and A/C amp.
sends air mix door, mode door and intake door motor opening angle data to the air mix door motor LCU, mode
door motor LCU and intake door motor LCU.
The air mix door motor, mode door motor and intake door motor read their respective signals according to the
address signal. Opening angle indication signals received from the unified meter and A/C amp. and each of
the motor position sensors are compared by the LCUs in each door motor with the existing decision and open-
ing angles. Subsequently, HOT/COLD, DEF/VENT and FRESH/RECIRCULATION operation is selected. The
new selection data are returned to the unified meter and A/C amp.
Air Mix Door Control Specification
RJIA1781E
RJIA1782E
Page 571 of 4731
ATC-134
DUCTS AND GRILLES
Revision: 2005 July 2005 FX
DUCTS AND GRILLESPFP:27860
Removal and InstallationAJS0015O
REMOVAL
Removal of Center Ventilator Grille
1. Remove cluster lid C. Refer to IP-11, "Removal and Installation" .
2. Remove mounting screws, and then remove center ventilator grille.
Removal of Side Ventilation
Remove side ventilation. Refer to IP-11, "Removal and Installation" .
Removal of Rear Ventilator Grille
1. Remove center pillar lower garnish. Refer to EI-36, "Removal and Installation" .
1. Defroster nozzle 2. Side defroster duct (left) 3. Side ventilator duct (left)
4. Instrument panel 5. Side ventilation (left) 6. Center ventilator grille (left)
7. Center ventilator grille (right) 8. Side ventilation (right) 9. Center ventilator duct (right)
10. Side ventilator duct (right) 11. Side defroster duct (right) 12. Center ventilator duct
13. Center ventilator duct (left)
RJIA2047E
RJIA2048E