Page 4370 of 4731
RFD-1
REAR FINAL DRIVE
D DRIVELINE/AXLE
CONTENTS
C E F
G H
I
J
K L
M
SECTION RFD
A
B
RFD
Revision: 2005 July 2005 FX
REAR FINAL DRIVE
PRECAUTIONS .......................................................... 2
Service Notice or Precautions ............................. ..... 2
PREPARATION ...................................................... ..... 3
Special Service Tools .......................................... ..... 3
Commercial Service Tools ................................... ..... 6
NOISE, VIBRATION AND HARSHNESS (NVH)
TROUBLESHOOTING ........................................... ..... 7
NVH Troubleshooting Chart ................................ ..... 7
DESCRIPTION ....................................................... ..... 8
Cross-Sectional View .......................................... ..... 8
DIFFERENTIAL GEAR OIL ................................... ..... 9
Changing Differential Gear Oil ............................ ..... 9
DRAINING ........................................................ ..... 9
FILLING ............................................................ ..... 9
Checking Differential Gear Oil ............................. ..... 9
OIL LEAKAGE AND OIL LEVEL ...................... ..... 9
FRONT OIL SEAL ................................................. ... 10
Removal and Installation ..................................... ... 10
REMOVAL ........................................................ ... 10
INSTALLATION ................................................ .... 11
SIDE OIL SEAL ..................................................... ... 12
Removal and Installation ..................................... ... 12
REMOVAL ........................................................ ... 12
INSTALLATION ................................................ ... 12 REAR FINAL DRIVE ASSEMBLY .........................
... 14
Removal and Installation ..................................... ... 14
COMPONENTS ................................................ ... 14
REMOVAL ........................................................ ... 14
INSTALLATION ................................................ ... 15
Disassembly and Assembly ................................. ... 16
COMPONENTS ................................................ ... 16
ASSEMBLY INSPECTION AND ADJUSTMENT ... 17
DISASSEMBLY ................................................ ... 21
INSPECTION AFTER DISASSEMBLY ............. ... 25
ADJUSTMENT AND SELECTION OF ADJUST-
ING WASHERS ................................................ ... 25
ASSEMBLY ...................................................... ... 30
SERVICE DATA AND SPECIFICATIONS (SDS) ... ... 36
General Specifications ......................................... ... 36
Inspection and Adjustment .................................. ... 36
DRIVE GEAR RUNOUT ................................... ... 36
DIFFERENTIAL SIDE GEAR CLEARANCE .... ... 36
PRELOAD TORQUE ........................................ ... 36
BACKLASH ...................................................... ... 36
COMPANION FLANGE RUNOUT .................... ... 36
SELECTIVE PARTS ......................................... ... 36
Page 4376 of 4731
NOISE, VIBRATION AND HARSHNESS (NVH) TROUBLESHOOTING RFD-7
C E F
G H
I
J
K L
M A
B
RFD
Revision: 2005 July 2005 FX
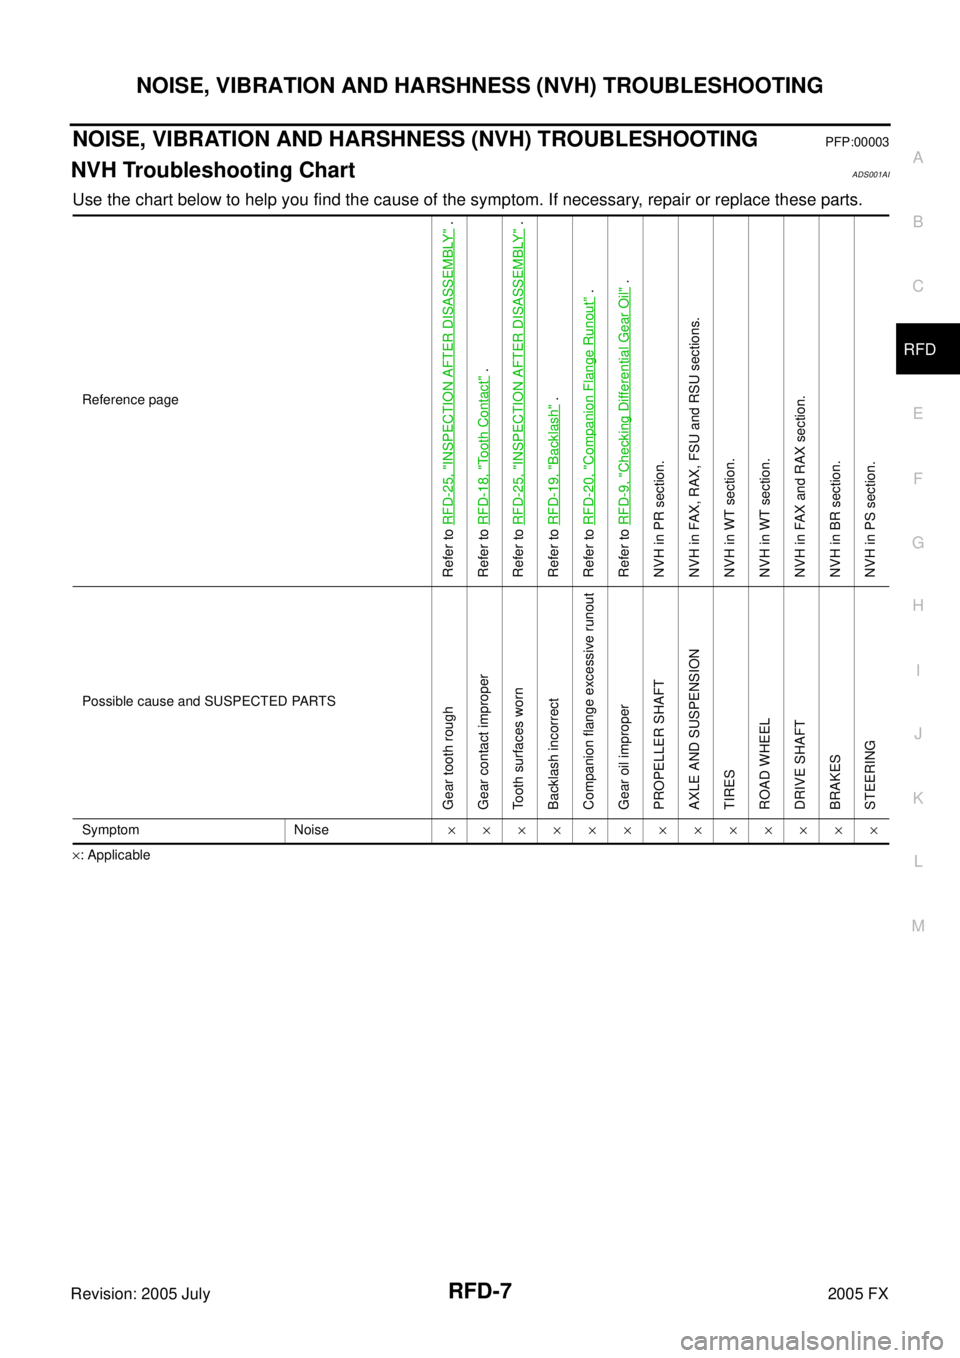
NOISE, VIBRATION AND HARSHNESS (NVH) TROUBLESHOOTINGPFP:00003
NVH Troubleshooting ChartADS001AI
Use the chart below to help you find the cause of the symptom. If necessary, repair or replace these parts.
×: Applicable Reference page
Refer to
RFD-25, "
INSPECTION AFTER DISASSEMBLY
" .
Refer to RFD-18, "
Tooth Contact
" .
Refer to RFD-25, "
INSPECTION AFTER DISASSEMBLY
" .
Refer to RFD-19, "
Backlash
" .
Refer to RFD-20, "
Companion Flange Runout
" .
Refer to RFD-9, "
Checking Differential Gear Oil
" .
NVH in PR section.
NVH in FAX, RAX, FSU and RSU sections.
NVH in WT section.
NVH in WT section.
NVH in FAX and RAX section.
NVH in BR section.
NVH in PS section.
Possible cause and SUSPECTED PARTS
Gear tooth rough
Gear contact improper
Tooth surfaces worn
Backlash incorrect
Companion flange excessive runout
Gear oil improper
PROPELLER SHAFT
AXLE AND SUSPENSION
TIRES
ROAD WHEEL
DRIVE SHAFT
BRAKES
STEERING
Symptom Noise ×××××××××××××
Page 4378 of 4731
DIFFERENTIAL GEAR OIL RFD-9
C E F
G H
I
J
K L
M A
B
RFD
Revision: 2005 July 2005 FX
DIFFERENTIAL GEAR OILPFP:KLD30
Changing Differential Gear OilADS001AK
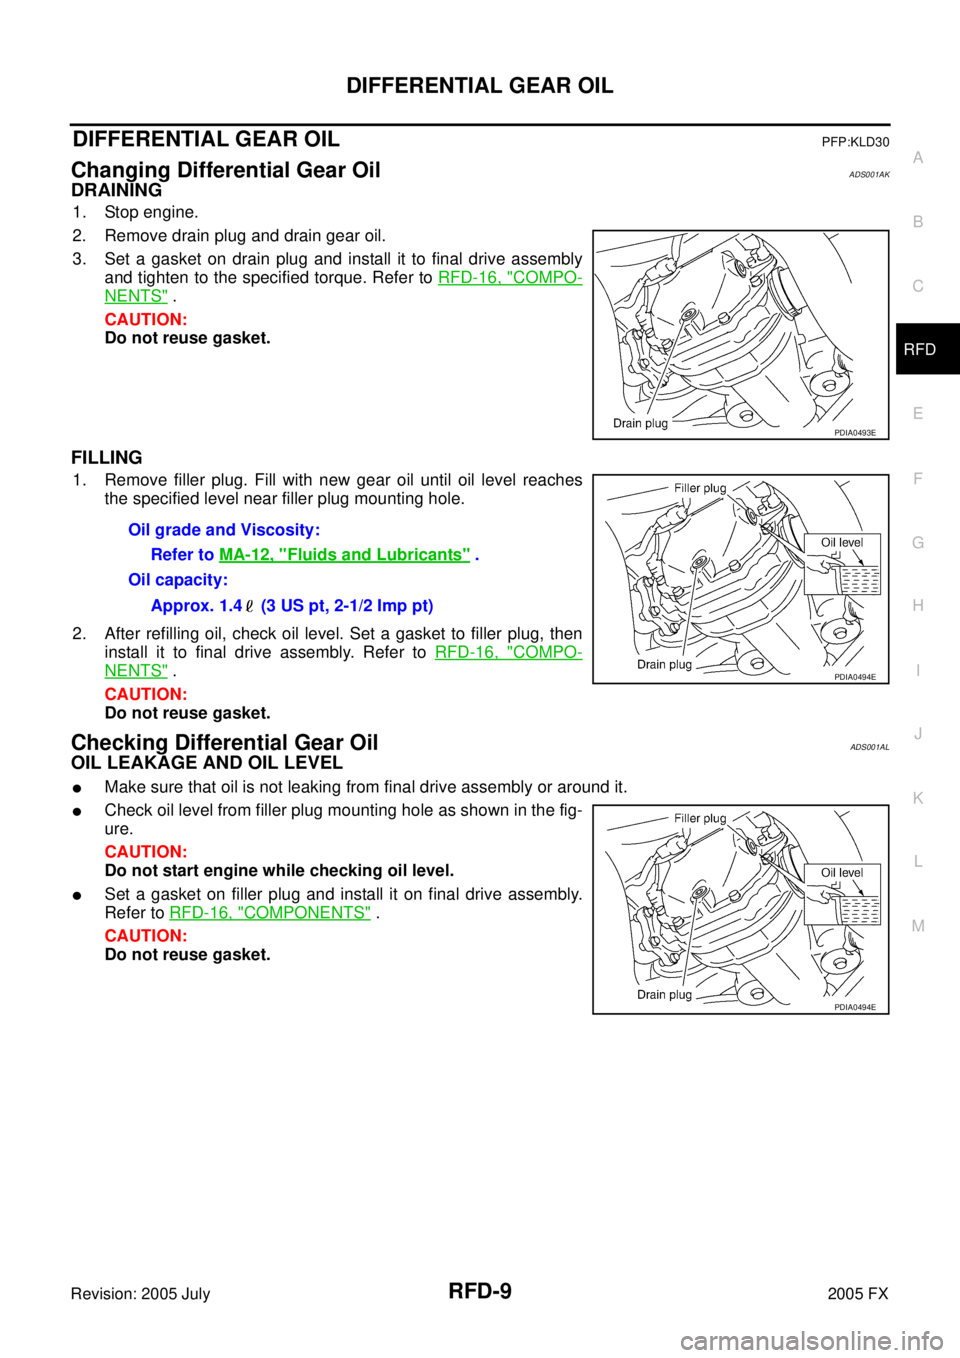
DRAINING
1. Stop engine.
2. Remove drain plug and drain gear oil.
3. Set a gasket on drain plug and install it to final drive assembly and tighten to the specified torque. Refer to RFD-16, "
COMPO-
NENTS" .
CAUTION:
Do not reuse gasket.
FILLING
1. Remove filler plug. Fill with new gear oil until oil level reaches
the specified level near filler plug mounting hole.
2. After refilling oil, check oil level. Set a gasket to filler plug, then install it to final drive assembly. Refer to RFD-16, "
COMPO-
NENTS" .
CAUTION:
Do not reuse gasket.
Checking Differential Gear OilADS001AL
OIL LEAKAGE AND OIL LEVEL
�Make sure that oil is not leaking from final drive assembly or around it.
�Check oil level from filler plug mounting hole as shown in the fig-
ure.
CAUTION:
Do not start engine while checking oil level.
�Set a gasket on filler plug and install it on final drive assembly.
Refer to RFD-16, "
COMPONENTS" .
CAUTION:
Do not reuse gasket.
PDIA0493E
Oil grade and Viscosity:
Refer to MA-12, "
Fluids and Lubricants" .
Oil capacity:
Approx. 1.4 (3 US pt, 2-1/2 Imp pt)
PDIA0494E
PDIA0494E
Page 4384 of 4731
REAR FINAL DRIVE ASSEMBLY RFD-15
C E F
G H
I
J
K L
M A
B
RFD
Revision: 2005 July 2005 FX
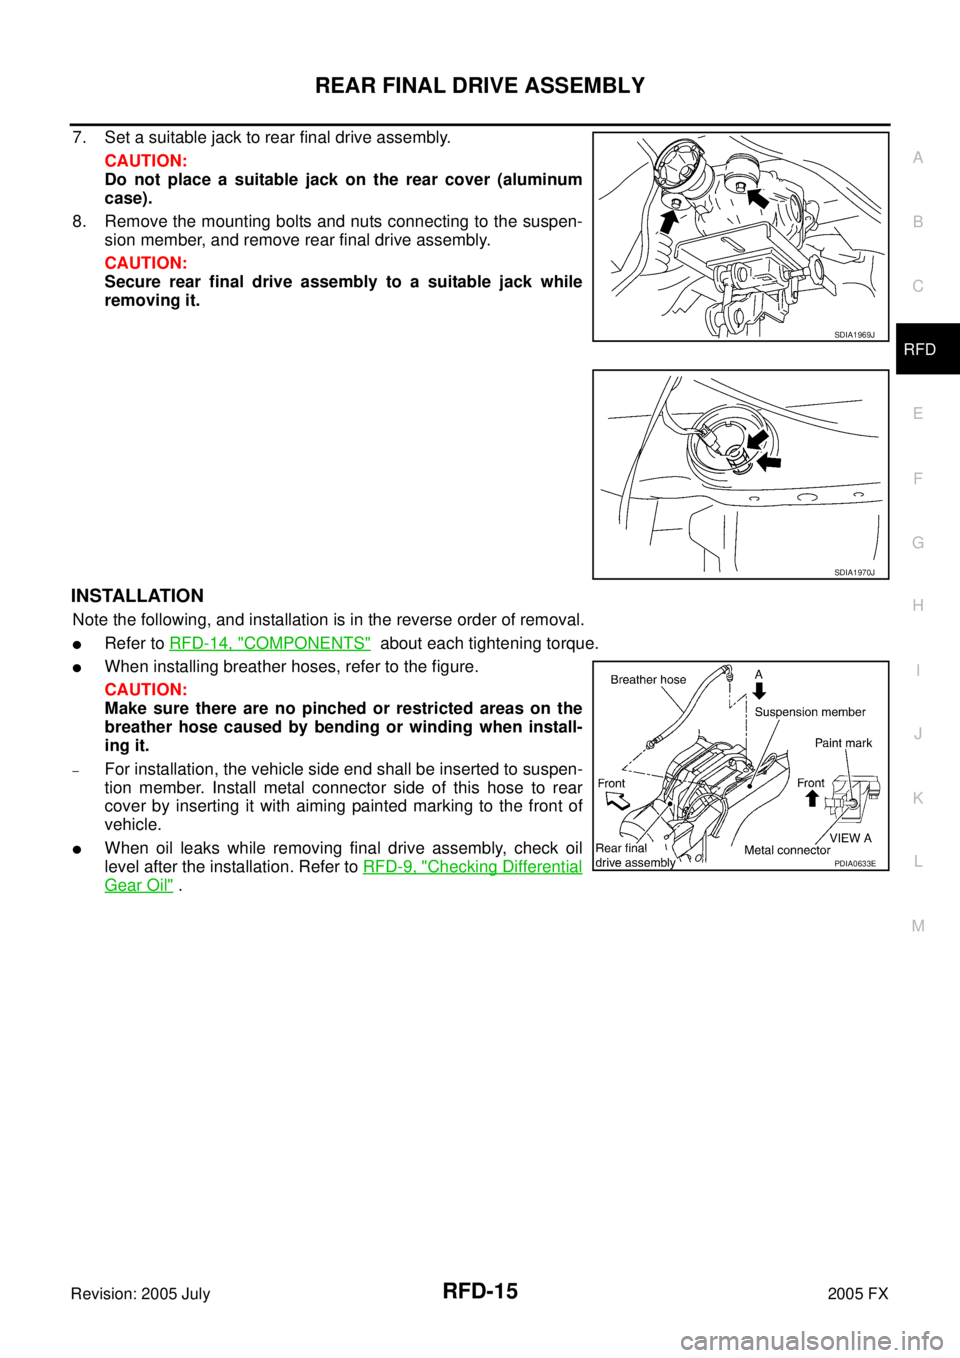
7. Set a suitable jack to rear final drive assembly.
CAUTION:
Do not place a suitable jack on the rear cover (aluminum
case).
8. Remove the mounting bolts and nuts connecting to the suspen- sion member, and remove rear final drive assembly.
CAUTION:
Secure rear final drive assembly to a suitable jack while
removing it.
INSTALLATION
Note the following, and installation is in the reverse order of removal.
�Refer to RFD-14, "COMPONENTS" about each tightening torque.
�When installing breather hoses, refer to the figure.
CAUTION:
Make sure there are no pinched or restricted areas on the
breather hose caused by bending or winding when install-
ing it.
–For installation, the vehicle side end shall be inserted to suspen-
tion member. Install metal connector side of this hose to rear
cover by inserting it with aiming painted marking to the front of
vehicle.
�When oil leaks while removing final drive assembly, check oil
level after the installation. Refer to RFD-9, "
Checking Differential
Gear Oil" .
SDIA1969J
SDIA1970J
PDIA0633E
Page 4469 of 4731
SC-34
CHARGING SYSTEM
Revision: 2005 July 2005 FX
Alternator Pulley Inspection
Perform the following.
�Make sure that alternator pulley does not rattle.
�Make sure that alternator pulley nut is tight.
Installation
Installation is the reverse order of removal.
�Install alternator, and check tension of belt. Refer to EM-173, "Checking Drive Belts" .
CAUTION:
Be sure to tighten “B” terminal nut carefully.
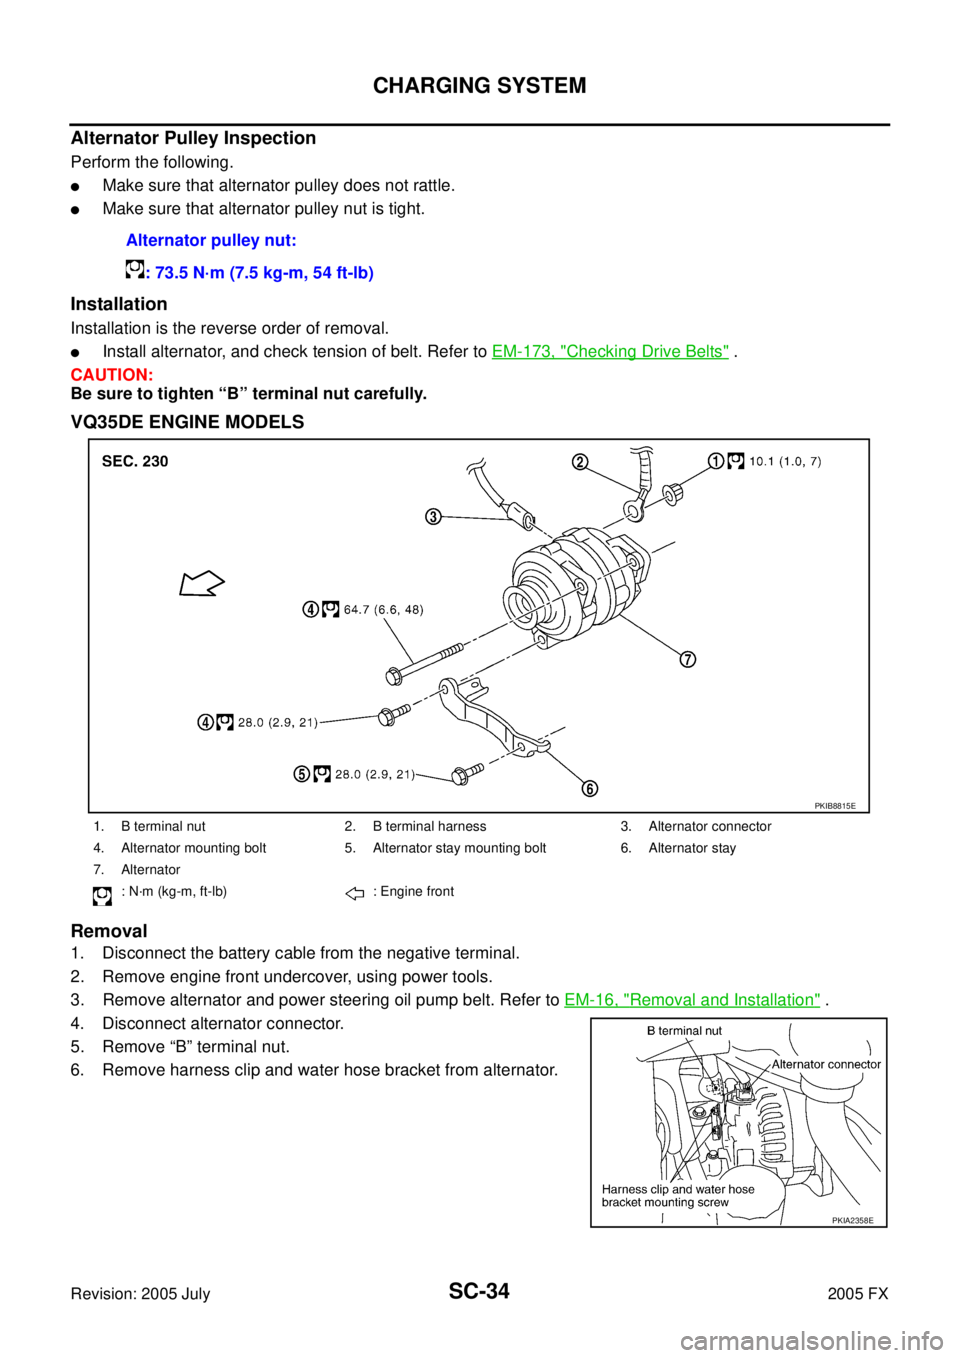
VQ35DE ENGINE MODELS
Removal
1. Disconnect the battery cable from the negative terminal.
2. Remove engine front undercover, using power tools.
3. Remove alternator and power steering oil pump belt. Refer to EM-16, "
Removal and Installation" .
4. Disconnect alternator connector.
5. Remove “B” terminal nut.
6. Remove harness clip and water hose bracket from alternator. Alternator pulley nut:
: 73.5 N·m (7.5 kg-m, 54 ft-lb)
1. B terminal nut 2. B terminal harness 3. Alternator connector
4. Alternator mounting bolt 5. Alternator stay mounting bolt 6. Alternator stay
7. Alternator
: N·m (kg-m, ft-lb) : Engine front
PKIB8815E
PKIA2358E
Page 4470 of 4731
CHARGING SYSTEM SC-35
C
D E
F
G H
I
J
L
M A
B
SC
Revision: 2005 July 2005 FX
7. Remove oil pressure switch harness clip from alternator stay.
(2WD)
8. Disconnect oil pressure switch connector. (2WD)
9. Remove alternator stay mounting bolts and alternator stay, using power tools.
10. Remove alternator mounting bolt, using power tools.
11. Remove alternator assembly downward from the vehicle.
Alternator Pulley Inspection
Perform the following.
�Make sure that alternator pulley does not rattle.
�Make sure that alternator pulley nut is tight.
Installation
Installation is the reverse order of removal.
�Install alternator, and check tension of belt. Refer to EM-15, "Checking Drive Belts" .
CAUTION:
Be sure to tighten “B” terminal nut carefully.
PKIA1923E
Alternator pulley nut:
: 118 N·m (12.0 kg-m, 87 ft-lb)