Page 268 of 414

�µ
The HomeLinkUniversal
Transceiver built into your vehicle
canbeprogrammedtooperateupto
three remote controlled devices
around your home, such as garage
doors, lighting, or home security
systems.
If you are training HomeLink to
operate a garage door or gate, you
should unplug the motor f or that
device during training. Repeatedly
pressing the remote control button
could burn out the motor. Always ref er to the opening
instructions and saf ety inf ormation
that came with your garage door
opener or other equipment you
intend to operate with HomeLink. If
you do not have this inf ormation,
contact the manuf acturer of the
equipment.
Todothis,pressandholdthetwo
outside buttons on the HomeLink
Transceiver for about 20 seconds, or
until the red indicator f lashes.
Release the buttons, then go to step
1.
If you are training the second or
third buttons, go directly to step 1.If you just
received your vehicle and have not
trained any of the buttons in
HomeLink bef ore, you should erase
any previously learned codes bef ore
training the first button.
HomeLink stores the code in a
permanent memory. There should
be no need to retrain HomeLink if
your vehicle’s battery goes dead or is
disconnected. If your garage door
opener was manuf actured bef ore
April 1982, you may not be able to
program HomeLink to operate it.
They do not have the saf ety f eature that causes the motor to stop and
reverse if an obstacle is detected
during closing, increasing the risk of
injury.
CONT INUED
On EX and Touring models
HomeL ink Universal T ransceiver
General Inf ormation
T raining HomeL ink
Important Saf ety Precautions Bef ore you begin
Features
267
Page 269 of 414

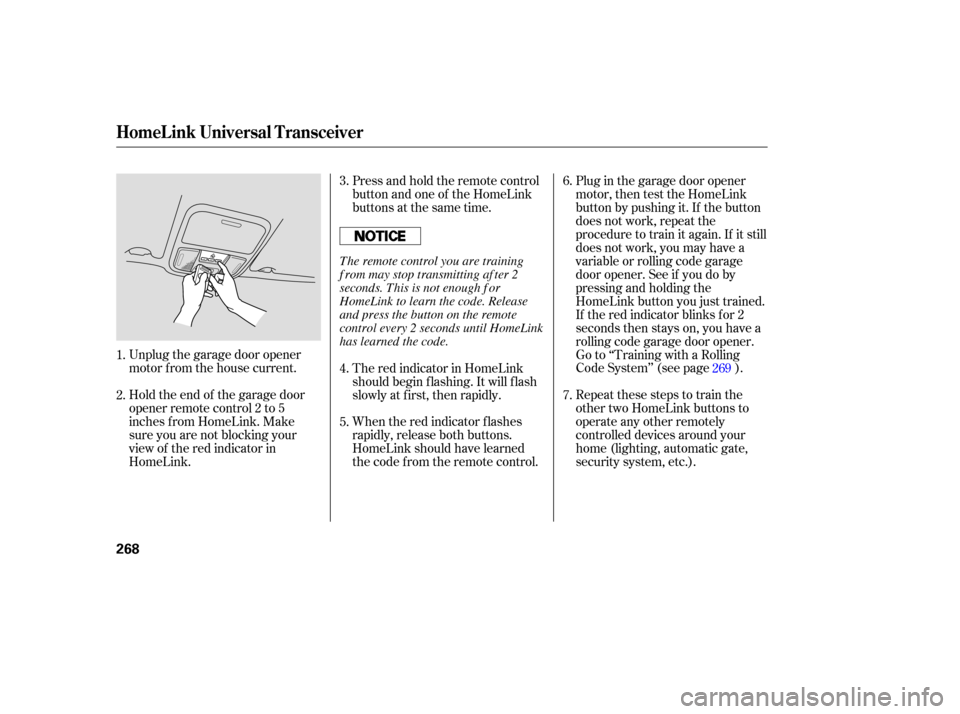
Unplug the garage door opener
motor f rom the house current.
Holdtheendof thegaragedoor
opener remote control 2 to 5
inches f rom HomeLink. Make
sure you are not blocking your
view of the red indicator in
HomeLink.Press and hold the remote control
button and one of the HomeLink
buttons at the same time.
Plug in the garage door opener
motor, then test the HomeLink
button by pushing it. If the button
does not work, repeat the
procedure to train it again. If it still
does not work, you may have a
variable or rolling code garage
door opener. See if you do by
pressing and holding the
HomeLink button you just trained.
If the red indicator blinks for 2
seconds then stays on, you have a
rolling code garage door opener.
Go to ‘‘Training with a Rolling
Code System’’ (see page ).
Repeat these steps to train the
other two HomeLink buttons to
operate any other remotely
controlled devices around your
home (lighting, automatic gate,
security system, etc.).
When the red indicator f lashes
rapidly, release both buttons.
HomeLink should have learned
the code f rom the remote control. The red indicator in HomeLink
should begin f lashing. It will f lash
slowly at first, then rapidly.
2. 3.
1. 4.
5.7. 6.
269
HomeL ink Universal T ransceiver
268
The remote control you are training
f rom may stop transmitting af ter 2
seconds. This is not enough f or
HomeLink to learn the code. Release
and press the button on the remote
control every 2 seconds until HomeLink
has learned the code.
Page 281 of 414
Park the vehicle, and set the
parking brake. Pull the hood
release handle located under the
lower lef t corner of the dashboard.
The hood will pop up slightly.Put your f ingers under the f ront
edge of the hood. The hood latch
handle is above the ‘‘H’’ logo. Pull
up on this handle until it releases
the hood. Lif t the hood.
If the hood latch handle moves stif f ly,
or you can open the hood without
lifting the handle, the mechanism
should be cleaned and lubricated.
Screw the fuel fill cap back on
until it clicks at least three times.
If you do not properly tighten the
cap, the malf unction indicator
lampmaycomeon(seepage ).
On the Touring model, you will
also see a ‘‘CHECK FUEL CAP’’
message on the multi-inf ormation
display.
Push the f uel f ill door closed until
it latches.
1.
5.
6.
2.
372
Service Station Procedures
Opening and Closing the Hood
280
HOOD RELEASE HANDLE
LATCH
Page 282 of 414
Wait a f ew minutes af ter turning the
engine of f bef ore you check the oil.Remove the dipstick again, and
check the level. It should be
between the upper and lower
marks.
To close the hood, lif t it up slightly to
remove the support rod f rom the
hole. Put the support rod back into
its holding clip. Lower the hood to
about a f oot (30 cm) above the
f ender, then let it drop. Make sure it
is securely latched. Remove the dipstick (orange loop).
Wipe of f the dipstick with a clean
cloth or paper towel.
Insert it all the way back in its hole.
Pull the support rod out of its clip
and insert the end into the hole on
thepassenger’ssideof thehood.
If it is near or below the lower mark,
seeon page .
1.
3.
2.
3.4.
328
Oil Check
A dding Engine Oil
Service Station Procedures
Bef ore Driving
281
DIPSTICK
SUPPORT ROD
UPPER MARK
LOWER MARK
Page 285 of 414

Your dealer has Honda accessories
that allow you to personalize your
vehicle. These accessories have
been designed and approved f or your
vehicle, and are covered by warranty.When properly installed, cellular
phones, alarms, two-way radios, and
low-powered audio systems should
not interf ere with your vehicle’s
computer controlled systems, such
as your airbags and anti-lock brakes.Bef ore installing any accessory:
Make sure the accessory does not
obscure any lights, or interf ere
with proper vehicle operation or
perf ormance.
Modif ying your vehicle, or installing
some non-Honda accessories, can
make it unsaf e. Bef ore you make any
modif ications or add any accessories,
be sure to read the f ollowing
inf ormation.
Although non-Honda accessories
may f it on your vehicle, they may not
meet f actory specif ications, and
could adversely af f ect your vehicle’s
handling and stability (see page ). Be sure electronic accessories do
not overload electrical circuits
(see page ) or interf ere with
the proper operation of your
vehicle.
Bef ore installing any electronic
accessory, have the installer
contact your dealer. If possible,
have your dealer inspect the f inal
installation.
285 376
A ccessories
A ccessories and Modif ications
284
Improper accessories or
modifications can affect your
vehicle’s handling, stability, and
performance, and cause a
crash in which you can be hurt
or killed.
Follow all instructions in this
owner’s manual regarding
accessories and modifications.
Page 290 of 414
You can use the cargo net to secure
items in the cargo area, and store
small items between the two halves
of the net. To install the cargo net,
hook the loops on the f our corners of
the net to the tabs at both sides of
the tailgate sill.There are cargo hooks f or plastic
grocery bags on the back of the third
row seat. They are designed to hold
light items. Heavy objects may
damage the hooks.
On EX and Touring models
Carrying Cargo
Cargo Net
Cargo Hooks
Bef ore Driving
289
CARGO HOOKS
Page 293 of 414
Youshoulddothefollowingchecks
and adjustments bef ore you drive
your vehicle.Make sure all windows, mirrors,
and outside lights are clean and
unobstructed. Remove f rost, snow,
or ice.
Check that the hood is f ully closed.
Visually check the tires. If a tire
looks low, use a gauge to check its
pressure.
Check that any items you may be
carrying are stored properly or
f astened down securely. Check the seat adjustment (see
page ).
Check the adjustment of the
inside and outside mirrors (see
page ).
Check the steering wheel
adjustment (see page ).
Make sure the doors and the
tailgate are securely closed and
locked.
Fasten your seat belt. Check that
your passengers have f astened
their seat belts (see page ).
When you start the engine, check
the gauges and indicators in the
instrument panel (see page ).
3.
2.
1.
4. 5.
6.
7.
8.
9.
10. 16
61
167
149
127
Preparing to Drive
292
Page 299 of 414

Always use the parking brake when
you park your vehicle. Make sure
the parking brake is set f irmly or
your vehicle may roll if it is parked
on an incline.
Set the parking brake bef ore you put
the transmission in Park. This keeps
the vehicle from moving and putting
pressure on the parking mechanism
in the transmission.If the vehicle is f acing uphill, turn
the f ront wheels away f rom the
curb.
If the vehicle is f acing downhill,
turn the front wheels toward the
curb.
Make sure the parking brake is
f ully released bef ore driving away.
Driving with the parking brake
partially set can overheat or
damage the rear brakes.
Make sure the moonroof and the
windows are closed.
Never park over dry leaves, tall
grass, or other f lammable
materials. The hot three way
catalytic converter could cause
these materials to catch on fire. Lock the doors and the tailgate. Place any packages, valuables, etc.
in the cargo area, or take them
with you. Turn of f the lights.
Parking T ips
Parking
298