Page 18 of 414
CONT INUED
The f ront seats and second row seats
have adjustable seat belt anchors. To
adjust the height of an anchor,
squeeze the two release buttons, and
slide the anchor up or down as
needed (the anchor has f our
positions).Pull out the anchor latch and the
latch plate f rom each holding slot in
the ceiling, and pull out the seat belt
to extend it.Insert the hook at the end of the
anchor latch into the anchor buckle
by lining up the triangle marks on
the anchor latch and buckle. Make
sure the belt is not twisted. Push the
anchor latch until it locks. Then
f ollow the procedure f or f astening an
ordinary seat belt (see page ).
16
The plus-one seat on EX model also has
this type of seat belt.
Protecting A dults and Teens
Using t he L ap/Shoulder Belt in t heCent er Posit ion of t he T hird Row
Driver and Passenger Saf ety
17
RELEASE
BUTTONS LATCH
PLATE
ANCHOR
LATCHANCHOR
LATCH
ANCHOR
BUCKLE
Page 75 of 414

The multi-inf ormation display in the
instrument panel displays various
inf ormation and messages when the
ignition switch is in the ON (II)
position. Some of the messages help
you operate your vehicle more
comf ortably.
Others help to keep you aware of the
periodic maintenance your vehicle
needs f or continued trouble-f ree
driving.When you unlock and open the
driver’s door with the key, the
display shows ‘‘Welcome DRIVER 1’’
or ‘‘Welcome DRIVER 2’’ depending
on which remote transmitter was
used last. (The driver’s ‘‘ID’’ is
detected by the transmitter.)
If you use the remote transmitter to
unlock the driver’s door, the display
shows ‘‘Welcome DRIVER 1’’ or
‘‘Welcome DRIVER 2’’ depending onwhich remote transmitter you use,
and the driver’s seat moves to the
positionstoredinthattransmitter.
When you turn the ignition switch to
LOCK (0) and remove the key from
the ignition switch, the display
shows ‘‘Goodbye.’’
There are f our types of messages;
normal display messages, engine oil
lif e and maintenance messages,
system messages, and PAX system
warning messages.
You can also customize some vehicle
control settings to your liking with
the multi-inf ormation display and the
two buttons on the steering wheel
(see page ).
89
On Touring model onlyNormal Display Messages
Multi-Inf ormation Display
74
Page 136 of 414

Each remote transmitter activates
the driver’s seat position memory
system and customized vehicle
control settings (see page ).
When you open the driver’s door
after unlocking it with the remote
transmitter, the driver’s seat moves
to the positions stored in memory.
You will hear two beeps when the
movement is completed.The driver’s seat position memory
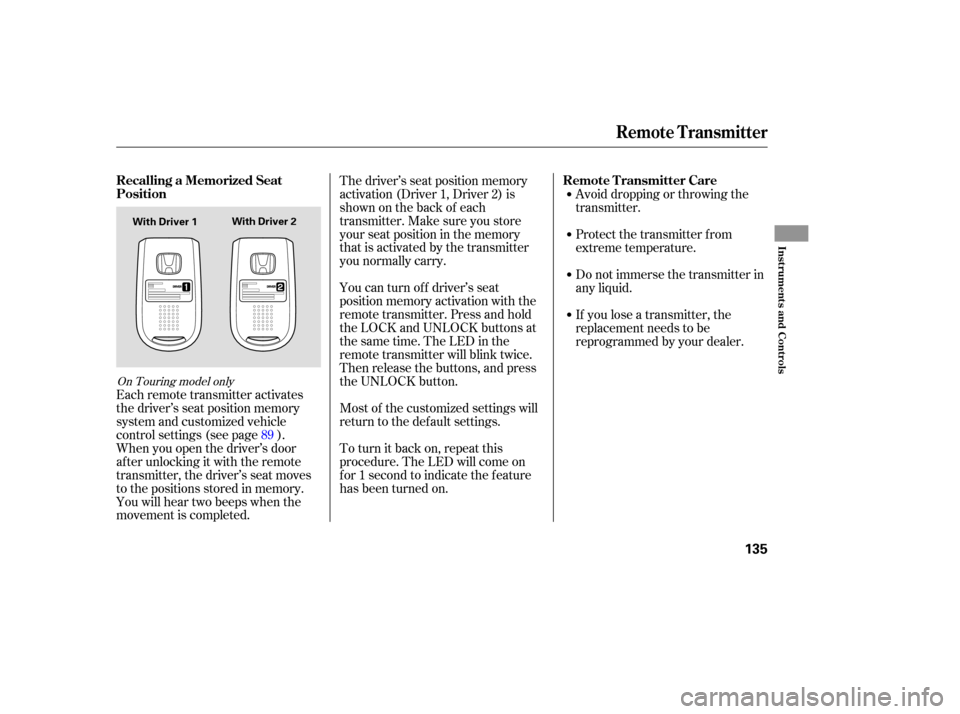
activation (Driver 1, Driver 2) is
shownonthebackof each
transmitter. Make sure you store
your seat position in the memory
that is activated by the transmitter
you normally carry.
You can turn of f driver’s seat
position memory activation with the
remote transmitter. Press and hold
the LOCK and UNLOCK buttons at
thesametime.TheLEDinthe
remote transmitter will blink twice.
Then release the buttons, and press
the UNLOCK button.
Avoid dropping or throwing the
transmitter.
Protect the transmitter from
extreme temperature.
Do not immerse the transmitter in
any liquid.
If you lose a transmitter, the
replacement needs to be
reprogrammed by your dealer.
Most of the customized settings will
return to the default settings.
To turn it back on, repeat this
procedure. The LED will come on
for 1 second to indicate the feature
has been turned on.
89
On Touring model only
Recalling a Memorized Seat
Position
Remote Transmitter Care
Remote Transmitter
Inst rument s and Cont rols
135
With Driver 2
With Driver 1
Page 155 of 414
Unlock the seat f rom the f loor by
pulling the lock release lever under
the seat cushion’s f ront edge and
lifting the rear of the seat.
Slide the seat toward the center of
the vehicle.
The second row bucket seat on the
passenger’s side can be moved to the
center to provide access to the third
row seat.
To get into or out of the third row
seat, pull up the release lever on the
shoulder of each second row bucket
seat. The seat-back will tilt forward
and the whole seat will slide f orward.
Push the back of the seat down over
the f loor hooks. Make sure the seat
is securely locked in place.
Remove the piece mat and the f loor
cover f rom under the passenger’s
side bucket seat. To remove the
piece mat, unfasten the two buttons
on the rear edge. Moving the Second Row Bucket
Seat
Seats
154
LOCK
RELEASE
LEVER
BUTTONS
PIECE MAT
Page 156 of 414

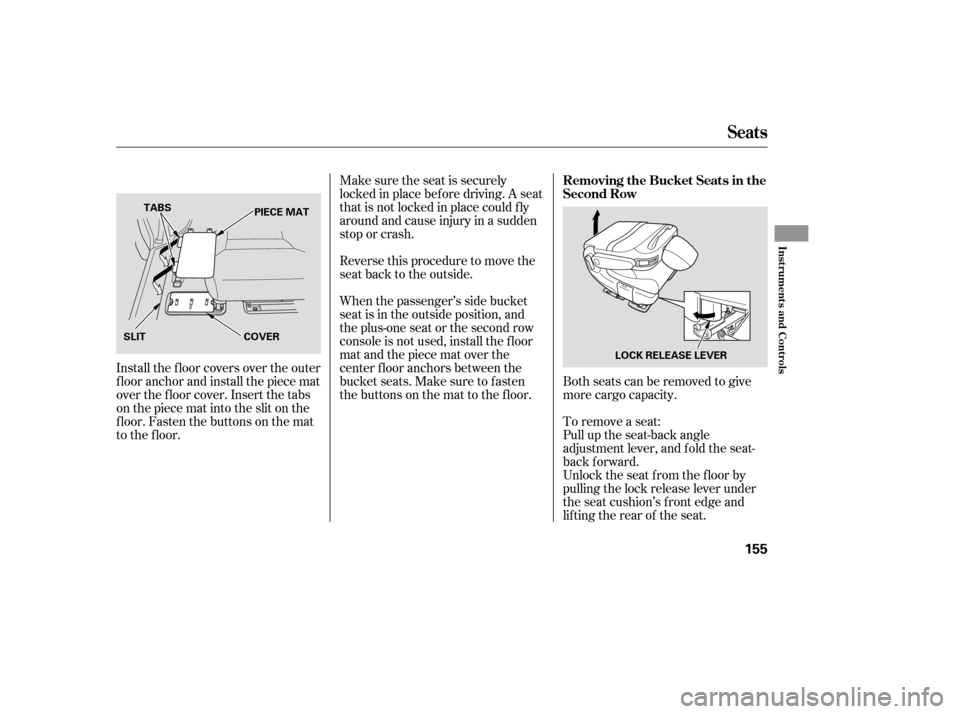
Both seats can be removed to give
more cargo capacity.
To remove a seat:
Make sure the seat is securely
locked in place bef ore driving. A seat
thatisnotlockedinplacecouldfly
around and cause injury in a sudden
stop or crash.
Reversethisproceduretomovethe
seat back to the outside.
When the passenger’s side bucket
seat is in the outside position, and
theplus-oneseatorthesecondrow
console is not used, install the f loor
mat and the piece mat over the
center f loor anchors between the
bucket seats. Make sure to f asten
the buttons on the mat to the floor.
Install the f loor covers over the outer
f loor anchor and install the piece mat
over the f loor cover. Insert the tabs
on the piece mat into the slit on the
floor. Fasten the buttons on the mat
to the f loor.
Pull up the seat-back angle
adjustment lever, and fold the seat-
back f orward.
Unlock the seat f rom the f loor by
pulling the lock release lever under
the seat cushion’s f ront edge and
lifting the rear of the seat.
Seats
Removing the Bucket Seats in the
Second Row
Inst rument s and Cont rols
155
LOCK RELEASE LEVER
PIECE MAT
SLIT COVER
TABS
Page 162 of 414

Your vehicle has a memory feature
f or the driver’s seat position.
Two seat positions can be stored in
separate memories. You select a
memorized position by pushing the
appropriate button or appropriate
remote transmitter (Driver 1 or
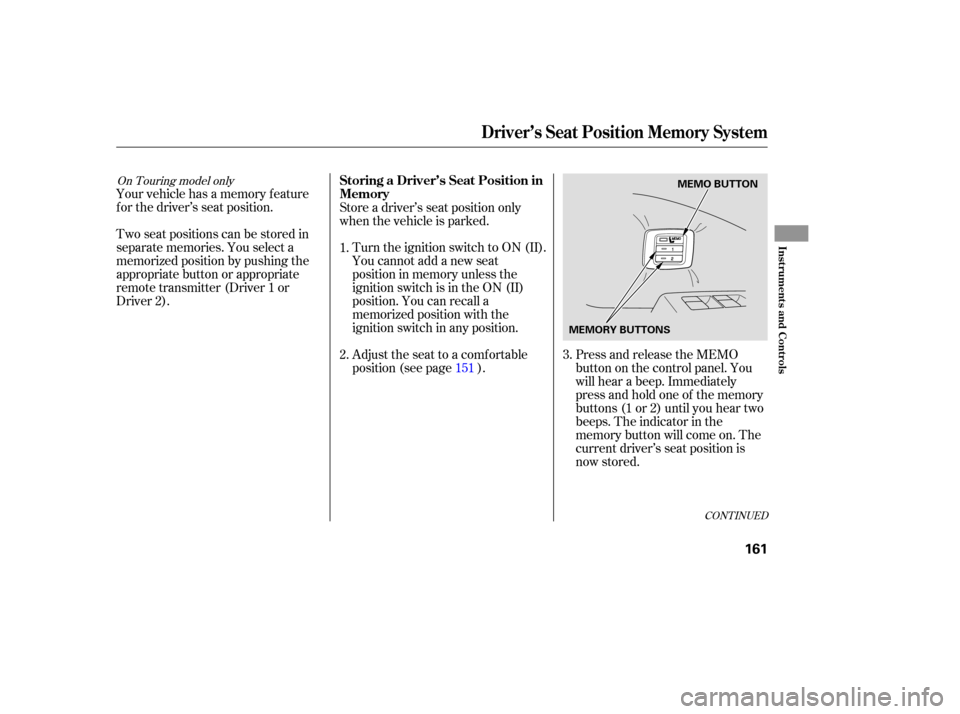
Driver 2).Press and release the MEMO
buttononthecontrolpanel.You
will hear a beep. Immediately
press and hold one of the memory
buttons (1 or 2) until you hear two
beeps. The indicator in the
memory button will come on. The
current driver’s seat position is
now stored.
Store a driver’s seat position only
when the vehicle is parked.
Turn the ignition switch to ON (II).
You cannot add a new seat
position in memory unless the
ignition switch is in the ON (II)
position. You can recall a
memorized position with the
ignition switch in any position.
Adjust the seat to a comfortable
position (see page ).
1.
2.
3.
151
CONT INUED
On Touring model onlyStoring a Driver’s Seat Position in
Memory
Driver’s Seat Position Memory System
Inst rument s and Cont rols
161
MEMO BUTTON
MEMORY BUTTONS
Page 163 of 414

Doing any of the f ollowing af ter
pressing the MEMO button will
cancel the storing procedure.Not pressing a memory button
within 5 seconds.
Readjusting the seat position.
Each memory button stores only one
seat position. Storing a new position
erases the previous position stored in
that button’s memory. If you want to
add a new position while retaining
the current one, use the other
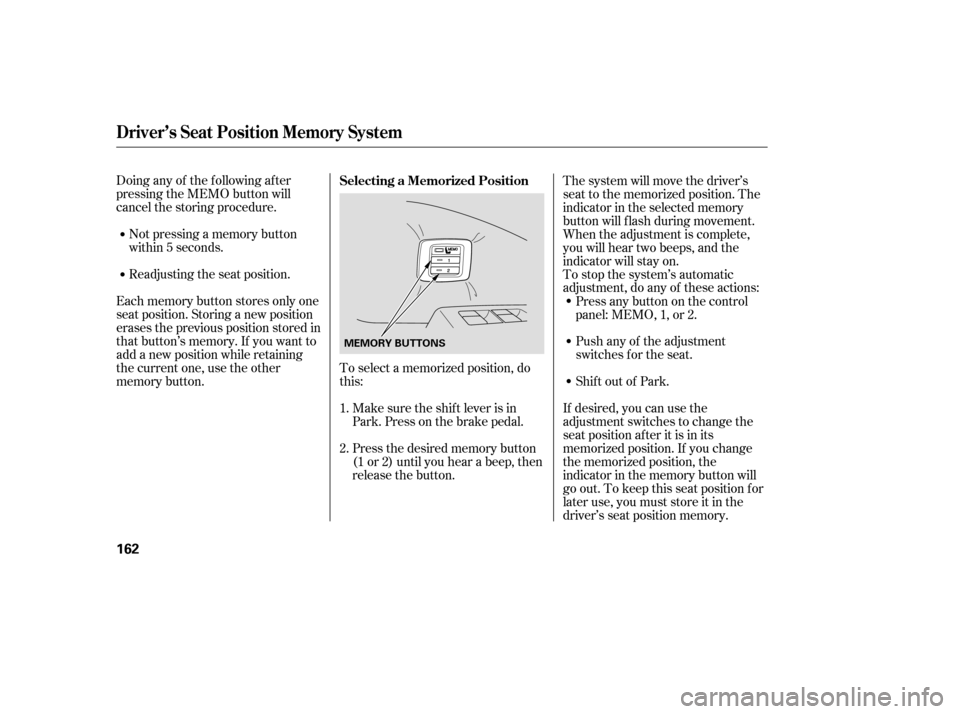
memory button. To select a memorized position, do
this:
Make sure the shif t lever is in
Park. Press on the brake pedal.
Press the desired memory button
(1 or 2) until you hear a beep, then
release the button. The system will move the driver’s
seat to the memorized position. The
indicator in the selected memory
button will f lash during movement.
When the adjustment is complete,
you will hear two beeps, and the
indicator will stay on.
To stop the system’s automatic
adjustment, do any of these actions:
If desired, you can use the
adjustment switches to change the
seat position af ter it is in its
memorized position. If you change
the memorized position, the
indicator in the memory button will
go out. To keep this seat position f or
later use, you must store it in the
driver’s seat position memory.
Shif t out of Park. Push any of the adjustment
switches f or the seat. Press any button on the control
panel: MEMO, 1, or 2.
1.
2. Selecting a Memorized Position
Driver’s Seat Position Memory System
162
MEMORY BUTTONS
Page 189 of 414
Vents, Heating, and A/C
LX modelEX/T ouring models
188
RECIRCULATION
BUTTON AIR CONDITIONING
BUTTON
REAR WINDOW
DEFOGGER BUTTON
FAN CONTROL
BUTTON MODE
CONTROL
DIAL
MODE
BUTTONAIR CONDITIONING
BUTTON
AUTO
BUTTON
RECIRCULATION
BUTTON TEMPERATURE
CONTROL DIAL
REAR
CONTROLLER
DIAL
WINDSHIELD
DEFROSTER BUTTON REAR WINDOW
DEFOGGER
BUTTONREAR
BUTTON
REAR LOCK
BUTTON
FAN CONTROL BUTTONS
OFF BUTTON
SYNCHRO BUTTON DRIVER’S SIDE
TEMPERATURE
CONTROL
SWITCH PASSENGER’S SIDE
TEMPERATURE CONTROL SWITCH
REAR TEMPERATURE/FAN SPEED (EX model)
CONTROL SWITCH