Page 217 of 414

To load a single CD:
TheindicatorsabovetheDisc
buttons of the empty positions will
blink, and the green load indicator
above the CD slot comes on.
Press and release the LOAD
button.
The system will load the CD, and
begin playing it.If you press the LOAD button while
a CD is playing, the system will stop
playing that CD and start the loading
sequence. It will then play the CD
just loaded.
You can also load a CD into an empty
position while a CD is playing by
pressing the appropriate Disc button.
Select an empty Disc button (the
indicator above the button is off),
and press the button. The system
will stop playing the current CD and
start the loading sequence. It will
then play the CD just loaded.
Insert a CD into the CD slot.
Insert it only about halfway; the
drive will pull it in the rest of the
way. You will see ‘‘BUSY’’ in the
display. The CD load indicator
turns red and blinks as the CD is
loaded.
When LOADING appears again in
the display, insert the next CD into
the CD slot.
Repeat this until all six positions
are loaded. The system will then
begin playing the f irst CD loaded.
TheindicatorsabovetheDisc
buttons of the empty positions will
blink, and the green CD load
indicator comes on. When you see
‘‘LOAD’’ in the display, insert the
disc into the CD slot. Insert it only
about half way; the drive will pull it
in the rest of the way.
If you stop loading CDs bef ore all six
positions are f illed, the system will
wait f or 10 seconds, then stop the
load operation and begin playing the
last CD loaded.
2.
2.
3.
4.
5. 1.
3.
Playing a CD, CD Changer
216
Page 221 of 414
 in
the display. T")
When you press the RDM button or
touch the TRACK RANDOM icon on
the upper display, the system plays
the tracks of the current disc in
random order. You will see
RANDOM (TRACK RANDOM) in
the display. To turn this feature off,
press the RDM button (touch
TRACK RANDOM) again.
Operation of TRACK SCAN, DISC
SCAN, TRACK REPEAT, DISC
REPEAT, and TRACK RANDOM on
the upper display is possible only
when the audio display is in the
upright position.
To take the system out of CD mode,
press the AM/FM button or SAT
RADIO button (U.S. models). Each
time you press the AM/FM button,
the system changes to the next
mode (AM, FM1, or FM2). When
you return to CD mode by pressing
the CD button, play will continuewhere it lef t of f .
To eject all discs, press and hold the
eject button until the indicators
above the disc buttons blink. To eject one disc, press and release
the eject button. You can also eject discs when the
ignition switch is on or of f : When you press the eject button
while listening to the radio, or with
the audio system turned of f , the disc
that was last selected is ejected.
Af ter that disc is ejected, pressing
the eject button again will eject the
next disc in numerical order. By
doing this six times, you can remove
all the discs f rom the changer. To remove the disc f rom the
changer,firstselectitbypressing
the appropriate disc button or
corresponding number on the preset
button. When that disc begins
playing, press the eject button.
If you do not remove the CD f rom
the slot, the system will reload the
CD af ter 15 seconds and put the CD
changer in pause mode. To begin
playing the CD, press the CD button. To remove the disc that is currently
playing, press the eject button. You
will see ‘‘EJECT’’ in the display.
When you remove the disc f rom the
slot, the system automatically begins
the load sequence so you can load
another disc in that position. If you
do not load another CD, within 15
seconds, the system selects the
previous mode [AM, FM1, FM2, or
XM Radio (U.S. models)]. If you turn the system of f while a CD
is playing, either with the PWR/VOL
knob or the ignition switch, play will
continue at the same point when you
turn it back on.
Playing a CD, CD Changer
Random Play
To Stop Playing a Disc Removing CDs f rom the Changer
220
Page 224 of 414
Playing a T ape
L X modelEX model wit hout RES
Features
223
FF BUTTONSKIP BAR
PLAY/PROG
BUTTON REW
BUTTON
NR BUTTON
REPEAT
BUTTONFF BUTTON
PLAY/PROG
BUTTONREW
BUTTON
REPEAT
BUTTON SKIP BAR
NR BUTTON
Page 230 of 414

Your vehicle’s audio system will
disable itself if it is disconnected
f rom electrical power f or any reason.
To make it work again, you must
enter a specif ic f ive-digit code with
the preset buttons. Because there
are hundreds of number
combinations possible f rom the f ive
digits, making the system work
without knowing the exact code is
nearly impossible.
Youshouldhavereceivedacardthat
lists your audio system code number
and serial number. It is best to store
this card in a saf e place at home. In
addition, you should write the audio
system’s serial number in this
Owner’s Manual.
If youshouldhappentolosethecard,
you must obtain the code number
f rom a Honda dealer. To do this, you
will need the system’s serial number.If your vehicle’s battery is discon-
nected or goes dead, or the radio
f use is removed, the audio system
will disable itself . If this happens,
youwillsee‘‘ ’’inthe
frequencydisplaythenexttimeyou
turn on the system. Use the preset
buttons to enter the five-digit code.
The code is located on the radio code
card included in your Owner’s
Manual kit. When it is entered
correctly, the radio will start playing.
If you make a mistake entering the
code, do not start over; complete the
f ive-digit sequence, then enter the
correct code. You have ten tries to
enter the correct code. If you are
unsuccessful in ten attempts, you
must then leave the system on for 1
hour bef ore trying again.
You will have to store your favorite
stations in the preset buttons after
the system begins working. Your
original settings were lost when the
power was disconnected.
On EX and Touring models
Radio T hef t Prot ect ion
Features
229
Page 233 of 414

To operate the rear entertainment
system from the front panel, turn the
RR CTRL knob clockwise. The
amber RR LED comes on to show
that the control panel is enabled.
If CDs are loaded in the CD changer,
select CD. If a CD is loaded in the
lower player, select DVD/AUX. To play the radio, the buttons for the
f ront entertainment system have the
same f unctions.The DVD player in your rear
entertainment system can play DVD
video discs and CDs.
Open the overhead screen by
pushing the OPEN button. The
screen will swing down part-way.
Pivot the screen the rest of the way.
If you pivot the screen too f ar
f orward, past the second detent, the
display will turn of f . Pivot the screen
back to the second or first detent to
turn the display back on. To close
the screen, pivot it up until it latches.
To Select Rear Entertainment
f rom the Front Control Panel
Operating the DVD Player f rom
the Front Control Panel
Rear Entertainment System
232
REAR CONTROL PANEL
OPEN BUTTON
OVERHEAD SCREEN
Page 236 of 414
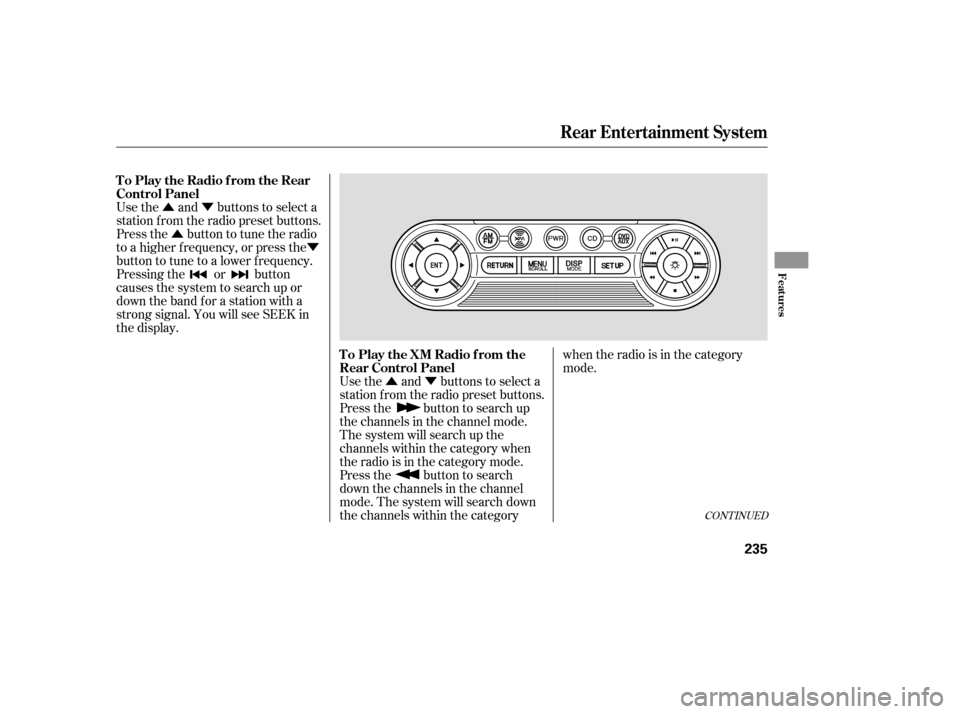
�Û�Ý�Û �Ý
�Û�Ý
Use the and buttons to select a
station f rom the radio preset buttons.
Press the button to tune the radio
to a higher f requency, or press the
button to tune to a lower f requency.
Pressing the or button
causes the system to search up or
down the band for a station with a
strong signal. You will see SEEK in
the display.
Use the and buttons to select a
station f rom the radio preset buttons.
Press the button to search up
the channels in the channel mode.
The system will search up the
channels within the category when
the radio is in the category mode.
Press the button to search
down the channels in the channel
mode. The system will search down
the channels within the categorywhen the radio is in the category
mode.
CONT INUED
To Play the Radio f rom the Rear
Control Panel
To Play the XM Radio f rom the
Rear Control Panel
Rear Entertainment System
Features
235
Page 238 of 414

The video screen is f or use by rear
seat passengers only. The driver and
f ront seat passenger should not try
to view the screen while driving.Press the button when you
want to pause the DVD. Press this
button again to go back to PLAY.
Pressthe buttontoskiptothe
beginning of the next chapter. Press
the button to return to the
beginning of the current chapter.
To move rapidly within a chapter,
press and hold the orbutton. The system will
continue to move through the chapter. Press the button to
move forward, or the button to
move backward. Release the button
when the system reaches the point
you want.
ToselectthemenuontheDVD,
press the MENU/SCROLL button
(U.S. models) or MENU button
(Canadian models). Use the ,
, , and buttons to
move to the desired menu selection,
then press the ENT button to enter
your selection.
Open the overhead screen by
pushing the OPEN button. The
screen will swing down part-way.
Pivot the screen the rest of the way.
If you pivot the screen too f ar
f orward, past the second detent, the
display will turn of f . Pivot the screen
back to the second or first detent to
turn the display back on. To close
the screen, pivot it up until it latches. To Play a DVD f rom the Rear
Control Panel
Rear Entertainment System
Features
237
REAR CONTROL PANEL
OPEN
BUTTON
OVERHEAD SCREEN
Page 268 of 414

�µ
The HomeLinkUniversal
Transceiver built into your vehicle
canbeprogrammedtooperateupto
three remote controlled devices
around your home, such as garage
doors, lighting, or home security
systems.
If you are training HomeLink to
operate a garage door or gate, you
should unplug the motor f or that
device during training. Repeatedly
pressing the remote control button
could burn out the motor. Always ref er to the opening
instructions and saf ety inf ormation
that came with your garage door
opener or other equipment you
intend to operate with HomeLink. If
you do not have this inf ormation,
contact the manuf acturer of the
equipment.
Todothis,pressandholdthetwo
outside buttons on the HomeLink
Transceiver for about 20 seconds, or
until the red indicator f lashes.
Release the buttons, then go to step
1.
If you are training the second or
third buttons, go directly to step 1.If you just
received your vehicle and have not
trained any of the buttons in
HomeLink bef ore, you should erase
any previously learned codes bef ore
training the first button.
HomeLink stores the code in a
permanent memory. There should
be no need to retrain HomeLink if
your vehicle’s battery goes dead or is
disconnected. If your garage door
opener was manuf actured bef ore
April 1982, you may not be able to
program HomeLink to operate it.
They do not have the saf ety f eature that causes the motor to stop and
reverse if an obstacle is detected
during closing, increasing the risk of
injury.
CONT INUED
On EX and Touring models
HomeL ink Universal T ransceiver
General Inf ormation
T raining HomeL ink
Important Saf ety Precautions Bef ore you begin
Features
267