Page 1626 of 2339
(31) Remove low/reverse reaction plate (Fig. 46).
(32) Remove one low/reverse clutch disc (Fig. 47).(33) Remove low/reverse reaction plate snap ring
(Fig. 48).
(34) Remove low/reverse clutch pack (Fig. 49).
Fig. 46 Remove Low/Reverse Reaction Plate
1 - LOW/REVERSE REACTION PLATE (FLAT SIDE UP)
Fig. 47 Remove One Disc
1 - ONE DISC FROM LOW/REVERSE CLUTCH
Fig. 48 Remove Low/Reverse Reaction Plate Snap
Ring
1 - SCREWDRIVER
2 - LOW/REVERSE REACTION PLATE FLAT SNAP RING
3 - DO NOT SCRATCH CLUTCH PLATE
Fig. 49 Remove Low/Reverse Clutch Pack
1 - CLUTCH PLATES (5)
2 - CLUTCH DISCS (5)
RS41TE AUTOMATIC TRANSAXLE21 - 165
41TE AUTOMATIC TRANSAXLE (Continued)
Page 1632 of 2339
(54) Remove rear carrier assembly from transaxle
(Fig. 70).
(55) Remove rear carrier assembly bearing cone
using setup shown in (Fig. 71).(56) Install low/reverse spring compressor tool as
shown in (Fig. 72) (Fig. 73).
Fig. 70 Remove Rear Carrier Assembly
1 - REAR CARRIER ASSEMBLY
Fig. 71 Remove Rear Carrier Bearing Cone
1 - TOOL 5048 WITH JAWS 5048±3 AND BUTTON 6055
2 - WRENCHES
3 - REAR CARRIER ASSEMBLY
Fig. 72 Low/Reverse Spring Compressor Tool
1 - TOOL 6057
2 - TOOL 5059
3 - TOOL 5058±3
Fig. 73 Compressor Tool in Use
1 - LOW/REVERSE CLUTCH RETURN SPRING
2 - SNAP RING (INSTALL AS SHOWN)
3 - TOOL 6057
4 - TOOL 5059
5 - TOOL 5058±3
RS41TE AUTOMATIC TRANSAXLE21 - 171
41TE AUTOMATIC TRANSAXLE (Continued)
Page 1634 of 2339
(61) Inspect guide bracket components for exces-
sive wear and replace if necessary (Fig. 78).
NOTE: The Low/Reverse Clutch Piston has bonded
seals which are not individually serviceable. Seal
replacement requires replacement of the piston
assembly.
(62) Remove low/reverse clutch piston (Fig. 79).(63) Remove low/reverse piston retainer-to-case
screws (Fig. 80).
(64) Remove low/reverse piston retainer (Fig. 81).
Fig. 78 Guide Bracket Disassembled
1 - ANTIRATCHET SPRING
2 - GUIDE BRACKET
3 - SPLIT SLEEVE
4 - SPACER
5-PAWL
6 - STEPPED SPACER
Fig. 79 Remove Low/Reverse Clutch Piston
1 - LOW/REVERSE CLUTCH PISTON
2 - BONDED SEAL
3 - BONDED SEAL
Fig. 80 Remove Piston Retainer Attaching Screws
1 - LOW/REVERSE CLUTCH PISTON RETAINER
2 - SCREWDRIVER
3 - TORX-LOC SCREWS
Fig. 81 Remove Piston Retainer
1 - LOW/REVERSE CLUTCH PISTON RETAINER
2 - GASKET
RS41TE AUTOMATIC TRANSAXLE21 - 173
41TE AUTOMATIC TRANSAXLE (Continued)
Page 1635 of 2339

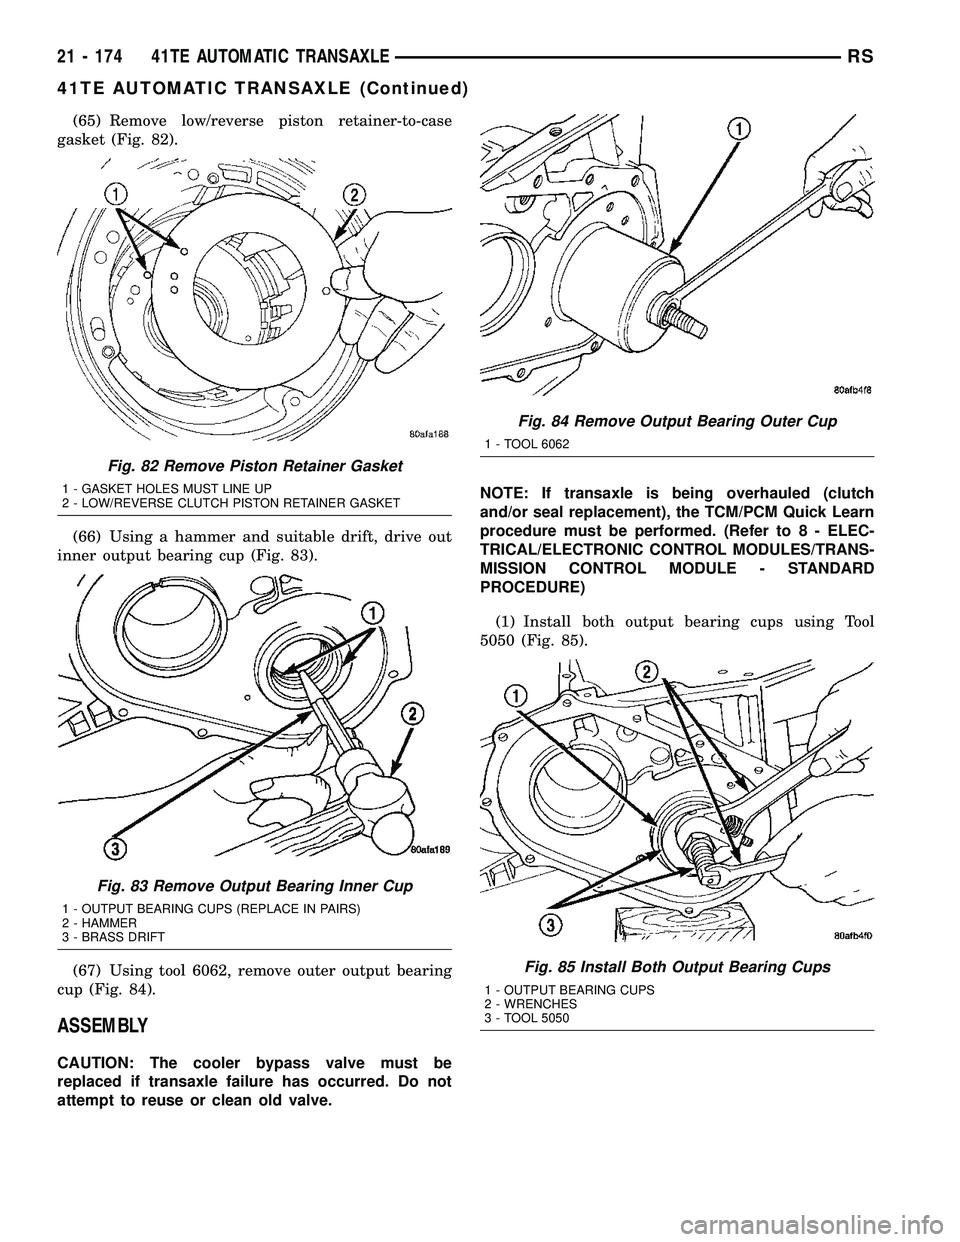
(65) Remove low/reverse piston retainer-to-case
gasket (Fig. 82).
(66) Using a hammer and suitable drift, drive out
inner output bearing cup (Fig. 83).
(67) Using tool 6062, remove outer output bearing
cup (Fig. 84).
ASSEMBLY
CAUTION: The cooler bypass valve must be
replaced if transaxle failure has occurred. Do not
attempt to reuse or clean old valve.NOTE: If transaxle is being overhauled (clutch
and/or seal replacement), the TCM/PCM Quick Learn
procedure must be performed. (Refer to 8 - ELEC-
TRICAL/ELECTRONIC CONTROL MODULES/TRANS-
MISSION CONTROL MODULE - STANDARD
PROCEDURE)
(1) Install both output bearing cups using Tool
5050 (Fig. 85).
Fig. 82 Remove Piston Retainer Gasket
1 - GASKET HOLES MUST LINE UP
2 - LOW/REVERSE CLUTCH PISTON RETAINER GASKET
Fig. 83 Remove Output Bearing Inner Cup
1 - OUTPUT BEARING CUPS (REPLACE IN PAIRS)
2 - HAMMER
3 - BRASS DRIFT
Fig. 84 Remove Output Bearing Outer Cup
1 - TOOL 6062
Fig. 85 Install Both Output Bearing Cups
1 - OUTPUT BEARING CUPS
2 - WRENCHES
3 - TOOL 5050
21 - 174 41TE AUTOMATIC TRANSAXLERS
41TE AUTOMATIC TRANSAXLE (Continued)
Page 1636 of 2339
(2) Install low/reverse piston retainer gasket (Fig.
86). Make sure gasket holes line up with case.
(3) Install low/reverse piston retainer (Fig. 87).(4) Install low/reverse piston retainer-to-case bolts
(Fig. 88) and torque to 5 N´m (45 in. lbs.).
NOTE: The Low/Reverse Clutch Piston has bonded
seals which are not individually serviceable. Seal
replacement requires replacement of the piston
assembly.
(5) Install low/reverse clutch piston (Fig. 89).
Fig. 86 Install Piston Retainer Gasket
1 - GASKET HOLES MUST LINE UP
2 - LOW/REVERSE CLUTCH PISTON RETAINER GASKET
Fig. 87 Install Piston Retainer
1 - LOW/REVERSE CLUTCH PISTON RETAINER
2 - GASKET
Fig. 88 Install Piston Retainer Attaching Screws
1 - LOW/REVERSE CLUTCH PISTON RETAINER
2 - SCREWDRIVER
3 - TORX-LOC SCREWS
Fig. 89 Install Low/Reverse Clutch Piston
1 - LOW/REVERSE CLUTCH PISTON
2 - BONDED SEAL
3 - BONDED SEAL
RS41TE AUTOMATIC TRANSAXLE21 - 175
41TE AUTOMATIC TRANSAXLE (Continued)
Page 1638 of 2339
(9) Install low/reverse piston return spring (Fig.
94).
(10) Install low/reverse spring compressor into
position (Fig. 95). Compress low/reverse piston and
install snap ring as shown in (Fig. 96).(11) Install rear carrier bearing cone using Tool
6053 (Fig. 97).
Fig. 94 Low/Reverse Piston Return Spring
1 - LOW/REVERSE PISTON RETURN SPRING
2 - PISTON
Fig. 95 Compressor Tool in Use
1 - LOW/REVERSE CLUTCH RETURN SPRING
2 - SNAP RING (INSTALL AS SHOWN)
3 - TOOL 6057
4 - TOOL 5059
5 - TOOL 5058±3
Fig. 96 Install Snap Ring
1 - SNAP RING OPENING MUST BE BETWEEN SPRING LEVERS
(AS SHOWN)
2 - SNAP RING PLIERS
3 - TOOL 6057
Fig. 97 Install Rear Carrier Bearing Cone
1 - ARBOR PRESS RAM
2 - TOOL 6053
3 - NEW BEARING CONE
4 - REAR CARRIER ASSEMBLY
RS41TE AUTOMATIC TRANSAXLE21 - 177
41TE AUTOMATIC TRANSAXLE (Continued)
Page 1648 of 2339
(38) Install low/reverse clutch pack (Fig. 123).
Leave uppermost disc out until snap ring is installed.
(39) Install low/reverse reaction plate flat snap
ring (Fig. 124).(40) Install remaining low/reverse clutch disc (Fig.
125).
(41) Install low/reverse reaction plate with flat
side up (Fig. 126).
Fig. 123 Install Low/Reverse Clutch Pack
1 - CLUTCH PLATES (5)
2 - CLUTCH DISCS (5)
Fig. 124 Install Low/Reverse Reaction Plate Snap
Ring
1 - SCREWDRIVER
2 - LOW/REVERSE REACTION PLATE FLAT SNAP RING
3 - DO NOT SCRATCH CLUTCH PLATE
Fig. 125 Install One Disc
1 - ONE DISC FROM LOW/REVERSE CLUTCH
Fig. 126 Install Low/Reverse Reaction Plate
1 - LOW/REVERSE REACTION PLATE (FLAT SIDE UP)
RS41TE AUTOMATIC TRANSAXLE21 - 187
41TE AUTOMATIC TRANSAXLE (Continued)
Page 1649 of 2339

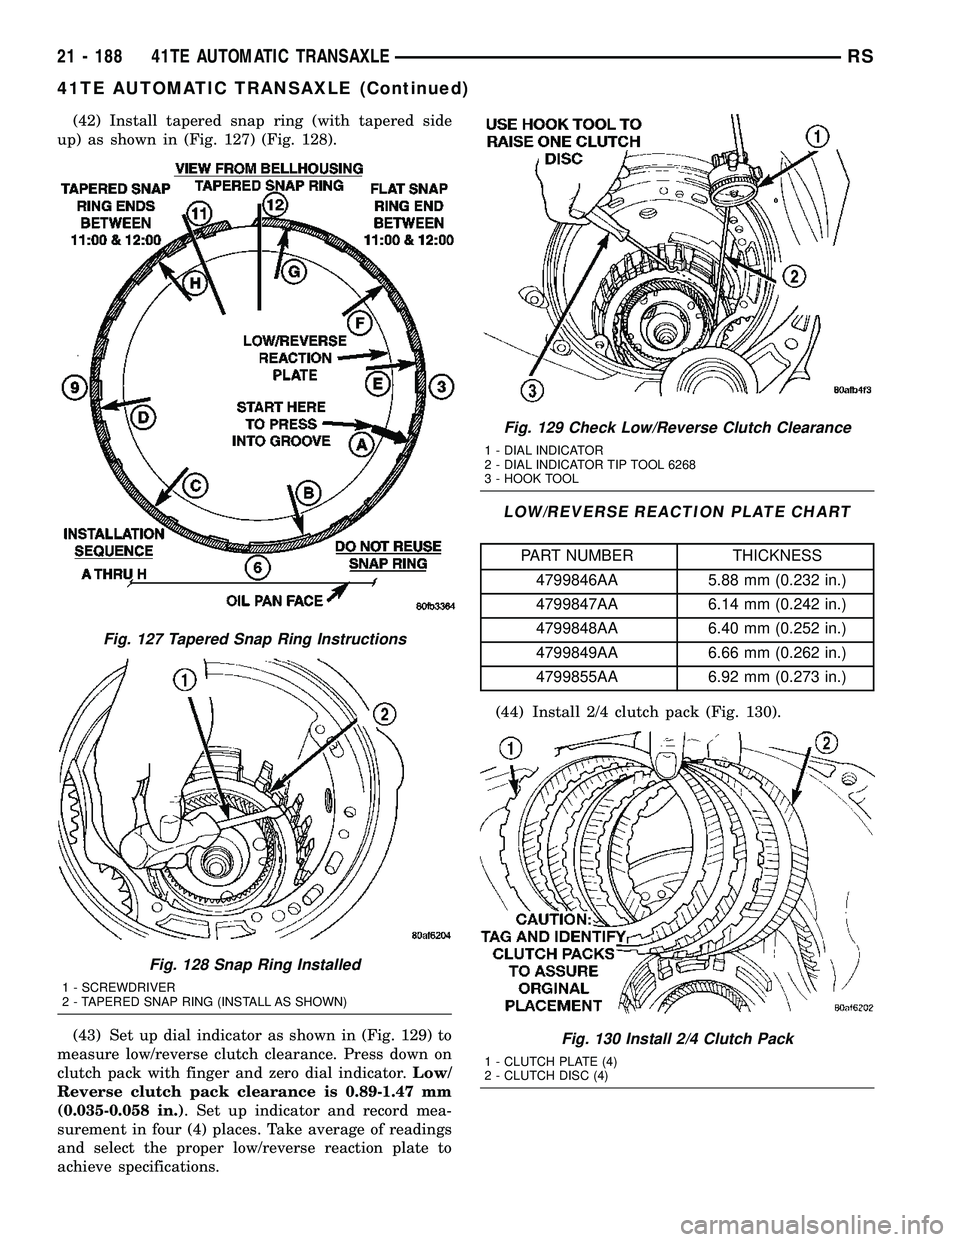
(42) Install tapered snap ring (with tapered side
up) as shown in (Fig. 127) (Fig. 128).
(43) Set up dial indicator as shown in (Fig. 129) to
measure low/reverse clutch clearance. Press down on
clutch pack with finger and zero dial indicator.Low/
Reverse clutch pack clearance is 0.89-1.47 mm
(0.035-0.058 in.). Set up indicator and record mea-
surement in four (4) places. Take average of readings
and select the proper low/reverse reaction plate to
achieve specifications.
LOW/REVERSE REACTION PLATE CHART
PART NUMBER THICKNESS
4799846AA 5.88 mm (0.232 in.)
4799847AA 6.14 mm (0.242 in.)
4799848AA 6.40 mm (0.252 in.)
4799849AA 6.66 mm (0.262 in.)
4799855AA 6.92 mm (0.273 in.)
(44) Install 2/4 clutch pack (Fig. 130).
Fig. 127 Tapered Snap Ring Instructions
Fig. 128 Snap Ring Installed
1 - SCREWDRIVER
2 - TAPERED SNAP RING (INSTALL AS SHOWN)
Fig. 129 Check Low/Reverse Clutch Clearance
1 - DIAL INDICATOR
2 - DIAL INDICATOR TIP TOOL 6268
3 - HOOK TOOL
Fig. 130 Install 2/4 Clutch Pack
1 - CLUTCH PLATE (4)
2 - CLUTCH DISC (4)
21 - 188 41TE AUTOMATIC TRANSAXLERS
41TE AUTOMATIC TRANSAXLE (Continued)