Page 177 of 307

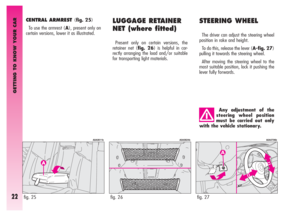
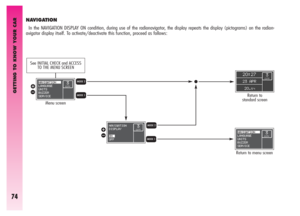
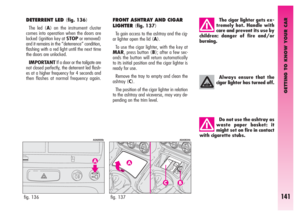
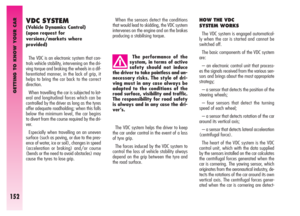
GETTING TO KNOW YOUR CAR
175
Emergency alarm reception
In the RDS mode the radio is set to receive
emergency announcements in the case of
exceptional circumstances or events that
may cause general danger (earthquakes,
floods, etc.) if they are broadcast by the sta-
tion tuned.
This function is activated automatically and
cannot be deactivated.
Program Type Function (PTY)
(selecting a type
of programme)
To turn on the PTY function, which makes
it possible to give top priority to PTY pro-
grammes, when present, which may involve
emergency messages or various topics (e.g.
music, news bulletins) briefly press the
“PTY” button (2) until the display shows
“PTY” and the subject of the last station
heard (e.g. “NEWS”).
IMPORTANTTo turn on the PTY func-
tion, the radio must be in the FM band.
If the station does not broadcast in the PTY
mode, the wording “NO-PTY” is shown
on the display for 5 seconds.
After 2 seconds the station name or fre-
quency is shown on the display.The list of the various subjects comprises:
NEWS
AFFAIRS
INFO
SPORT
EDUCATE
DRAMA
CULTURE
SCIENCE
VARIED
POP M
ROCK M
M,O,R,MMiddle of the Road Music
LIGHT M
CLASSICS
OTHER M
To change the type of PTY programme
press “
¯¯” (4) or “˙˙” (7) or one of
the 6 preset buttons. If the display shows
the station frequency or name, pressing
“
¯¯” (4) or “˙˙” (7) the current type
of programme will be displayed.To store the current type of programme on
one of the 6 preset buttons, give a pro-
longed press (over 1 second) on the pre-
set button. Storage is confirmed by a
“beep”. To seek a station with this pro-
gramme see the “Automatic tuning” and
“Scanning stations (Scan function)” para-
graphs.
If no station is available with this type of
programme the system sounds a “beep”,
the station selected previously is heard and
for 2 seconds the display shows the word-
ing “NO-PTY”.
To turn the PTY function off briefly press
the “PTY” (2) button again.
Page 178 of 307

GETTING TO KNOW YOUR CAR
176
Controlling the station type of
PTY programme
To know the type of PTY programme of
the station heard keep the “PTY” button
(2) pressed until a “beep” is heard. After
the “beep” the display will show the type
of programme (see previous paragraph) of-
fered by the station tuned. If the station has
no PTY code the display will show the word-
ing “NO-PTY”. After about 5 seconds the
display will again show the RDS name or
frequency of the station tuned.
EON function
(Enhanced Other Network)
Some countries have circuits which group
together several stations enabled to broad-
cast traffic information. In this case the pro-
gramme of the station being heard will be
interrupted temporarily to receive traffic in-
formation (only with the TA function on),
every time these bulletins are given by one
of the stations of the same circuit. Scrolling transmissions
It is possible to receive different pro-
grammes in the same network and scroll
them (in FM band only) - e.g.: NDR1,
NDR2, NDR3, NDR4, N-JOY...
To turn on this function, briefly press the
“AF-TA” button (1) to turn on the AF func-
tion. The user can then start scrolling press-
ing “
˙˙” (7) or “¯¯” (4).
IMPORTANTThe station must have
been received previously at least once.
Stereophonic stations
If the signal received is weak, the device
switches automatically from Stereo to Mono.
MENU(fig. 154)
Functions of “MENU” button (9)
To turn on the Menu function briefly press
(less than 1 second) the “MENU” button
(9). The display will show the word
“MENU”.
To scroll the Menu functions use “
▲” (6)
or “
▼” (8). To turn on/off the function se-
lected use “
˙˙” (7) or “¯¯” (4).
The display will show the current status
of the function selected.
The functions controlled by the menu are
the following:
–EQ SET(Equalizer settings, only if the
equalizer is on)
–PRESET/USER/CLASSIC/
ROCK/JAZZ(Turning on/off and choos-
ing predefined equalizer adjustments)
–HICUT(Treble reduction)
–PHONE(Volume of phone, if installed)
–CD NAME(Allocation of CD names,
only with CD inserted)
–SVC(Automatic volume control in re-
lation to speed) (excluding versions with
HI-FI BOSE sound system)
Page 179 of 307

GETTING TO KNOW YOUR CAR
177
–SENS DX/LO(Tuning sensitivity)
–CD(CD display setting)
–CDC(CD-Changer display setting, if in-
stalled)
–REG(Regional programmes).
To exit the Menu function, press the
“MENU” button again (9).
IGN TIME function (switching off
mode)
This function enables to set radio switch-
ing off in two different modes. To turn this
function on/off, use buttons 4 (
˜) or 7
(
÷).
The display will show the selected mode:
– “00 MIN”: deactivation dependent of
ignition key. The radio will switch off auto-
matically as soon as the ignition key is
turned to STOP;
– “20 MIN”: deactivation independent of
ignition key. The radio will stay on for max.
20 minutes after turning the ignition key
toSTOP.IMPORTANTShould the radio turn off
automatically after turning the ignition key
toSTOP(for the immediate or 20-minute
delayed deactivation), it will turn on auto-
matically turning the ignition key to MAR.
If the radio is turned off by pressing the
knob/button20(VOLUME ON/OFF),
when turning the key toMARthe radio will
stay off.
Turning the equalizer on/off
(excluding versions with HI-FI
BOSE sound system)
The integrated equalizer can be turned on
or off. With the equalizer off, it is possible
to change the sound settings only adjust-
ing the bass (“BASS”) and treble tones
(“TREBLE”), while activating the function
makes it possible to adjust the sound curves.
To turn the equalizer off, select “PRE-
SET” with “
▲” (6) or “▼” (8).To turn the equalizer on, select one of the
following with “
▲” (6) o “▼” (8):
– “USER” (adjustment of the 7 equal-
izer bands that can be changed by the user)
– “CLASSIC” (predefined equalizer ad-
justment)
– “ROCK” (predefined equalizer adjust-
ment)
– “JAZZ” (predefined equalizer adjust-
ment).
After selecting the last adjustment set in
the Menu using “
▲” (6) or “▼” (8), use
“
˙˙” (7) or “¯¯” (4) to change it.
When one of the equalizer settings in on,
the display shows “EQ”.
On versions with BOSE HI-FI system, ana-
logue equalizing in amplitude and phase of
the signal is done automatically by the am-
plifier.
Page 180 of 307

GETTING TO KNOW YOUR CAR
178
Equalizer settings
(only if the equalizer is on)
To set a personal equalizer adjustment use
“
▲” (6) or “▼” (8) “USER”; the display
shows “EQ SET”.
To change the equalizer settings, use
“
˙˙” (7) or “¯¯” (4). The display
shows a graph with 7 bars, where each bar
represents a frequency for the left or right
channel. Choose the bar to be adjusted us-
ing “
˙˙” (7) or “¯¯” (4); the bar cho-
sen starts to flash and it is possible to adjust
using “
▲” (6) or “▼” (8).
To store new settings, press the “MENU”
button again (9). The display still shows
“EQ SET”.Treble tone reduction function
(HICUT)
Using this function it is possible to reduce
the treble tones, in accordance with the sig-
nal transmitted. To turn this function on/off,
use “
¯¯” (4) or “˙˙” (7).
The display will show the current status
of the function:
– “HICUT ON”: function on
– “NO HICUT”: function off.
Phone volume adjustment
function (PHONE)
With this function it is possible to adjust
(setting from 1 to 66) or cut off (OFF set-
ting) the telephone sound.
To turn on/off, use “
¯¯” (4) or “˙˙”
(7).
To adjust the sound, use “VOL+” (21)
or “VOL-” (19).
The display will show the current status of
the function:
– “PHONE 23”: function on with vol-
ume setting 23
– “PHONE OFF”: function off.Allocating a name to a CD
(CD NAME)
This function can be chosen only if a Com-
pact Disc is inserted. To turn on, use “
¯¯”
(4) or “
˙˙” (7): the display will show
“CD-NAME”. If the CD already has a
name, this will be shown on the display, if
not, eight dashes will be shown. If storage
is no longer available for a new name, the
display will show the first name stored.
To change the name or give a name to the
new CD press “
¯¯” (4) or “˙˙” (7).
Press the buttons again to choose the posi-
tion of the character to be changed. Press
“
▲” (6) or “▼” (8) to choose or change
the character.
To store the name, press the “MENU”
button again (9). The display will show
“CD-NAME”.
To clear a name, turn the function on and
press “
▲” (6) or “▼” (8) to choose the
name to be cleared, then press the
“MENU” (9) button for about 2 seconds.
The system beeps and the display shows
“ONE CLR” for about 2 seconds. At this
point the procedure can be started to give a
new name.
Page 181 of 307

GETTING TO KNOW YOUR CAR
179
To clear all the names, turn the function
on and keep the “MENU” (9) button
pressed for about 4 seconds. The set gives
two beeps and the display shows “ALL
CLR” for about 2 seconds. At this point it
is possible to start the name allocation pro-
cedure.
Volume changing with speed
function (SVC) (excluding
versions with HI-FI BOSE sound
system)
The SVC function makes it possible to au-
tomatically adapt the volume level to the
speed of the car, increasing it as the speed
increases to maintain the ratio with the noise
level inside the passenger compartment.
To turn the function on/off use “
¯¯” (4)
or “
˙˙” (7). The display will show the cur-
rent status of the function:
– “SVC-ON”: function on
– “SVC-OFF”: function off.Tuner sensitivity
adjustment (SENS DX/LO)
With this function it is possible to change
the sensitivity of automatic station search-
ing. When low sensitivity is set “SENS-
LO” only stations with excellent reception
are sought, when high sensitivity is set
“SENS-DX” all stations are sought. There-
fore, if the car is in an area with a consid-
erable number of stations and you want to
choose only those with a strong signal, set
to low sensitivity “SENS-LO”.
To set the sensitivity, use “
¯¯” (4) or
“
˙˙” (7). The display will show the cur-
rent status of the function:
– “SENS-LO”: low sensitivity
– “SENS-DX”: high sensitivity.Compact Disc data display
function (CD)
With this function it is possible to choose
the information shown by the display, when
listening to a Compact Disc.
Two settings are available:
–TIME(time elapsed since the start of
the track)
–NAME(CD name).
After choosing “CD” in the Menu using
“
▲” (6) or “▼” (8), the display shows
“CD-DISP”. To change the setting use
“
¯¯” (4) or “˙˙” (7).
CD-Changer data display
function(CDC)
(if installed)
This function can be chosen only if a CD-
Changer is connected. In this case the dis-
play will show “CDC-DISP”.
To change function, use “
¯¯” (4) or
“
˙˙” (7).
The display shows the setting among the
two possible: “TIME” and “CD-NR”.
Page 182 of 307

GETTING TO KNOW YOUR CAR
180
Regional broadcast reception
function (REG)
Some national broadcasters, at determi-
nate times of the day, transmit regional pro-
grammes which differ from region to region.
This function makes it possible to tune in on-
ly local stations (regional). However if a
regional programme is heard and you wish
to stay tuned to it, the function must be ac-
tivated.
To turn the function on/off, use “
˙˙”
(7) or “
¯¯” (4).
The display will show the current status
of the function:
– “REG-ON”: function on
– “REG-OFF”: function off.
If the function is off and a regional pro-
gramme is tuned that works in a determi-
nate area and the car enters a different area,
the regional station of the new area is re-
ceived.
IMPORTANTWhen the function is off
(“REG-OFF”) and the AF function is on
(alternative frequencies) the radio auto-
matically tunes to the frequency of the se-
lection selected with the strongest signal.
COMPACT DISC PLAYER
(fig. 154)
Selecting the
Compact Disc player
To turn on the Compact Disc player inte-
grated in the set, when a CD is already in-
serted, turn the set on, then briefly and re-
peatedly press the “SRC” button (14) to
select the “CD” operating mode. Inserting
a CD, also with the device off, the CD play-
er is turned on.
Inserting/ejecting a CD
To insert the CD set it gently in place (3)
to activate the powered loading system,
which will position it correctly.
Press “
˚” (5), with the device on, to op-
erate the powered CD eject system.
After ejection, the source heard before play-
ing the CD will return. The CD cannot be
ejected if the device is off.Possible error messages
If the CD inserted is illegible, the display
will show the wording “CD-ERROR”, for
about 2 seconds, then the CD is ejected and
the previous source before the CD was se-
lected returns.
Display information
When the CD player is working, the dis-
play shows information which has the fol-
lowing meaning:
“T05”: shows the number of the track on
the CD
“03:42”: shows the time elapsed since
the start of the track (if the corresponding
Menu function is on)
“MADONNA”: shows the name given
to the CD.
Select track (forward/backward)
Briefly press “
▲” (6) to play the next
track on the CD and “
▼” (8) to play the
previous one.
Page 183 of 307

GETTING TO KNOW YOUR CAR
181
To select tracks continuously,
keep the button pressed.
If playing the track started more than 3
seconds ago, pressing “
▼” (8) the track is
played again from the start. In this case if
wanting to play the previous track, press the
button twice consecutively.
Fast forward/backward
Keep “
˙˙” (7) pressed to move the track
selected forward at high speed and keep
“
¯¯” (4) pressed to move it quickly back-
ward. Fast forward/backward is interrupt-
ed once the button is released.
If the CD name display has been chosen
in the menu, this will be replaced by the
CD time display. After about 2 seconds from
the last time the button is pressed, the CD
name will be displayed again.Pause function
To pause the CD player press the preset
button 3 (15). The display will show “CD-
PAUSE”.
To listen again, press the preset button 3
(15) again.
Scanning pieces on the
CD (Scan function)
With this function it is possible to hear all
the pieces contained on a CD.
Keep the “SRC” button (14) pressed for
over one second to play the first 10 seconds
of each track on the CD. While the track is
playing the display will alternately show, for
2 seconds, the CD function chosen (CD time
or name) and the wording “SCAN”. If the
Scan function is on, Repeat and Mix are
turned off.
The scanning sequence is the following:
– from the track played up to the last one
on the CD
– from the first one on the CD up to the
one played the moment scanning was start-
ed.The Scan function is interrupted in the fol-
lowing cases:
– turning the set off
– pressing the “SRC” button (14) again
to continue listening to the track that was
being played
– pressing “
▲” (6) or “▼” (8) (press-
ing them together the track will be skipped)
– pressing a preset button
– turning Autostore on
– turning PTY on
– changing the sound source
– pressing “AUD” (18)
– if the TA function is on the station se-
lected is broadcasting a traffic bulletin
– pressing “MENU” (9).
If the Scan function is not interrupted, at
the end it will continue playing the track
played before scanning was started.
Page 184 of 307

GETTING TO KNOW YOUR CAR
182
Repeat
Briefly press the preset button 4 (12) to
listen repeatedly to the last track played: for
about 2 seconds the display will show “RPT
TRUCK”.
Press preset button 4 (12) again to turn
off the repeat function: for about 2 seconds
the display will show“RPT OFF”. When
the function is on the display shows “RPT”.
Changing the sound source, the function
is turned off.
IMPORTANTWhen the repeat function
is turned on, the Scan and Mix functions are
turned off. Random playing (MIX function)
To start the random playing of tracks on
the Compact Disc, press the preset button 5
(11). A new track will be played and for
about 2 seconds the display will show “CD-
MIX-ON”. Press the preset button 5 (11)
again to turn the function off: for about 2
seconds the display will show “CD-MIX-
OFF”.
When the Mix function is on, all the tracks
on the CD are played in random sequence.
Changing the sound source, the function
is turned off.
IMPORTANTWhen The Mix function is
turned on, Scan and Repeat are turned off. TPM function (CD playing
sequence storage)
With the TPM function (Track Program
Memory) it is possible to store the sequence
for playing tracks of a CD, to be able to play
them later in the sequence set.
To turn the function on briefly press (less
than 1 second) the preset button 1 (17),
while listening to a CD. When the function
is on, the display shows “TPM”.
To store tracks, select the track required,
then press the preset button 1 (17) for
about 1 second, until hearing the beep; the
display will show “STORED”. Repeat this
procedure for all the other tracks to be stored.