Page 169 of 243

To thoroughly f lush the transmission,
the technician should drain and ref ill
it with Honda ATF-Z1, then drive the
vehicle f or a short distance. Do this
three times. Then drain and ref ill the
transmission a f inal time.Insert the dipstick all the way back
into the transmission securely as
shown in the illustration.
The transmission should be drained
and ref illed with new f luid according
to the time and distance recommen-
dations in the maintenance schedule.
If youarenotsurehowtoaddfluid,
contact your dealer.
If the level is below the lower
mark, remove the f ill plug and add
f luid to bring it to the upper mark.
Pour the f luid slowly and caref ully
so you do not spill. Clean up any
spill immediately; it could damage
components in the engine
compartment.
Always use Honda ATF-Z1
(Automatic Transmission Fluid). If
it’s not available, you may use a
DEXRON
III automatic
transmission f luid as a temporary
replacement. However, continued
use can affect the shift quality. Have
the transmission f lushed and ref illed
with Honda ATF-Z1 as soon as it is
convenient.
Insert the dipstick all the way into
the transmission securely.
Remove the dipstick and check
the f luid level. It should be
between the upper and lower
marks. 6.
5.
3.
4.
Automatic Transmission Fluid
168
UPPER
MARK
LOWER
MARK
Page 170 of 243

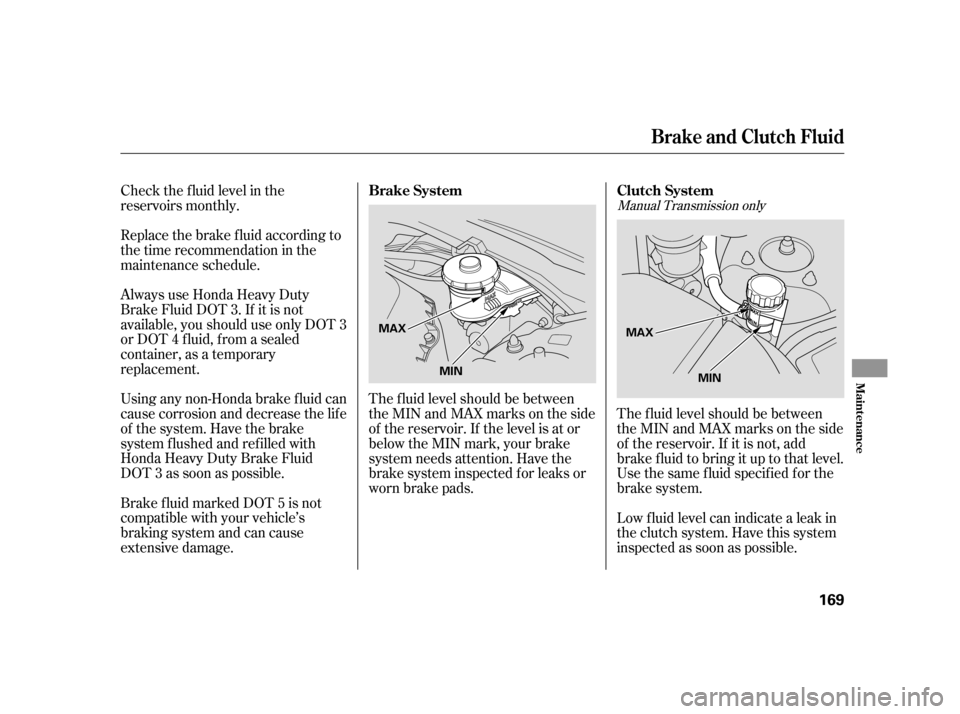
Check the f luid level in the
reservoirs monthly.
Replace the brake f luid according to
the time recommendation in the
maintenance schedule.
Always use Honda Heavy Duty
Brake Fluid DOT 3. If it is not
available, you should use only DOT 3
or DOT 4 f luid, f rom a sealed
container, as a temporary
replacement.
Using any non-Honda brake f luid can
cause corrosion and decrease the lif e
of the system. Have the brake
system f lushed and ref illed with
Honda Heavy Duty Brake Fluid
DOT 3 as soon as possible.
Brake f luid marked DOT 5 is not
compatible with your vehicle’s
braking system and can cause
extensive damage.The f luid level should be between
theMINandMAXmarksontheside
of the reservoir. If the level is at or
below the MIN mark, your brake
system needs attention. Have the
brake system inspected f or leaks or
worn brake pads.
The f luid level should be between
theMINandMAXmarksontheside
of the reservoir. If it is not, add
brake f luid to bring it up to that level.
Use the same fluid specified for the
brake system.
Low f luid level can indicate a leak in
the clutch system. Have this system
inspected as soon as possible.
Manual Transmission only
Brake and Clutch Fluid
Brake System
Clutch System
Maint enance
169
MAX
MIN MAX
MIN
Page 171 of 243
An auto-tensioner adjusts the tension
of the drive belt. The indicator on
the auto-tensioner should be in the
proper range. It should be checked
accordingtothetimeanddistance
recommendations in the
maintenance schedule.If the indicator is not within the
proper range, have the drive belt
replaced by your dealer as soon as
possible.
Drive Belts
Drive Belts
170
INDICATOR
Proper range
Page 172 of 243

Check the level on the side of the
reservoir when the engine is cold.
The f luid should be between the
UPPER LEVEL and LOWER LEVEL.
If not add power steering f luid to the
UPPER LEVEL mark.
Pour the f luid slowly and caref ully so
you do not spill. Clean up any spill
immediately; it could damage
components in the engine
compartment.A low power steering f luid level can
indicate a leak in the system. Check
the f luid level f requently, and have
the system inspected as soon as
possible. Always use Honda Power Steering
Fluid. You may use another power
steering f luid as an emergency
replacement, but have the power
steering system f lushed and ref illed
with Honda PSF as soon as possible.
Power Steering Fluid
Maint enance
171
UPPER LEVEL
LOWER LEVEL
Do not spill the power steering f luid
over the body, auto-tensioner, drive
belt and pulleys.
If spilled accidentally, wipe of f any
f luid completely. T urning the steering wheel to f ull lef t
or right lock and holding it there can
damage the power steering pump.
Page 173 of 243
Theheadlightswereproperlyaimed
when your vehicle was new. If you
regularly carry heavy items in the
cargo area or pull a trailer,
readjustment may be required.
Adjustment should be done by your
dealer or other qualif ied mechanic.Your vehicle uses halogen headlight
bulbs. When replacing a bulb, handle
it by its plastic case and protect the
glass from contact with your skin or
hard objects. If you touch the glass,
clean it with denatured alcohol and a
clean cloth.
If you need to change the low
beam headlight bulb on the driver’s
side, remove the neck of the
windshield washer reservoir f rom
the bracket by sliding it to the lef t.
1.
Lights
Headlight A iming
Replacing a Headlight BulbReplacing a Low Beam Headlight
Bulb
172
Driver’s side
Halogen headlight bulbs get very hot
when lit. Oil, perspiration, or a scratch
on the glass can cause the bulb to
overheat and shatter.
Page 174 of 243

Insert the new bulb into the hole,
making sure the tabs are in their
slots. Pivot the hold-down wire
back in place, and clip the end into
the slot.
Install the rubber seal and make
sure it is right side up; it is marked
‘‘TOP.’’
Pull the battery back to its original
position, then install the bolt in the
hold-down, and tighten it securely. Push the electrical connector onto
the tabs of the new bulb. Make
sureitlocksinplace.Turnonthe
headlights to test the new bulb.
Install the neck of the windshield
washer reservoir on the bracket.
Then remove the bolt f rom the
battery hold-down, and caref ully
push the battery toward the
windshield to obtain enough
working space.
Unclip the end of the hold-down
wire f rom its slot. Pivot it out of
the way, and remove the bulb. Remove the rubber weather seal
by pulling on the tab. Remove the electrical connector
f rom the bulb by pulling the
connector straight back.
3.
4. 5.
6.
7.
8.
2.
Lights
Driver’s Side
Maint enance
173
HOLD DOWN
WIRE
BULB
WEATHER SEAL
CONNECTOR
Page 175 of 243
To change a high beam headlight
bulb, remove the electrical
connector f rom the bulb by
pushing on the tab and pulling the
connector down.
Remove the bulb by turning it one-
quarter turn counterclockwise.Insert the new bulb into the hole
and turn it one-quarter turn clock-
wise to lock it in place.
Push the electrical connector back
onto the bulb. Make sure it is on
all the way.
Turn on the headlights to test the
new bulb.
Remove the socket from the
headlight assembly by turning it
one-quarter turn counterclockwise.
Pull the bulb straight out of its
socket. Push the new bulb straight
into the socket until it bottoms.
3.
4.
5.
2. 1. 2. 1.
Lights
Replacing a Front T urn Signal
BulbReplacing a High Beam HeadlightBulb
174
Page 176 of 243
Insert the socket into the
headlight assembly. Turn it
clockwise to lock it in place.
Testthelightstomakesurethe
new bulb is working.Remove the socket from the
headlight assembly by turning it
one-quarter turn counterclockwise.Pull the bulb straight out of its
socket. Push the new bulb straight
into the socket until it bottoms.
Insert the socket back into the
headlight assembly. Turn it
clockwise to lock it in place.
Turn on the parking lights and
check that the new bulb is
working.
The f ront parking light bulb is
above the high beam headlight
bulb.
3.
4.
1.2.
3.
4.
Lights
Replacing a Front Parking Light
Bulb
Maint enance
175