Page 81 of 136
A09514
Front Mark
(Protrusion)
A09493
90�
90�
A09490
Front
Painted Mark
A09495
± ENGINE MECHANICALCYLINDER BLOCK (1CD±FTV)
14±41
1CD±FTV ENGINE REPAIR MANUAL (RM927E)
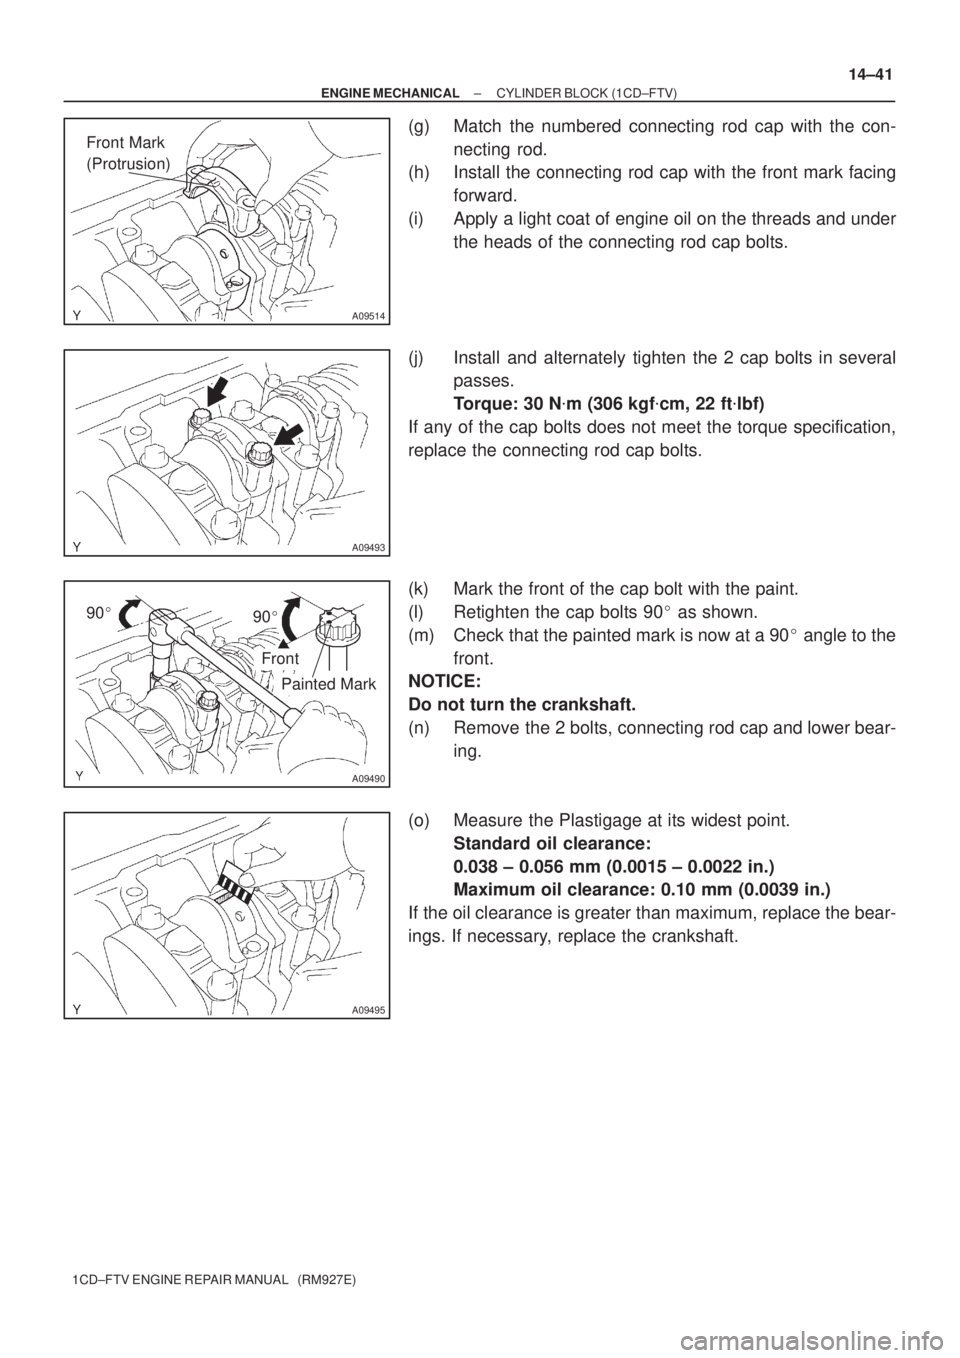
(g) Match the numbered connecting rod cap with the con-
necting rod.
(h) Install the connecting rod cap with the front mark facing
forward.
(i) Apply a light coat of engine oil on the threads and under
the heads of the connecting rod cap bolts.
(j) Install and alternately tighten the 2 cap bolts in several
passes.
Torque: 30 N�m (306 kgf�cm, 22 ft�lbf)
If any of the cap bolts does not meet the torque specification,
replace the connecting rod cap bolts.
(k) Mark the front of the cap bolt with the paint.
(l) Retighten the cap bolts 90� as shown.
(m) Check that the painted mark is now at a 90� angle to the
front.
NOTICE:
Do not turn the crankshaft.
(n) Remove the 2 bolts, connecting rod cap and lower bear-
ing.
(o) Measure the Plastigage at its widest point.
Standard oil clearance:
0.038 ± 0.056 mm (0.0015 ± 0.0022 in.)
Maximum oil clearance: 0.10 mm (0.0039 in.)
If the oil clearance is greater than maximum, replace the bear-
ings. If necessary, replace the crankshaft.
Page 82 of 136
A09472
No.1
No.2
No.3
No.4
Mark
0,1 or 2Mark
1, 2, 3, 4 or 5Mark
1, 2 or 3
A56037
Ridge reamer
14±42
± ENGINE MECHANICALCYLINDER BLOCK (1CD±FTV)
1CD±FTV ENGINE REPAIR MANUAL (RM927E)
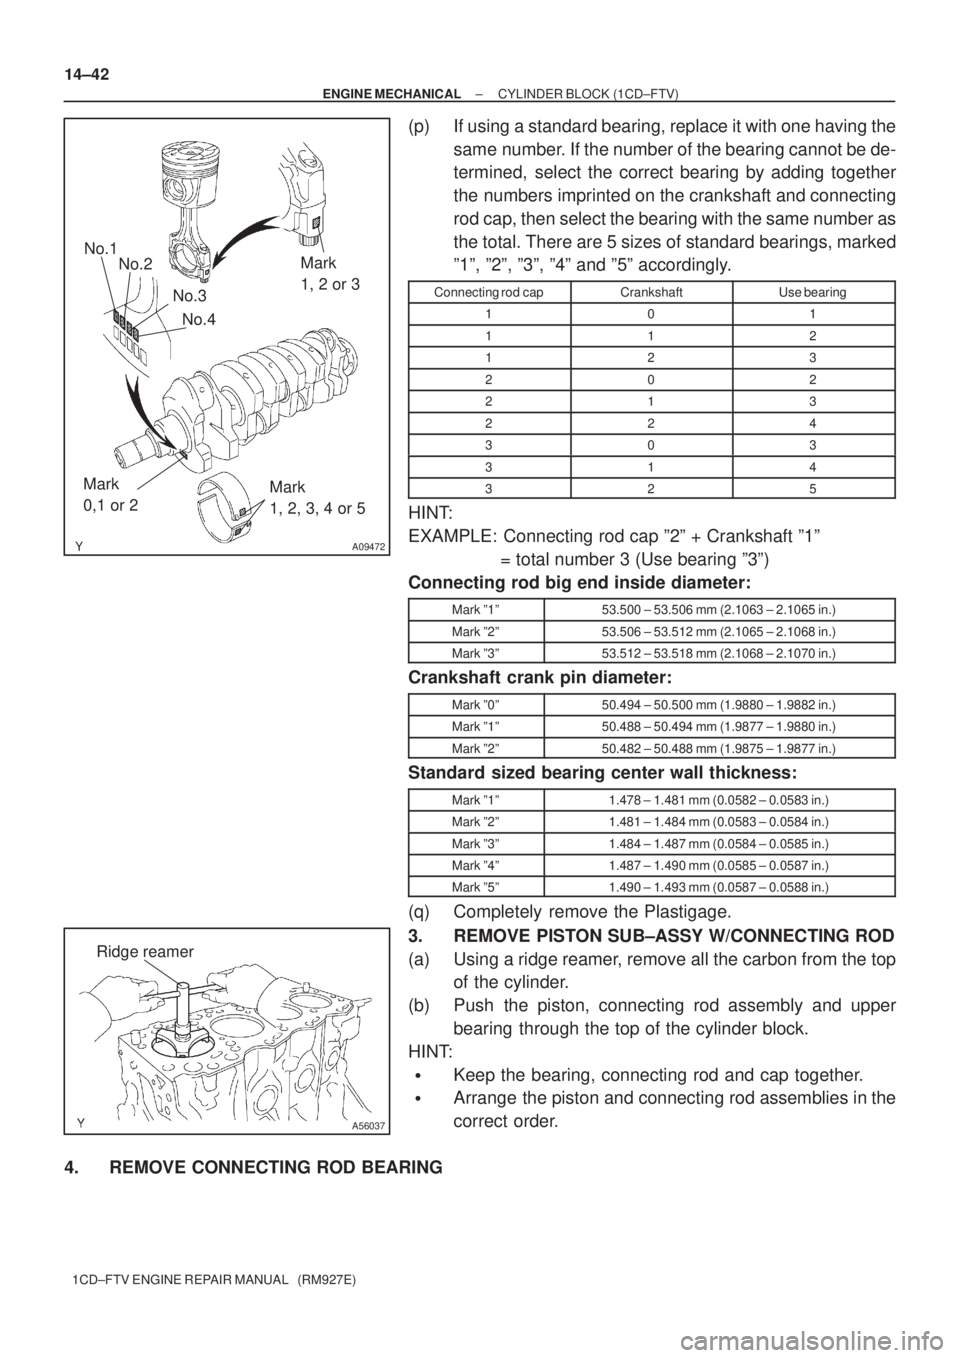
(p) If using a standard bearing, replace it with one having the
same number. If the number of the bearing cannot be de-
termined, select the correct bearing by adding together
the numbers imprinted on the crankshaft and connecting
rod cap, then select the bearing with the same number as
the total. There are 5 sizes of standard bearings, marked
º1º, º2º, º3º, º4º and º5º accordingly.
Connecting rod capCrankshaftUse bearing
101
112
123
202
213
224
303
314
325
HINT:
EXAMPLE: Connecting rod cap º2º + Crankshaft º1º
= total number 3 (Use bearing º3º)
Connecting rod big end inside diameter:
Mark º1º53.500 ± 53.506 mm (2.1063 ± 2.1065 in.)
Mark º2º53.506 ± 53.512 mm (2.1065 ± 2.1068 in.)
Mark º3º53.512 ± 53.518 mm (2.1068 ± 2.1070 in.)
Crankshaft crank pin diameter:
Mark º0º50.494 ± 50.500 mm (1.9880 ± 1.9882 in.)
Mark º1º50.488 ± 50.494 mm (1.9877 ± 1.9880 in.)
Mark º2º50.482 ± 50.488 mm (1.9875 ± 1.9877 in.)
Standard sized bearing center wall thickness:
Mark º1º1.478 ± 1.481 mm (0.0582 ± 0.0583 in.)
Mark º2º1.481 ± 1.484 mm (0.0583 ± 0.0584 in.)
Mark º3º1.484 ± 1.487 mm (0.0584 ± 0.0585 in.)
Mark º4º1.487 ± 1.490 mm (0.0585 ± 0.0587 in.)
Mark º5º1.490 ± 1.493 mm (0.0587 ± 0.0588 in.)
(q) Completely remove the Plastigage.
3. REMOVE PISTON SUB±ASSY W/CONNECTING ROD
(a) Using a ridge reamer, remove all the carbon from the top
of the cylinder.
(b) Push the piston, connecting rod assembly and upper
bearing through the top of the cylinder block.
HINT:
�Keep the bearing, connecting rod and cap together.
�Arrange the piston and connecting rod assemblies in the
correct order.
4. REMOVE CONNECTING ROD BEARING
Page 83 of 136
A09496
A09497
A08026
A09503
± ENGINE MECHANICALCYLINDER BLOCK (1CD±FTV)
14±43
1CD±FTV ENGINE REPAIR MANUAL (RM927E)
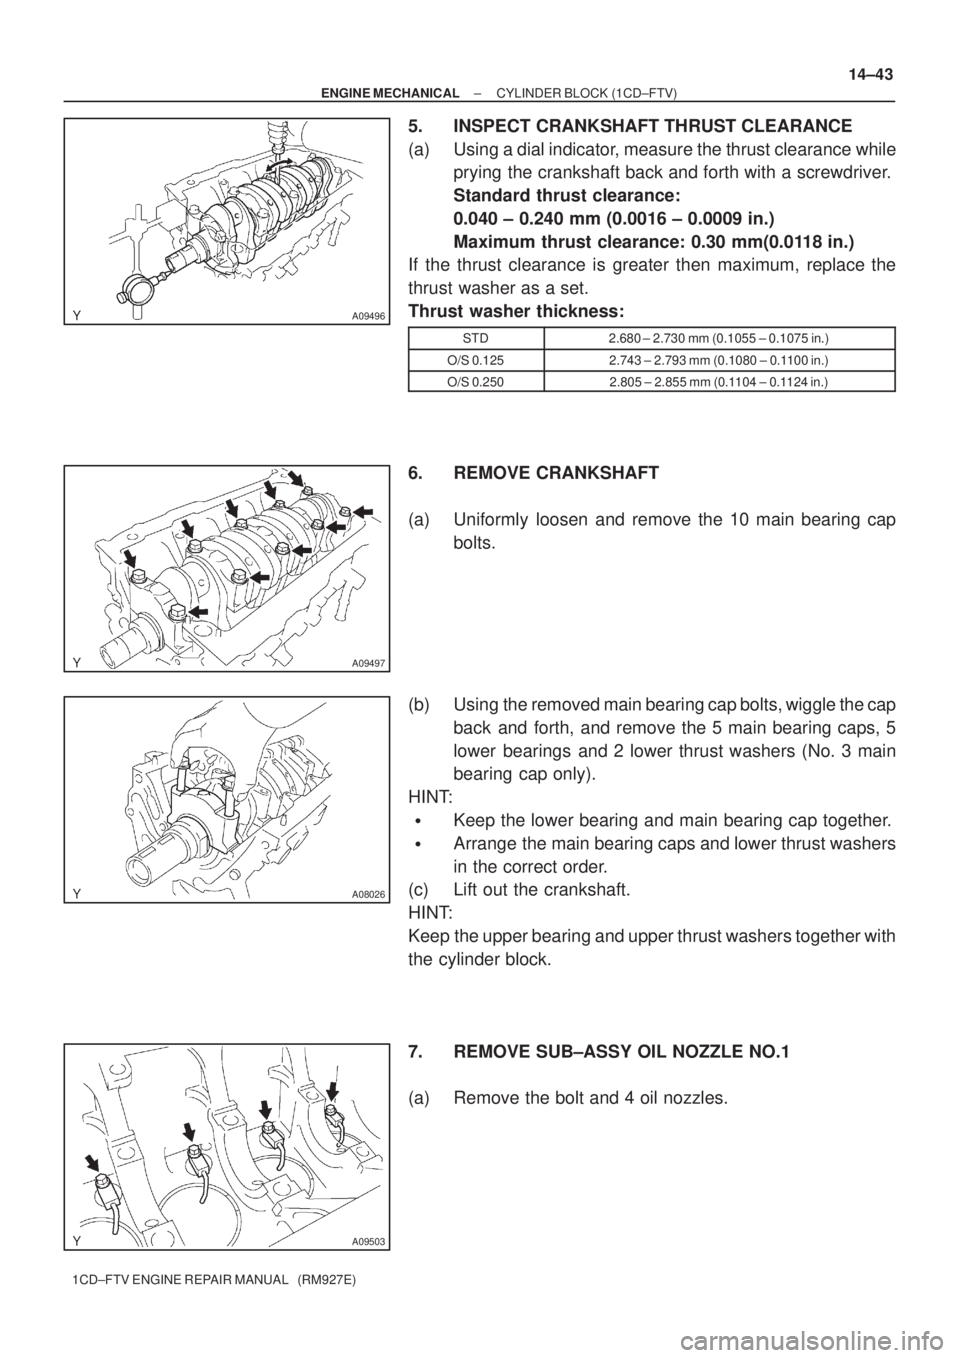
5. INSPECT CRANKSHAFT THRUST CLEARANCE
(a) Using a dial indicator, measure the thrust clearance while
prying the crankshaft back and forth with a screwdriver.
Standard thrust clearance:
0.040 ± 0.240 mm (0.0016 ± 0.0009 in.)
Maximum thrust clearance: 0.30 mm(0.0118 in.)
If the thrust clearance is greater then maximum, replace the
thrust washer as a set.
Thrust washer thickness:
STD2.680 ± 2.730 mm (0.1055 ± 0.1075 in.)
O/S 0.1252.743 ± 2.793 mm (0.1080 ± 0.1100 in.)
O/S 0.2502.805 ± 2.855 mm (0.1104 ± 0.1124 in.)
6. REMOVE CRANKSHAFT
(a) Uniformly loosen and remove the 10 main bearing cap
bolts.
(b) Using the removed main bearing cap bolts, wiggle the cap
back and forth, and remove the 5 main bearing caps, 5
lower bearings and 2 lower thrust washers (No. 3 main
bearing cap only).
HINT:
�Keep the lower bearing and main bearing cap together.
�Arrange the main bearing caps and lower thrust washers
in the correct order.
(c) Lift out the crankshaft.
HINT:
Keep the upper bearing and upper thrust washers together with
the cylinder block.
7. REMOVE SUB±ASSY OIL NOZZLE NO.1
(a) Remove the bolt and 4 oil nozzles.
Page 84 of 136
A09473
Hexagon
Wrench (6 mm)
A09457
A09502
A09501
14±44
± ENGINE MECHANICALCYLINDER BLOCK (1CD±FTV)
1CD±FTV ENGINE REPAIR MANUAL (RM927E)
8. REMOVE CYLINDER BLOCK OIL ORIFICE
(a) Using a hexagon wrench (6 mm), remove the oil orifice.
9. REMOVE PISTON RING SET
(a) Using a piston ring expander, remove the No. 1 piston
ring, No. 2 piston ring and oil ring.
NOTICE:
Make the expansion of the piston ring as small as neces-
sary.
(b) Remove the coil by hand.
HINT:
Arrange the piston rings in correct order.
10. REMOVE W/PIN PISTON SUB±ASSY
(a) Using a small screwdriver, pry off the snap rings from the
piston.
(b) Gradually heat the piston to approx. 60�C (140�F).
(c) Using a plastic±faced hammer and brass bar, lightly tap
out the piston pin and remove the connecting rod.
HINT:
�The piston and pin are a matched set.
�Arrange the pistons, pins, rings, connecting rods and
bearings in the correct order.
Page 85 of 136
A09453
10mm
(0.39 in)
10mm
(0.39 in)
A09455
1
2 Front
Thrust
Direction
Axial
Direction1
2
A
B
C
14mm
A09465
± ENGINE MECHANICALCYLINDER BLOCK (1CD±FTV)
14±45
1CD±FTV ENGINE REPAIR MANUAL (RM927E)
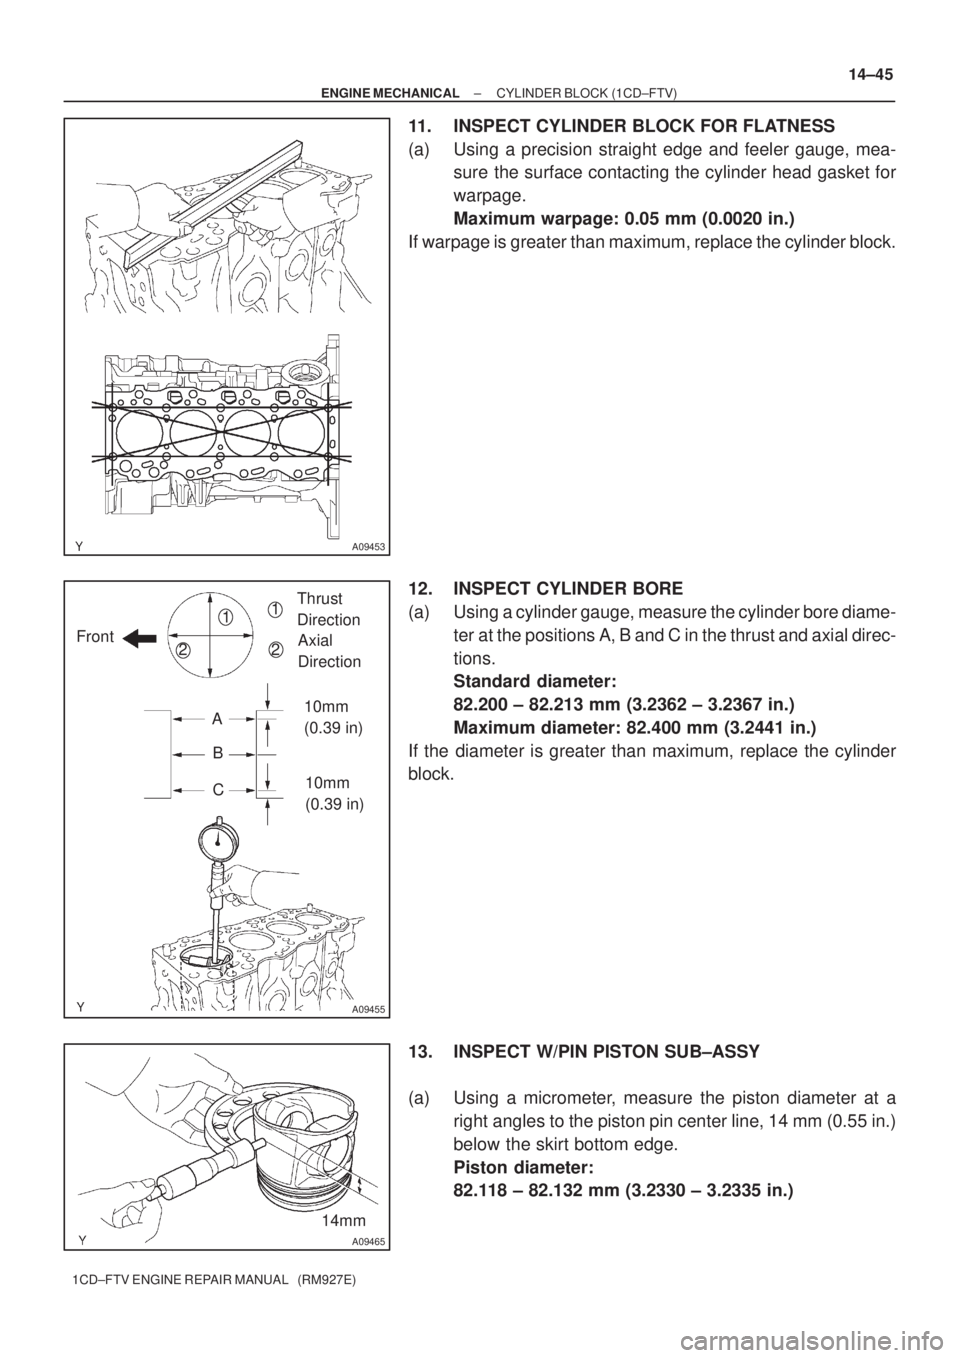
11. INSPECT CYLINDER BLOCK FOR FLATNESS
(a) Using a precision straight edge and feeler gauge, mea-
sure the surface contacting the cylinder head gasket for
warpage.
Maximum warpage: 0.05 mm (0.0020 in.)
If warpage is greater than maximum, replace the cylinder block.
12. INSPECT CYLINDER BORE
(a) Using a cylinder gauge, measure the cylinder bore diame-
ter at the positions A, B and C in the thrust and axial direc-
tions.
Standard diameter:
82.200 ± 82.213 mm (3.2362 ± 3.2367 in.)
Maximum diameter: 82.400 mm (3.2441 in.)
If the diameter is greater than maximum, replace the cylinder
block.
13. INSPECT W/PIN PISTON SUB±ASSY
(a) Using a micrometer, measure the piston diameter at a
right angles to the piston pin center line, 14 mm (0.55 in.)
below the skirt bottom edge.
Piston diameter:
82.118 ± 82.132 mm (3.2330 ± 3.2335 in.)
Page 86 of 136
A09693
EM0227
14±46
± ENGINE MECHANICALCYLINDER BLOCK (1CD±FTV)
1CD±FTV ENGINE REPAIR MANUAL (RM927E)
(b) Subtract the piston diameter measurement from the cylin-
der bore diameter measurement.
Standard oil clearance:
0.068 ± 0.095 mm (0.0027 ± 0.0037 in.)
Maximum oil clearance: 0.14 mm (0.0055 in.)
If the oil clearance is greater than maximum, replace all the 4
pistons. If necessary, replace the cylinder block.
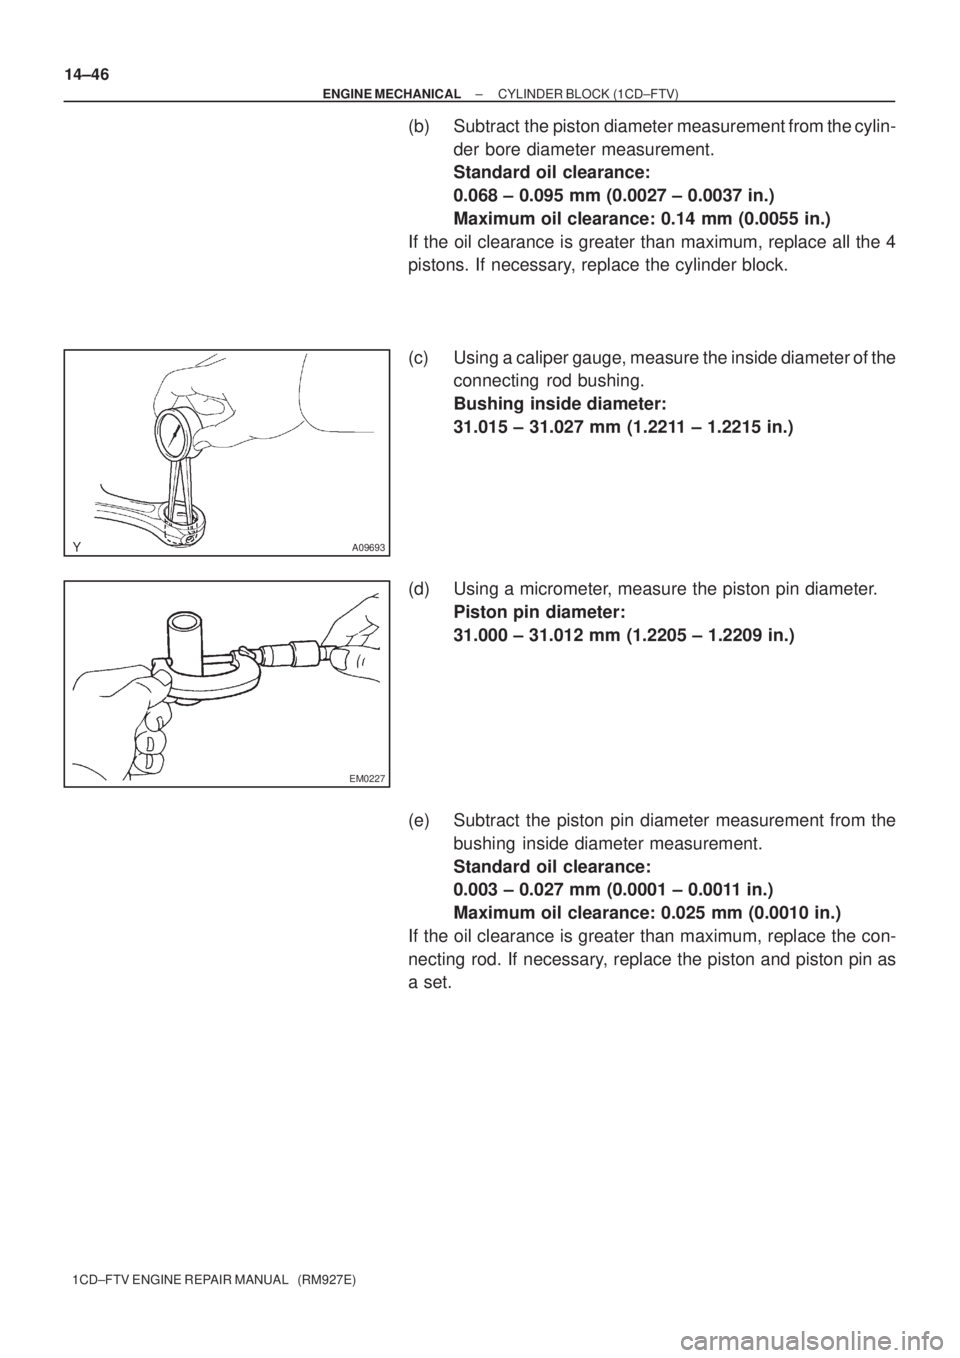
(c) Using a caliper gauge, measure the inside diameter of the
connecting rod bushing.
Bushing inside diameter:
31.015 ± 31.027 mm (1.2211 ± 1.2215 in.)
(d) Using a micrometer, measure the piston pin diameter.
Piston pin diameter:
31.000 ± 31.012 mm (1.2205 ± 1.2209 in.)
(e) Subtract the piston pin diameter measurement from the
bushing inside diameter measurement.
Standard oil clearance:
0.003 ± 0.027 mm (0.0001 ± 0.0011 in.)
Maximum oil clearance: 0.025 mm (0.0010 in.)
If the oil clearance is greater than maximum, replace the con-
necting rod. If necessary, replace the piston and piston pin as
a set.
Page 87 of 136
Z00064
Z00065
A09462
110mm
A09464
± ENGINE MECHANICALCYLINDER BLOCK (1CD±FTV)
14±47
1CD±FTV ENGINE REPAIR MANUAL (RM927E)
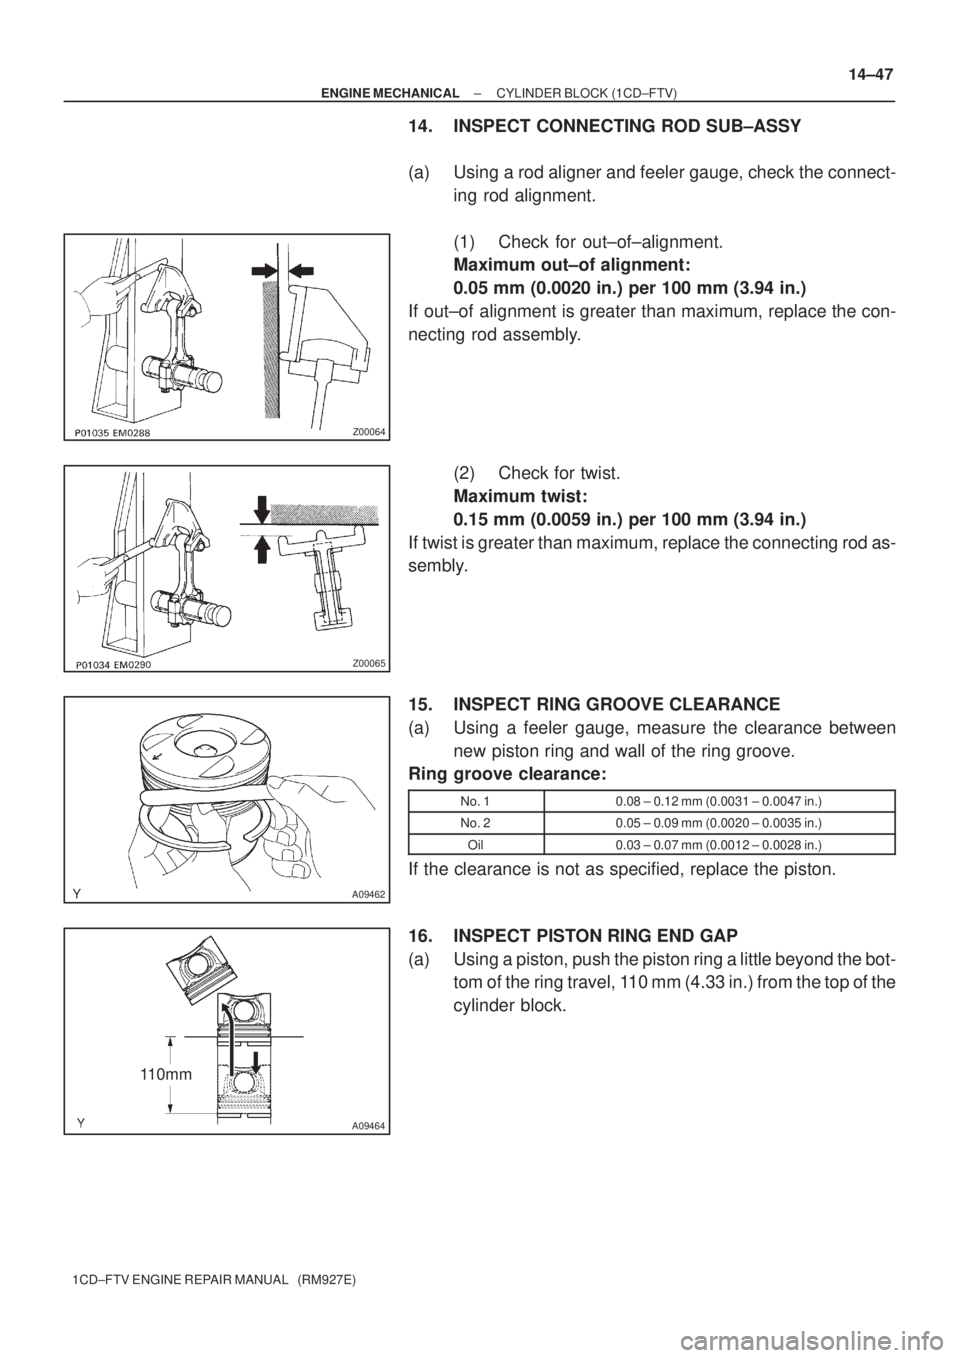
14. INSPECT CONNECTING ROD SUB±ASSY
(a) Using a rod aligner and feeler gauge, check the connect-
ing rod alignment.
(1) Check for out±of±alignment.
Maximum out±of alignment:
0.05 mm (0.0020 in.) per 100 mm (3.94 in.)
If out±of alignment is greater than maximum, replace the con-
necting rod assembly.
(2) Check for twist.
Maximum twist:
0.15 mm (0.0059 in.) per 100 mm (3.94 in.)
If twist is greater than maximum, replace the connecting rod as-
sembly.
15. INSPECT RING GROOVE CLEARANCE
(a) Using a feeler gauge, measure the clearance between
new piston ring and wall of the ring groove.
Ring groove clearance:
No. 10.08 ± 0.12 mm (0.0031 ± 0.0047 in.)
No. 20.05 ± 0.09 mm (0.0020 ± 0.0035 in.)
Oil0.03 ± 0.07 mm (0.0012 ± 0.0028 in.)
If the clearance is not as specified, replace the piston.
16. INSPECT PISTON RING END GAP
(a) Using a piston, push the piston ring a little beyond the bot-
tom of the ring travel, 110 mm (4.33 in.) from the top of the
cylinder block.
Page 88 of 136
EM7639
A09491
20 mm (0.79 in.)
A56040
14±48
± ENGINE MECHANICALCYLINDER BLOCK (1CD±FTV)
1CD±FTV ENGINE REPAIR MANUAL (RM927E)
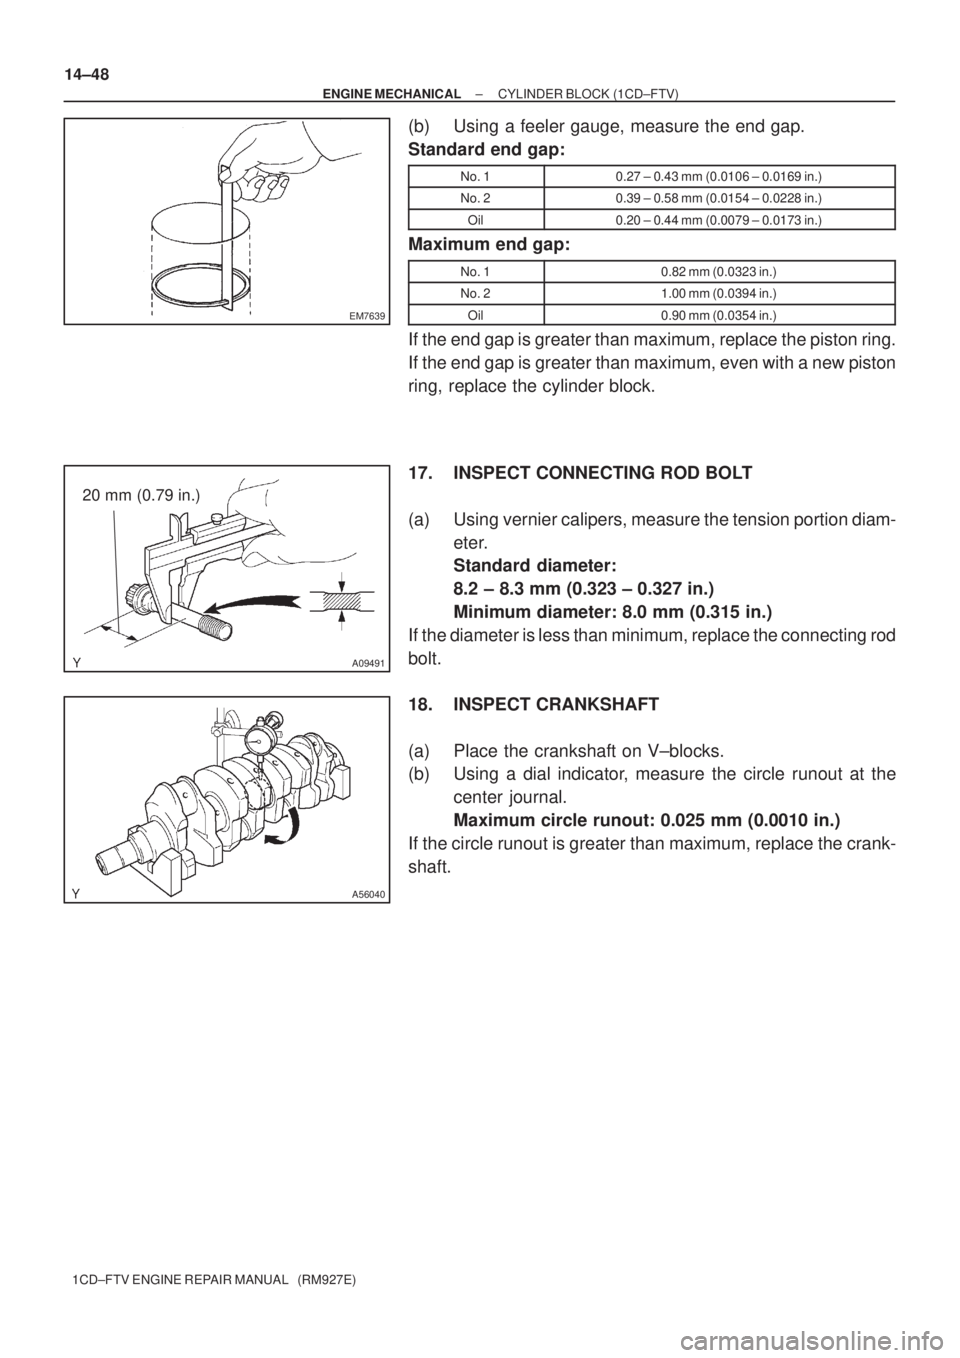
(b) Using a feeler gauge, measure the end gap.
Standard end gap:
No. 10.27 ± 0.43 mm (0.0106 ± 0.0169 in.)
No. 20.39 ± 0.58 mm (0.0154 ± 0.0228 in.)
Oil0.20 ± 0.44 mm (0.0079 ± 0.0173 in.)
Maximum end gap:
No. 10.82 mm (0.0323 in.)
No. 21.00 mm (0.0394 in.)
Oil0.90 mm (0.0354 in.)
If the end gap is greater than maximum, replace the piston ring.
If the end gap is greater than maximum, even with a new piston
ring, replace the cylinder block.
17. INSPECT CONNECTING ROD BOLT
(a) Using vernier calipers, measure the tension portion diam-
eter.
Standard diameter:
8.2 ± 8.3 mm (0.323 ± 0.327 in.)
Minimum diameter: 8.0 mm (0.315 in.)
If the diameter is less than minimum, replace the connecting rod
bolt.
18. INSPECT CRANKSHAFT
(a) Place the crankshaft on V±blocks.
(b) Using a dial indicator, measure the circle runout at the
center journal.
Maximum circle runout: 0.025 mm (0.0010 in.)
If the circle runout is greater than maximum, replace the crank-
shaft.