Page 13 of 122
AVALON_Navi_U (L/O 0408)
5
2004 AVALON Navigation from Aug. ’04 Prod. (OM41413U)
NOTICE
�Make sure the positive side and
negative side of the battery should
be faced correctly.
�Do not replace the battery with wet
hands. Water may cause unexpected
rust.
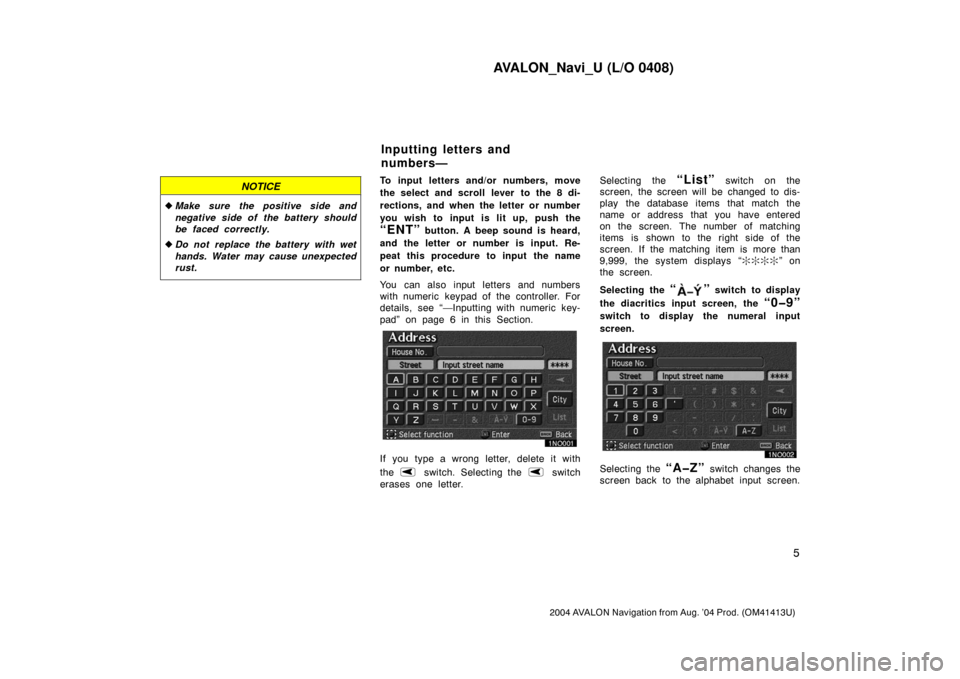
To input letters and/or numbers, move
the select and scroll lever to the 8 di-
rections, and when the letter or number
you wish to input is lit up, push the
“ENT” button. A beep sound is heard,
and the letter or number is input. Re-
peat this procedure to input the name
or number, etc.
You can also input letters and numbers
with numeric keypad of the controller. For
details, see “—Inputting with numeric key-
pad” on page 6 in this Section.
If you type a wrong letter, delete it with
the
switch. Selecting the switch
erases one letter.Selecting the
“List” switch on the
screen, the screen will be changed to dis-
play the database items that match the
name or address that you have entered
on the screen. The number of matching
items is shown to the right side of the
screen. If the matching item is more than
9,999, the system displays “����” on
the screen.
Selecting the
“” switch to display
the diacritics input screen, the
“0�9”
switch to display the numeral input
screen.
Selecting the “A�Z” switch changes the
screen back to the alphabet input screen.
Inputting letters and
numbers—
Page 19 of 122

AVALON_Navi_U (L/O 0408)
11
2004 AVALON Navigation from Aug. ’04 Prod. (OM41413U)
US8
Connecticut
Maine
Massachisetts
New Hampshire
New Jersey
New York
Rhode Island
Vermont
US9
Delaware
Maryland
New Jersey
Pennsylvania
Virginia
Washington, D.C.
West Virginia
US10
Florida
Georgia
North Carolina
South Carolina
CANADA
CAN
Alberta
British Columbia
Manitoba
New Brunswick
Newfoundland and Labrador
Nova Scotia
Ontario
Prince Edward Island
Québec
Saskatchewan
Yukon Territory
You can find your destination using vari-
ous methods. See pages 13 through 28
for the detailed steps.
1. By Address: You can input the house
number and the street address by us-
ing the input keys. See page 13 for the
detailed steps.2. By POI (Point of Interest): You can
select one of the many points of inter-
est that have been already stored in
the system’s database. There are 54
categories to choose from including
restaurants, hotels and so on. See
page 16 for the detailed steps.
3. By Marked Points: You can select
your own favorite destinations as
“Marked points”. The system allows
you to store up 100 marked points.
See page 22 for the detailed steps.
4. By Previous Destination: You can se-
lect a destination from any of the last
20 previously set destinations. See
page 23 for the detailed steps.
5. By Emergency: You can select one of
the three points of emergency service
points that have been already stored in
the system’s database. See page 23
for the detailed steps.
6. By Intersection: You can enter the
names of two intersecting streets. This
is helpful if you do not know the spe-
cific street address of your destination
but know the general vicinity. See page
24 for the detailed steps.
Page 20 of 122
AVALON_Navi_U (L/O 0408)
12
2004 AVALON Navigation from Aug. ’04 Prod. (OM41413U)
7. By Previous Starting Point: You can
enter a point where the system has
started to guide last time. See page 27
for the detailed steps.
8. By Freeway Ent./Exit: You can enter
the name of the freeway (interstate)
entrance or exit. See page 25 for the
detailed steps.
9. By Map Selection: You can select a
destination simply by selecting the
location on the displayed map. See
page 27 for the detailed steps.
10. By Preset Destination (
—
switches on the “Destination”
screen): You can choose the destina-
tion by selecting one of the preset des-
tination switch. In this case, it is nec-
essary to register your desired
destination beforehand. See page 28
for the detailed steps.
11 . B y H o m e (
switch on the “Des-
tination” screen): You can select your
own home without entering the address
each time. In this case, it is necessary
to register your home beforehand. See
page 27 for the detailed steps.
INFORMATION
�When inputting the destination, the
response to the switch may be slow.
�“Points of interest” registration is
made based on the NAVTEQ
“Standard POI Inclusion List” and
infoUSA POI data.
�If there is no point registered,
switches such as “Marked point”,
“Home”, “Previous destination” or
“Previous starting point” are
dimmed and not available.
�The route for returning may not be
the same as that for going.
�The route guidance to the destina-
tion may not be the shortest route
or a route without traffic conges-
tion.
�Route guidance may not be avail-
able if there is no road data for the
specified location.
�When setting the destination, you
should use the map on a scale of
one half mile or smaller.
�To select an “Address”, “Point of
interest”, “Freeway Ent./Exit” or “In-
tersection” in a different region, a
search area’s change is necessary.
CAUTION
While you are driving, be sure to fol-
low traffic regulations and keep the
road condition in mind. If a traffic
sign on the road has been changed,
the route guidance may provide
wrong information.
Page 21 of 122
AVALON_Navi_U (L/O 0408)
13
2004 AVALON Navigation from Aug. ’04 Prod. (OM41413U)
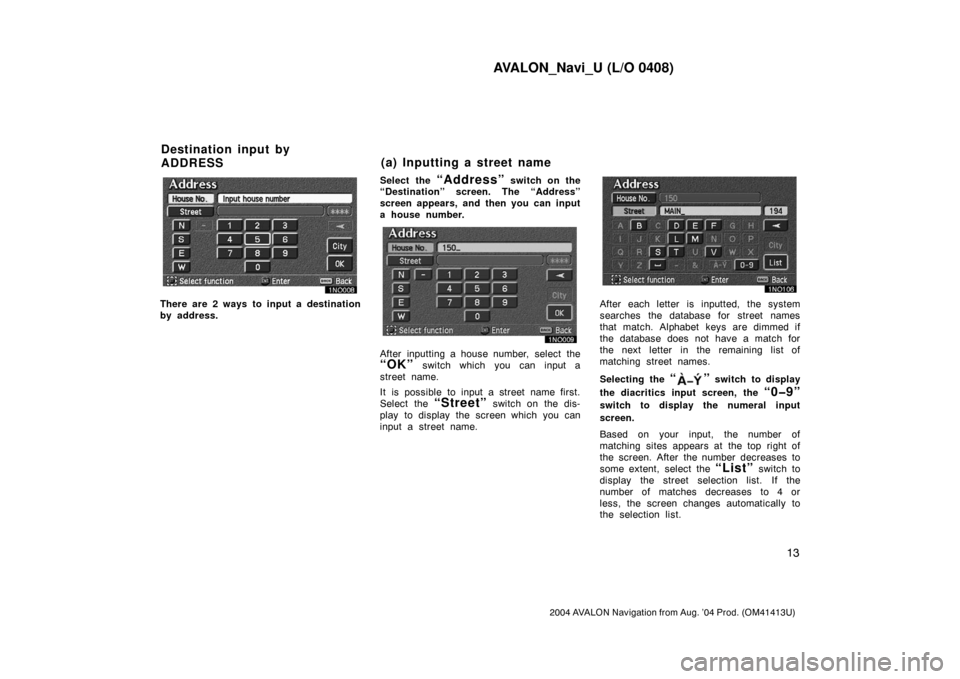
There are 2 ways to input a destination
by address.Select the
“Address” switch on the
“Destination” screen. The “Address”
screen appears, and then you can input
a house number.
After inputting a house number, select the
“OK” switch which you can input a
street name.
It is possible to input a street name first.
Select the
“Street” switch on the dis-
play to display the screen which you can
input a street name.
After each letter is inputted, the system
searches the database for street names
that match. Alphabet keys are dimmed if
the database does not have a match for
the next letter in the remaining list of
matching street names.
Selecting the
“” switch to display
the diacritics input screen, the
“0�9”
switch to display the numeral input
screen.
Based on your input, the number of
matching sites appears at the top right of
the screen. After the number decreases to
some extent, select the
“List” switch to
display the street selection list. If the
number of matches decreases to 4 or
less, the screen changes automatically to
the selection list.
Destination input by
ADDRESS(a) Inputting a street name
Page 35 of 122
AVALON_Navi_U (L/O 0408)
27
2004 AVALON Navigation from Aug. ’04 Prod. (OM41413U)
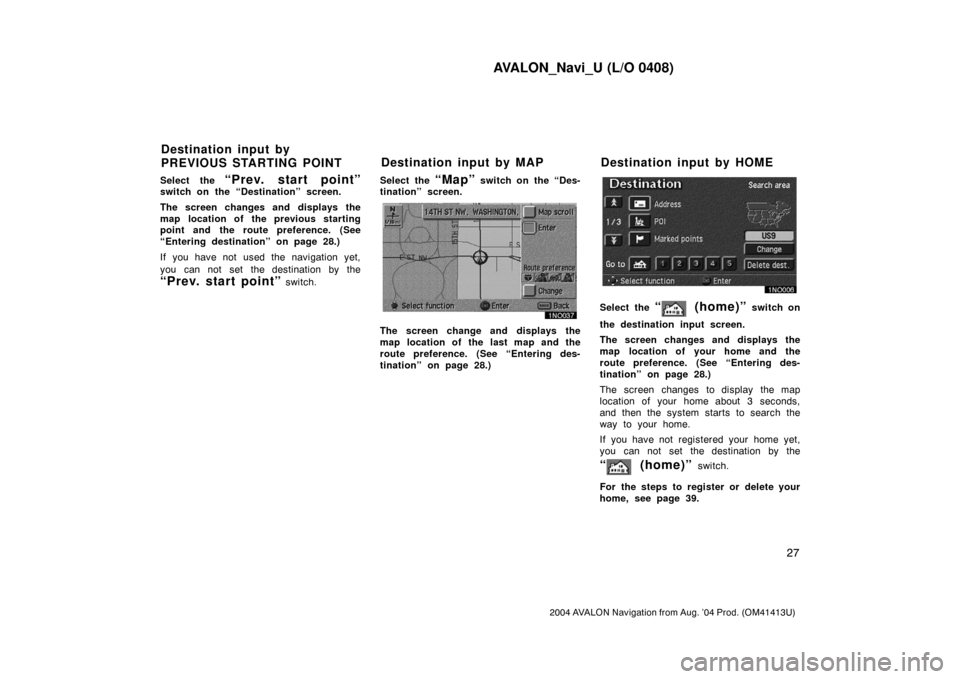
Select the “Prev. start point”switch on the “Destination” screen.
The screen changes and displays the
map location of the previous starting
point and the route preference. (See
“Entering destination” on page 28.)
If you have not used the navigation yet,
you can not set the destination by the
“Prev. start point” switch.Select the
“Map” switch on the “Des-
tination” screen.
The screen change and displays the
map location of the last map and the
route preference. (See “Entering des-
tination” on page 28.)
Select the “ (home)” switch on
the destination input screen.
The screen changes and displays the
map location of your home and the
route preference. (See “Entering des-
tination” on page 28.)
The screen changes to display the map
location of your home about 3 seconds,
and then the system starts to search the
way to your home.
If you have not registered your home yet,
you can not set the destination by the
“ (home)” switch.
For the steps to register or delete your
home, see page 39.
Destination input by
PREVIOUS STARTING POINTDestination input by MAP Destination input by HOME
Page 36 of 122
AVALON_Navi_U (L/O 0408)
28
2004 AVALON Navigation from Aug. ’04 Prod. (OM41413U)
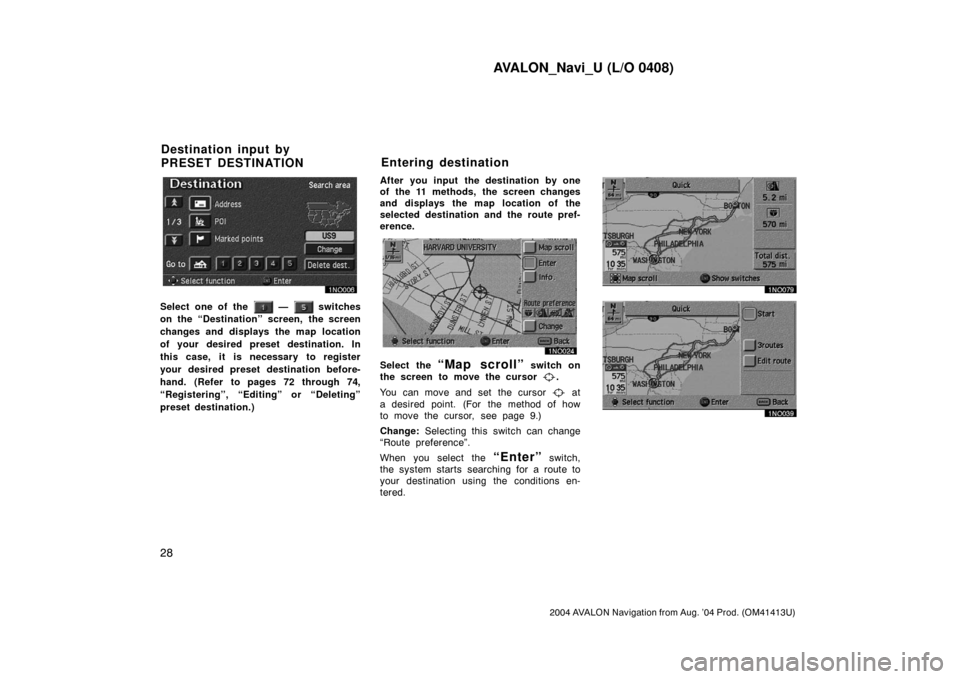
Select one of the — switches
on the “Destination” screen, the screen
changes and displays the map location
of your desired preset destination. In
this case, it is necessary to register
your desired preset destination before-
hand. (Refer to pages 72 through 74,
“Registering”, “Editing” or “Deleting”
preset destination.)After you input the destination by one
of the 11 methods, the screen changes
and displays the map location of the
selected destination and the route pref-
erence.
Select the “Map scroll” switch on
the screen to move the cursor
.
You can move and set the cursor
at
a desired point. (For the method of how
to move the cursor, see page 9.)
Change: Selecting this switch can change
“Route preference”.
When you select the
“Enter” switch,
the system starts searching for a route to
your destination using the conditions en-
tered.
Destination input by
PRESET DESTINATIONEntering destination
Page 37 of 122
AVALON_Navi_U (L/O 0408)
29
2004 AVALON Navigation from Aug. ’04 Prod. (OM41413U)
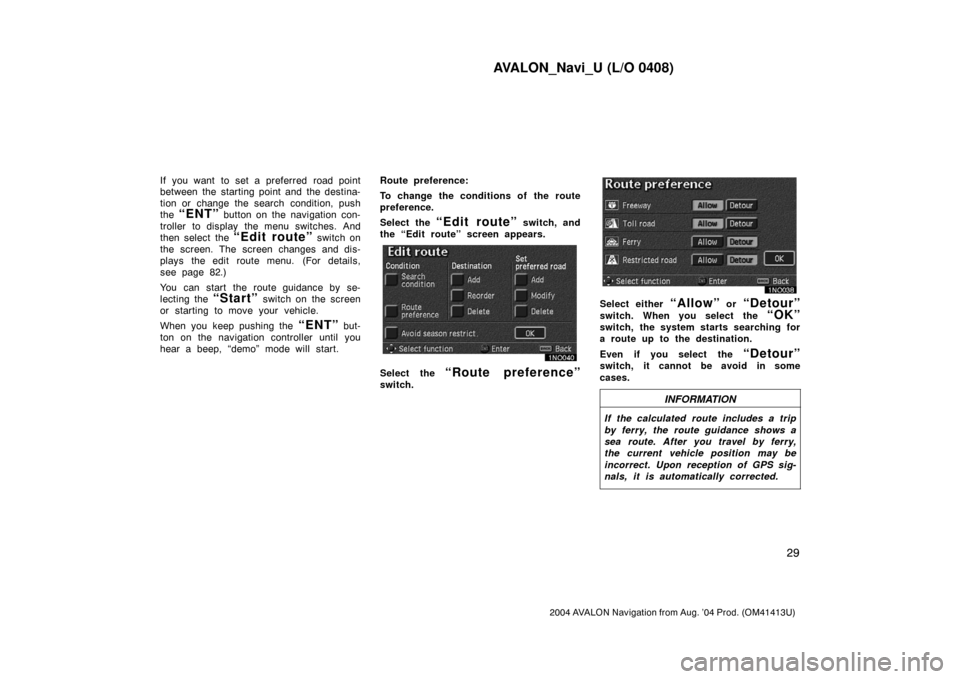
If you want to set a preferred road point
between the starting point and the destina-
tion or change the search condition, push
the
“ENT” button on the navigation con-
troller to display the menu switches. And
then select the
“Edit route” switch on
the screen. The screen changes and dis-
plays the edit route menu. (For details,
see page 82.)
You can start the route guidance by se-
lecting the
“Start” switch on the screen
or starting to move your vehicle.
When you keep pushing the
“ENT” but-
ton on the navigation controller until you
hear a beep, “demo” mode will start.Route preference:
To change the conditions of the route
preference.
Select the
“Edit route” switch, and
the “Edit route” screen appears.
Select the “Route preference”
switch.
Select either “Allow” or “Detour”
switch. When you select the “OK”
switch, the system starts searching for
a route up to the destination.
Even if you select the
“Detour”
switch, it cannot be avoid in some
cases.
INFORMATION
If the calculated route includes a trip
by ferry, the route guidance shows a
sea route. After you travel by ferry,
the current vehicle position may be
incorrect. Upon reception of GPS sig-
nals, it is automatically corrected.
Page 39 of 122
AVALON_Navi_U (L/O 0408)
31
2004 AVALON Navigation from Aug. ’04 Prod. (OM41413U)
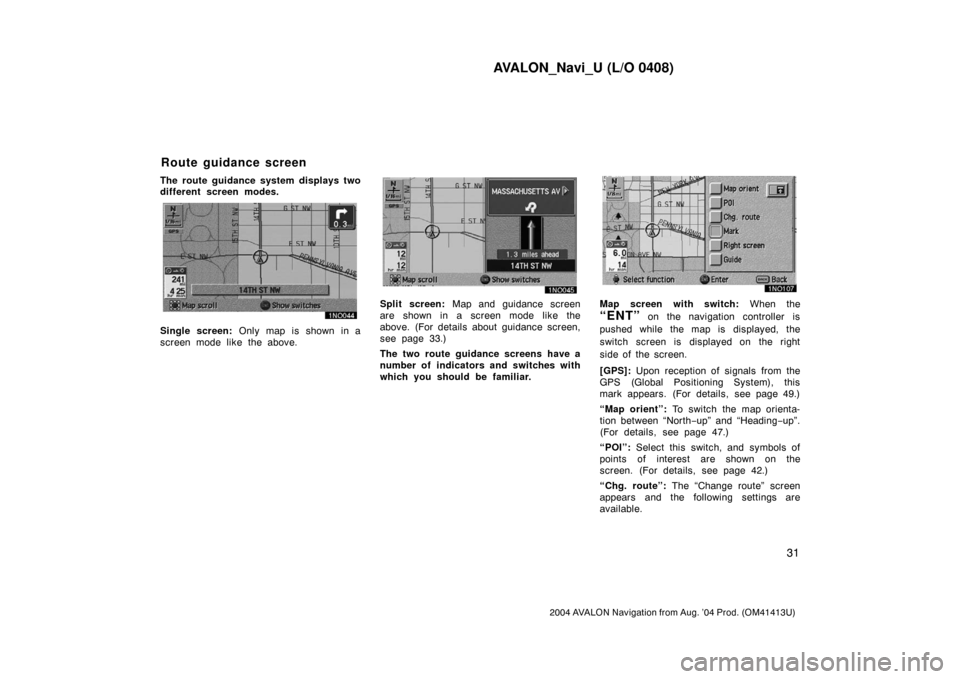
The route guidance system displays two
different screen modes.
Single screen: Only map is shown in a
screen mode like the above.
Split screen: Map and guidance screen
are shown in a screen mode like the
above. (For details about guidance screen,
see page 33.)
The two route guidance screens have a
number of indicators and switches with
which you should be familiar.Map screen with switch: When the
“ENT” on the navigation controller is
pushed while the map is displayed, the
switch screen is displayed on the right
side of the screen.
[GPS]: Upon reception of signals from the
GPS (Global Positioning System), this
mark appears. (For details, see page 49.)
“Map orient”: To switch the map orienta-
tion between “North−up” and “Heading−up”.
(For details, see page 47.)
“POI”: Select this switch, and symbols of
points of interest are shown on the
screen. (For details, see page 42.)
“Chg. route”: The “Change route” screen
appears and the following settings are
available.
Route guidance screen