2004 SUBARU IMPREZA WRX light
[x] Cancel search: lightPage 379 of 491
10-2
Appearance care
Appearance careExterior care !
Washing
The best way to preserve your vehicle’s beauty is fre-
quent washing. Wash the vehicle at least once a
month to avoid contamination by road grime.
Wash dirt off with a wet sponge and plenty of luke-
warm or cold water. Do not wash the vehicle with hot
water and in direct sunlight.
Salt, chemicals, insects, tar, soot and bird droppings
should be washed off by using a light detergent, as re-
quired. If you use a light detergent, make certain that
it is a neutral detergent. Do not use strong soap or
chemical detergents. All cleaning agents should be
promptly flushed from the surface and not allowed to
dry there. Rinse the vehicle thoroughly with plenty of
lukewarm water. Wipe the remaining water off with a
chamois or soft cloth.
NOTE
When having your vehicle washed in an automatic
car wash, make sure beforehand that the car wash
is of suitable type. Automatic car wash brushes or
other equipment may damage the rear wiper and
rear/roof spoiler (if equipped).
" When washing the vehicle, the brakes may
get wet. As a result, the brake stopping dis-
tance will be longer. To dry the brakes, drive the
vehicle at a safe speed while lightly pressing
the brake pedal to heat up the brakes. " Do not wash the engine compartment and
area adjacent to it. If water enters the engine air
intake, electrical parts or the power steering flu-
id reservoir, it will cause engine trouble or
faulty power steering respectively.
! Washing the underbody
Chemicals, salts and gravel used for deicing road sur-
faces are extremely corrosive, accelerating the corro-
sion of underbody components, such as the exhaust
system, fuel and brake lines, brake cables, floor pan
and fenders, and suspension.
Thoroughly flush the underbody and inside of the
fenders with lukewarm or cold water at frequent inter-
vals to reduce the harmful effects of such agents.
Mud and sand adhering to the underbody components may accelerate their corrosion.
After driving off-road or on muddy or sandy roads,
wash the mud and sand off the underbody. Carefully
Page 380 of 491
10-3
Appearance care
– CONTINUED –
flush the suspension and axle parts, as they are par-
ticularly prone to mud and sand buildup. Do not use a
sharp-edged tool to remove caked mud.
NOTE
Be careful not to damage brake hoses, sensor har-
nesses, and other parts when washing suspen-
sion components. !Using a warm water washer
" Keep a good distance of 12 in (30 cm) or more be-
tween the washer nozzle and the vehicle. " Do not wash the same area continuously.
" If a stain will not come out easily, wash by hand.
Some warm water washers are of the high tempera-
ture, high pressure type, and they can damage or de-
form the resin parts such as mouldings, or cause wa-
ter to leak into the vehicle. ! Waxing and polishing
Always wash and dry the vehicle before waxing and
polishing.
Use a good quality polish and wax and apply them ac-
cording to the manufacturer’s instructions. Wax or pol-
ish when the painted surface is cool.
Be sure to polish and wax the chrome trim, as well as
the painted surfaces. Loss of wax on a painted surface leads to loss of the original luster and also quickens
the deterioration of the surface. It is recommended
that a coat of wax be applied at least once a month, or
whenever the surface no longer repels water.
If the appearance of the paint has diminished to the
point where the luster or tone cannot be restored,
lightly polish the surface with a fine-grained com-
pound. Never polish just the affected area, but include
the surrounding area as well. Always polish in only
one direction. A No. 2000 grain compound is recom-
mended. Never use a coarse-grained compound.
Coarser grained compounds have a smaller grain-size
number and could damage the paint. After polishing
with a compound, coat with wax to restore the original
luster. Frequent polishing with a compound or an in-
correct polishing technique will result in removing the
paint layer and exposing the undercoat. When in
doubt, it is always best to contact your SUBARU deal-
er or an auto paint specialist.
NOTE
Be careful not to block the windshield washer noz-
zles with wax when waxing the vehicle. !
Cleaning aluminum wheels
" Promptly wipe the aluminum wheels clean of any
kind of grime or agent. If dirt is left on too long, it may
Page 383 of 491

10-6
Appearance care
Cleaning the interior
Use a vacuum cleaner to get rid of the dust and dirt.
Wipe the vinyl areas with a clean, damp cloth. !
Seat fabric
Remove loose dirt, dust or debris with a vacuum
cleaner. If the dirt is caked on the fabric or hard to re-
move with a vacuum cleaner, use a soft blush then
vacuum it.
Wipe the fabric surface with a tightly wrung cloth and
dry the seat fabric thoroughly. If the fabric is still dirty,
wipe using a solution of mild soap and lukewarm water
then dry thoroughly.
If the stain does not come out, try a commercially-
available fabric cleaner. Use the cleaner on a hidden
place and make sure it does not affect the fabric ad-
versely. Use the cleaner according to its instructions. ! Leather seat materials
The leather used by SUBARU is a high quality natural
product which will retain its distinctive appearance and
feel for many years with proper care.
Allowing dust or road dirt to build up on the surface can
cause the material to become brittle and to wear pre- maturely. Regular cleaning with a soft, moist, natural
fiber cloth should be performed monthly, taking care
not to soak the leather or allow water to penetrate the
stitched seams.
A mild detergent suitable for cleaning woolen fabrics
may be used to remove difficult dirt spots, rubbing with
a soft, dry cloth afterwards to restore the luster. If your
SUBARU is to be parked for a long time in bright sun-
light, it is recommended that the seats and headrests
be covered, or the windows shaded, to prevent fading
or shrinkage.
Minor surface blemishes or bald patches may be treat-
ed with a commercial leather spray lacquer. You willdiscover that each leather seat section will develop
soft folds or wrinkles, which is characteristic of genu-
ine leather. !
Synthetic leather upholstery
The synthetic leather material used on the SUBARU
may be cleaned using mild soap or detergent and wa-
ter, after first vacuuming or brushing away loose dirt.
Allow the soap to soak in for a few minutes and wipe
off with a clean, damp cloth. Commercial foam-type
cleaners suitable for synthetic leather materials may
be used when necessary.
Page 387 of 491

11 - 2
Maintenance and service
Types of tires .................................................... 11-44
Tire inspection .................................................. 11-45
Tire pressures and wear .................................. 11-45
Wheel balance ................................................... 11-48
Wear indicators ................................................. 11-49
Tire rotation ....................................................... 11-50
Tire replacement ............................................... 11-50
Wheel replacement ........................................... 11-51
Wheel covers .................................................... 11-52
Aluminum wheels (If equipped) .................. 11-53
Intercooler water spray ................................ 11-53
Windshield washer fluid .............................. 11-54
Replacement of windshield wiper blades .. 11-55
Battery ........................................................... 11-58
Fuses ............................................................. 11-60
Main fuse ....................................................... 11-63
Installation of accessories .......................... 11-63
Replacing bulbs ............................................ 11-64 Headlights (U.S. spec. WRX-STi) .................... 11-66
Headlight (Except U.S. spec. WRX-STi) .......... 11-66
Front turn signal light bulbs ............................ 11-69
Parking light ...................................................... 11-70
Front fog light ................................................... 11-73
Rear combination lights ................................... 11-74
License plate light ............................................ 11-76
Dome light, map light and cargo area light .... 11-77
Trunk light ......................................................... 11-78
High mount stop light ...................................... 11-78
Page 391 of 491
11 - 6
Maintenance and service
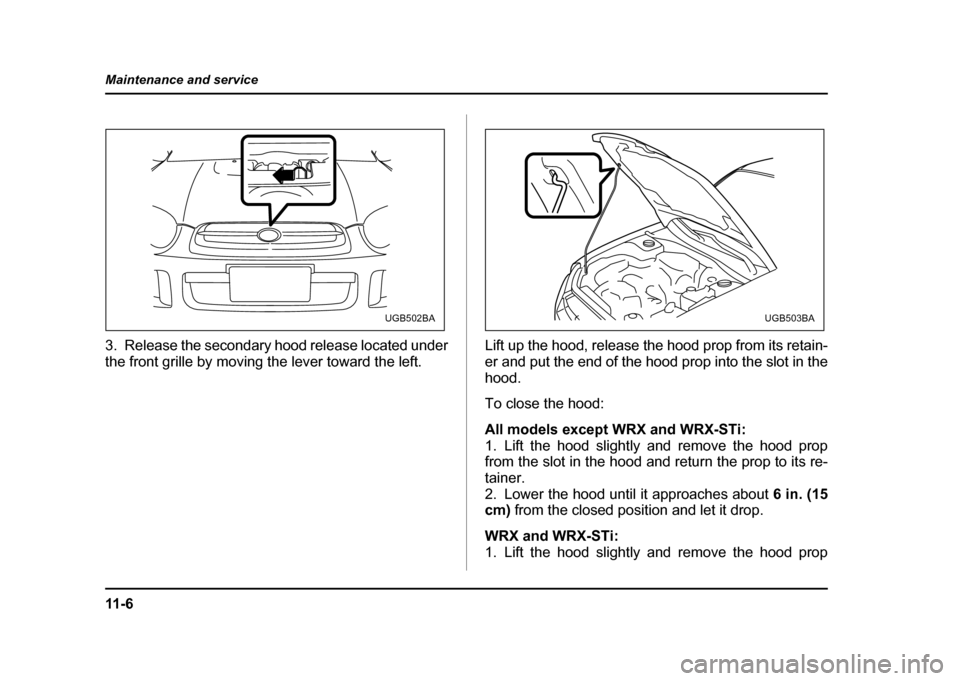
3. Release the secondary hood release located under
the front grille by moving the lever toward the left.
Lift up the hood, release the hood prop from its retain-
er and put the end of the hood prop into the slot in the
hood.
To close the hood:
All models except WRX and WRX-STi:
1. Lift the hood slightly and remove the hood prop
from the slot in the hood and return the prop to its re-
tainer.
2. Lower the hood until it approaches about
6 in. (15
cm) from the closed position and let it drop.
WRX and WRX-STi:
1. Lift the hood slightly and remove the hood prop
UGB502BAUGB503BA
Page 392 of 491
11 - 7
Maintenance and service
– CONTINUED –
from the slot in the hood and return the prop to its re-
tainer.
2. Lower the hood until it approaches about 12 in. (30
cm) from the closed position and let it drop.
After closing the hood, be sure the hood is securely
locked.
If this does not close the hood, release it from a slightly
higher position. Do not push the hood forcibly to close
it. It could deform the metal.
Always check that the hood is properly locked
before you start driving. If it is not, it might fly
open while the vehicle is moving and block
your view, which may cause an accident and
serious bodily injury.
Page 400 of 491
11 -1 5
Maintenance and service
– CONTINUED –
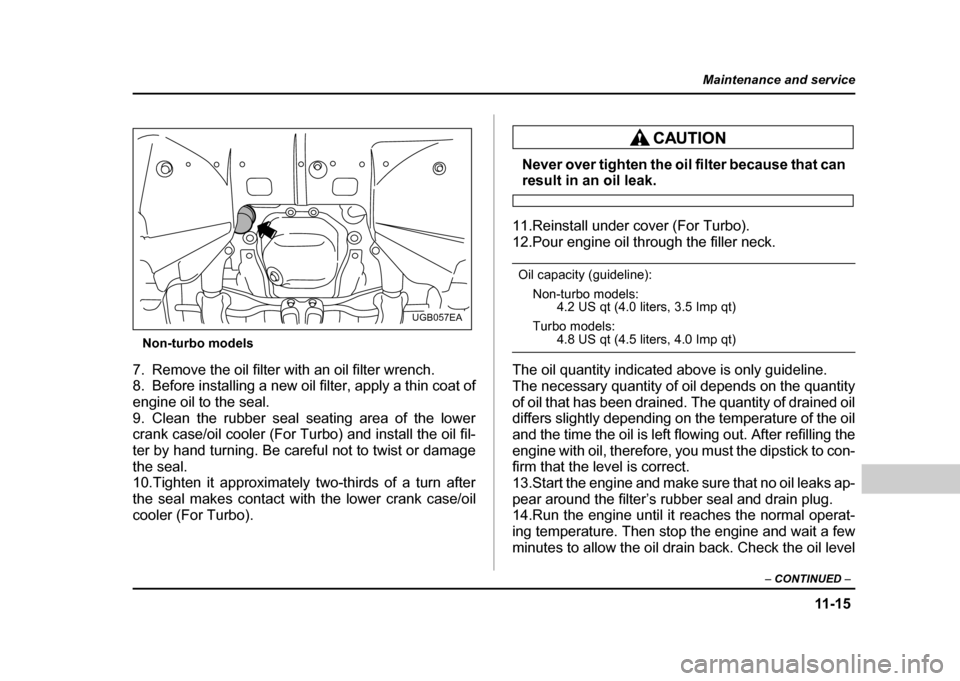
Non-turbo models
7. Remove the oil filter with an oil filter wrench.
8. Before installing a new oil filter, apply a thin coat of
engine oil to the seal.
9. Clean the rubber seal seating area of the lower
crank case/oil cooler (For Turbo) and install the oil fil-
ter by hand turning. Be careful not to twist or damage
the seal.
10.Tighten it approximately two-thirds of a turn after
the seal makes contact with the lower crank case/oil
cooler (For Turbo).
Never over tighten the oil filter because that canresult in an oil leak.
11.Reinstall under cover (For Turbo).
12.Pour engine oil through the filler neck.
Oil capacity (guideline): Non-turbo models: 4.2 US qt (4.0 liters, 3.5 Imp qt)
Turbo models:
4.8 US qt (4.5 liters, 4.0 Imp qt)
The oil quantity indicated above is only guideline.
The necessary quantity of oil depends on the quantity
of oil that has been drained. The quantity of drained oil
differs slightly depending on the temperature of the oil
and the time the oil is left flowing out. After refilling the
engine with oil, therefore, you must the dipstick to con-
firm that the level is correct.
13.Start the engine and make sure that no oil leaks ap-
pear around the filter’s rubber seal and drain plug.
14.Run the engine until it reaches the normal operat-
ing temperature. Then stop the engine and wait a few
minutes to allow the oil drain back. Check the oil level
UGB057EA
Page 425 of 491
11 - 4 0
Maintenance and service
Brake booster
If the brake booster does not operate as described be-
low, have it checked by your SUBARU dealer.
1. With the engine off, depress the brake pedal sever-
al times, applying the same pedal force each time. The
distance the pedal travels should not vary.
2. With the brake pedal depressed, start the engine.
The pedal should move slightly down to the floor.
3. With the brake pedal depressed, stop the engine
and keep the pedal depressed for 30 seconds. The
pedal height should not change.
4. Start the engine again and run for about one minute
then turn it off. Depress the brake pedal several times
to check the brake booster. Brake booster operates
properly if the pedal stroke decreases with each de- pression.Brake pedal
Check the brake pedal free play and reserve distance
according to the maintenance schedule in the “War-
ranty and Maintenance Booklet”. !
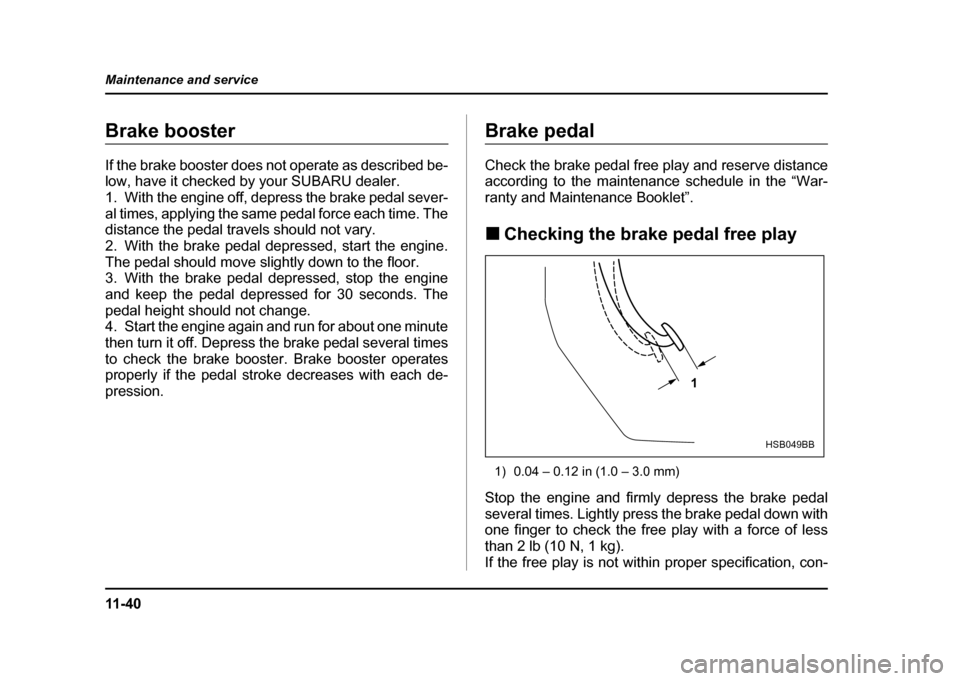
Checking the brake pedal free play
1) 0.04 – 0.12 in (1.0 – 3.0 mm)
Stop the engine and firmly depress the brake pedal
several times. Lightly press the brake pedal down with
one finger to check the free play with a force of less
than 2 lb (10 N, 1 kg).
If the free play is not within proper specification, con-
1
HSB049BB