2004 SUBARU IMPREZA WRX light
[x] Cancel search: lightPage 289 of 491
7-20
Starting and operating
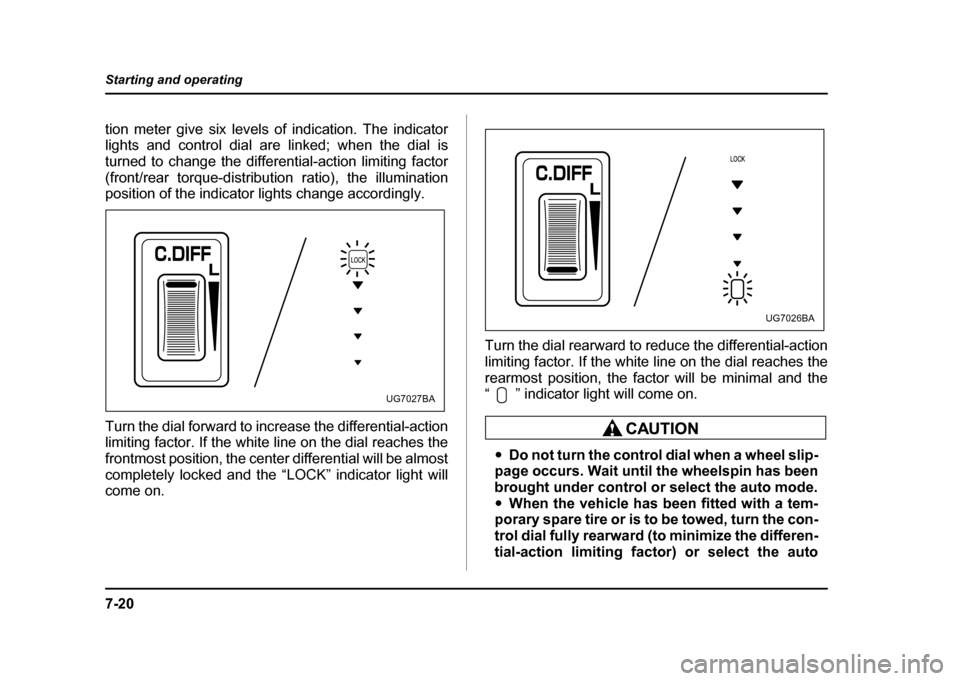
tion meter give six levels of indication. The indicator
lights and control dial are linked; when the dial is
turned to change the differential-action limiting factor
(front/rear torque-distribution ratio), the illumination
position of the indicator lights change accordingly.
Turn the dial forward to increase the differential-action
limiting factor. If the white line on the dial reaches the
frontmost position, the center differential will be almost
completely locked and the “LOCK” indicator light will come on.
Turn the dial rearward to reduce the differential-action
limiting factor. If the white line on the dial reaches the
rearmost position, the factor will be minimal and the
“ ” indicator light will come on.
"
Do not turn the control dial when a wheel slip-
page occurs. Wait until the wheelspin has been
brought under control or select the auto mode." When the vehicle has been fitted with a tem-
porary spare tire or is to be towed, turn the con-
trol dial fully rearward (to minimize the differen-
tial-action limiting factor) or select the auto
UG7027BA
UG7026BA
Page 290 of 491
7-21
Starting and operating
– CONTINUED –
mode.
NOTE "If the differential-limiting factor is large during
cornering maneuvers, a small speed difference
between the front and rear wheels may cause tight
corner braking (a phenomenon accompanied by
vibration and noise). This phenomenon does not
indicate a problem. It will disappear if the differen-
tial-action limiting factor is reduced. " Use the center-differential indicator light only as
a rough indication of the differential-action limit-
ing factor. ! Temporary release
When the driver stop the vehicle and pulls the parking-
brake lever after manually setting the differential-ac-
tion limiting factor, the factor is temporarily minimized.
The indicator in the combination meter continues to
show the driver’s selected differential-action limiting
factor. When the driver releases the parking-brake le-
ver, the factor set by the driver is restored.
Automatic transmission
The automatic transmission is electronically controlled
with 4-forward speeds and 1-reverse speed.
NOTE
Immediately after a disconnected battery is recon-
nected or ATF (automatic transmission fluid) is re-
placed, you may feel that the automatic transmis-
sion operation is somewhat unusual.
This results from erasure or invalidation of data
the on-board computer has collected and stored in
memory to allow the transmission to shift at the
most appropriate times for the current condition
of your vehicle. Optimized shifting will be restored
as the vehicle continues to be driven for a while.
Do not shift from the “P” or “N” position into
the “D”, “3”, “2”, “1” or “R” position while de-
pressing the accelerator pedal. This may cause
the vehicle to jump forward or backward.
" Shift into the “P” or “R” position only after
Page 292 of 491
7-23
Starting and operating
– CONTINUED –
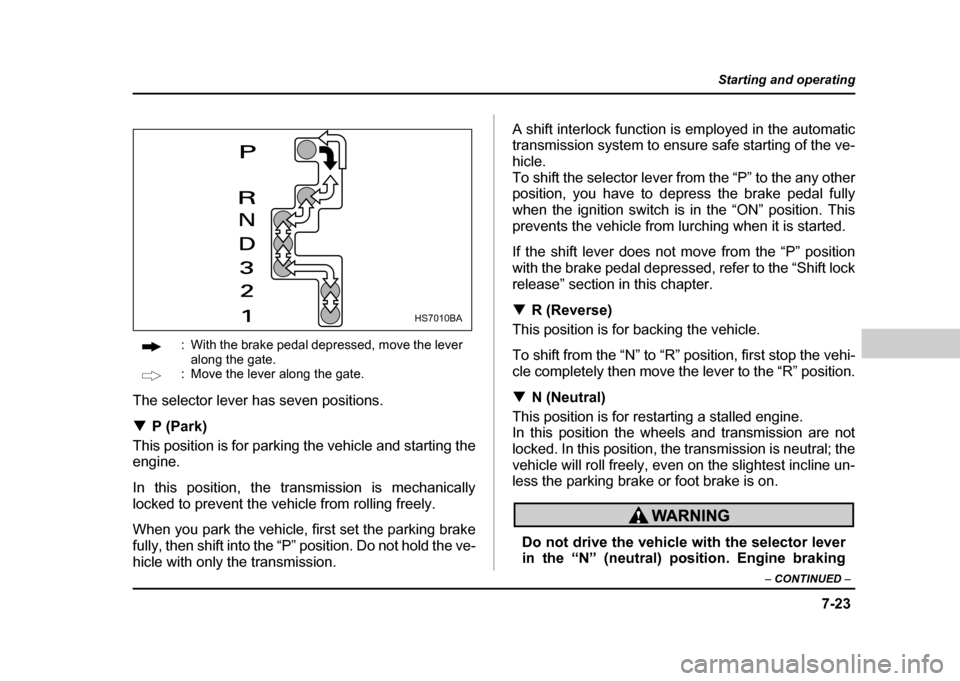
: With the brake pedal depressed, move the lever
along the gate.
: Move the lever along the gate.
The selector lever has seven positions. ! P (Park)
This position is for parking the vehicle and starting the
engine.
In this position, the transmission is mechanically
locked to prevent the vehicle from rolling freely.
When you park the vehicle, first set the parking brake
fully, then shift into the “P” position. Do not hold the ve-
hicle with only the transmission. A shift interlock function is employed in the automatic
transmission system to ensure safe starting of the ve-
hicle.
To shift the selector lever from the “P” to the any other
position, you have to depress the brake pedal fully
when the ignition switch is in the “ON” position. This
prevents the vehicle from lurching when it is started.
If the shift lever does not move from the “P” position
with the brake pedal depressed, refer to the “Shift lock
release” section in this chapter. !
R (Reverse)
This position is for backing the vehicle.
To shift from the “N” to “R” position, first stop the vehi-
cle completely then move the lever to the “R” position. ! N (Neutral)
This position is for restarting a stalled engine.
In this position the wheels and transmission are not
locked. In this position, the transmission is neutral; the
vehicle will roll freely, even on the slightest incline un-
less the parking brake or foot brake is on.
Do not drive the vehicle with the selector lever
in the “N” (neutral) position. Engine braking
HS7010BA
Page 297 of 491
7-28
Starting and operating
Power steering
The power steering system operates only when the
engine is running.
If you lose power steering assist because the engine
stops or the system fails to function, you can steer butit will take much more effort.
NOTE
Right after the engine has been started and before
it has warmed up, you may hear a noise coming
from areas adjacent to the power steering pump
which is located at the right-front area of the en-
gine compartment. This noise is normal. It does
not indicate power steering system trouble.
Do not hold the steering wheel at the fully
locked position left or right for more than five
seconds. This may damage the power steering
pump.
Braking !
Braking tips
Never rest your foot on the brake pedal while
driving. This can cause dangerous overheating
of the brakes and needless wear on the brake
pads and linings.
! When the brakes get wet
When driving in rain or after washing the vehicle, the
brakes may get wet. As a result, brake stopping dis-
tance will be longer. To dry the brakes, drive the vehi-
cle at a safe speed while lightly depressing the brake
pedal to heat up the brakes. ! Use of engine braking
Remember to make use of engine braking in addition
to foot braking. When descending a grade, if only the
foot brake is used, the brakes may start working im-
properly because of brake fluid overheating, caused
by overheated brake pads. To help prevent this, shift
into a lower gear to get stronger engine braking.
Page 299 of 491
7-30
Starting and operating
ABS (Anti-lock Brake System)
The ABS system prevents the lock-up of wheels which
may occur during sudden braking or braking on slip-
pery road surfaces. This helps prevent the loss of
steering control and directional stability caused by
wheel lock-up.
When the ABS system is operating, you may hear a
chattering noise or feel a slight vibration in the brake
pedal. This is normal when the ABS operates.
The ABS system will not operate when the vehicle
speed is below approximately 6 mph (10 km/h).
Always use the utmost care in driving – over-
confidence because you are driving with an
ABS equipped vehicle could easily lead to a se-
rious accident.
"
The ABS system does not always decrease
stopping distance. You should always main-
tain a safe following distance from other vehi- cles. "
When driving on badly surfaced roads, gravel
roads, icy roads, or over deep newly fallen
snow, stopping distances may be longer for a
vehicle with the ABS system than one without.
When driving under these conditions, there-
fore, reduce your speed and leave ample dis-
tance from other vehicles. " When you feel the ABS system operating,
you should maintain constant brake pedal pres-
sure. Do not pump the brake pedal since doing
so may defeat the operation of the ABS system.
! ABS system self-check
You may feel a slight shock in the brake pedal and hear the operating sound of ABS from the engine com-
partment just after the vehicle is started. This is
caused by an automatic functional test of the ABS sys-
tem being carried out and does not indicate any abnor-
mal condition.
Page 300 of 491
7-31
Starting and operating
– CONTINUED –
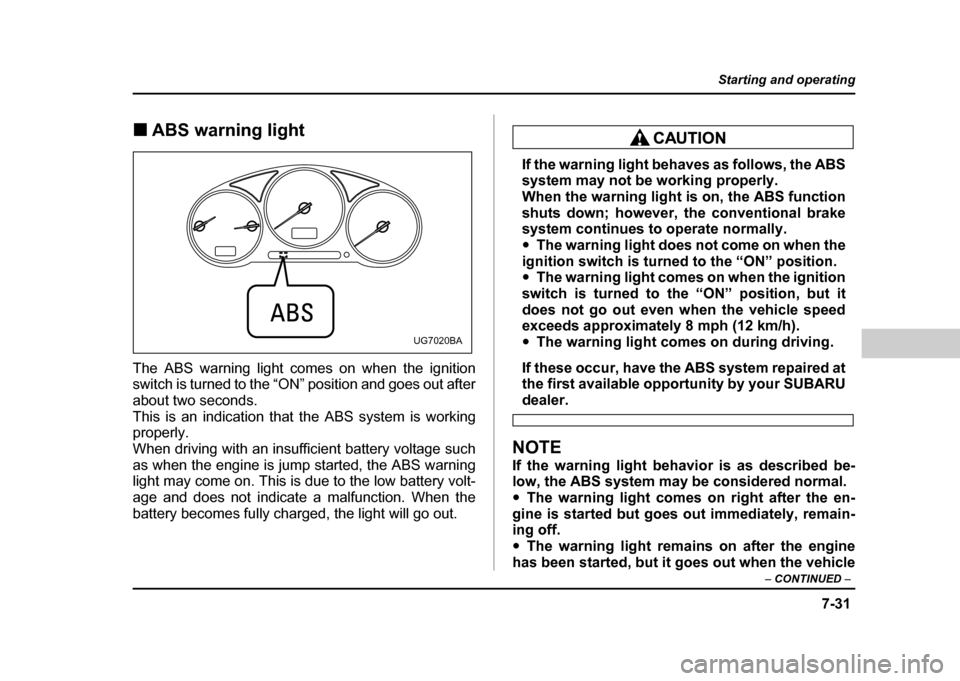
!ABS warning light
The ABS warning light comes on when the ignition
switch is turned to the “ON” position and goes out after
about two seconds.
This is an indication that the ABS system is working
properly.
When driving with an insufficient battery voltage such
as when the engine is jump started, the ABS warning
light may come on. This is due to the low battery volt-
age and does not indicate a malfunction. When the
battery becomes fully charged, the light will go out.
If the warning light behaves as follows, the ABS
system may not be working properly.
When the warning light is on, the ABS function
shuts down; however, the conventional brake
system continues to operate normally. " The warning light does not come on when the
ignition switch is turned to the “ON” position. " The warning light comes on when the ignition
switch is turned to the “ON” position, but it
does not go out even when the vehicle speed
exceeds approximately 8 mph (12 km/h). " The warning light comes on during driving.
If these occur, have the ABS system repaired at
the first available opportunity by your SUBARU
dealer.
NOTE
If the warning light behavior is as described be-
low, the ABS system may be considered normal." The warning light comes on right after the en-
gine is started but goes out immediately, remain-
ing off." The warning light remains on after the engine
has been started, but it goes out when the vehicle
UG7020BA
Page 301 of 491

7-32
Starting and operating
speed reaches about 8 mph (12 km/h). "
The warning light comes on during driving, but
it goes out immediately and remains off. Electronic Brake Force Distribution
(EBD) system
The EBD system maximizes the effectiveness of the
brakes by allowing the rear brakes to supply a greater
proportion of the braking force. It functions by adjust-
ing the distribution of braking force to the rear wheels
in accordance with the vehicle’s loading condition and
speed.
The EBD system is an integral part of the ABS system
and uses some of the ABS system’s components to
perform its function of optimizing the distribution of
braking force. If any of the ABS components used by
the EBD function fails, the EBD system also stops
working.
When the EBD system is operating, you may hear a
chattering noise or feel a slight vibration in the brake
pedal. This is normal and does not indicate a malfunc-tion.
Page 302 of 491
7-33
Starting and operating
– CONTINUED –
!Steps to take if EBD system fails
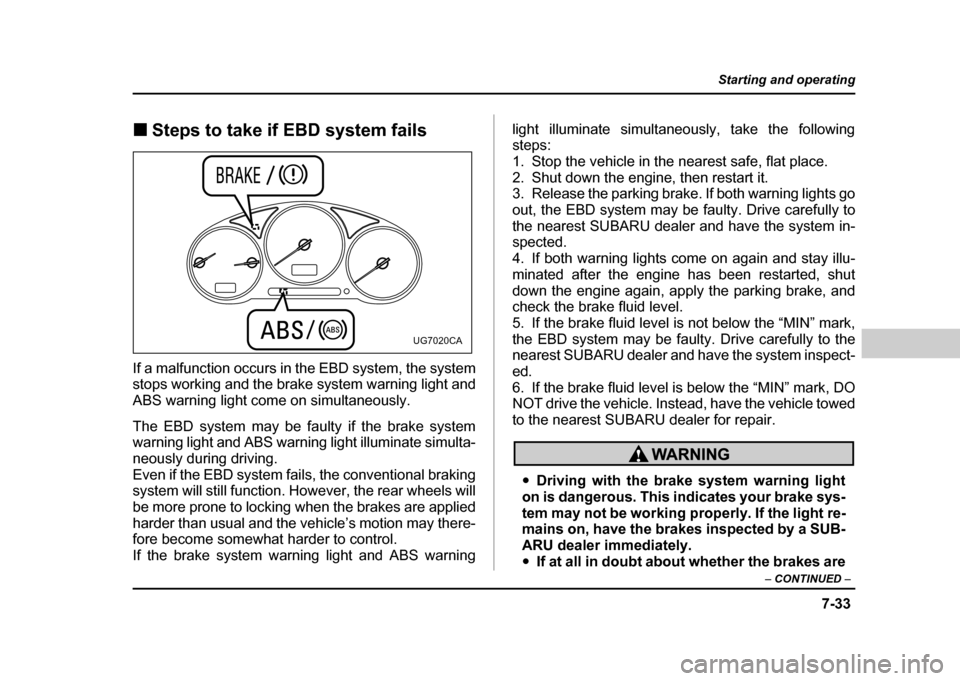
If a malfunction occurs in the EBD system, the system
stops working and the brake system warning light and
ABS warning light come on simultaneously.
The EBD system may be faulty if the brake system
warning light and ABS warning light illuminate simulta-
neously during driving.
Even if the EBD system fails, the conventional braking
system will still function. However, the rear wheels will
be more prone to locking when the brakes are applied
harder than usual and the vehicle’s motion may there-
fore become somewhat harder to control. If the brake system warning light and ABS warning light illuminate simultaneously, take the following steps:
1. Stop the vehicle in the nearest safe, flat place.
2. Shut down the engine, then restart it.
3. Release the parking brake. If both warning lights go
out, the EBD system may be faulty. Drive carefully to
the nearest SUBARU dealer and have the system in- spected.
4. If both warning lights come on again and stay illu-
minated after the engine has been restarted, shut
down the engine again, apply the parking brake, and
check the brake fluid level.
5. If the brake fluid level is not below the “MIN” mark,
the EBD system may be faulty. Drive carefully to the
nearest SUBARU dealer and have the system inspect- ed.
6. If the brake fluid level is below the “MIN” mark, DO
NOT drive the vehicle. Instead, have the vehicle towed
to the nearest SUBARU dealer for repair.
"
Driving with the brake system warning light
on is dangerous. This indicates your brake sys-
tem may not be working properly. If the light re-
mains on, have the brakes inspected by a SUB-
ARU dealer immediately." If at all in doubt about whether the brakes are
UG7020CA