2004 SUBARU FORESTER check engine
[x] Cancel search: check enginePage 1692 of 2870

EN(H4DOTC)-62
ENGINE (DIAGNOSTIC)
Diagnostics for Engine Starting Failure
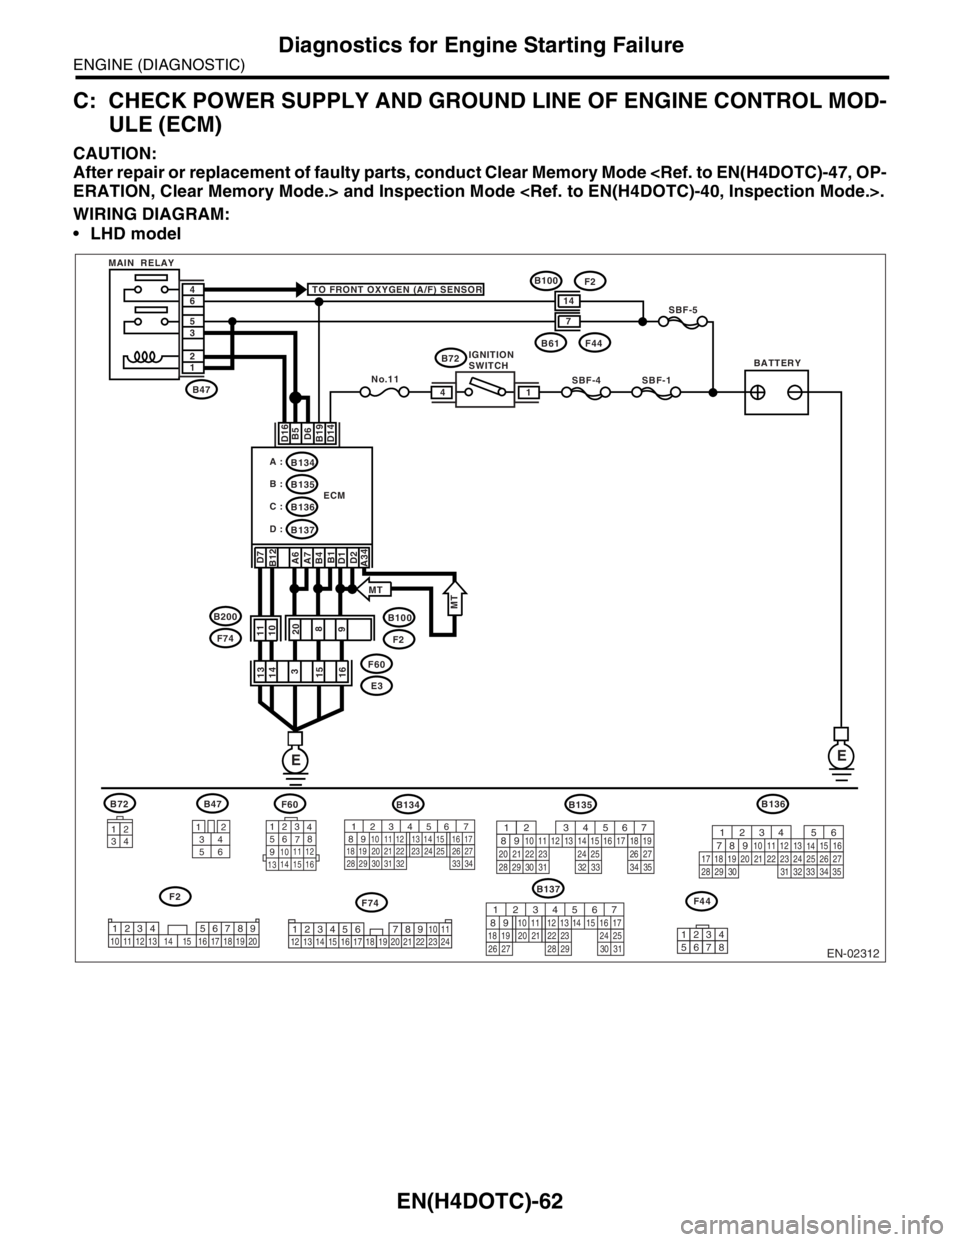
C: CHECK POWER SUPPLY AND GROUND LINE OF ENGINE CONTROL MOD-
ULE (ECM)
CAUTION:
After repair or replacement of faulty parts, conduct Clear Memory Mode
WIRING DIAGRAM:
LHD model
EN-02312
F74
B72
34
12
BATTERYIGNITION
SWITCH MAIN RELAY
SBF-4SBF-1
SBF-5
B72 TO FRONT OXYGEN (A/F) SENSOR
D16 D7
B12
A6
A7
B4
B1
D1
D2
A34B5
D6
B19
D14
No.11
B61F44
B47
B100
F2
E3 F60 1 2 3 5 6 4
ECM
EE
14
B134
B137 B135 A :
B :
C :B136
D :
14
7
3412
56
123
4
56
78
9
1011 12
1314 15 16
F60B47
B137
F2
B100F2
11
10
20
8
9 13
14
3
15
16
B135
F44
567
82 1
94 310
24 22 23 2511 12 13 14 15
26 27
2816 17 18 19
20 21
29 30 31 32 33 34 35
12345678
34
12 8910 11
12 13 14 15 16 17 18 19 20 21 22 23 2456 71234 5678910 11 12 13 14 15 16 17 18 19 20
567
82 1
94 310
22 23 11 12 13 14 15
24 25
2616 17
18 19 20 21
27 28 29 30 31
F74 B200
MT
MT
B134
56 7
82 1
94 310
24 22 23 25 11 12 13 14 15
26 27
2816 17
18 19 20 21
33 34 29
32 30 31
B136
56
782 1
94 310
24 22 23 2511 12 13
1415
26 27
2816
17 18 19 20 21
33 34 29
32 30
31 35
Page 1694 of 2870

EN(H4DOTC)-64
ENGINE (DIAGNOSTIC)
Diagnostics for Engine Starting Failure
Step Check Yes No
1 CHECK MAIN RELAY.
1) Turn the ignition switch to OFF.
2) Remove the main relay.
3) Connect the battery to main relay terminals
No. 1 and No. 2.
4) Measure the resistance between main relay
terminals.
Te r m i n a l s
No. 3 — No. 5:
No. 4 — No. 6:Is the resistance less than 10
Ω?Go to step 2.Replace the main
relay.
2 CHECK GROUND CIRCUIT FOR ECM.
1) Disconnect the connector from ECM.
2) Measure the resistance of harness
between ECM and chassis ground.
Connector & terminal
(B134) No. 6 — Chassis ground:
(B134) No. 7 — Chassis ground:
(B134) No. 34 — Chassis ground:
(B135) No. 1 — Chassis ground:
(B135) No. 12 — Chassis ground:
(B137) No. 1 — Chassis ground:
(B137) No. 2 — Chassis ground:
(B137) No. 7 — Chassis ground:
(B134) No. 34 — Chassis ground: (MT
model)Is the resistance less than 5
Ω?Go to step 3.Repair open circuit
in harness
between ECM
connector and
engine ground ter-
minal.
3 CHECK INPUT VOLTAGE OF ECM.
Measure the voltage between ECM connector
and chassis ground.
Connector & terminal
(B135) No. 19 (+) — Chassis ground (
−):Is the voltage more than 10 V? Go to step 4.Repair open or
ground short cir-
cuit of power sup-
ply circuit.
4 CHECK INPUT VOLTAGE OF ECM.
1) Turn the ignition switch to ON.
2) Measure the voltage between ECM con-
nector and chassis ground.
Connector & terminal
(B137) No. 14 (+) — Chassis ground (
−):Is the voltage more than 10 V? Go to step 5.Repair open or
ground short cir-
cuit of power sup-
ply circuit.
5 CHECK INPUT VOLTAGE OF MAIN RELAY.
Measure the voltage between main relay con-
nector and chassis ground.
Connector & terminal
(B47) No. 1 (+) — Chassis ground (
−):
(B47) No. 5 (+) — Chassis ground (
−):
(B47) No. 6 (+) — Chassis ground (
−):Is the voltage more than 10 V? Go to step 6.Repair open or
ground short cir-
cuit of power sup-
ply circuit.
6 CHECK INPUT VOLTAGE OF ECM.
1) Connect the main relay and ECM connec-
tor.
2) Turn the ignition switch to ON.
3) Measure the voltage between ECM con-
nector and chassis ground.
Connector & terminal
(B135) No. 5 (+) — Chassis ground (
−):
(B135) No. 6 (+) — Chassis ground (
−):
(B137) No. 16 (+) — Chassis ground (
−):Is the voltage more than 10 V? Check ignition
control system.
IGNITION CON-
TROL SYSTEM,
Diagnostics for
Engine Starting
Fa il u r e. >Repair open or
ground short cir-
cuit in harness
between ECM
connector and
main relay connec-
tor.
Page 1697 of 2870

EN(H4DOTC)-67
ENGINE (DIAGNOSTIC)
Diagnostics for Engine Starting Failure
Step Check Yes No
1 CHECK SPARK PLUG CONDITION.
1) Remove the spark plug.
2) Check the spark plug condition.
plug.
2 CHECK IGNITION SYSTEM FOR SPARKS.
1) Connect the spark plug to ignition coil.
2) Release the fuel pressure.
PRESSURE, OPERATION, Fuel.>
3) Contact the spark plug’s thread portion on
engine.
4) While opening the throttle valve fully, crank
the engine to check that spark occurs at each
cylinder.Does spark occur at each cyl-
inder?Check fuel pump
system.
FUEL PUMP CIR-
CUIT, Diagnostics
for Engine Start-
ing Failure.>Go to step 3.
3 CHECK POWER SUPPLY CIRCUIT FOR IG-
NITION COIL & IGNITOR ASSY.
1) Turn the ignition switch to OFF.
2) Disconnect the connector from ignition coil
& ignitor ASSY.
3) Turn the ignition switch to ON.
4) Measure the power supply voltage between
ignition coil & ignitor ASSY connector and
engine ground.
Connector & terminal
(E31) No. 3 (+) — Engine ground (
−):
(E32) No. 3 (+) — Engine ground (
−):
(E33) No. 3 (+) — Engine ground (
−):
(E34) No. 3 (+) — Engine ground (
−):Is the voltage more than 10 V? Go to step 4.Repair the har-
ness and connec-
tor.
N
OTE:
In this case repair
the following:
Open circuit in
harness between
ignition coil & igni-
tor ASSY, and igni-
tion switch
connector
Poor contact in
coupling connector
4 CHECK HARNESS OF IGNITION COIL & IG-
NITOR ASSY GROUND CIRCUIT.
1) Turn the ignition switch to OFF.
2) Measure the resistance between ignition
coil & ignitor ASSY connector and engine
ground.
Connector & terminal
(E31) No. 2 — Engine ground:
(E32) No. 2 — Engine ground:
(E33) No. 2 — Engine ground:
(E34) No. 2 — Engine ground:Is the resistance less than 5
Ω?Go to step 5.Repair the har-
ness and connec-
tor.
NOTE:
In this case repair
the following:
Open circuit in
harness between
ignition coil & igni-
tor ASSY connec-
tor and engine
ground terminal
5 CHECK HARNESS BETWEEN ECM AND IG-
NITION COIL & IGNITOR ASSY CONNEC-
TOR.
1) Turn the ignition switch to OFF.
2) Disconnect the connector from ECM.
3) Disconnect the connector from ignition coil
& ignitor ASSY.
4) Measure the resistance of harness
between ECM and ignition coil & ignitor ASSY
connector.
Connector & terminal
(B135) No. 15 — (E34) No. 1:
(B135) No. 16 — (E33) No. 1:
(B135) No. 17 — (E32) No. 1:
(B135) No. 18 — (E31) No. 1:Is the resistance less than 1
Ω?Go to step 6.Repair the har-
ness and connec-
tor.
N
OTE:
In this case repair
the following:
OPEN CIR-
CUIT IN HAR-
NESS BETWEEN
ECM AND IGNI-
TION COIL &
IGNITOR ASSY
CONNECTOR.
Poor contact in
coupling connector
Page 1698 of 2870

EN(H4DOTC)-68
ENGINE (DIAGNOSTIC)
Diagnostics for Engine Starting Failure
6 CHECK HARNESS BETWEEN ECM AND IG-
NITION COIL & IGNITOR ASSY CONNEC-
TOR.
Measure the resistance of harness between
ECM and engine ground.
Connector & terminal:
(B135) No. 15 — Engine ground:
(B135) No. 16 — Engine ground:
(B135) No. 17 — Engine ground:
(B135) No. 18 — Engine ground:Is the resistance more than 1
MΩ?Go to step 7.Repair ground
short circuit in har-
ness between
ECM and ignition
coil & ignitor ASSY
connector.
7 CHECK POOR CONTACT.
Check poor contact in ECM connector.Is there poor contact in ECM
connector?Repair the poor
contact in ECM
connector.Replace the igni-
tion coil & ignitor
ASSY. Step Check Yes No
Page 1700 of 2870

EN(H4DOTC)-70
ENGINE (DIAGNOSTIC)
Diagnostics for Engine Starting Failure
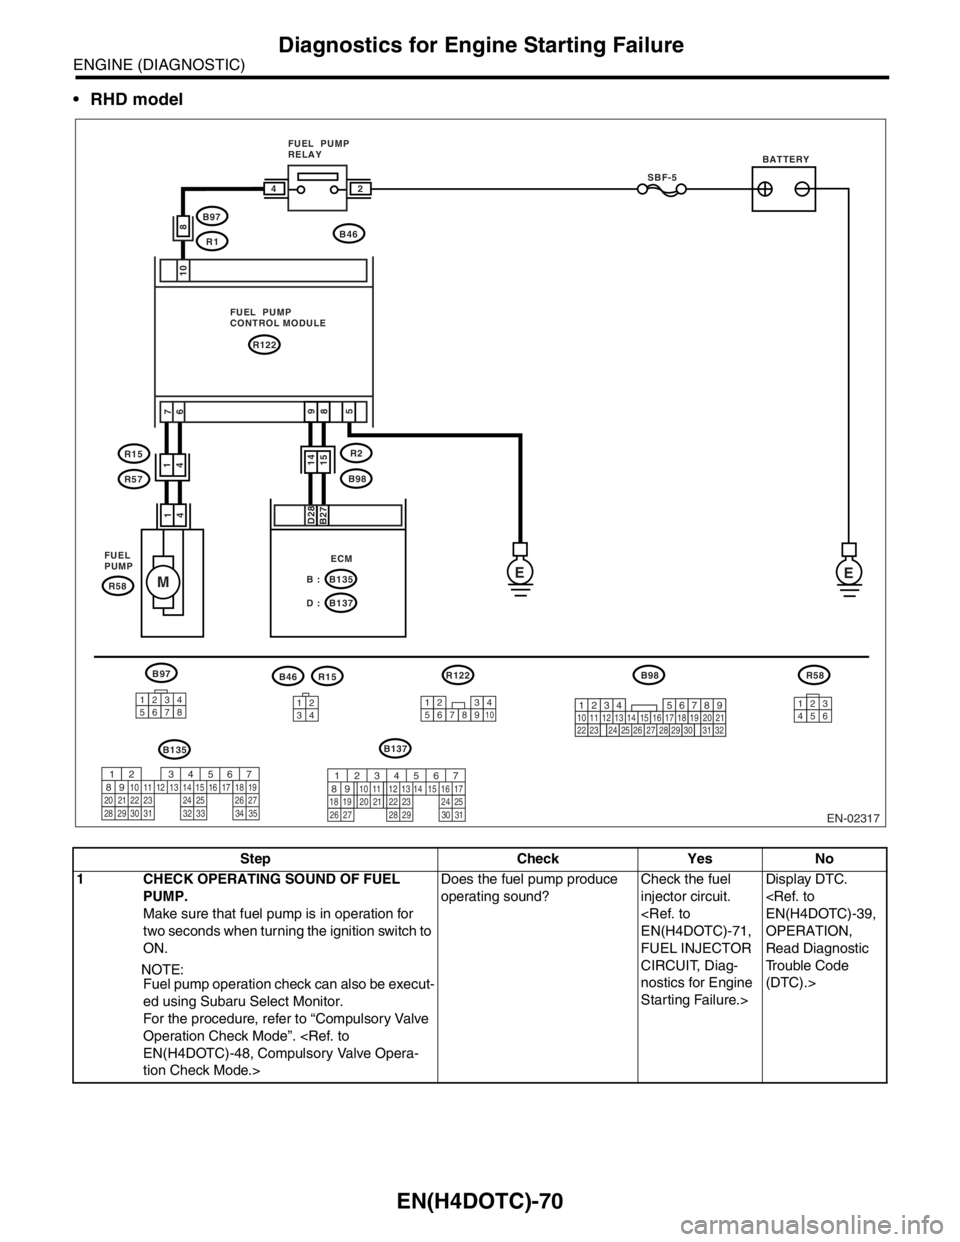
RHD model
Step Check Yes No
1 CHECK OPERATING SOUND OF FUEL
PUMP.
Make sure that fuel pump is in operation for
two seconds when turning the ignition switch to
ON.
NOTE:
Fuel pump operation check can also be execut-
ed using Subaru Select Monitor.
For the procedure, refer to “Compulsory Valve
Operation Check Mode”.
tion Check Mode.>Does the fuel pump produce
operating sound?Check the fuel
injector circuit.
FUEL INJECTOR
CIRCUIT, Diag-
nostics for Engine
Starting Failure.>Display DTC.
OPERATION,
Read Diagnostic
Trouble Code
(DTC).>
EN-02317
B97
B135B137
R122
EE
M
10 7
6
FUEL PUMP
RELAY
FUEL PUMP
CONTROL MODULE
FUEL
PUMP
SBF-5
B46
R122
B135 B :
B137 D :
R15
R57
R58
R2
ECM
B98
B98R58
B97
R1
BATTERY
8
1
4
D28
B27
123456783412123456789102356
24
1
4
9
85
14
14
15
219
32
1234
5610 11 12 13 14 15716
23 3019 20
22 26 27 28 29817
24 3118
25
567
82 1
94 310
24 22 23 2511 12 13 14 15
26 27
2816 17 18 19
20 21
29 30 31 32 33 34 35567
82 1
94 310
22 23 11 12 13 14 15
24 25
2616 17
18 19 20 21
27 28 29 30 31
B46R15
Page 1701 of 2870

EN(H4DOTC)-71
ENGINE (DIAGNOSTIC)
Diagnostics for Engine Starting Failure
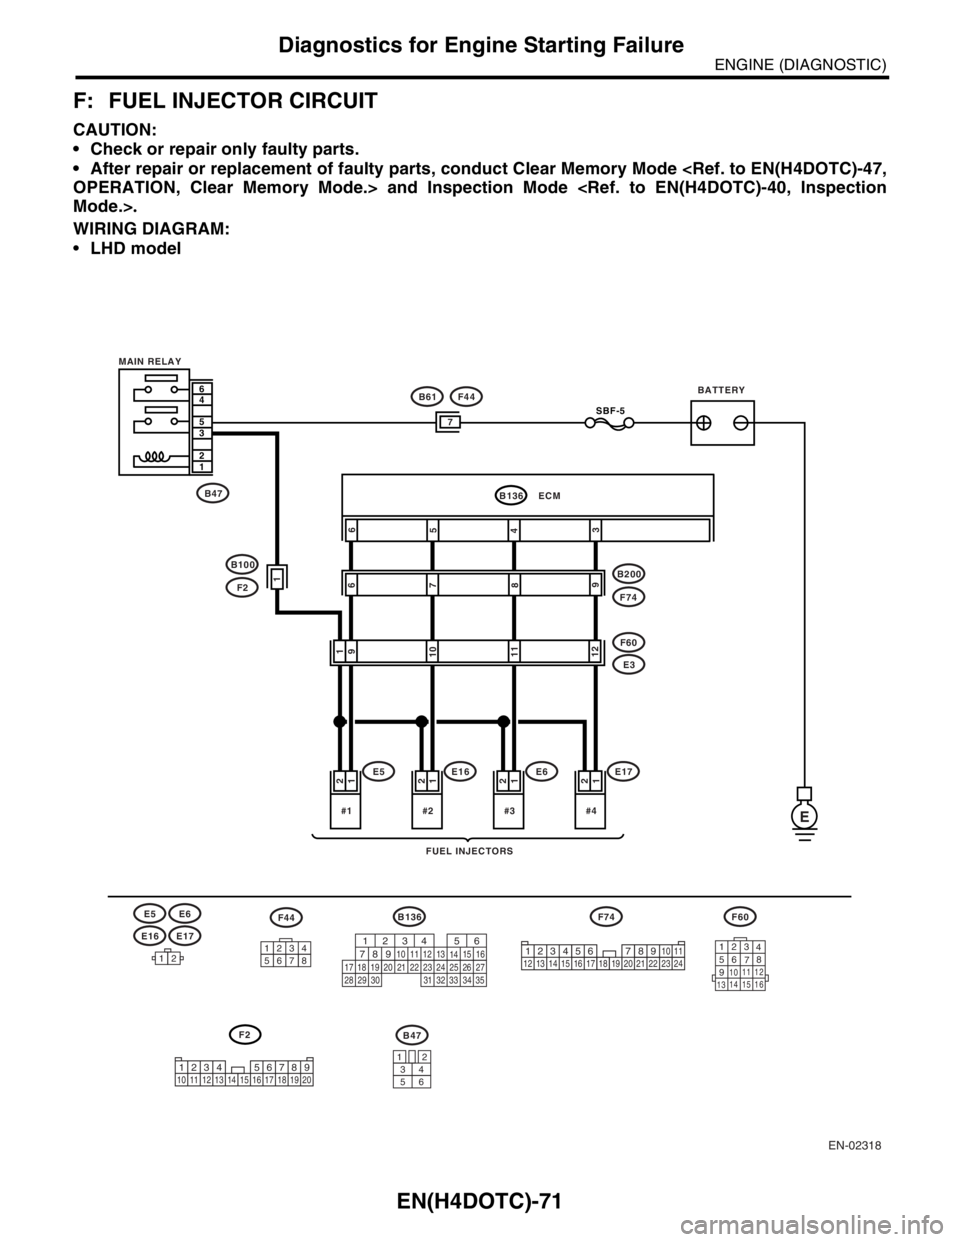
F: FUEL INJECTOR CIRCUIT
CAUTION:
Check or repair only faulty parts.
After repair or replacement of faulty parts, conduct Clear Memory Mode
WIRING DIAGRAM:
LHD model
EN-02318
BATTERY
FUEL INJECTORS MAIN RELAY
E#4
1 2
SBF-5
#3
1
2
#2
1
2
F60
#1
1 2
1
9
10
11
12
6
7
8
9
6
5
4
3
1
7
12123
4
56
78
9
1011 12
1314 15 16
6
4
5
3
2
1
F60
F74
B136F74
B200
E5
E5
E3
E6
E6
E16
E16
E17
F44
F2
B100
B47
B61F44
E17
12345678
F2B47
34
12
56
56
782 1
94 310
24 22 23 2511 12 13
1415
26 27
2816
17 18 19 20 21
33 34 29
32 30
31 3534 12 8910 11
12 13 14 15 16 17 18 19 20 21 22 23 2456 7
1234 5678910 11 12 13 14 15 16 17 18 19 20
B136
ECM
Page 1703 of 2870

EN(H4DOTC)-73
ENGINE (DIAGNOSTIC)
Diagnostics for Engine Starting Failure
Step Check Yes No
1 CHECK OPERATION OF EACH FUEL INJEC-
TOR.
While cranking the engine, check that each
fuel injector emits operating sound.Use a
sound scope or attach a screwdriver to the
injector for this check.Does the fuel pump produce
operating sound?Check the fuel
pressure.
INSPECTION,
Fuel Pressure.>Go to step 2.
2 CHECK POWER SUPPLY TO EACH FUEL
INJECTOR.
1) Turn the ignition switch to OFF.
2) Disconnect the connector from fuel injector.
3) Turn the ignition switch to ON.
4) Measure the power supply voltage between
fuel injector terminal and engine ground.
Connector & terminal
#1 (E5) No. 2 (+) — Engine ground (
−):
#2 (E16) No. 2 (+) — Engine ground (
−):
#3 (E6) No. 2 (+) — Engine ground (
−):
#4 (E17) No. 2 (+) — Engine ground (
−):Is the voltage more than 10 V? Go to step 3.Repair the har-
ness and connec-
tor.
N
OTE:
In this case repair
the following:
Open circuit in
harness between
main relay and fuel
injector connector
Poor contact in
main relay connec-
tor
Poor contact in
coupling connector
Poor contact in
fuel injector con-
nector
3 CHECK HARNESS BETWEEN ECM AND
FUEL INJECTOR CONNECTOR.
1) Disconnect the connector from ECM.
2) Measure the resistance of harness
between ECM and fuel injector connector.
Connector & terminal
(B136) No. 6 — (E5) No. 1:
(B136) No. 5 — (E16) No. 1:
(B136) No. 4 — (E6) No. 1:
(B136) No. 3 — (E6) No. 1:Is the resistance less than 1
Ω?Go to step 4.Repair the har-
ness and connec-
tor.
NOTE:
In this case repair
the following:
Open circuit in
harness between
ECM and fuel
injector connector
Poor contact in
coupling connector
4 CHECK HARNESS BETWEEN ECM AND
FUEL INJECTOR CONNECTOR.
Measure the resistance of harness between
ECM and fuel injector connector.
Connector & terminal
(B136) No. 6 — Chassis ground:
(B136) No. 5 — Chassis ground:
(B136) No. 4 — Chassis ground:
(B136) No. 3 — Chassis ground:Is the resistance less than 1
Ω?Repair ground
short circuit in har-
ness between
ECM and fuel
injector connector.Go to step 5.
5 CHECK EACH FUEL INJECTOR.
1) Turn the ignition switch to OFF.
2) Measure the resistance between each fuel
injector terminals.
Te r m i n a l s
No. 1 — No. 2:Is the resistance 5 — 20 Ω? Go to step 6.Replace the faulty
fuel injector.
6 CHECK POOR CONTACT.
Check poor contact in ECM connector.Is there poor contact in ECM
connector?Repair the poor
contact in ECM
connector.Inspection using
“General Diagnos-
tic Table”
295, INSPEC-
TION, General
Diagnostic Table.>
Page 1706 of 2870

EN(H4DOTC)-76
ENGINE (DIAGNOSTIC)
List of Diagnostic Trouble Code (DTC)
P0304 Cylinder 4 Misfire Detected
P0327 Knock Sensor 1 Circuit Low Input
(Bank 1 or Single Sensor)
nostic Trouble Code (DTC).>
P0328 Knock Sensor 1 Circuit High Input
(Bank 1 or Single Sensor)
nostic Trouble Code (DTC).>
P0335 Crankshaft Position Sensor “A” Cir-
cuit
(DTC).>
P0336 Crankshaft Position Sensor “A” Cir-
cuit Range/Performance
Diagnostic Trouble Code (DTC).>
P0340 Camshaft Position Sensor “A” Cir-
cuit (Bank 1 or Single Sensor)
Diagnostic Trouble Code (DTC).>
P0341 Camshaft Position Sensor “A” Cir-
cuit Range/Performance (Bank 1 or
Single Sensor)
Diagnostic Procedure with Diagnostic Trouble Code (DTC).>
P0365 Camshaft Position Sensor “B” Cir-
cuit (Bank 1)
(DTC).>
P0390 Camshaft Position Sensor “B” Cir-
cuit (Bank 2)
(DTC).>
P0420 Catalyst System Efficiency Below
Threshold (Bank 1)
Trouble Code (DTC).>
P0458 Evaporative Emission Control Sys-
tem Purge Control Valve Circuit
Low
cedure with Diagnostic Trouble Code (DTC).>
P0459 Evaporative Emission Control Sys-
tem Purge Control Valve Circuit
High
Procedure with Diagnostic Trouble Code (DTC).>
P0461 Fuel Level Sensor Circuit Range/
Performance
Code (DTC).>
P0462 Fuel Level Sensor Circuit Low
Input
P0463 Fuel Level Sensor Circuit High
Input
P0464 Fuel Level Sensor Circuit Intermit-
tent
(DTC).>
P0483 Cooling Fan Rationality Check
P0502 Vehicle Speed Sensor Circuit Low
Input
(DTC).>
P0503 Vehicle Speed Sensor Intermittent/
Erratic/High
(DTC).>
P0506 Idle Control System RPM Lower
Than Expected
Code (DTC).> DTC Item NOTE