2004 SUBARU FORESTER height
[x] Cancel search: heightPage 1003 of 2870
CO(H4SO)-20
COOLING
Engine Coolant
B: INSPECTION
1. RELATIONSHIP OF SUBARU COOLANT
CONCENTRATION AND FREEZING TEM-
PERATURE
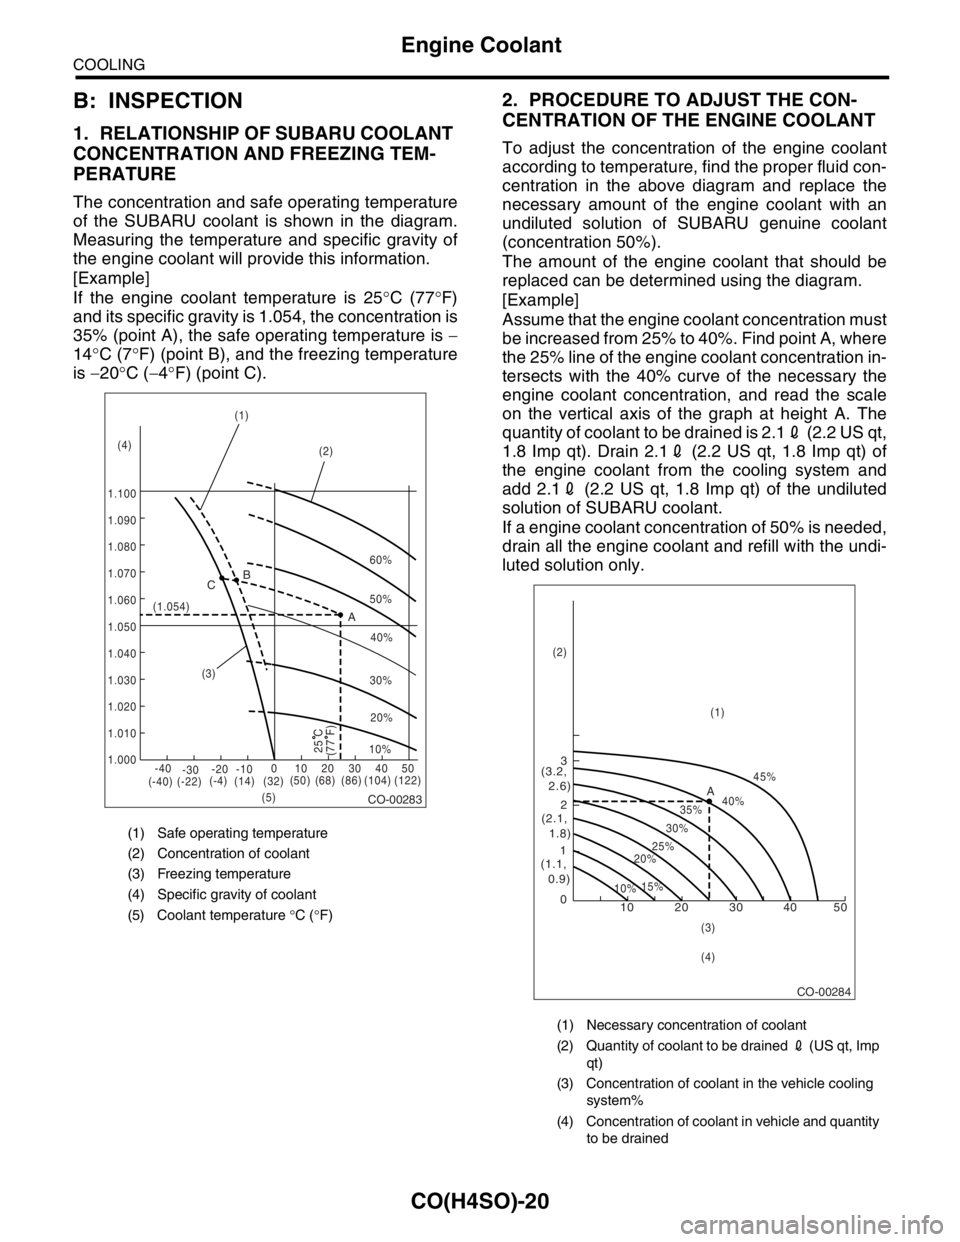
The concentration and safe operating temperature
of the SUBARU coolant is shown in the diagram.
Measuring the temperature and specific gravity of
the engine coolant will provide this information.
[Example]
If the engine coolant temperature is 25°C (77°F)
and its specific gravity is 1.054, the concentration is
35% (point A), the safe operating temperature is −
14°C (7°F) (point B), and the freezing temperature
is −20°C (−4°F) (point C).
2. PROCEDURE TO ADJUST THE CON-
CENTRATION OF THE ENGINE COOLANT
To adjust the concentration of the engine coolant
according to temperature, find the proper fluid con-
centration in the above diagram and replace the
necessary amount of the engine coolant with an
undiluted solution of SUBARU genuine coolant
(concentration 50%).
The amount of the engine coolant that should be
replaced can be determined using the diagram.
[Example]
Assume that the engine coolant concentration must
be increased from 25% to 40%. Find point A, where
the 25% line of the engine coolant concentration in-
tersects with the 40% curve of the necessary the
engine coolant concentration, and read the scale
on the vertical axis of the graph at height A. The
quantity of coolant to be drained is 2.12 (2.2 US qt,
1.8 Imp qt). Drain 2.12 (2.2 US qt, 1.8 Imp qt) of
the engine coolant from the cooling system and
add 2.12 (2.2 US qt, 1.8 Imp qt) of the undiluted
solution of SUBARU coolant.
If a engine coolant concentration of 50% is needed,
drain all the engine coolant and refill with the undi-
luted solution only.
(1) Safe operating temperature
(2) Concentration of coolant
(3) Freezing temperature
(4) Specific gravity of coolant
(5) Coolant temperature °C (°F)
CO-00283
60%
(1.054)
1.000 1.010 1.020
1.030
1.040
1.050
1.060
1.070 1.080 1.090
1.100(1)
(2)
(3)
(5) (4)B
A C
-40
(-40) (-22)(-4)
(14)(32)(50) (68) (86) (104) (122) -30-20 -1001020304050
(77 F)
50%
40%
30%
20%
25 C10%
(1) Necessary concentration of coolant
(2) Quantity of coolant to be drained 2 (US qt, Imp
qt)
(3) Concentration of coolant in the vehicle cooling
system%
(4) Concentration of coolant in vehicle and quantity
to be drained
CO-00284
10 0 12 3
(1.1,
0.9)(2.1,
1.8) (3.2,
2.6)
10%15%25%
20%30%35%40%45%
A
20 30 40 50
(1) (2)
(3)
(4)
Page 1459 of 2870

ME(H4DOTC)-3
MECHANICAL
General Description
CamshaftBend limit 0.020 mm (0.0079 in)
Thrust clearanceSTD 0.068 — 0.116 mm (0.0027 — 0.0046 in)
Limit 0.14 mm (0.0055 in)
Cam lobe heightIntakeSTD 44.75 — 44.85 mm (1.762 — 1.766 in)
Limit 44.65 mm (1.758 in)
ExhaustSTD 44.75 — 44.85 mm (1.762 — 1.766 in)
Limit 44.65 mm (1.758 in)
Journal O.D.
STDFront 37.946 — 37.963 mm (1.4939 — 1.4946 in)
Center
rear29.946 — 29.963 mm (1.1790 — 1.1796 in)
Oil clearanceSTD 0.037 — 0.072 mm (0.0015 — 0.0028 in)
Limit 0.10 mm (0.0039 in)
Cylinder
headSurface warpage limit 0.05 mm (0.0020 in)
Surface grinding limit 0.3 mm (0.012 in)
Standard height 127.5 mm (5.02 in)
Va l ve s e a tRefacing angle 90°
Contacting widthIntakeSTD 1.0 mm (0.039 in)
Limit 1.7 mm (0.067 in)
ExhaustSTD 1.5 mm (0.059 in)
Limit 2.2 mm (0.087 in)
Valve guideInner diameter 6.000 — 6.012 mm (0.2362 — 0.2367 in)
Protrusion above head 15.8 — 16.2 mm (0.622 — 0.638 in)
Va l veHead edge thicknessIntakeSTD 1.2 mm (0.047 in)
Limit 0.8 mm (0.031 in)
ExhaustSTD 1.5 mm (0.059 in)
Limit 0.8 mm (0.031 in)
Stem diameterIntake 5.955 — 5.970 mm (0.2344 — 0.2350 in)
Exhaust 5.945 — 5.960 mm (0.2341 — 0.2346 in)
Stem oil clearanceSTDIntake 0.030 — 0.057 mm (0.0012 — 0.0022 in)
Exhaust 0.040 — 0.067 mm (0.0016 — 0.0026 in)
Limit — 0.15 mm (0.0059 in)
Overall lengthIntake 104.4 mm (4.110 in)
Exhaust 104.65 mm (4.120 in)
Va l ve
springFree length 44.67 mm (1.759 in)
Squareness 2.5°, 2.0 mm (0.079 in)
Tension/spring heightSet206 — 236 N (21.0 — 24.1 kgf, 46.3 — 53.1 lb)/
36.0 mm (1.417 in)
Lift485 — 537 N (49.5 — 54.8 kgf, 109 — 121 lb)/
26.6 mm (1.047 in)
Cylinder
blockSurface warpage limit (mating with cylinder head) 0.05 mm (0.0020 in)
Surface grinding limit 0.1 mm (0.004 in)
Cylinder bore STDA 92.005 — 92.015 mm (3.6222 — 3.6226 in)
B 91.995 — 92.005 mm (3.6218 — 3.6222 in)
TaperSTD 0.015 mm (0.0006 in)
Limit 0.050 mm (0.0020 in)
Out-of-roundnessSTD 0.010 mm (0.0004 in)
Limit 0.050 mm (0.0020 in)
Piston clearanceSTD 0.010 — 0.030 mm (0.0004 — 0.0012 in)
Limit 0.050 mm (0.0020 in)
Enlarging (boring) limit 0.5 mm (0.020 in)
Page 1463 of 2870

ME(H4DOTC)-7
MECHANICAL
General Description
Belt ten-
sion
adjusterProtrusion of adjuster rod 5.7 — 6.7 mm (0.224 — 0.264 in)
Belt ten-
sionerSpacer O.D. 17.955 — 17.975 mm (0.7069 — 0.7077 in)
Tensioner bush I.D. 18.0 — 18.08 mm (0.7087 — 0.7118 in)
Clearance between spacer and bushSTD 0.025 — 0.125 mm (0.0010 — 0.0049 in)
Limit 0.175 mm (0.069 in)
Side clearance of spacerSTD 0.2 — 0.55 mm (0.0079 — 0.0217 in)
Limit 0.81 mm (0.0319 in)
CamshaftBend limit 0.020 mm (0.0079 in)
Thrust clearanceSTD 0.068 — 0.116 mm (0.0027 — 0.0046 in)
Limit 0.14 mm (0.0055 in)
Cam lobe heightIntakeSTD 46.55 — 46.65 mm (1.833 — 1.837 in)
Limit 46.45 mm (1.829 in)
ExhaustSTD 46.75 — 46.85 mm (1.841 — 1.844 in)
Limit 46.65 mm (1.837 in)
Journal O.D. STDFront 37.946 — 37.963 mm (1.4939 — 1.4946 in)
Center
rear29.946 — 29.963 mm (1.1790 — 1.1796 in)
Oil clearanceSTD 0.037 — 0.072 mm (0.0015 — 0.0028 in)
Limit 0.10 mm (0.0039 in)
Cylinder
headSurface warpage limit (mating with cylinder head) 0.05 mm (0.0020 in)
Surface grinding limit 0.3 mm (0.012 in)
Standard height 127.5 mm (5.02 in)
Va l ve s e a tRefacing angle 90°
Contacting widthIntakeSTD 1.0 mm (0.039 in)
Limit 1.7 mm (0.067 in)
ExhaustSTD 1.5 mm (0.059 in)
Limit 2.2 mm (0.087 in)
Valve guideInner diameter 6.000 — 6.012 mm (0.2362 — 0.2367 in)
Protrusion above head 15.8 — 16.2 mm (0.622 — 0.638 in)
Va l veHead edge thicknessIntakeSTD 1.2 mm (0.047 in)
Limit 0.8 mm (0.031 in)
ExhaustSTD 1.5 mm (0.059 in)
Limit 0.8 mm (0.031 in)
Stem diameterIntake 5.955 — 5.970 mm (0.2344 — 0.2350 in)
Exhaust 5.945 — 5.960 mm (0.2341 — 0.2346 in)
Stem oil clearanceSTDIntake 0.030 — 0.057 mm (0.0012 — 0.0022 in)
Exhaust 0.040 — 0.067 mm (0.0016 — 0.0026 in)
Limit — 0.15 mm (0.0059 in)
Overall lengthIntake 104.4 mm (4.110 in)
Exhaust 104.65 mm (4.120 in)
Va l ve
springFree length 47.32 mm (1.863 in)
Squareness 2.5°, 2.1 mm (0.083 in)
Tension/spring heightSet205 — 235 N (20.9 — 24.0 kgf, 46.1 — 52.8 lb)/
36.0 mm (1.417 in)
Lift426 — 490 N (43.4 — 50.0 kgf, 95.8 — 110 lb)/
26.50 mm (1.043 in)
Page 1464 of 2870

ME(H4DOTC)-8
MECHANICAL
General Description
Cylinder
blockSurface warpage limit (mating with cylinder head) 0.05 mm (0.0020 in)
Surface grinding limit 0.1 mm (0.004 in)
Standard height 201.0 mm (7.91 in)
Cylinder bore STDA 99.505 — 99.515 mm (3.9175 — 3.9179 in)
B 99.495 — 99.505 mm (3.9171 — 3.9175 in)
TaperSTD 0.015 mm (0.0006 in)
Limit 0.050 mm (0.0020 in)
Out-of-roundnessSTD 0.010 mm (0.0004 in)
Limit 0.050 mm (0.0020 in)
Piston clearanceSTD−0.010 — 0.010 mm (−0.0004 — 0.0004 in)
Limit 0.030 mm (0.0012 in)
Enlarging (boring) limit 0.5 mm (0.020 in)
Piston Outer diameterSTDA 99.505 — 99.515 mm (3.9175 — 3.9179 in)
B 99.495 — 99.505 mm (3.9171 — 3.9175 in)
0.25 mm (0.0098 in)
OS99.745 — 99.765 mm (3.9270 — 3.9278 in)
0.50 mm (0.0197 in)
OS99.995 — 100.015 mm (3.9368 — 3.9376 in)
Piston pinStandard clearance between piston
pin and hole in pistonSTD 0.004 — 0.008 mm (0.0002 — 0.0003 in)
Limit 0.020 mm (0.0008 in)
Degree of fitPiston pin must be fitted into position with thumb at 20°C
(68°F).
Piston ringPiston ring gapTop ringSTD 0.20 — 0.25 mm (0.0079 — 0.0098 in)
Limit 1.0 mm (0.039 in)
Second
ringSTD 0.37 — 0.52 mm (0.015 — 0.020 in)
Limit 1.0 mm (0.039 in)
Oil ringSTD 0.20 — 0.50 mm (0.0079 — 0.020 in)
Limit 1.5 mm (0.059 in)
Clearance between piston
ring and piston ring
grooveTop ringSTD 0.040 — 0.080 mm (0.0016 — 0.0031 in)
Limit 0.15 mm (0.0059 in)
Second
ringSTD 0.030 — 0.070 mm (0.0012 — 0.0028 in)
Limit 0.15 mm (0.0059 in)
Connecting
rodBend twist per 100 mm (3.94 in) in
lengthLimit 0.10 mm (0.0039 in)
Side clearanceSTD 0.070 — 0.330 mm (0.0028 — 0.0130 in)
Limit 0.4 mm (0.016 in)
Connecting
rod bearingOil clearanceSTD 0.017 — 0.045 mm (0.0007 — 0.0018 in)
Limit 0.05 mm (0.0020 in)
Thickness at center portionSTD 1.490 — 1.502 mm (0.0587 — 0.0591 in)
0.03 mm
(0.0012
in) US1.504 — 1.512 mm (0.0592 — 0.0595 in)
0.05 mm
(0.0020
in) US1.514 — 1.522 mm (0.0596 — 0.0599 in)
0.25 mm
(0.0098
in) US1.614 — 1.622 mm (0.0635 — 0.0639 in)
Connecting
rod bushingClearance between piston pin and
bushingSTD 0 — 0.022 mm (0 — 0.0009 in)
Limit 0.030 mm (0.0012 in)
Page 1531 of 2870
ME(H4DOTC)-73
MECHANICAL
Camshaft
C: INSPECTION
1) Measure the bend, and repair or replace if nec-
essary.
Limit:
0.020 mm (0.0008 in)
2) Check the journal for damage and wear. Re-
place if faulty.
3) Measure the outside diameter of camshaft jour-
nal. If the journal diameter is not as specified,
check the oil clearance.
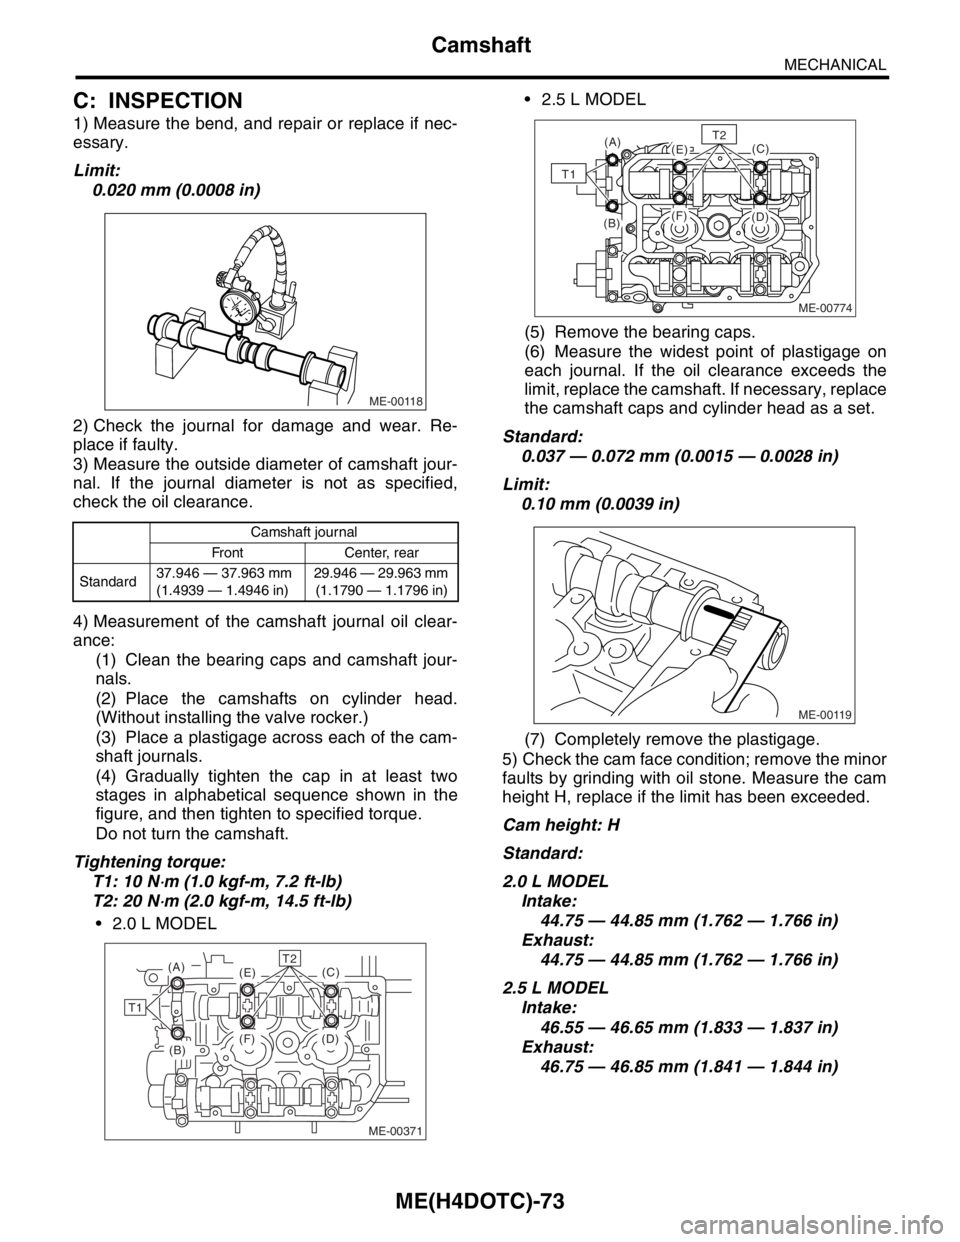
4) Measurement of the camshaft journal oil clear-
ance:
(1) Clean the bearing caps and camshaft jour-
nals.
(2) Place the camshafts on cylinder head.
(Without installing the valve rocker.)
(3) Place a plastigage across each of the cam-
shaft journals.
(4) Gradually tighten the cap in at least two
stages in alphabetical sequence shown in the
figure, and then tighten to specified torque.
Do not turn the camshaft.
Tightening torque:
T1: 10 N
⋅m (1.0 kgf-m, 7.2 ft-lb)
T2: 20 N
⋅m (2.0 kgf-m, 14.5 ft-lb)
2.0 L MODEL 2.5 L MODEL
(5) Remove the bearing caps.
(6) Measure the widest point of plastigage on
each journal. If the oil clearance exceeds the
limit, replace the camshaft. If necessary, replace
the camshaft caps and cylinder head as a set.
Standard:
0.037 — 0.072 mm (0.0015 — 0.0028 in)
Limit:
0.10 mm (0.0039 in)
(7) Completely remove the plastigage.
5) Check the cam face condition; remove the minor
faults by grinding with oil stone. Measure the cam
height H, replace if the limit has been exceeded.
Cam height: H
Standard:
2.0 L MODEL
Intake:
44.75 — 44.85 mm (1.762 — 1.766 in)
Exhaust:
44.75 — 44.85 mm (1.762 — 1.766 in)
2.5 L MODEL
Intake:
46.55 — 46.65 mm (1.833 — 1.837 in)
Exhaust:
46.75 — 46.85 mm (1.841 — 1.844 in)
Camshaft journal
Front Center, rear
Standard37.946 — 37.963 mm
(1.4939 — 1.4946 in)29.946 — 29.963 mm
(1.1790 — 1.1796 in)
ME-00118
ME-00371
(F) (D)(C)
T1
T2(A)(E)
(B)
ME-00774
(A)(E)
(F)(B)(D)
(C)T2
T1
ME-00119
Page 1536 of 2870
ME(H4DOTC)-78
MECHANICAL
Cylinder Head Assembly
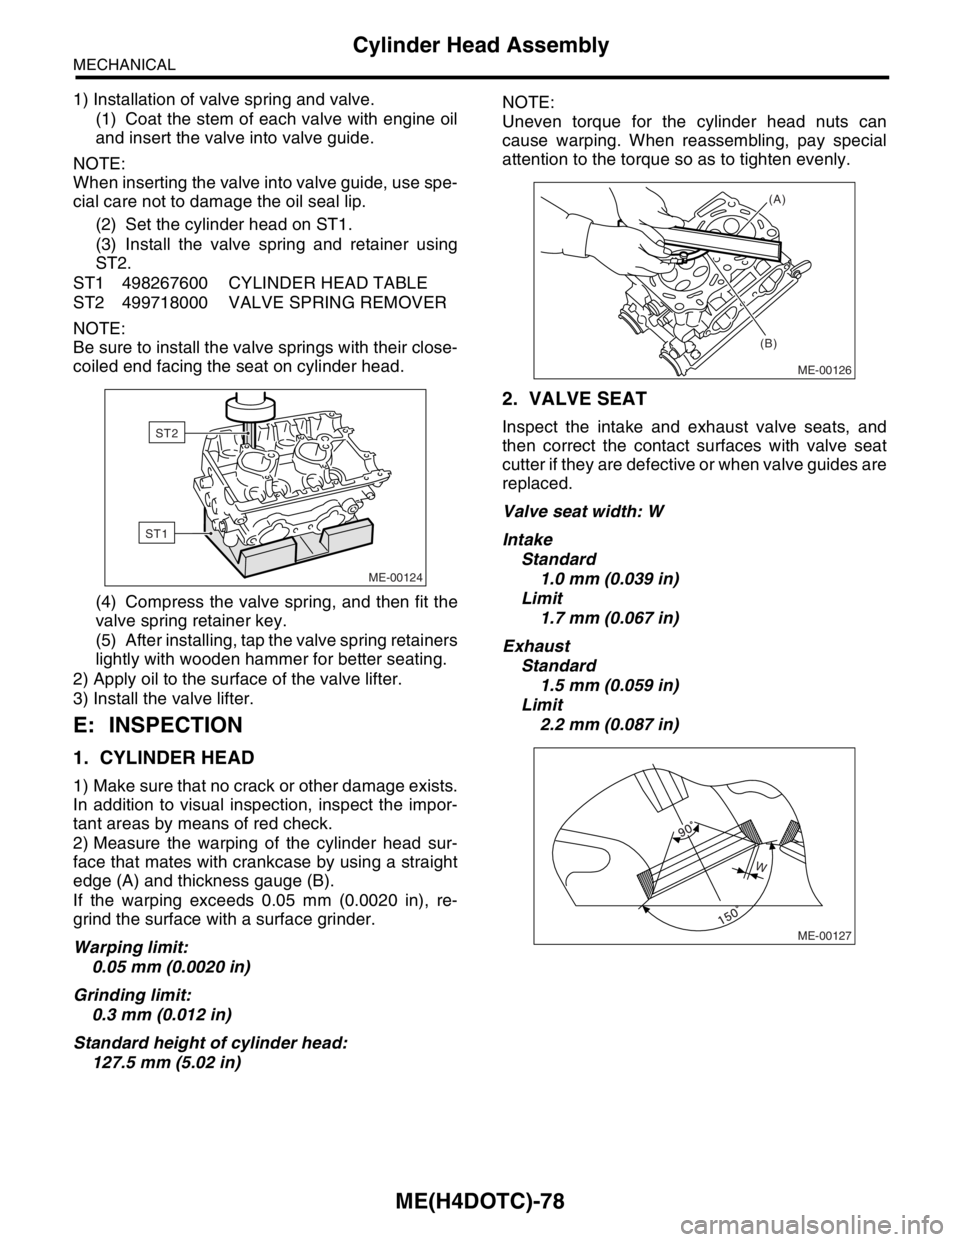
1) Installation of valve spring and valve.
(1) Coat the stem of each valve with engine oil
and insert the valve into valve guide.
NOTE:
When inserting the valve into valve guide, use spe-
cial care not to damage the oil seal lip.
(2) Set the cylinder head on ST1.
(3) Install the valve spring and retainer using
ST2.
ST1 498267600 CYLINDER HEAD TABLE
ST2 499718000 VALVE SPRING REMOVER
NOTE:
Be sure to install the valve springs with their close-
coiled end facing the seat on cylinder head.
(4) Compress the valve spring, and then fit the
valve spring retainer key.
(5) After installing, tap the valve spring retainers
lightly with wooden hammer for better seating.
2) Apply oil to the surface of the valve lifter.
3) Install the valve lifter.
E: INSPECTION
1. CYLINDER HEAD
1) Make sure that no crack or other damage exists.
In addition to visual inspection, inspect the impor-
tant areas by means of red check.
2) Measure the warping of the cylinder head sur-
face that mates with crankcase by using a straight
edge (A) and thickness gauge (B).
If the warping exceeds 0.05 mm (0.0020 in), re-
grind the surface with a surface grinder.
Warping limit:
0.05 mm (0.0020 in)
Grinding limit:
0.3 mm (0.012 in)
Standard height of cylinder head:
127.5 mm (5.02 in)NOTE:
Uneven torque for the cylinder head nuts can
cause warping. When reassembling, pay special
attention to the torque so as to tighten evenly.
2. VALVE SEAT
Inspect the intake and exhaust valve seats, and
then correct the contact surfaces with valve seat
cutter if they are defective or when valve guides are
replaced.
Valve seat width: W
Intake
Standard
1.0 mm (0.039 in)
Limit
1.7 mm (0.067 in)
Exhaust
Standard
1.5 mm (0.059 in)
Limit
2.2 mm (0.087 in)
ME-00124
ST1
ST2
ME-00126
(A)
(B)
ME-00127
W
Page 1538 of 2870
ME(H4DOTC)-80
MECHANICAL
Cylinder Head Assembly
(9) Recheck the contact condition between
valve and valve seat after replacing the valve
guide.
4. INTAKE AND EXHAUST VALVE
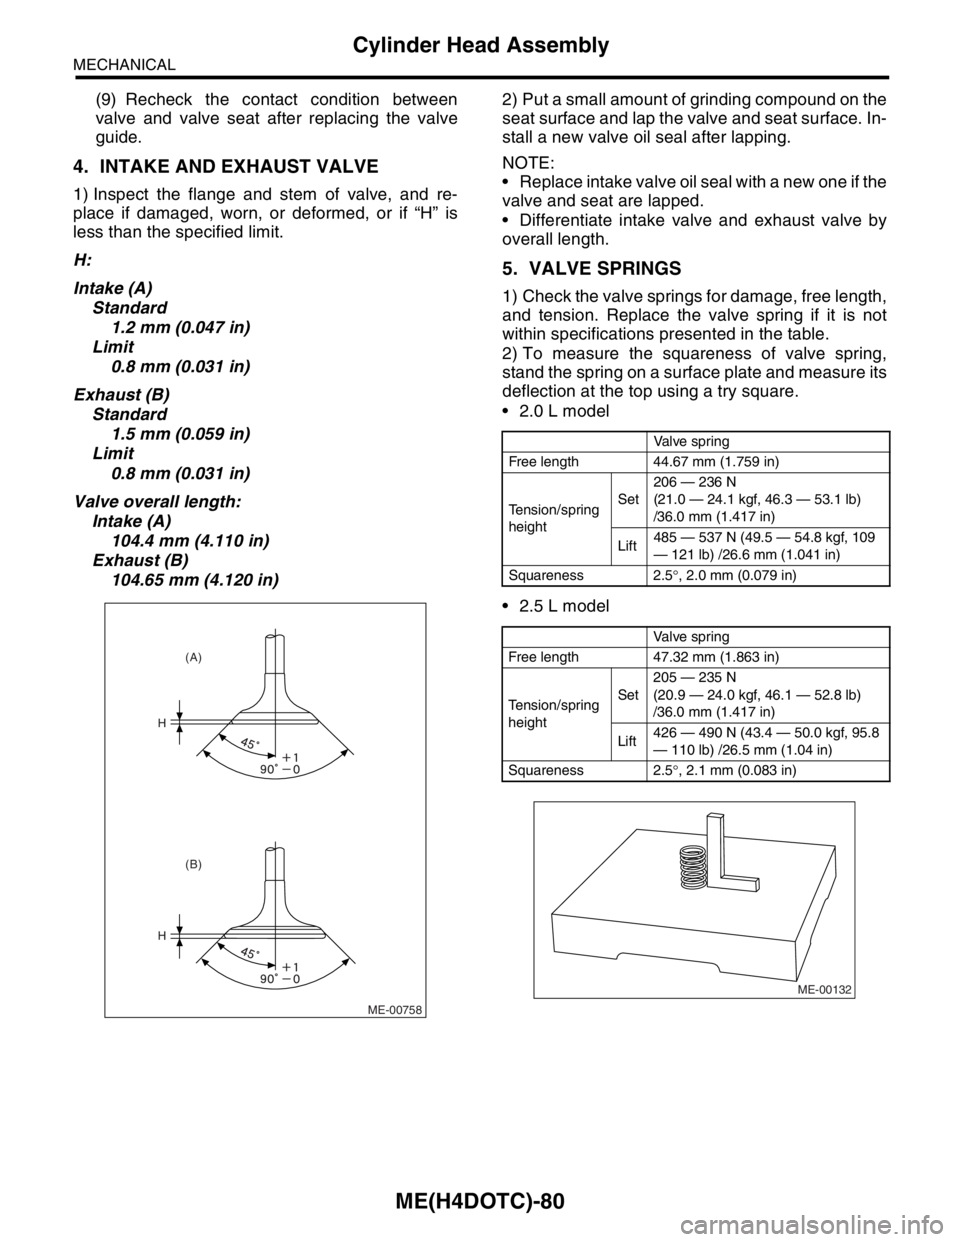
1) Inspect the flange and stem of valve, and re-
place if damaged, worn, or deformed, or if “H” is
less than the specified limit.
H:
Intake (A)
Standard
1.2 mm (0.047 in)
Limit
0.8 mm (0.031 in)
Exhaust (B)
Standard
1.5 mm (0.059 in)
Limit
0.8 mm (0.031 in)
Valve overall length:
Intake (A)
104.4 mm (4.110 in)
Exhaust (B)
104.65 mm (4.120 in)2) Put a small amount of grinding compound on the
seat surface and lap the valve and seat surface. In-
stall a new valve oil seal after lapping.
NOTE:
Replace intake valve oil seal with a new one if the
valve and seat are lapped.
Differentiate intake valve and exhaust valve by
overall length.
5. VALVE SPRINGS
1) Check the valve springs for damage, free length,
and tension. Replace the valve spring if it is not
within specifications presented in the table.
2) To measure the squareness of valve spring,
stand the spring on a surface plate and measure its
deflection at the top using a try square.
2.0 L model
2.5 L model
ME-00758
H
H
(B) (A)
Valve spring
Free length 44.67 mm (1.759 in)
Tension/spring
heightSet206 — 236 N
(21.0 — 24.1 kgf, 46.3 — 53.1 lb)
/36.0 mm (1.417 in)
Lift485 — 537 N (49.5 — 54.8 kgf, 109
— 121 lb) /26.6 mm (1.041 in)
Squareness 2.5°, 2.0 mm (0.079 in)
Valve spring
Free length 47.32 mm (1.863 in)
Tension/spring
heightSet205 — 235 N
(20.9 — 24.0 kgf, 46.1 — 52.8 lb)
/36.0 mm (1.417 in)
Lift426 — 490 N (43.4 — 50.0 kgf, 95.8
— 110 lb) /26.5 mm (1.04 in)
Squareness 2.5°, 2.1 mm (0.083 in)
ME-00132
Page 1565 of 2870
ME(H4DOTC)-105
MECHANICAL
Cylinder Block
D: ASSEMBLY
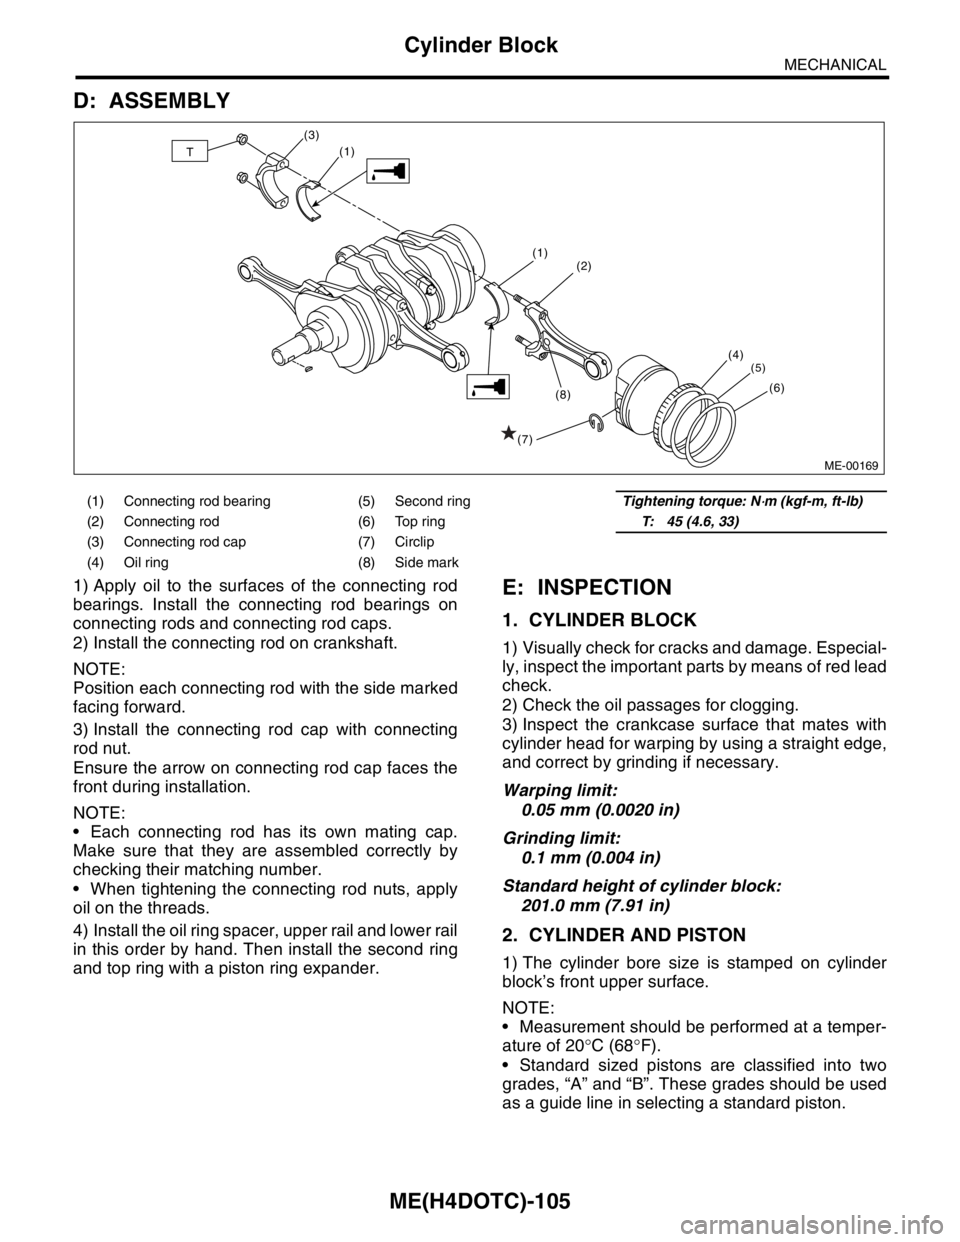
1) Apply oil to the surfaces of the connecting rod
bearings. Install the connecting rod bearings on
connecting rods and connecting rod caps.
2) Install the connecting rod on crankshaft.
NOTE:
Position each connecting rod with the side marked
facing forward.
3) Install the connecting rod cap with connecting
rod nut.
Ensure the arrow on connecting rod cap faces the
front during installation.
NOTE:
Each connecting rod has its own mating cap.
Make sure that they are assembled correctly by
checking their matching number.
When tightening the connecting rod nuts, apply
oil on the threads.
4) Install the oil ring spacer, upper rail and lower rail
in this order by hand. Then install the second ring
and top ring with a piston ring expander.E: INSPECTION
1. CYLINDER BLOCK
1) Visually check for cracks and damage. Especial-
ly, inspect the important parts by means of red lead
check.
2) Check the oil passages for clogging.
3) Inspect the crankcase surface that mates with
cylinder head for warping by using a straight edge,
and correct by grinding if necessary.
Warping limit:
0.05 mm (0.0020 in)
Grinding limit:
0.1 mm (0.004 in)
Standard height of cylinder block:
201.0 mm (7.91 in)
2. CYLINDER AND PISTON
1) The cylinder bore size is stamped on cylinder
block’s front upper surface.
NOTE:
Measurement should be performed at a temper-
ature of 20°C (68°F).
Standard sized pistons are classified into two
grades, “A” and “B”. These grades should be used
as a guide line in selecting a standard piston.
(1) Connecting rod bearing (5) Second ringTightening torque: N⋅m (kgf-m, ft-lb)
(2) Connecting rod (6) Top ringT: 45 (4.6, 33)
(3) Connecting rod cap (7) Circlip
(4) Oil ring (8) Side mark
ME-00169
(2)
(4)
(5)
(6)
(1)
(1)
(7)(8) (3)T