Page 2405 of 2870
4AT-92
AUTOMATIC TRANSMISSION
Transfer Clutch
30.Transfer Clutch
A: REMOVAL
1) Remove the transmission assembly from vehi-
cle.
mission Assembly.>
2) Remove the extension case, and then remove
the transfer clutch assembly.
MOVAL, Extension Case.>
ASSEMBLY, Extension Case.>
B: INSTALLATION
1) Select the thrust needle bearing.
95, ADJUSTMENT, Transfer Clutch.>
2) Install the transfer clutch assembly to the case.
3) Tighten bolts to secure the case.
Tightening torque:
25 N
⋅m (2.5 kgf-m, 18.1 ft-lb)
4) Install the transmission assembly into the vehi-
cle.
Transmission Assembly.>
C: DISASSEMBLY
1) Remove the seal ring.
2) Remove ball bearing using ST and press.
ST 498077600 REMOVER
3) Remove the snap ring, and then take out the
pressure plate, drive plate and driven plate using
flat tip screw driver and etc.
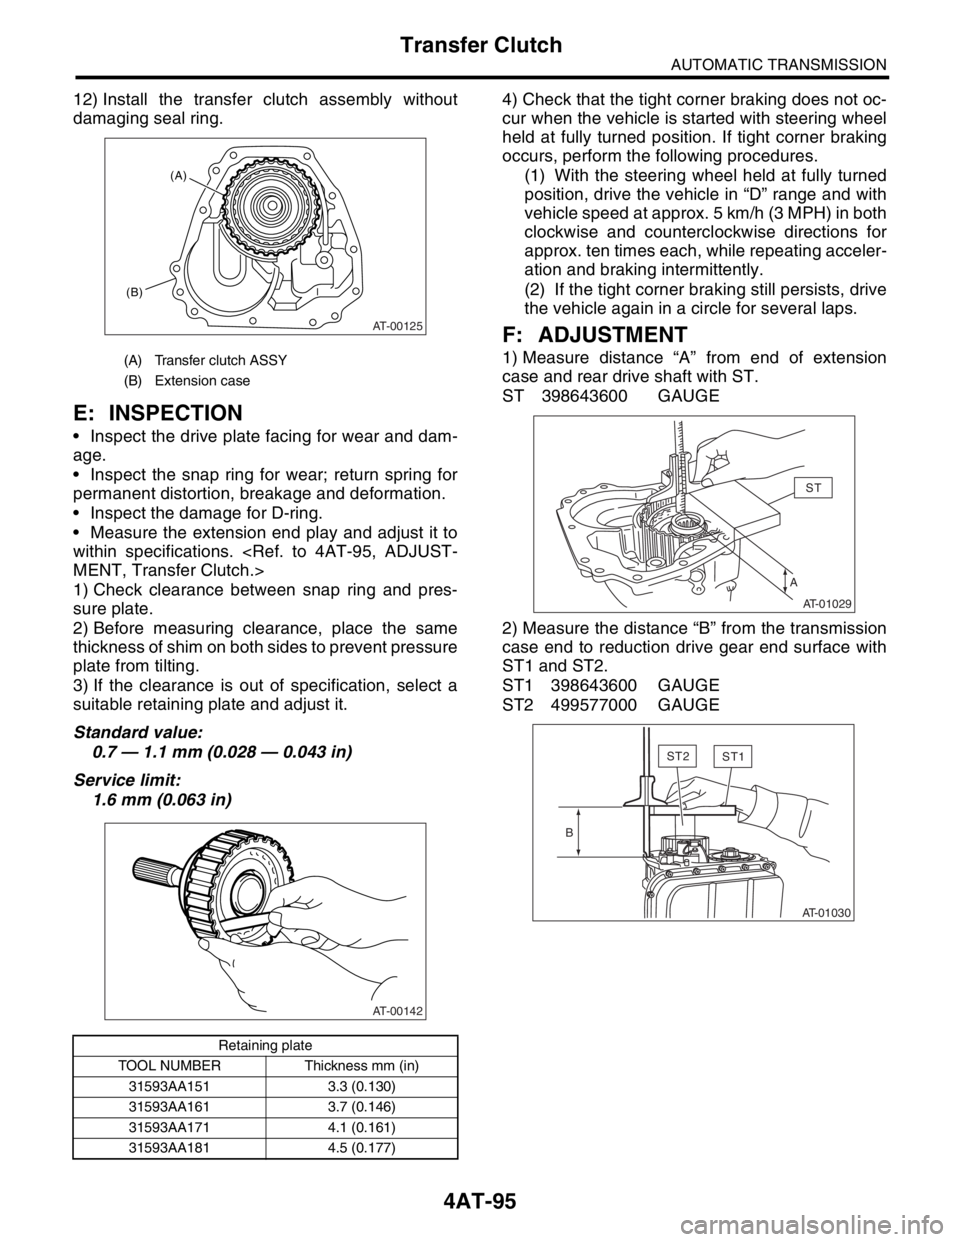
(A) Transfer clutch ASSY
(B) Extension case
AT-00125
(A)
(B)
AT-00118
(A) Seal ring
(B) Rear drive shaft
(A) Snap ring
(B) Rear drive shaft
AT-00127
AT-00128
AT-00129
Page 2406 of 2870
4AT-93
AUTOMATIC TRANSMISSION
Transfer Clutch
4) Using ST1, ST2 and ST3, remove the snap ring,
and then take out the return spring and transfer
clutch piston seal.
ST1 399893600 PLIERS
ST2 398673600 COMPRESSOR
ST3 398623600 SEAT
5) Apply compressed air to the rear drive shaft to
remove the transfer clutch piston.
D: ASSEMBLY
1) Install the transfer clutch piston.2) Install the return spring to transfer clutch piston.
3) Install the transfer clutch piston seal.
4) Install ST to the rear drive shaft.
ST 499257300 SNAP RING OUTER GUIDE
(A) Snap ring
(B) Transfer clutch piston seal
(A) Transfer clutch piston
(B) Rear drive shaft
AT-00130(B) (A)
ST1ST2
ST3
AT-00131
(B)AT-00132
(A)
(A) Return spring
(B) Rear drive shaft
(A) Transfer clutch piston seal
(B) Rear drive shaft
(A) Rear drive shaft
(B)AT-00133
(A)
(B)
AT-00134
(A)
AT-00135
(A)
ST
Page 2407 of 2870
4AT-94
AUTOMATIC TRANSMISSION
Transfer Clutch
5) Install the snap ring to ST.
ST 499257300 SNAP RING OUTER GUIDE
6) Install the snap ring to rear drive shaft using ST1
and ST2.
ST1 499257300 SNAP RING OUTER GUIDE
ST2 499247400 INSTALLER
7) Install the driven plate, drive plate, pressure
plate, retaining plate and snap ring.8) Apply compressed air to see if the assembled
parts move smoothly.
9) Check clearance between snap ring and pres-
sure plate.
fer Clutch.>
10) Press-fit new ball bearing using ST.
ST 899580100 INSTALLER
11) Apply vaseline to seal ring and attach to seal
ring groove of rear drive shaft.
NOTE:
While installing the seal ring, not to expand the seal
ring excessively.
(A) Snap ring
(B) Transfer clutch
(A) Snap ring
(B) Transfer clutch
(A) Snap ring
AT-00136
(A)
(B)ST
AT-00137
(A)
(B)
ST2
ST1
AT-00138
(A)
(A) Ball bearing
(A) Seal ring
(B) Rear drive shaft
AT-00139
AT-00140
(A)
ST
AT-00141
(A)(B)
Page 2408 of 2870

4AT-95
AUTOMATIC TRANSMISSION
Transfer Clutch
12) Install the transfer clutch assembly without
damaging seal ring.
E: INSPECTION
Inspect the drive plate facing for wear and dam-
age.
Inspect the snap ring for wear; return spring for
permanent distortion, breakage and deformation.
Inspect the damage for D-ring.
Measure the extension end play and adjust it to
within specifications.
MENT, Transfer Clutch.>
1) Check clearance between snap ring and pres-
sure plate.
2) Before measuring clearance, place the same
thickness of shim on both sides to prevent pressure
plate from tilting.
3) If the clearance is out of specification, select a
suitable retaining plate and adjust it.
Standard value:
0.7 — 1.1 mm (0.028 — 0.043 in)
Service limit:
1.6 mm (0.063 in)4) Check that the tight corner braking does not oc-
cur when the vehicle is started with steering wheel
held at fully turned position. If tight corner braking
occurs, perform the following procedures.
(1) With the steering wheel held at fully turned
position, drive the vehicle in “D” range and with
vehicle speed at approx. 5 km/h (3 MPH) in both
clockwise and counterclockwise directions for
approx. ten times each, while repeating acceler-
ation and braking intermittently.
(2) If the tight corner braking still persists, drive
the vehicle again in a circle for several laps.
F: ADJUSTMENT
1) Measure distance “A” from end of extension
case and rear drive shaft with ST.
ST 398643600 GAUGE
2) Measure the distance “B” from the transmission
case end to reduction drive gear end surface with
ST1 and ST2.
ST1 398643600 GAUGE
ST2 499577000 GAUGE(A) Transfer clutch ASSY
(B) Extension case
Retaining plate
TOOL NUMBER Thickness mm (in)
31593AA151 3.3 (0.130)
31593AA161 3.7 (0.146)
31593AA171 4.1 (0.161)
31593AA181 4.5 (0.177)
AT-00125
(A)
(B)
AT-00142
AST
AT-01029
ST2ST1
B
AT-01030
Page 2409 of 2870
![SUBARU FORESTER 2004 Service Repair Manual 4AT-96
AUTOMATIC TRANSMISSION
Transfer Clutch
3) Calculation formula:
NOTE:
Calculation of “T”:
T = A−B+35.4 mm
[T = A−B+1.3937 in]
T: Thrust needle bearing thickness
A: Distance from the end SUBARU FORESTER 2004 Service Repair Manual 4AT-96
AUTOMATIC TRANSMISSION
Transfer Clutch
3) Calculation formula:
NOTE:
Calculation of “T”:
T = A−B+35.4 mm
[T = A−B+1.3937 in]
T: Thrust needle bearing thickness
A: Distance from the end](/manual-img/17/57426/w960_57426-2408.png)
4AT-96
AUTOMATIC TRANSMISSION
Transfer Clutch
3) Calculation formula:
NOTE:
Calculation of “T”:
T = A−B+35.4 mm
[T = A−B+1.3937 in]
T: Thrust needle bearing thickness
A: Distance from the end of extension case to end
of rear drive shaft
B: Distance from the end of transmission case to
end of reduction drive gear
Example:
When A = 33.6 mm (1.3228 in), B = 65.05 mm
(2.5610 in)
T = 33.6−65.05+35.4 = 3.95
[T = 1.3228−2.5610+1.3937 = 0.1555]
After calculation, the value of “T” becomes 3.95,
therefore select bearing thickness of 3.8.
NOTE:
Calculation formula for “T” is applied when measur-
ing using ST (398643600 GAUGE, 499577000
GAUGE). When not using ST, apply
T = (A−α+0.45 mm) − (B−β) −H
[T = (A−α+0.0177 in) − (B−β) −H]
T: Thrust needle bearing thickness
A: Distance from the end of extension case to end
of reduction drive shaft
B: Distance from the end of transmission case to
end of rear drive shaft
α: Collar thickness used when measuring “A”
β: Collar thickness used when measuring “B”
0.45: Gasket thickness (mm)
H: Shim clearance
Thrust needle bearing
TOOL NUMBER Thickness mm (in)
806536020 3.8 (0.150)
806535030 4.0 (0.157)
806535040 4.2 (0.165)
806535050 4.4 (0.173)
806535060 4.6 (0.181)
806535070 4.8 (0.189)
806535090 5.0 (0.197)
Page 2410 of 2870

FUJI HEAVY INDUSTRIES LTD. G8080GE5
2004 FORESTER SERVICE MANUAL QUICK REFERENCE INDEX
TRANSMISSION SECTION
This service manual has been prepared
to provide SUBARU service personnel
with the necessary information and data
for the correct maintenance and repair
of SUBARU vehicles.
This manual includes the procedures
for maintenance, disassembling, reas-
sembling, inspection and adjustment of
components and diagnostics for guid-
ance of experienced mechanics.
Please peruse and utilize this manual
fully to ensure complete repair work for
satisfying our customers by keeping
their vehicle in optimum condition.
When replacement of parts during
repair work is needed, be sure to use
SUBARU genuine parts.
All information, illustration and specifi-
cations contained in this manual are
based on the latest product information
available at the time of publication
approval.CONTROL SYSTEM CS
AUTOMATIC TRANSMISSION 4AT
AUTOMATIC TRANSMISSION
(DIAGNOSTIC)4AT(H4SO)
AUTOMATIC TRANSMISSION
(DIAGNOSTIC)4AT(H4DOTC)
AUTOMATIC TRANSMISSION
(DIAGNOSTIC)4AT(H4DOTC 2.5)
MANUAL TRANSMISSION AND
DIFFERENTIAL5MT
CLUTCH SYSTEM CL
Page 2411 of 2870

4AT-97
AUTOMATIC TRANSMISSION
Reduction Driven Gear
31.Reduction Driven Gear
A: REMOVAL
1) Remove the transmission assembly from vehi-
cle.
mission Assembly.>
2) Remove the rear vehicle speed sensor, and then
separate the extension case from transmission
case.
Case.>
3) Set the range select lever to “P” range.
4) Remove the caulking part, and then remove the
lock nut.
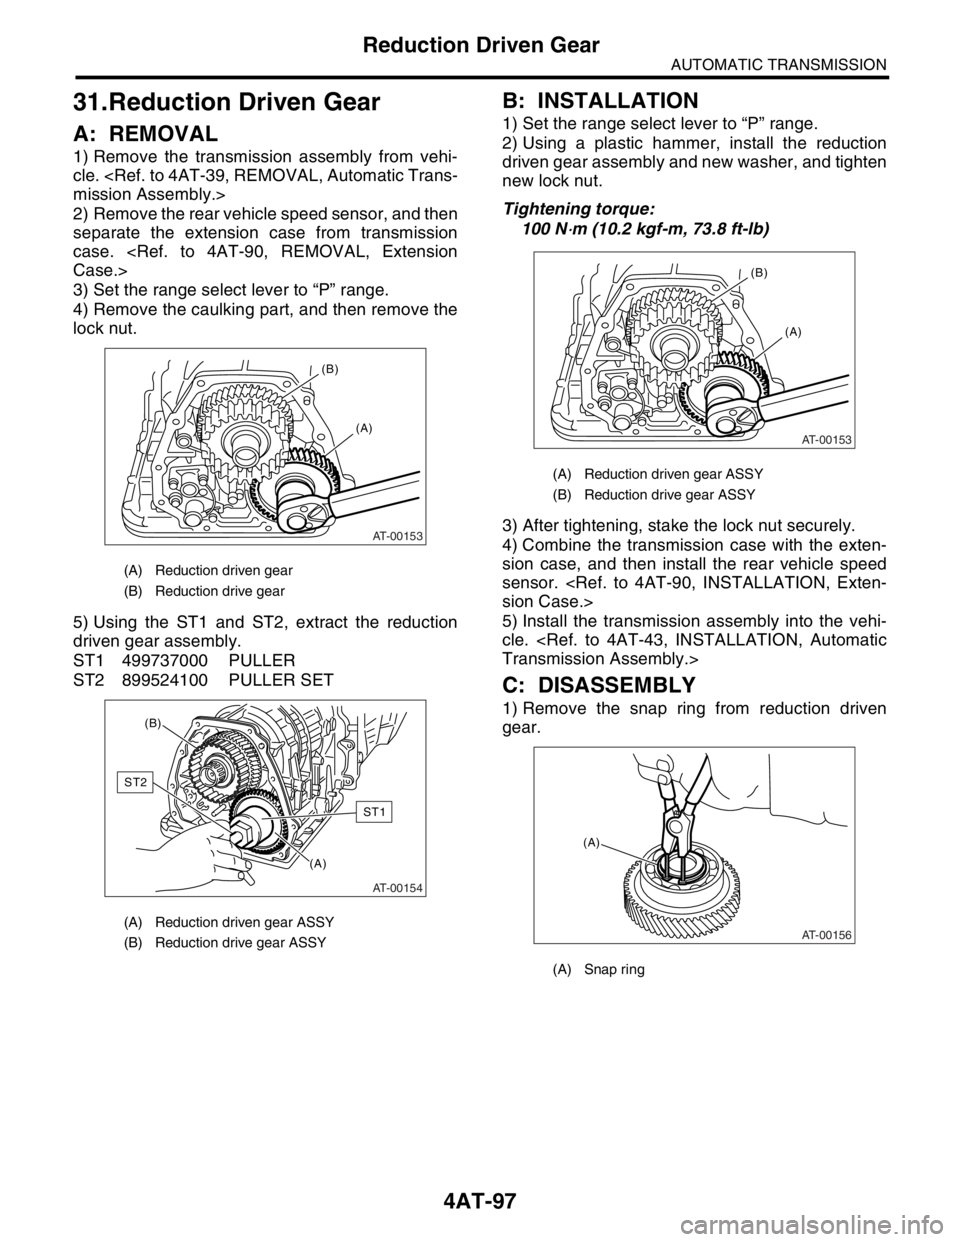
5) Using the ST1 and ST2, extract the reduction
driven gear assembly.
ST1 499737000 PULLER
ST2 899524100 PULLER SET
B: INSTALLATION
1) Set the range select lever to “P” range.
2) Using a plastic hammer, install the reduction
driven gear assembly and new washer, and tighten
new lock nut.
Tightening torque:
100 N
⋅m (10.2 kgf-m, 73.8 ft-lb)
3) After tightening, stake the lock nut securely.
4) Combine the transmission case with the exten-
sion case, and then install the rear vehicle speed
sensor.
sion Case.>
5) Install the transmission assembly into the vehi-
cle.
Transmission Assembly.>
C: DISASSEMBLY
1) Remove the snap ring from reduction driven
gear.
(A) Reduction driven gear
(B) Reduction drive gear
(A) Reduction driven gear ASSY
(B) Reduction drive gear ASSY
AT-00153
(A) (B)
AT-00154
(A) (B)
ST1
ST2
(A) Reduction driven gear ASSY
(B) Reduction drive gear ASSY
(A) Snap ring
AT-00153
(A) (B)
AT-00156
(A)
Page 2412 of 2870
4AT-98
AUTOMATIC TRANSMISSION
Reduction Driven Gear
2) Remove the ball bearing from reduction driven
gear using ST.
ST 498077600 REMOVER
D: ASSEMBLY
1) Install the new ball bearing to reduction driven
gear using press.
2) Install the snap ring to reduction driven gear.
E: INSPECTION
Make sure the ball bearing and gear is not de-
formed or damaged.
(A) Ball bearing
(A) Ball bearing
(A) Snap ring
AT-00157
(A)ST
AT-00158
(A)
AT-00156
(A)