2004 SUBARU FORESTER fuel
[x] Cancel search: fuelPage 846 of 2870
FU(H4SO)-64
FUEL INJECTION (FUEL SYSTEM)
Fuel Delivery, Return and Evaporation Lines
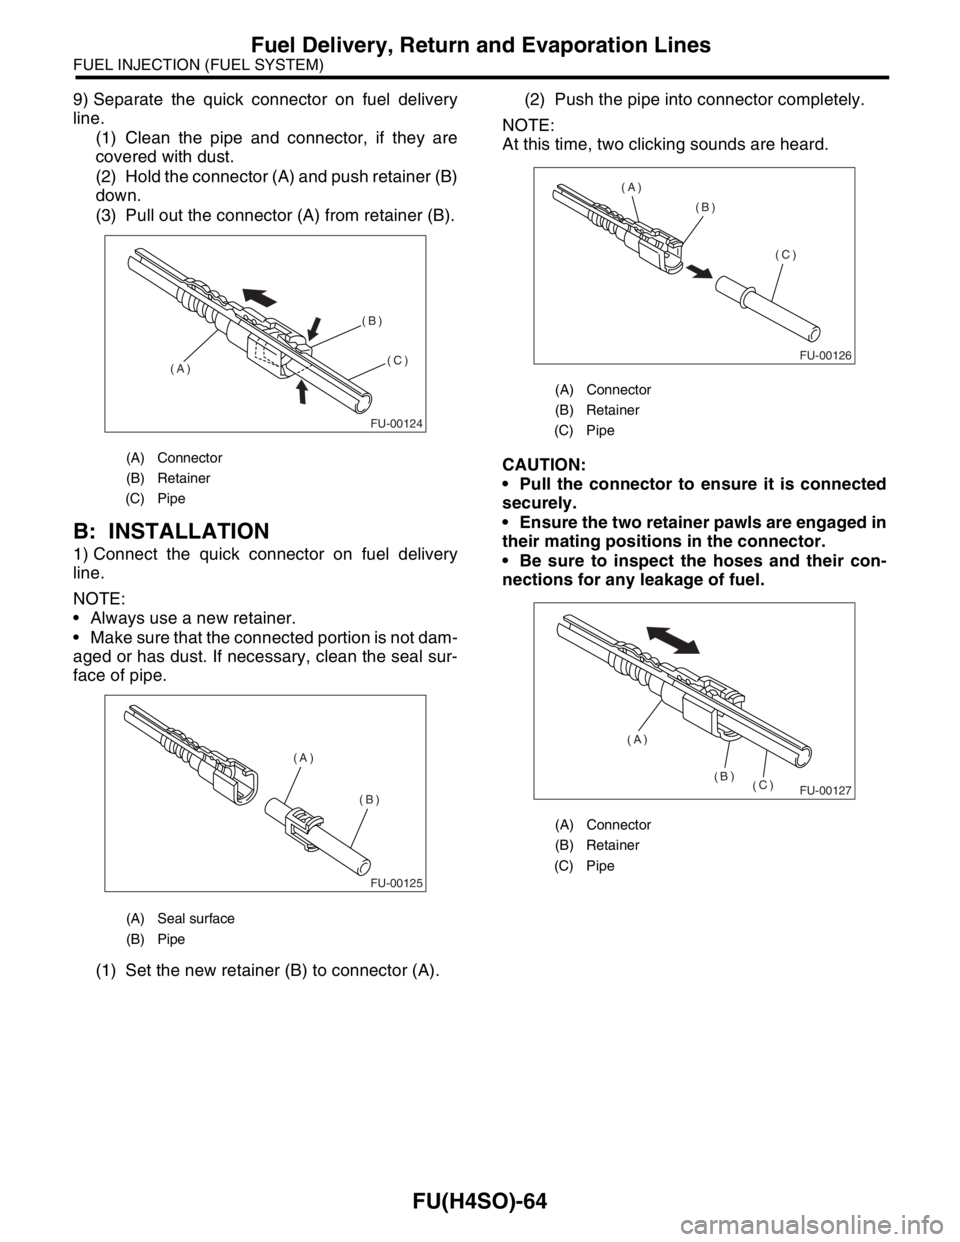
9) Separate the quick connector on fuel delivery
line.
(1) Clean the pipe and connector, if they are
covered with dust.
(2) Hold the connector (A) and push retainer (B)
down.
(3) Pull out the connector (A) from retainer (B).
B: INSTALLATION
1) Connect the quick connector on fuel delivery
line.
NOTE:
Always use a new retainer.
Make sure that the connected portion is not dam-
aged or has dust. If necessary, clean the seal sur-
face of pipe.
(1) Set the new retainer (B) to connector (A).(2) Push the pipe into connector completely.
NOTE:
At this time, two clicking sounds are heard.
CAUTION:
Pull the connector to ensure it is connected
securely.
Ensure the two retainer pawls are engaged in
their mating positions in the connector.
Be sure to inspect the hoses and their con-
nections for any leakage of fuel.
(A) Connector
(B) Retainer
(C) Pipe
(A) Seal surface
(B) Pipe
FU-00124
(A)(B)
(C)
FU-00125
(A)
(B)
(A) Connector
(B) Retainer
(C) Pipe
(A) Connector
(B) Retainer
(C) Pipe
FU-00126
(C)
(A)
(B)
FU-00127
(A)
(B)
(C)
Page 847 of 2870
FU(H4SO)-65
FUEL INJECTION (FUEL SYSTEM)
Fuel Delivery, Return and Evaporation Lines
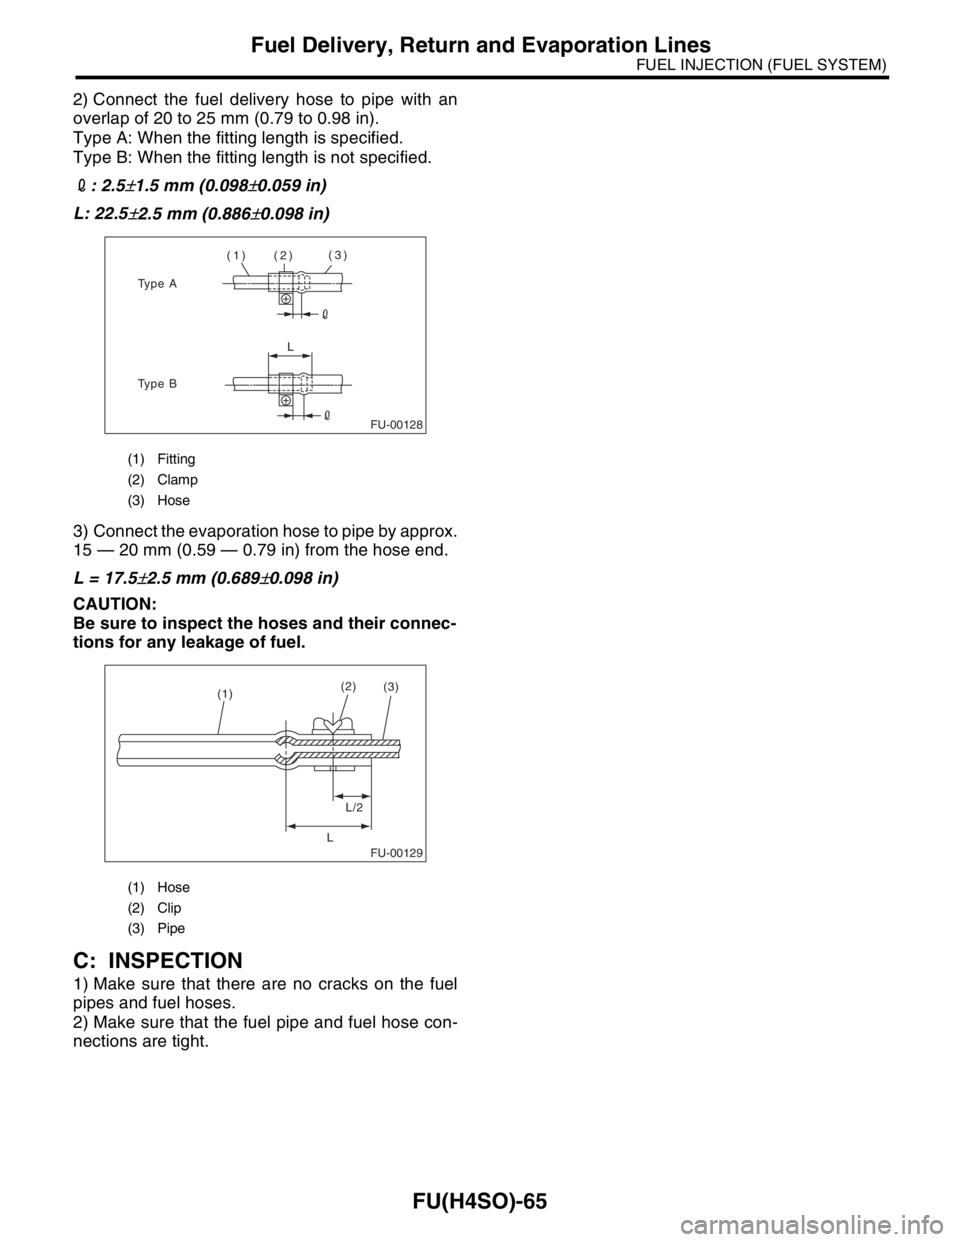
2) Connect the fuel delivery hose to pipe with an
overlap of 20 to 25 mm (0.79 to 0.98 in).
Type A: When the fitting length is specified.
Type B: When the fitting length is not specified.
2: 2.5
±1.5 mm (0.098±0.059 in)
L: 22.5
±2.5 mm (0.886±0.098 in)
3) Connect the evaporation hose to pipe by approx.
15 — 20 mm (0.59 — 0.79 in) from the hose end.
L = 17.5
±2.5 mm (0.689±0.098 in)
CAUTION:
Be sure to inspect the hoses and their connec-
tions for any leakage of fuel.
C: INSPECTION
1) Make sure that there are no cracks on the fuel
pipes and fuel hoses.
2) Make sure that the fuel pipe and fuel hose con-
nections are tight.
(1) Fitting
(2) Clamp
(3) Hose
(1) Hose
(2) Clip
(3) Pipe
FU-00128
(1) (2)(3)
L
Type A
Type B
FU-00129
(1)(2)
L/2
L(3)
Page 848 of 2870

FU(H4SO)-66
FUEL INJECTION (FUEL SYSTEM)
Fuel System Trouble in General
29.Fuel System Trouble in General
A: INSPECTION
NOTE:
When the vehicle is left unattended for an ex-
tended period of time, water may accumulate in the
fuel tank.
To prevent water condensation.
(1) Top off the fuel tank or drain the fuel com-
pletely.
(2) Drain the water condensation from the fuel
filter.
Refilling the fuel tank.
Refill the fuel tank while there is still some fuel left in
the tank.
Protecting the fuel system against freezing and
water condensation.
(3) Cold areas :
In snow-covered areas, mountainous areas, ski-
ing areas, etc. where ambient temperatures
drop below 0°C (32°F) throughout the winter
season, use an anti-freeze solution in the fuel
tank. Refueling will also complement the effect
of anti-freeze solution each time the fuel leveldrops to about one-half. After the winter season,
drain the water which may have accumulated in
the fuel filter and fuel tank in the manner same
as that described under “Affected areas” below.
(4) Affected areas :
When the water condensation is notched in the
fuel filter, drain the water from both the fuel filter
and fuel tank or use a water removing agent (or
anti-freeze solution) in the fuel tank.
Observe the instructions, notes, etc., indicated
on the label affixed to the anti-freeze solution (wa-
ter removing agent) container before use.
Trouble and possible cause Corrective action
1. Insufficient fuel supply to the injector
1) Fuel pump will not operate.
❍Defective terminal contact.Inspect connections, especially ground, and tighten
securely.
❍Trouble in electromagnetic or electronic circuit parts. Replace fuel pump.
2) Lowering of fuel pump function. Replace fuel pump.
3) Clogged dust or water in the fuel filter. Replace fuel filter, clean or replace fuel tank.
4) Clogged or bent fuel pipe or hose. Clean, correct or replace fuel pipe or hose.
5) Air is mixed in the fuel system. Inspect or retighten each connection part.
6) Clogged or bent breather tube or pipe. Clean, correct or replace air breather tube or pipe.
7) Damaged diaphragm of pressure regulator. Replace.
2. Leakage or blow out fuel
1) Loosened joints of the fuel pipe. Retightening.
2) Cracked fuel pipe, hose and fuel tank. Replace.
3) Defective welding part on the fuel tank. Replace.
4) Defective drain packing of the fuel tank. Replace.
5) Clogged or bent air breather tube or air vent tube.Clean, correct or replace air breather tube or air vent
tube.
3. Gasoline smell inside of compartment
1)Loose joints at air breather tube, air vent tube and fuel filler
pipe.Retightening.
2) Defective packing air tightness on the fuel saucer. Correct or replace packing.
3) Cracked fuel separator. Replace separator.
4) Inoperative fuel pump modulator or circuit. Replace.
4. Defective fuel meter indicator
1) Defective operation of fuel level sensor. Replace.
2) Defective operation of fuel meter. Replace.
5. Noise
1) Large operation noise or vibration of fuel pump. Replace.
Page 849 of 2870
FUJI HEAVY INDUSTRIES LTD. G8080GE2
2004 FORESTER SERVICE MANUAL QUICK REFERENCE INDEX
ENGINE SECTION 1
This service manual has been prepared
to provide SUBARU service personnel
with the necessary information and data
for the correct maintenance and repair
of SUBARU vehicles.
This manual includes the procedures
for maintenance, disassembling, reas-
sembling, inspection and adjustment of
components and diagnostics for guid-
ance of experienced mechanics.
Please peruse and utilize this manual
fully to ensure complete repair work for
satisfying our customers by keeping
their vehicle in optimum condition.
When replacement of parts during
repair work is needed, be sure to use
SUBARU genuine parts.
All information, illustration and specifi-
cations contained in this manual are
based on the latest product information
available at the time of publication
approval.FUEL INJECTION (FUEL SYSTEM) FU(H4SO)
EMISSION CONTROL
(AUX. EMISSION CONTROL DEVICE)EC(H4SO)
INTAKE (INDUCTION) IN(H4SO)
MECHANICAL ME(H4SO)
EXHAUST EX(H4SO)
COOLING CO(H4SO)
LUBRICATION LU(H4SO)
SPEED CONTROL SYSTEM SP(H4SO)
IGNITION IG(H4SO)
STARTING/CHARGING SYSTEM SC(H4SO)
ENGINE (DIAGNOSTIC) EN(H4SO)
Page 858 of 2870
EC(H4SO)-9
EMISSION CONTROL (AUX. EMISSION CONTROL DEVICE)
Purge Control Solenoid Valve
6. Purge Control Solenoid Valve
A: REMOVAL
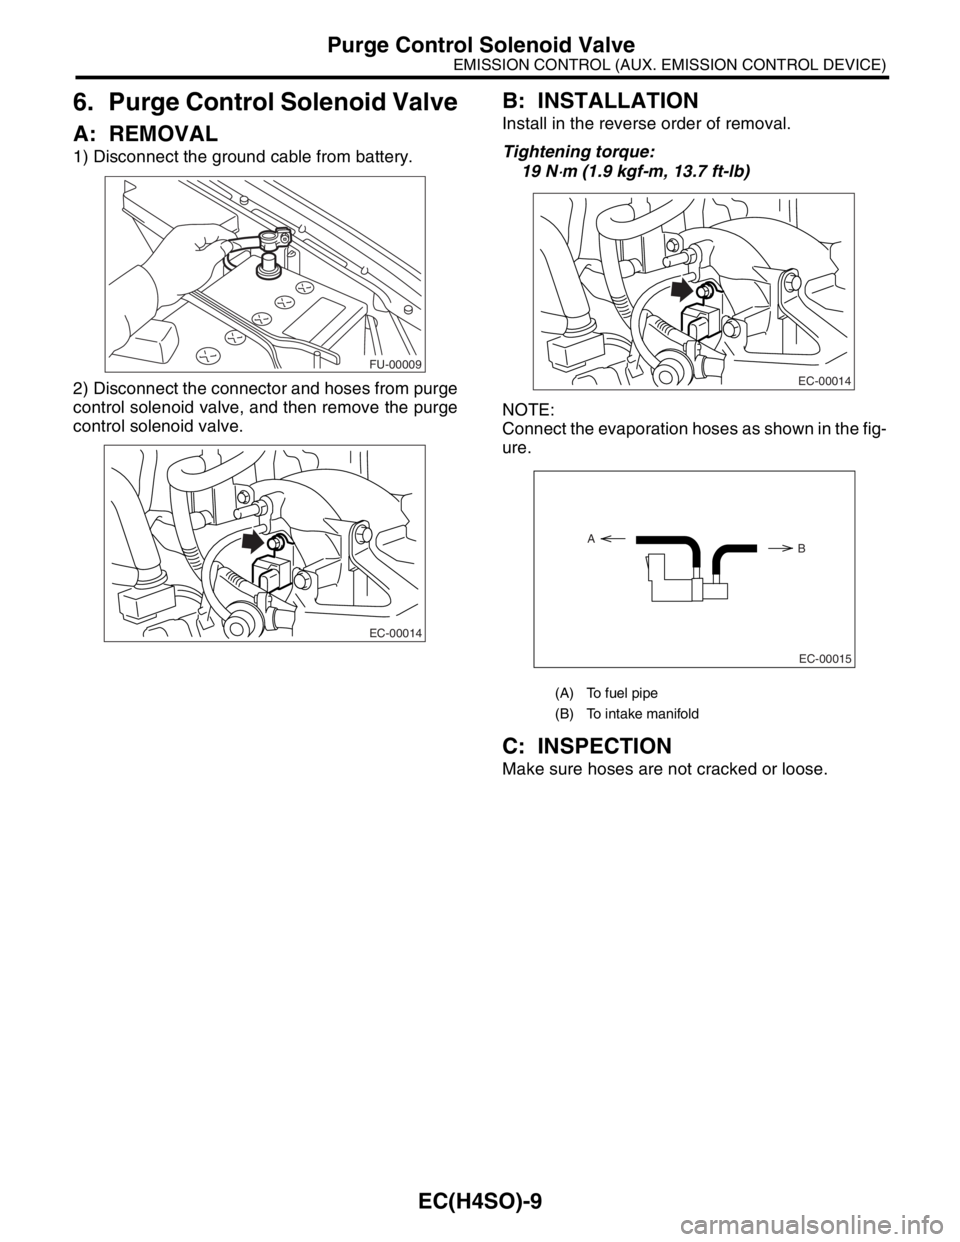
1) Disconnect the ground cable from battery.
2) Disconnect the connector and hoses from purge
control solenoid valve, and then remove the purge
control solenoid valve.
B: INSTALLATION
Install in the reverse order of removal.
Tightening torque:
19 N
⋅m (1.9 kgf-m, 13.7 ft-lb)
NOTE:
Connect the evaporation hoses as shown in the fig-
ure.
C: INSPECTION
Make sure hoses are not cracked or loose.
FU-00009
EC-00014
(A) To fuel pipe
(B) To intake manifold
EC-00014
EC-00015
A
B
Page 860 of 2870
FUJI HEAVY INDUSTRIES LTD. G8080GE2
2004 FORESTER SERVICE MANUAL QUICK REFERENCE INDEX
ENGINE SECTION 1
This service manual has been prepared
to provide SUBARU service personnel
with the necessary information and data
for the correct maintenance and repair
of SUBARU vehicles.
This manual includes the procedures
for maintenance, disassembling, reas-
sembling, inspection and adjustment of
components and diagnostics for guid-
ance of experienced mechanics.
Please peruse and utilize this manual
fully to ensure complete repair work for
satisfying our customers by keeping
their vehicle in optimum condition.
When replacement of parts during
repair work is needed, be sure to use
SUBARU genuine parts.
All information, illustration and specifi-
cations contained in this manual are
based on the latest product information
available at the time of publication
approval.FUEL INJECTION (FUEL SYSTEM) FU(H4SO)
EMISSION CONTROL
(AUX. EMISSION CONTROL DEVICE)EC(H4SO)
INTAKE (INDUCTION) IN(H4SO)
MECHANICAL ME(H4SO)
EXHAUST EX(H4SO)
COOLING CO(H4SO)
LUBRICATION LU(H4SO)
SPEED CONTROL SYSTEM SP(H4SO)
IGNITION IG(H4SO)
STARTING/CHARGING SYSTEM SC(H4SO)
ENGINE (DIAGNOSTIC) EN(H4SO)
Page 869 of 2870
FUJI HEAVY INDUSTRIES LTD. G8080GE2
2004 FORESTER SERVICE MANUAL QUICK REFERENCE INDEX
ENGINE SECTION 1
This service manual has been prepared
to provide SUBARU service personnel
with the necessary information and data
for the correct maintenance and repair
of SUBARU vehicles.
This manual includes the procedures
for maintenance, disassembling, reas-
sembling, inspection and adjustment of
components and diagnostics for guid-
ance of experienced mechanics.
Please peruse and utilize this manual
fully to ensure complete repair work for
satisfying our customers by keeping
their vehicle in optimum condition.
When replacement of parts during
repair work is needed, be sure to use
SUBARU genuine parts.
All information, illustration and specifi-
cations contained in this manual are
based on the latest product information
available at the time of publication
approval.FUEL INJECTION (FUEL SYSTEM) FU(H4SO)
EMISSION CONTROL
(AUX. EMISSION CONTROL DEVICE)EC(H4SO)
INTAKE (INDUCTION) IN(H4SO)
MECHANICAL ME(H4SO)
EXHAUST EX(H4SO)
COOLING CO(H4SO)
LUBRICATION LU(H4SO)
SPEED CONTROL SYSTEM SP(H4SO)
IGNITION IG(H4SO)
STARTING/CHARGING SYSTEM SC(H4SO)
ENGINE (DIAGNOSTIC) EN(H4SO)
Page 870 of 2870

MECHANICAL
ME(H4SO)
Page
1. General Description ....................................................................................2
2. Compression .............................................................................................25
3. Idle Speed .................................................................................................26
4. Ignition Timing ...........................................................................................27
5. Intake Manifold Vacuum............................................................................28
6. Engine Oil Pressure ..................................................................................29
7. Fuel Pressure ............................................................................................30
8. Valve Clearance ........................................................................................31
9. Engine Assembly ......................................................................................34
10. Engine Mounting .......................................................................................41
11. Preparation for Overhaul ...........................................................................42
12. V-belt .........................................................................................................43
13. Crank Pulley ..............................................................................................45
14. Timing Belt Cover......................................................................................47
15. Timing Belt ................................................................................................48
16. Cam Sprocket ...........................................................................................53
17. Crank Sprocket .........................................................................................55
18. Valve Rocker Assembly ............................................................................56
19. Camshaft ...................................................................................................58
20. Cylinder Head ...........................................................................................62
21. Cylinder Block ...........................................................................................69
22. Engine Trouble in General ........................................................................91
23. Engine Noise .............................................................................................96