Page 1039 of 2870

LU(H4SO)-11
LUBRICATION
Engine Oil
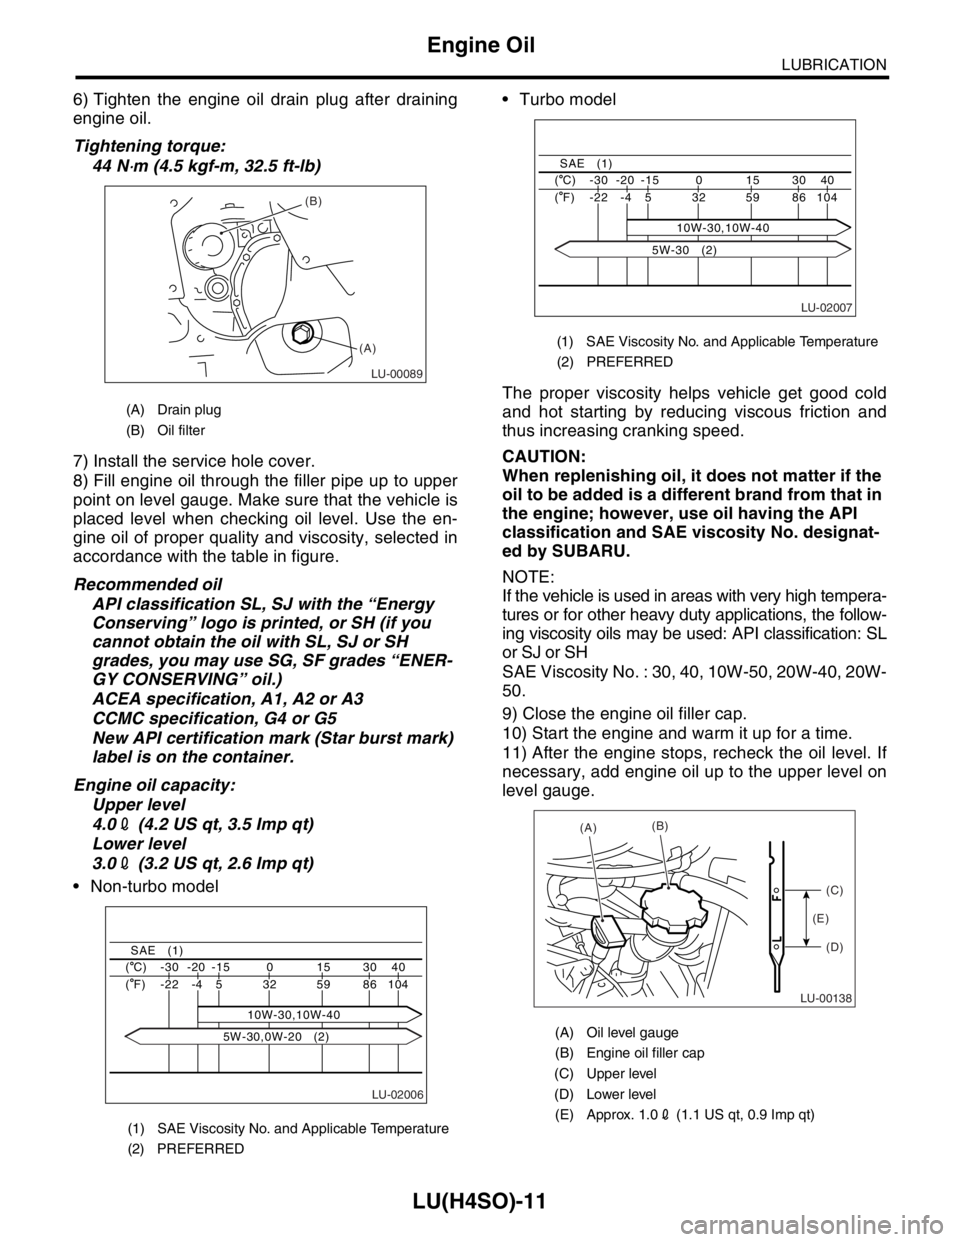
6) Tighten the engine oil drain plug after draining
engine oil.
Tightening torque:
44 N
⋅m (4.5 kgf-m, 32.5 ft-lb)
7) Install the service hole cover.
8) Fill engine oil through the filler pipe up to upper
point on level gauge. Make sure that the vehicle is
placed level when checking oil level. Use the en-
gine oil of proper quality and viscosity, selected in
accordance with the table in figure.
Recommended oil
API classification SL, SJ with the “Energy
Conserving” logo is printed, or SH (if you
cannot obtain the oil with SL, SJ or SH
grades, you may use SG, SF grades “ENER-
GY CONSERVING” oil.)
ACEA specification, A1, A2 or A3
CCMC specification, G4 or G5
New API certification mark (Star burst mark)
label is on the container.
Engine oil capacity:
Upper level
4.02 (4.2 US qt, 3.5 Imp qt)
Lower level
3.02 (3.2 US qt, 2.6 Imp qt)
Non-turbo model Turbo model
The proper viscosity helps vehicle get good cold
and hot starting by reducing viscous friction and
thus increasing cranking speed.
CAUTION:
When replenishing oil, it does not matter if the
oil to be added is a different brand from that in
the engine; however, use oil having the API
classification and SAE viscosity No. designat-
ed by SUBARU.
NOTE:
If the vehicle is used in areas with very high tempera-
tures or for other heavy duty applications, the follow-
ing viscosity oils may be used: API classification: SL
or SJ or SH
SAE Viscosity No. : 30, 40, 10W-50, 20W-40, 20W-
50.
9) Close the engine oil filler cap.
10) Start the engine and warm it up for a time.
11) After the engine stops, recheck the oil level. If
necessary, add engine oil up to the upper level on
level gauge.
(A) Drain plug
(B) Oil filter
(1) SAE Viscosity No. and Applicable Temperature
(2) PREFERRED
LU-00089
(B)
(A)
LU-02006
40 30 15 0 -15 -20 -30 ( C)
104 86 59 32
10W-30,10W-40 5 -4 -22 ( F)
SAE (1)
5W-30,0W-20 (2)
(1) SAE Viscosity No. and Applicable Temperature
(2) PREFERRED
(A) Oil level gauge
(B) Engine oil filler cap
(C) Upper level
(D) Lower level
(E) Approx. 1.02 (1.1 US qt, 0.9 Imp qt)
LU-02007
40 30 15 0 -15 -20 -30 ( C)
104 86 59 32 5 -4 -22 ( F)
SAE (1)
10W-30,10W-40
5W-30 (2)
LU-00138
(A)(B)
(C)
(D) (E)
Page 1047 of 2870
LU(H4SO)-19
LUBRICATION
Oil Pan and Strainer
10) Remove the lifting device and steel cables.
11) Install the pitching stopper.
Tightening torque:
T1: 50 N
⋅m (5.1 kgf-m, 36.9 ft-lb)
T2: 58 N
⋅m (5.9 kgf-m, 42.8 ft-lb)
12) Install the radiator upper brackets.
13) Install the air intake duct and air cleaner case.
(Non-turbo model)
LATION, Air Intake Duct.>
INSTALLATION, Air Cleaner Case.>
14) Install the intercooler. (Turbo model)
IN(H4DOTC)-11, INSTALLATION, Intercooler.>15) Install the air intake boot and air cleaner upper
cover. (Turbo model)
16) Connect the connector to mass air flow sensor.
(Turbo model)
17) Install the front wheels.
18) Connect the battery ground cable to battery.
19) Fill engine oil.
TION, Engine Oil.>
C: INSPECTION
By visual check make sure the oil pan, oil strainer,
oil strainer stay and baffle plate are not damaged.
LU-00028
ME-00218T2T1
LU-00027
LU-00070
LU-00026
FU-00009
Page 1050 of 2870
LU(H4SO)-22
LUBRICATION
Engine Oil Cooler
B: INSTALLATION
NOTE:
Engine oil cooler is equipped with turbo model only.
1) Install in the reverse order of removal.
2) Contact the knock pin (A) of adapter (1) to cylin-
der block rib (B) to install adapter (1).
3) Install the adapter (2).
4) Contact the engine oil cooler stopper (A) to
adapter (2) rib (B) to install engine oil cooler.
Tightening torque:
T1: 6.4 N
⋅m (0.7 kgf-m, 5.1 ft-lb)
T2: 44 N
⋅m (4.5 kgf-m, 33 ft-lb)
T3: 54 N
⋅m (5.5 kgf-m, 40 ft-lb)NOTE:
Always use a new O-ring.
C: INSPECTION
1) Check that the coolant passages are not
clogged using air blow method.
2) Check the mating surfaces of cylinder block, O-
ring groove and oil filter for damage.
LU-00042
(A)
(B)
LU-00043
(B)(A)
(A) Adapter (1)
(B) Adapter connector
(C) Adapter (2)
(D) Oil cooler
(E) Oil cooler connector
LU-00044
(A)
(B)
(C)
(D)
(E)
T1
T2
T3
Page 1051 of 2870

LU(H4SO)-23
LUBRICATION
Engine Oil Filter
8. Engine Oil Filter
A: REMOVAL
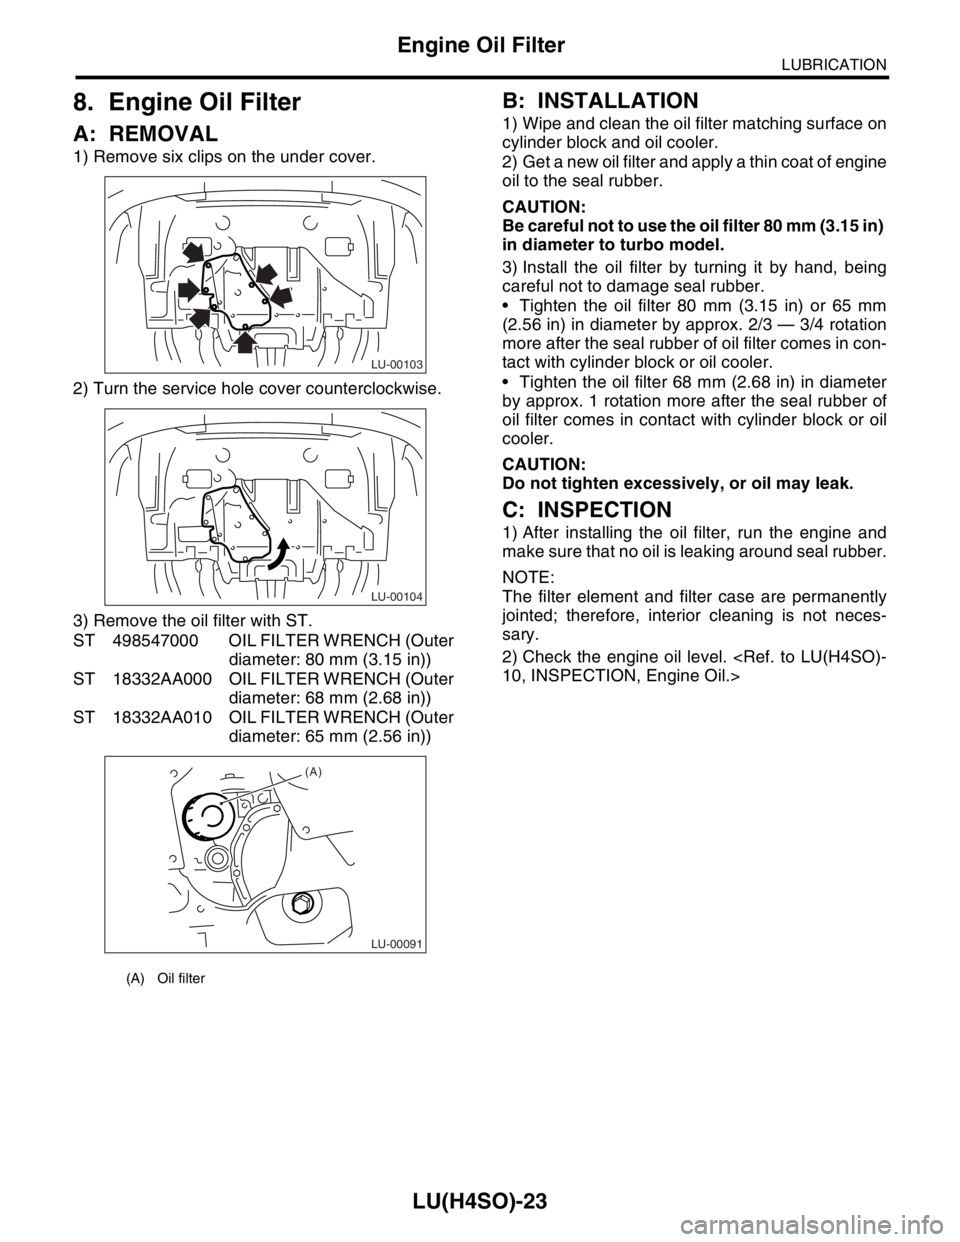
1) Remove six clips on the under cover.
2) Turn the service hole cover counterclockwise.
3) Remove the oil filter with ST.
ST 498547000 OIL FILTER WRENCH (Outer
diameter: 80 mm (3.15 in))
ST 18332AA000 OIL FILTER WRENCH (Outer
diameter: 68 mm (2.68 in))
ST 18332AA010 OIL FILTER WRENCH (Outer
diameter: 65 mm (2.56 in))
B: INSTALLATION
1) Wipe and clean the oil filter matching surface on
cylinder block and oil cooler.
2) Get a new oil filter and apply a thin coat of engine
oil to the seal rubber.
CAUTION:
Be careful not to use the oil filter 80 mm (3.15 in)
in diameter to turbo model.
3) Install the oil filter by turning it by hand, being
careful not to damage seal rubber.
Tighten the oil filter 80 mm (3.15 in) or 65 mm
(2.56 in) in diameter by approx. 2/3 — 3/4 rotation
more after the seal rubber of oil filter comes in con-
tact with cylinder block or oil cooler.
Tighten the oil filter 68 mm (2.68 in) in diameter
by approx. 1 rotation more after the seal rubber of
oil filter comes in contact with cylinder block or oil
cooler.
CAUTION:
Do not tighten excessively, or oil may leak.
C: INSPECTION
1) After installing the oil filter, run the engine and
make sure that no oil is leaking around seal rubber.
NOTE:
The filter element and filter case are permanently
jointed; therefore, interior cleaning is not neces-
sary.
2) Check the engine oil level.
10, INSPECTION, Engine Oil.>
(A) Oil filter
LU-00103
LU-00104
LU-00091
(A)
Page 1052 of 2870

LU(H4SO)-24
LUBRICATION
Engine Lubrication System Trouble in General
9. Engine Lubrication System Trouble in General
A: INSPECTION
Before performing diagnostics, make sure that the engine oil level is correct and no oil leakage exists.
Trouble Possible cause Corrective action
1. Warning light remains
on.1) Oil pressure switch
failureCracked diaphragm or oil leakage within switch Replace.
Broken spring or seized contacts Replace.
2) Low oil pressureClogged oil filter Replace.
Malfunction of oil by-pass valve of oil filter Clean or replace.
Malfunction of oil relief valve of oil pump Clean or replace.
Clogged oil passage Clean.
Excessive tip clearance and side clearance of oil
pump rotor and gearReplace.
Clogged oil strainer or broken pipe Clean or replace.
3) No oil pressureInsufficient engine oil Replenish.
Broken pipe of oil strainer Replace.
Stuck oil pump rotor Replace.
2. Warning light does
not go on.1) Malfunction of combination meter Replace.
2) Poor contact of switch contact points Replace.
3) Disconnection of wiring Repair.
3. Warning light flickers
momentarily.1) Poor contact at terminals Repair.
2) Defective wiring harness Repair.
3) Low oil pressureCheck for the same
possible causes as
listed in 1. — 2).
Page 1099 of 2870

ENGINE (DIAGNOSTIC)
EN(H4SO)
Page
1. Basic Diagnostics Procedure ......................................................................2
2. Check List for Interview ...............................................................................4
3. General Description ....................................................................................6
4. Electrical Component Location ...................................................................9
5. Engine Control Module (ECM) I/O Signal .................................................21
6. Engine Condition Data ..............................................................................24
7. Transmission Control Module (TCM) I/O Signal .......................................25
8. Data Link Connector .................................................................................26
9. OBD-II General Scan Tool ........................................................................27
10. Subaru Select Monitor...............................................................................29
11. Read Diagnostic Trouble Code (DTC) ......................................................36
12. Inspection Mode ........................................................................................37
13. Drive Cycle ................................................................................................42
14. Clear Memory Mode..................................................................................44
15. Compulsory Valve Operation Check Mode ...............................................45
16. Malfunction Indicator Light ........................................................................47
17. Diagnostics for Engine Starting Failure .....................................................57
18. List of Diagnostic Trouble Code (DTC) .....................................................72
19. Diagnostic Procedure with Diagnostic Trouble Code (DTC) .....................78
20. General Diagnostic Table........................................................................255
Page 1100 of 2870

EN(H4SO)-2
ENGINE (DIAGNOSTIC)
Basic Diagnostics Procedure
1. Basic Diagnostics Procedure
A: PROCEDURE
1. ENGINE
Step Check Yes No
1 CHECK ENGINE START FAILURE.
1) Ask the customer when and how the trou-
ble occurred using the interview check list.
List for Interview.>
2) Start the engine.Does the engine start? Go to step 2.Inspection using
“Diagnostics for
Engine Starting
Failure”.
EN(H4SO)-57,
Diagnostics for
Engine Starting
Fai lu r e.>
2 CHECK ILLUMINATION OF MALFUNCTION
INDICATOR LIGHT.Does malfunction indicator
light illuminate?Go to step 3.Inspection using
“General Diagnos-
tic Table”.
EN(H4SO)-255,
INSPECTION,
General Diagnos-
tic Table.>
3 CHECK INDICATION OF DTC ON DISPLAY
1) Turn the ignition switch to OFF.
2) Connect the Subaru Select Monitor or the
OBD-II general scan tool to data link connec-
tor.
3) Turn the ignition switch to ON and the Sub-
aru Select Monitor or OBD-II general scan tool
switch to ON.
4) Read the DTC on the Subaru Select Moni-
tor or OBD-II general scan tool.Does the Subaru Select Moni-
tor or OBD-II general scan tool
indicate DTC?Record the DTC.
Repair the trouble
cause.
EN(H4SO)-72, List
of Diagnostic Trou-
ble Code (DTC).>
Go to step 4.Repair the related
parts.
N
OTE:
If DTC is not shown
on display although
the engine warning
light illuminates, per-
form the diagnostics
of engine warning
light circuit or combi-
nation meter.
to EN(H4SO)-47,
Malfunction Indica-
tor Light.>
4 PERFORM THE DIAGNOSIS.
1) Perform the Clear Memory Mode.
EN(H4SO)-44, Clear Memory Mode.>
2) Perform the Inspection Mode.
EN(H4SO)-37, Inspection Mode.>Does the Subaru Select Moni-
tor or OBD-II general scan tool
indicate DTC?Check on “Diag-
nostic Procedure
with Diagnostic
Trouble Code
(DTC)”
EN(H4SO)-78,
Diagnostic Proce-
dure with Diagnos-
tic Trouble Code
(DTC).>Finish the diagno-
sis.
Page 1101 of 2870
EN(H4SO)-3
ENGINE (DIAGNOSTIC)
Basic Diagnostics Procedure
2. AUTOMATIC TRANSMISSION
When the DTC about automatic transmission is
shown on display, carry out the following basic
check. After that, carry out the replacement or re-
pair work.
1) ATF level check
Transmission Fluid.>
2) Differential gear oil level check
Differential Gear Oil.>
3) ATF leak check
Transmission Fluid.>
4) Differential gear oil level check
Differential Gear Oil.>
5) Stall Test
6) Line Pressure Test
sure Test.>
7) Transfer Clutch Pressure Test
Transfer Clutch Pressure Test.>
8) Time Lag Test
9) Road Test
10) Shift characteristics
Clutch Pressure Test.>