2004 NISSAN TERRANO brake fluid
[x] Cancel search: brake fluidPage 918 of 1833
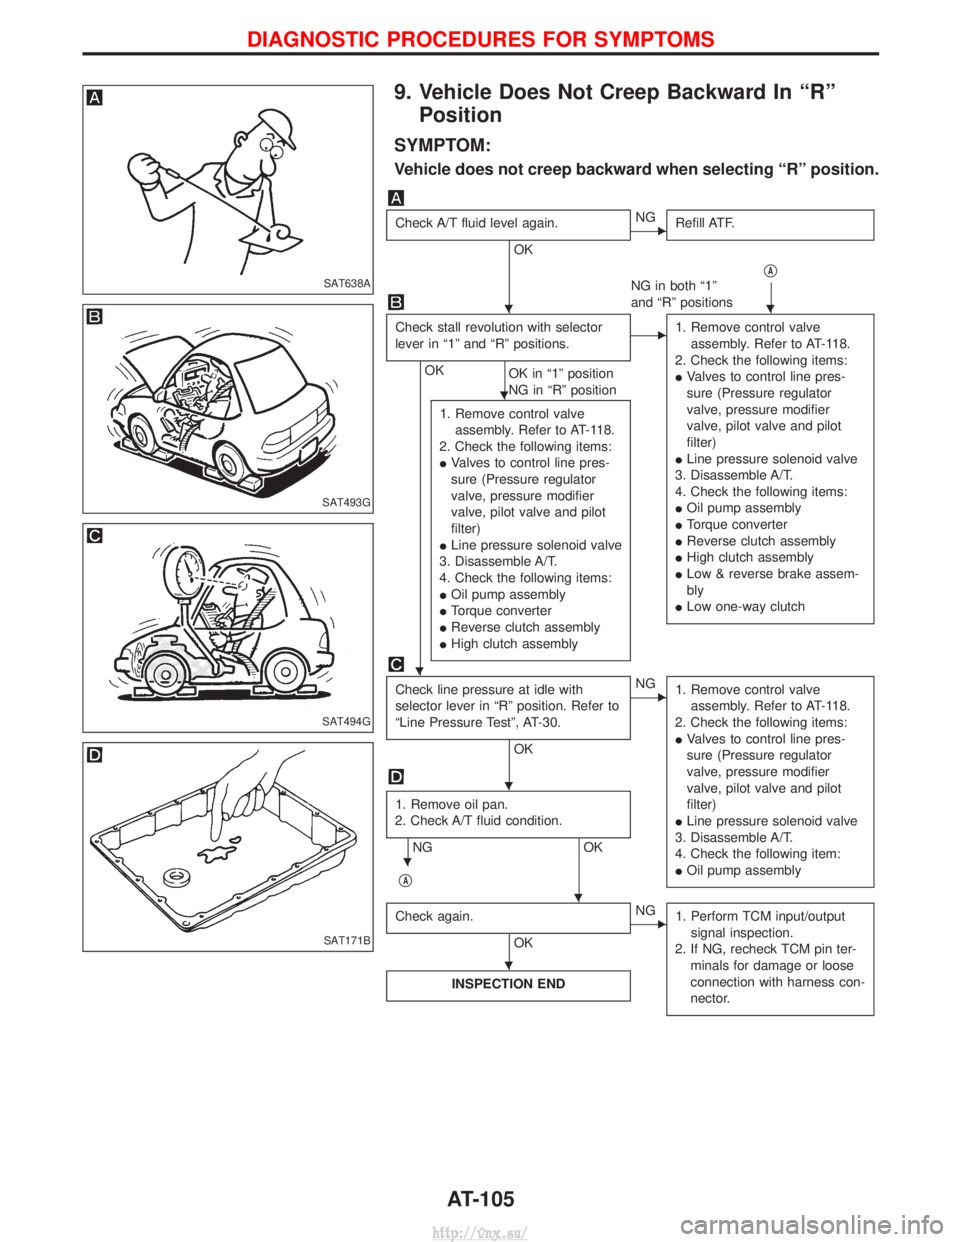
9. Vehicle Does Not Creep Backward In ªRºPosition
SYMPTOM:
Vehicle does not creep backward when selecting ªRº position.
Check A/T fluid level again.
OK
ENG Refill ATF.
qA
NG in both ª1º
and ªRº positions
Check stall revolution with selector
lever in ª1º and ªRº positions.
OK OK in ª1º position
NG in ªRº position
E1. Remove control valve
assembly. Refer to AT-118.
2. Check the following items:
I Valves to control line pres-
sure (Pressure regulator
valve, pressure modifier
valve, pilot valve and pilot
filter)
I Line pressure solenoid valve
3. Disassemble A/T.
4. Check the following items:
I Oil pump assembly
I Torque converter
I Reverse clutch assembly
I High clutch assembly
I Low & reverse brake assem-
bly
I Low one-way clutch
1. Remove control valve
assembly. Refer to AT-118.
2. Check the following items:
I Valves to control line pres-
sure (Pressure regulator
valve, pressure modifier
valve, pilot valve and pilot
filter)
I Line pressure solenoid valve
3. Disassemble A/T.
4. Check the following items:
I Oil pump assembly
I Torque converter
I Reverse clutch assembly
I High clutch assembly
Check line pressure at idle with
selector lever in ªRº position. Refer to
ªLine Pressure Testº, AT-30.
OK
ENG
1. Remove control valve
assembly. Refer to AT-118.
2. Check the following items:
I Valves to control line pres-
sure (Pressure regulator
valve, pressure modifier
valve, pilot valve and pilot
filter)
I Line pressure solenoid valve
3. Disassemble A/T.
4. Check the following item:
I Oil pump assembly
1. Remove oil pan.
2. Check A/T fluid condition.
NG OK
q
A
Check again.
OK
ENG 1. Perform TCM input/output
signal inspection.
2. If NG, recheck TCM pin ter- minals for damage or loose
connection with harness con-
nector.
INSPECTION END
SAT638A
SAT493G
SAT494G
SAT171B
HH
H
H
H
H
H
H
DIAGNOSTIC PROCEDURES FOR SYMPTOMS
AT-105
http://vnx.su/
Page 919 of 1833
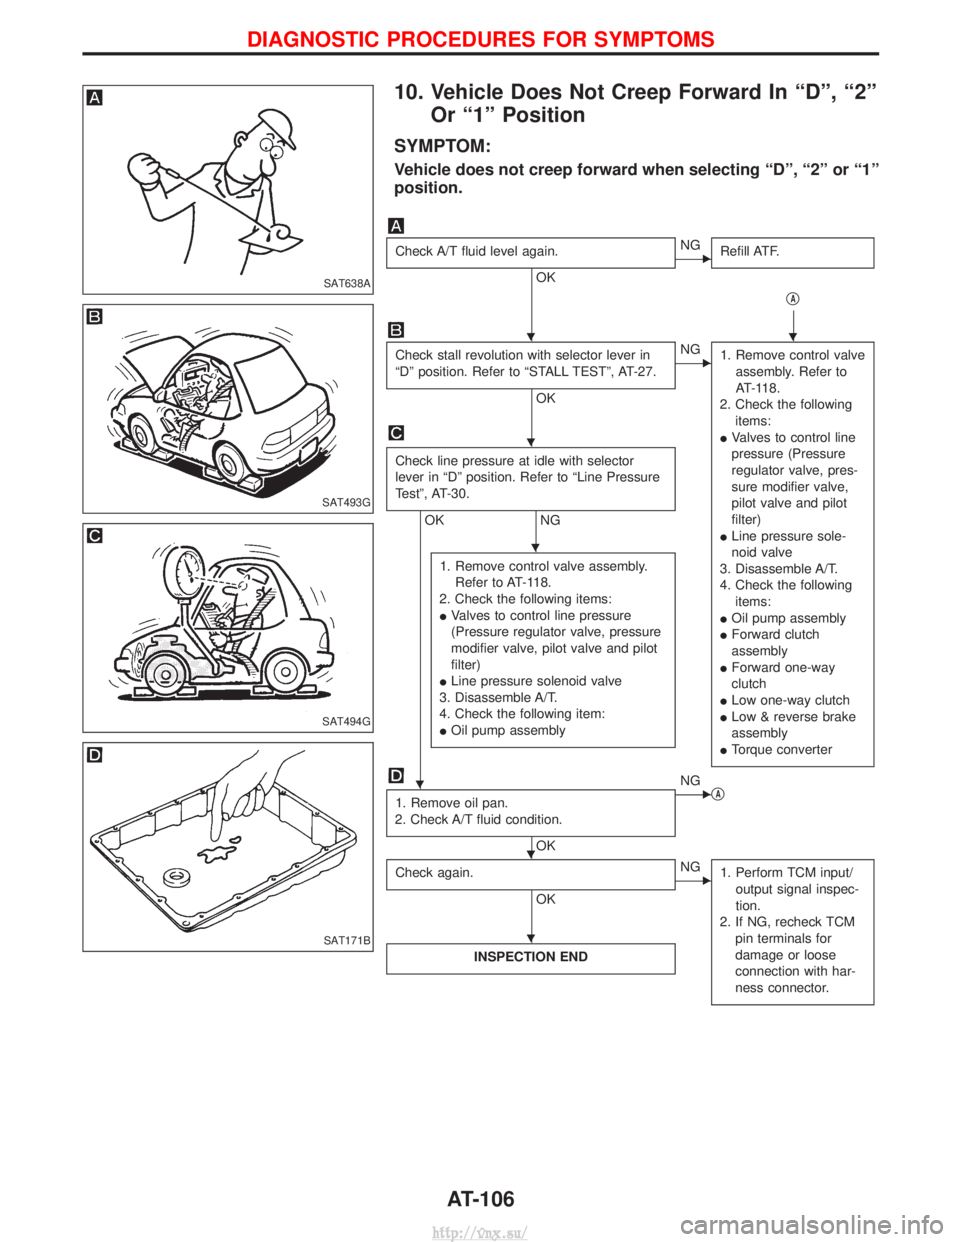
10. Vehicle Does Not Creep Forward In ªDº, ª2ºOr ª1º Position
SYMPTOM:
Vehicle does not creep forward when selecting ªDº, ª2º or ª1º
position.
Check A/T fluid level again.
OK
ENG Refill ATF.
qA
Check stall revolution with selector lever in
ªDº position. Refer to ªSTALL TESTº, AT-27.
OK
ENG1. Remove control valve
assembly. Refer to
AT-118.
2. Check the following items:
I Valves to control line
pressure (Pressure
regulator valve, pres-
sure modifier valve,
pilot valve and pilot
filter)
I Line pressure sole-
noid valve
3. Disassemble A/T.
4. Check the following items:
I Oil pump assembly
I Forward clutch
assembly
I Forward one-way
clutch
I Low one-way clutch
I Low & reverse brake
assembly
I Torque converter
Check line pressure at idle with selector
lever in ªDº position. Refer to ªLine Pressure
Testº, AT-30.
OK NG
1. Remove control valve assembly. Refer to AT-118.
2. Check the following items:
I Valves to control line pressure
(Pressure regulator valve, pressure
modifier valve, pilot valve and pilot
filter)
I Line pressure solenoid valve
3. Disassemble A/T.
4. Check the following item:
I Oil pump assembly
1. Remove oil pan.
2. Check A/T fluid condition.
OK
ENG qA
Check again.
OK
ENG 1. Perform TCM input/
output signal inspec-
tion.
2. If NG, recheck TCM pin terminals for
damage or loose
connection with har-
ness connector.
INSPECTION END
SAT638A
SAT493G
SAT494G
SAT171B
HH
H
H
H
HH
H
DIAGNOSTIC PROCEDURES FOR SYMPTOMS
AT-106
http://vnx.su/
Page 921 of 1833
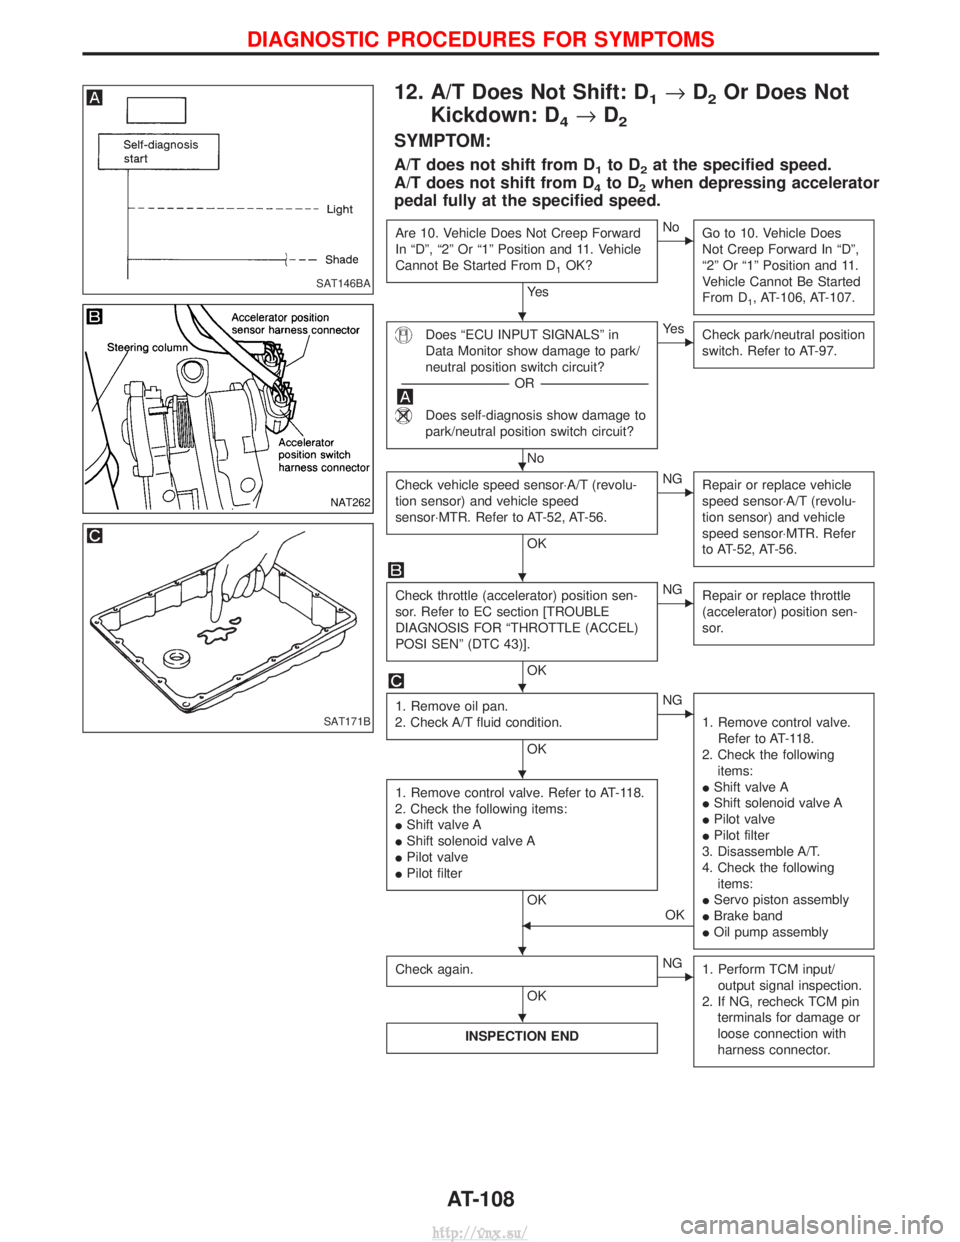
12. A/T Does Not Shift: D1®D2Or Does Not
Kickdown: D
4® D2
SYMPTOM:
A/T does not shift from D1to D2at the specified speed.
A/T does not shift from D
4to D2when depressing accelerator
pedal fully at the specified speed.
Are 10. Vehicle Does Not Creep Forward
In ªDº, ª2º Or ª1º Position and 11. Vehicle
Cannot Be Started From D
1OK?
Ye s
ENo Go to 10. Vehicle Does
Not Creep Forward In ªDº,
ª2º Or ª1º Position and 11.
Vehicle Cannot Be Started
From D
1, AT-106, AT-107.
Does ªECU INPUT SIGNALSº in
Data Monitor show damage to park/
neutral position switch circuit?
---------------------------------------------------------------------------------------------------------------------- -OR -----------------------------------------------------------------------------------------------------------------------
Does self-diagnosis show damage to
park/neutral position switch circuit?
No
EYe s
Check park/neutral position
switch. Refer to AT-97.
Check vehicle speed sensor×A/T (revolu-
tion sensor) and vehicle speed
sensor×MTR. Refer to AT-52, AT-56.
OK
ENGRepair or replace vehicle
speed sensor×A/T (revolu-
tion sensor) and vehicle
speed sensor×MTR. Refer
to AT-52, AT-56.
Check throttle (accelerator) position sen-
sor. Refer to EC section [TROUBLE
DIAGNOSIS FOR ªTHROTTLE (ACCEL)
POSI SENº (DTC 43)].
OK
ENGRepair or replace throttle
(accelerator) position sen-
sor.
1. Remove oil pan.
2. Check A/T fluid condition.
OK
ENG
1. Remove control valve.Refer to AT-118.
2. Check the following items:
I Shift valve A
I Shift solenoid valve A
I Pilot valve
I Pilot filter
3. Disassemble A/T.
4. Check the following items:
I Servo piston assembly
I Brake band
I Oil pump assembly
1. Remove control valve. Refer to AT-118.
2. Check the following items:
I Shift valve A
I Shift solenoid valve A
I Pilot valve
I Pilot filter
OK
FOK
Check again.
OK
ENG 1. Perform TCM input/
output signal inspection.
2. If NG, recheck TCM pin terminals for damage or
loose connection with
harness connector.
INSPECTION END
SAT146BA
NAT262
SAT171B
H
H
H
H
H
HH
H
DIAGNOSTIC PROCEDURES FOR SYMPTOMS
AT-108
http://vnx.su/
Page 923 of 1833
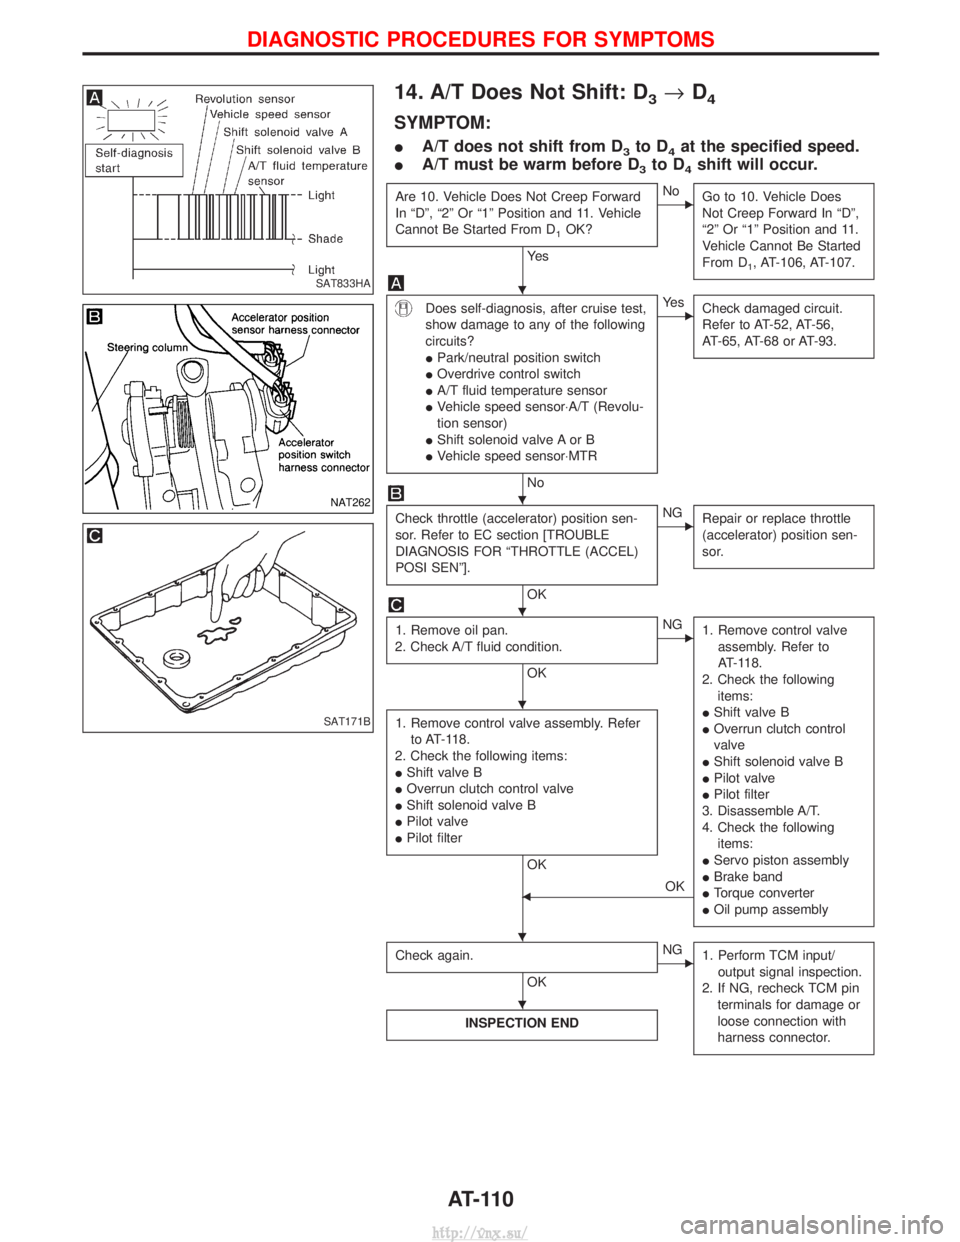
14. A/T Does Not Shift: D3®D4
SYMPTOM:
I A/T does not shift from D3to D4at the specified speed.
I A/T must be warm before D
3to D4shift will occur.
Are 10. Vehicle Does Not Creep Forward
In ªDº, ª2º Or ª1º Position and 11. Vehicle
Cannot Be Started From D
1OK?
Ye s
ENo
Go to 10. Vehicle Does
Not Creep Forward In ªDº,
ª2º Or ª1º Position and 11.
Vehicle Cannot Be Started
From D
1, AT-106, AT-107.
Does self-diagnosis, after cruise test,
show damage to any of the following
circuits?
IPark/neutral position switch
I Overdrive control switch
I A/T fluid temperature sensor
I Vehicle speed sensor×A/T (Revolu-
tion sensor)
I Shift solenoid valve A or B
I Vehicle speed sensor×MTR
No
EYe s
Check damaged circuit.
Refer to AT-52, AT-56,
AT-65, AT-68 or AT-93.
Check throttle (accelerator) position sen-
sor. Refer to EC section [TROUBLE
DIAGNOSIS FOR ªTHROTTLE (ACCEL)
POSI SENº].
OK
ENGRepair or replace throttle
(accelerator) position sen-
sor.
1. Remove oil pan.
2. Check A/T fluid condition.
OK
ENG 1. Remove control valve
assembly. Refer to
AT-118.
2. Check the following items:
I Shift valve B
I Overrun clutch control
valve
I Shift solenoid valve B
I Pilot valve
I Pilot filter
3. Disassemble A/T.
4. Check the following items:
I Servo piston assembly
I Brake band
I Torque converter
I Oil pump assembly
1. Remove control valve assembly. Refer
to AT-118.
2. Check the following items:
I Shift valve B
I Overrun clutch control valve
I Shift solenoid valve B
I Pilot valve
I Pilot filter
OK
FOK
Check again.
OK
ENG 1. Perform TCM input/
output signal inspection.
2. If NG, recheck TCM pin terminals for damage or
loose connection with
harness connector.
INSPECTION END
SAT833HA
NAT262
SAT171B
H
H
H
H
HH
H
DIAGNOSTIC PROCEDURES FOR SYMPTOMS
AT-110
http://vnx.su/
Page 926 of 1833
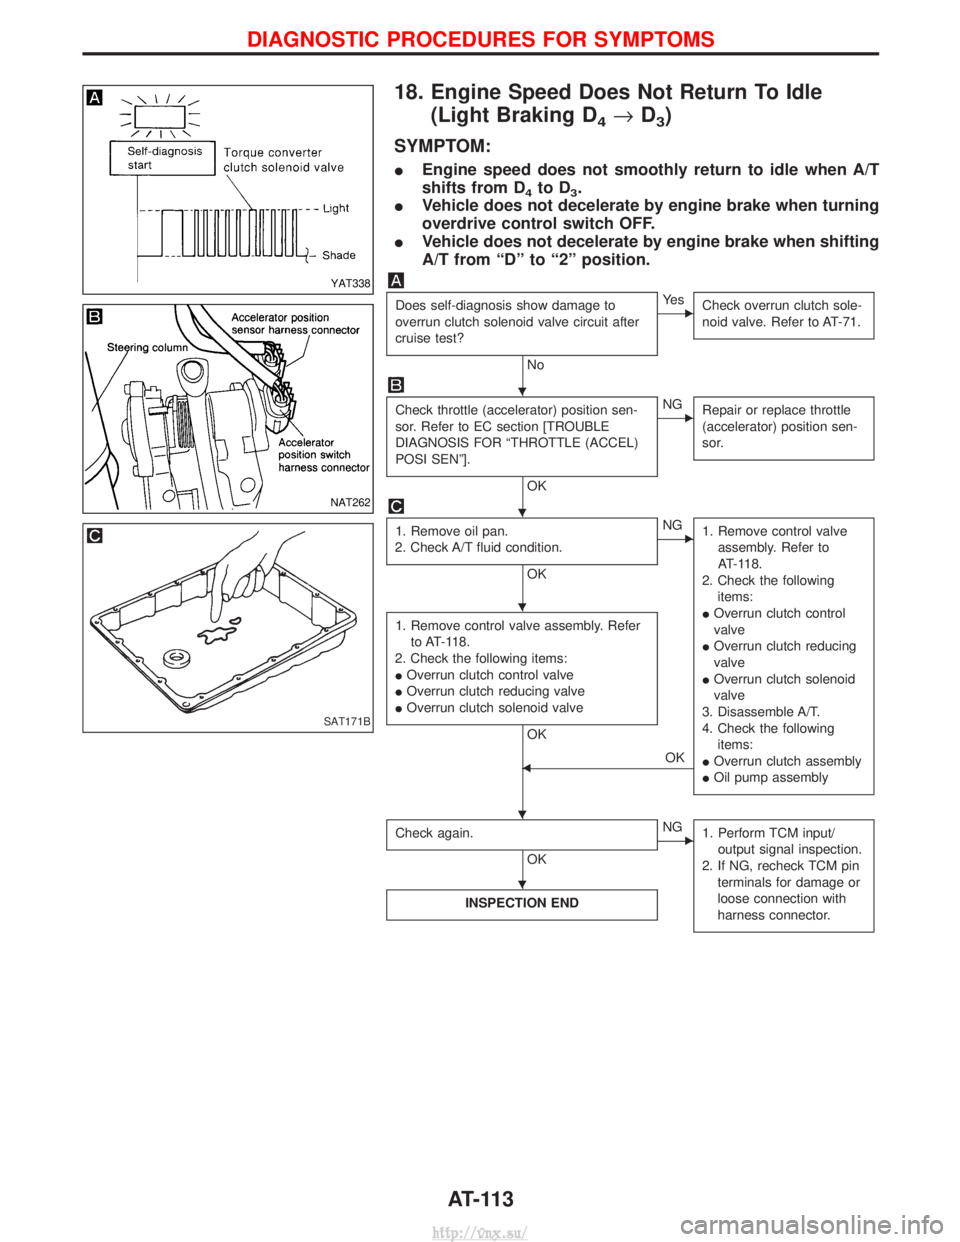
18. Engine Speed Does Not Return To Idle(Light Braking D
4®D3)
SYMPTOM:
I Engine speed does not smoothly return to idle when A/T
shifts from D
4to D3.
I Vehicle does not decelerate by engine brake when turning
overdrive control switch OFF.
I Vehicle does not decelerate by engine brake when shifting
A/T from ªDº to ª2º position.
Does self-diagnosis show damage to
overrun clutch solenoid valve circuit after
cruise test?
No
EYe s
Check overrun clutch sole-
noid valve. Refer to AT-71.
Check throttle (accelerator) position sen-
sor. Refer to EC section [TROUBLE
DIAGNOSIS FOR ªTHROTTLE (ACCEL)
POSI SENº].
OK
ENGRepair or replace throttle
(accelerator) position sen-
sor.
1. Remove oil pan.
2. Check A/T fluid condition.
OK
ENG 1. Remove control valve
assembly. Refer to
AT-118.
2. Check the following items:
I Overrun clutch control
valve
I Overrun clutch reducing
valve
I Overrun clutch solenoid
valve
3. Disassemble A/T.
4. Check the following items:
I Overrun clutch assembly
I Oil pump assembly
1. Remove control valve assembly. Refer
to AT-118.
2. Check the following items:
I Overrun clutch control valve
I Overrun clutch reducing valve
I Overrun clutch solenoid valve
OK
FOK
Check again.
OK
ENG 1. Perform TCM input/
output signal inspection.
2. If NG, recheck TCM pin terminals for damage or
loose connection with
harness connector.
INSPECTION END
YAT338
NAT262
SAT171B
H
H
H
HH
H
DIAGNOSTIC PROCEDURES FOR SYMPTOMS
AT-113
http://vnx.su/
Page 928 of 1833
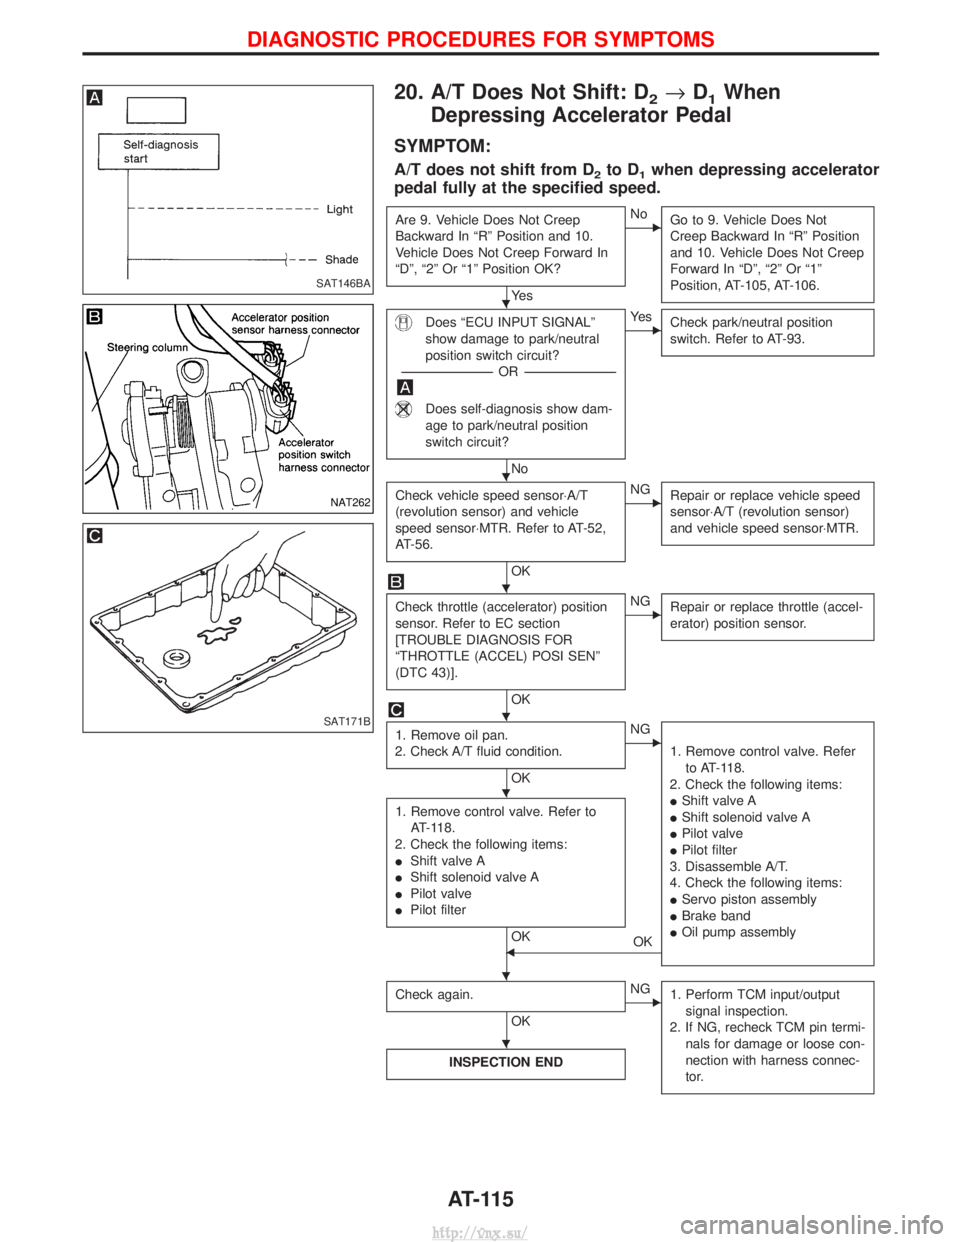
20. A/T Does Not Shift: D2®D1When
Depressing Accelerator Pedal
SYMPTOM:
A/T does not shift from D2to D1when depressing accelerator
pedal fully at the specified speed.
Are 9. Vehicle Does Not Creep
Backward In ªRº Position and 10.
Vehicle Does Not Creep Forward In
ªDº, ª2º Or ª1º Position OK?
Ye s
ENo Go to 9. Vehicle Does Not
Creep Backward In ªRº Position
and 10. Vehicle Does Not Creep
Forward In ªDº, ª2º Or ª1º
Position, AT-105, AT-106.
Does ªECU INPUT SIGNALº
show damage to park/neutral
position switch circuit?
---------------------------------------------------------------------------------------------------- -OR -----------------------------------------------------------------------------------------------------
Does self-diagnosis show dam-
age to park/neutral position
switch circuit?
No
EYe s
Check park/neutral position
switch. Refer to AT-93.
Check vehicle speed sensor×A/T
(revolution sensor) and vehicle
speed sensor×MTR. Refer to AT-52,
AT-56.
OK
ENGRepair or replace vehicle speed
sensor×A/T (revolution sensor)
and vehicle speed sensor×MTR.
Check throttle (accelerator) position
sensor. Refer to EC section
[TROUBLE DIAGNOSIS FOR
ªTHROTTLE (ACCEL) POSI SENº
(DTC 43)].
OK
ENGRepair or replace throttle (accel-
erator) position sensor.
1. Remove oil pan.
2. Check A/T fluid condition.
OK
ENG
1. Remove control valve. Referto AT-118.
2. Check the following items:
I Shift valve A
I Shift solenoid valve A
I Pilot valve
I Pilot filter
3. Disassemble A/T.
4. Check the following items:
I Servo piston assembly
I Brake band
I Oil pump assembly
1. Remove control valve. Refer to
AT-118.
2. Check the following items:
I Shift valve A
I Shift solenoid valve A
I Pilot valve
I Pilot filter
OKFOK
Check again.
OK
ENG 1. Perform TCM input/output
signal inspection.
2. If NG, recheck TCM pin termi- nals for damage or loose con-
nection with harness connec-
tor.
INSPECTION END
SAT146BA
NAT262
SAT171B
H
H
H
H
H
H
H
DIAGNOSTIC PROCEDURES FOR SYMPTOMS
AT-115
http://vnx.su/
Page 936 of 1833
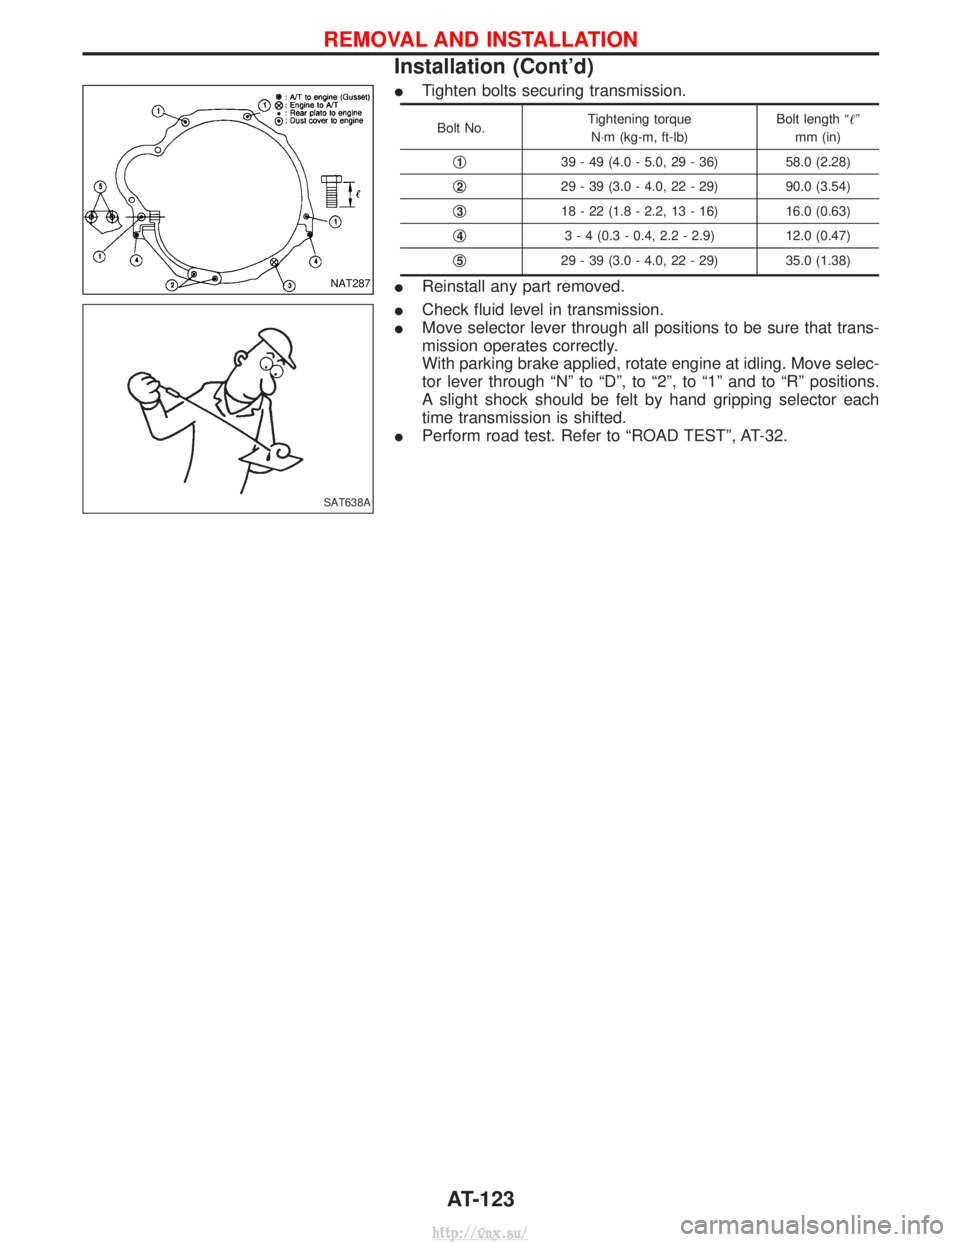
ITighten bolts securing transmission.
Bolt No. Tightening torque
N×m (kg-m, ft-lb) Bolt length ªº
mm (in)
q
139 - 49 (4.0 - 5.0, 29 - 36) 58.0 (2.28)
q
229 - 39 (3.0 - 4.0, 22 - 29) 90.0 (3.54)
q
318 - 22 (1.8 - 2.2, 13 - 16) 16.0 (0.63)
q
43 - 4 (0.3 - 0.4, 2.2 - 2.9) 12.0 (0.47)
q
529 - 39 (3.0 - 4.0, 22 - 29) 35.0 (1.38)
IReinstall any part removed.
I Check fluid level in transmission.
I Move selector lever through all positions to be sure that trans-
mission operates correctly.
With parking brake applied, rotate engine at idling. Move selec-
tor lever through ªNº to ªDº, to ª2º, to ª1º and to ªRº positions.
A slight shock should be felt by hand gripping selector each
time transmission is shifted.
I Perform road test. Refer to ªROAD TESTº, AT-32.NAT287
SAT638A
REMOVAL AND INSTALLATION
Installation (Cont'd)
AT-123
http://vnx.su/
Page 979 of 1833
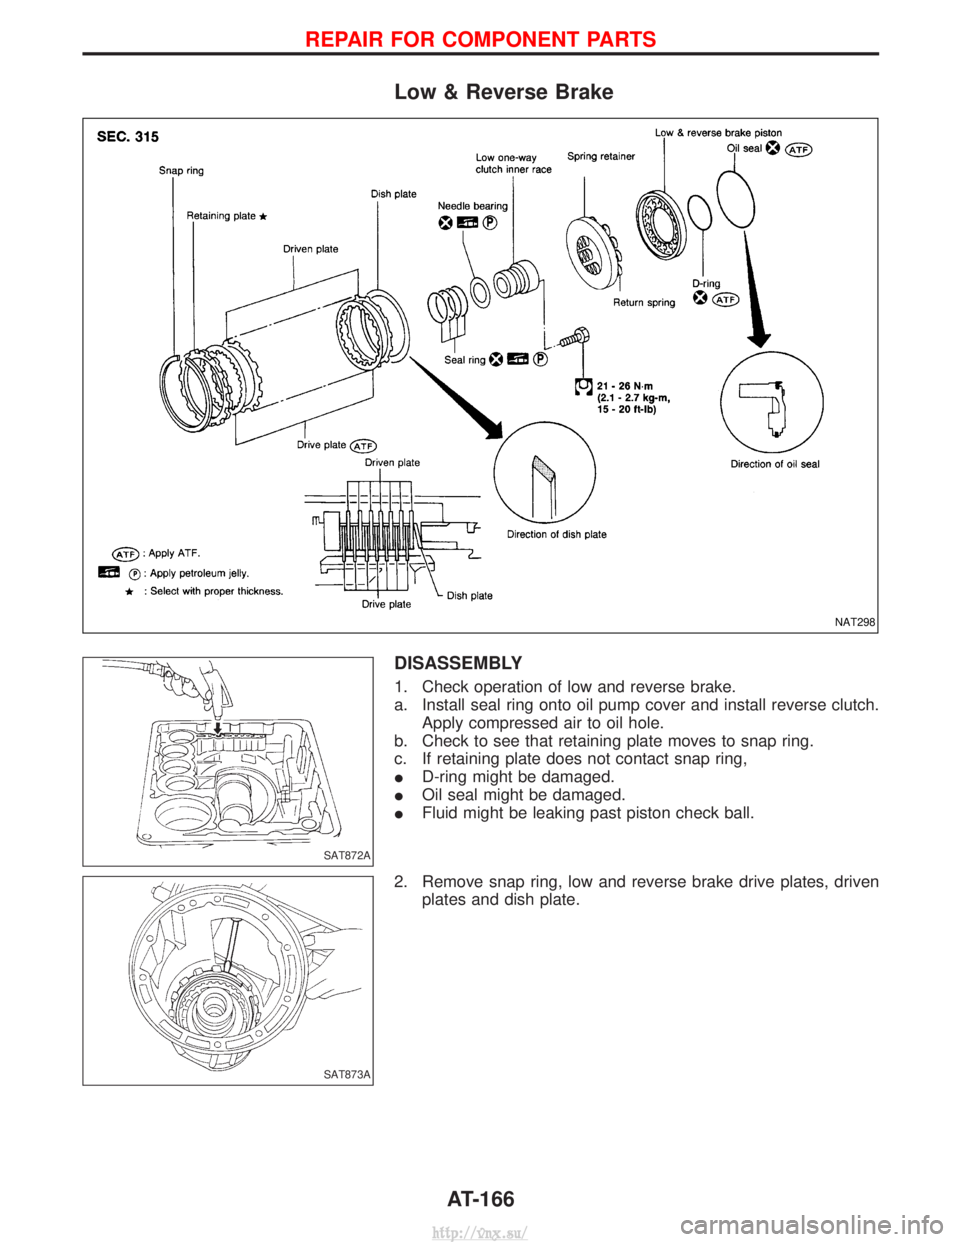
Low & Reverse Brake
DISASSEMBLY
1. Check operation of low and reverse brake.
a. Install seal ring onto oil pump cover and install reverse clutch.Apply compressed air to oil hole.
b. Check to see that retaining plate moves to snap ring.
c. If retaining plate does not contact snap ring,
I D-ring might be damaged.
I Oil seal might be damaged.
I Fluid might be leaking past piston check ball.
2. Remove snap ring, low and reverse brake drive plates, driven plates and dish plate.
NAT298
SAT872A
SAT873A
REPAIR FOR COMPONENT PARTS
AT-166
http://vnx.su/