Page 117 of 306

Unlocking doors1. Push the UNLOCK button on the keyfob
once.
�Only the driver’s door unlocks�The hazard indicator flashes once if all doors
are completely closed with the ignition key in
any position except the ON position.
�The interior light turns on and the light timer
activates for 30 seconds when the switch is
in the center�position with the ignition keyin any position except the ON position.
2. Push the UNLOCK button on the keyfob
again within 5 seconds.
�All doors unlock
�The hazard indicator flashes once if all doors
are completely closed.
If the following operation is not carried out
within 5 minutes after pressing the
UNLOCK button, all doors will be locked
automatically.
�any door is opened.
�the ignition key is turned to the ON
position
The interior light can be turned off without
waiting for 30 seconds by turning the ignition
switch to the ON position or by locking the
doors with the keyfob.
Opening the front windowPush the UNLOCK button on the keyfob.
The driver’s door will unlock.
Continue to press the UNLOCK button for 3
seconds. The driver’s and front passenger’s
windows will be lowered.
Continue to press the UNLOCK button until
windows are fully open.
SPA1373
Pre-driving checks and adjustments
3-7
�
04.3.9/R50-D/V5
�
Page 118 of 306

To stop lowering the windows, release the UN-
LOCK button.
To start lowering the windows, press the UN-
LOCK button again for 3 more seconds.
This function will operate after the ignition switch
is off and 45 seconds passed or either the front
door is opened.Using the panic alarmIf you are near your vehicle and feel threatened,
you may activate the alarm to call attention as
follows:
1. Push the PANIC button on the keyfob for
longer than 0.5 seconds.
2. The theft warning alarm and headlights will
stay on for 30 seconds.
3. The panic alarm stops when:
�It has run for 30 seconds, or
�The LOCK or the UNLOCK button is
pressed, or
�The panic button is pushed on the keyfob for
more than 0.5 seconds.
BATTERY REPLACEMENTReplace the battery as follows:
1. Open the lid using a suitable tool.
2. Replace the battery with a new one.Recommended battery: Sanyo CR2025 or
equivalent
Make sure that the⊕side faces the bottom
case.
3. Close the lid securely.
4. Push the keyfobbutton two or three times to
check its operation.
See your NISSAN dealer if you need any assis-
tance for replacement.
If the battery is removed for any reason
other than replacement, perform step 4
above.
�Be careful not to touch a circuit board
and a battery terminal.
�An improperly disposed battery can
harm the environment. Always confirm
local regulations for battery disposal.
�The keyfob is water-proof; however, if it
does get wet, immediately wipe com-
pletely dry.
�When changing batteries, do not let
dust or oil get on the keyfob.
FCC Notice:
Changes or modifications not expressly
approved by the manufacturer compliance
SPA1374
3-8
Pre-driving checks and adjustments
�
04.3.9/R50-D/V5
�
Page 119 of 306
")
could void the user’s authority to operate
the equipment.
This device complies with Part 15 of the
FCC Rules and RSS-210 of Industry
Canada.
Operation is subject to the following two
conditions: (1) This device may not cause
harmful interference, and (2) this device
must accept any interference received, in-
cluding interference that may cause undes-
ired operation of the device.
1. Pull the hood lock release handle located
below the instrument panel; the hood will
then spring up slightly.
2. Raise the lever at the front of the hood with
your fingertips and raise the hood.
3. Insert the assist bar into the slot in the front
edge of the hood.
4. When closing the hood, reset the assist bar
to its original position, then slowly close the
hood and make sure it locks into place.
WARNING
�Make sure the hood is completely
closed and latched before driving.
Failure to do so could cause the hood
to fly open and result in an accident.
�If you see steam or smoke coming
from the engine compartment, to
avoid injury do not open the hood.
SPA1375
HOOD
Pre-driving checks and adjustments
3-9
�
04.3.9/R50-D/V5
�
Page 120 of 306

WARNING
Do not drive with the back door open.
This could allow dangerous exhaust
gases to be drawn into the vehicle. See
“Precautions when starting and driving”
in the “5. Starting and driving” section
for exhaust gas.KEY OPERATION1. Turn the key counterclockwise to unlock the
back door.Turning the back door key one time coun-
terclockwise will unlock the rear door.
From that position, returning the key to
neutral (where the key can only the re-
moved and inserted.) and turning it coun-
terclockwise again within 5 seconds will
unlock all doors.
2. Pull the opener handle to open the back door.
3. To lock the back door, push it down firmly
and turn the key clockwise.
The power door lock system allows you to
lock or unlock all doors including the back
door simultaneously.
�Turning the front door key to the front of
the vehicle will lock all doors.
�Turning the front door key one time to
the rear of the vehicle will unlock the
corresponding door. From that position,
returning the key to neutral (where the
key can only be removed and inserted.)
and turning it to the rear again within 5
seconds will unlock all doors.When opening the back door, first open the
spare tire carrier in the sequence shown in the
illustration above. Then insert the stopper into
the hole to secure the carrier in the open posi-
tion.
CAUTION
�Be certain that there is adequate
area to allow the carrier to open fully.
�Open and close the spare tire carrier
slowly.
SPA1501
SPA0385
BACK DOOR
SPARE TIRE CARRIER (if so
equipped)3-10
Pre-driving checks and adjustments
�
04.3.9/R50-D/V5
�
Page 122 of 306
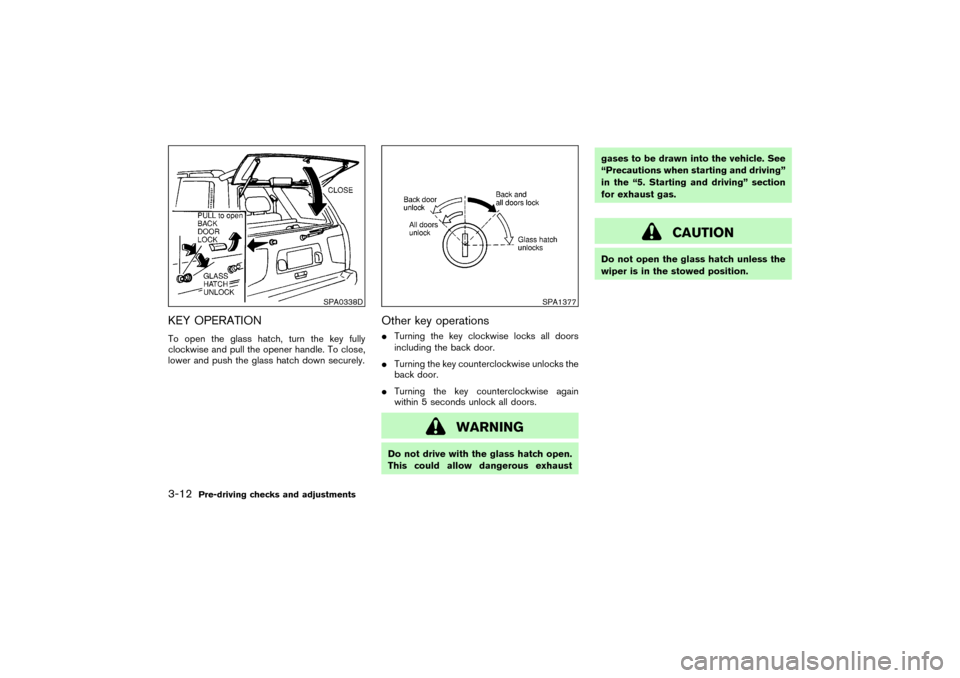
KEY OPERATIONTo open the glass hatch, turn the key fully
clockwise and pull the opener handle. To close,
lower and push the glass hatch down securely.
Other key operations�Turning the key clockwise locks all doors
including the back door.
�Turning the key counterclockwise unlocks the
back door.
�Turning the key counterclockwise again
within 5 seconds unlock all doors.
WARNING
Do not drive with the glass hatch open.
This could allow dangerous exhaustgases to be drawn into the vehicle. See
“Precautions when starting and driving”
in the “5. Starting and driving” section
for exhaust gas.
CAUTION
Do not open the glass hatch unless the
wiper is in the stowed position.
SPA0338D
SPA1377
3-12
Pre-driving checks and adjustments
�
04.3.9/R50-D/V5
�
Page 123 of 306
OPENER OPERATIONTo open the fuel filler lid, push the opener lever
down. To lock, close the fuel filler lid securely.The fuel filler lid release switch is located on the
floor below the driver’s arm rest.
To open the fuel filler lid, push the opener switch.
To lock, close the fuel filler lid securely.
FUEL FILLER CAPThe fuel filler cap is a ratcheting type.
Tighten the cap clockwise until ratcheting clicks
are heard.
WARNING
�Gasoline is extremely flammable and
highly explosive under certain condi-
tions. You could be burned or seri-
ously injured if it is misused or mis-
handled. Always stop the engine and
SPA1769
SPA1770
SPA1771
FUEL FILLER LID
Pre-driving checks and adjustments
3-13
�
04.3.9/R50-D/V5
�
Page 125 of 306
Put the fuel filler cap on the cap holder while
refueling.
TILT OPERATIONWhile pushing down on the lock lever, adjust the
steering wheel up or down to the desired posi-
tion. Push the lock lever up securely to lock the
steering wheel in place.
WARNING
Do not adjust the steering wheel while
driving. You could lose control of your
vehicle and cause an accident.
SPA1772
SPA0234
SPA0395
STEERING WHEEL SUN VISORS
Pre-driving checks and adjustments
3-15
�
04.3.9/R50-D/V5
�
Page 126 of 306

USING THE SUN VISORS1. To block out glare from the front, swing down
the main sun visor.
2. To block glare from the side, remove the main
sun visor from the center mount and swing it
to the side.
3. Then, to block glare from the front too, swing
down the sub-sun visor (if so equipped).
4. To adjust the glare block position, slide the
sub-sun visor to the left.
CAUTION
�Do not store the main sun visor be-
fore storing the sub-sun visor.
�Do not pull the sub-sun visor forcedly
downwards.
INSIDE MIRRORThe night position will reduce glare from the
headlights of vehicles behind you at night.
WARNING
Use the night position only when neces-
sary, because it reduces rear view clar-
ity.
OUTSIDE MIRRORSThe outside mirror will operate only when the
ignition switch is in the ACC or ON position.
Turn the control knobto the right or left to select
the right or left outside mirror, then adjust.
WARNING
Objects viewed in the outside mirror on
the passenger side are closer than they
appear. Be careful when moving to the
right. Using only this mirror could cause
PD1006M
SPA1211
MIRRORS
3-16
Pre-driving checks and adjustments
�
04.3.9/R50-D/V5
�