Page 40 of 306
vated. If it is activated it may cause uncom-
fortable seat belt tension.
WARNING
When fastening the seat belts, be cer-
tain that seatbacks are completely se-
cured in the latched position. If they are
not completely secured, passengers
may be injured in an accident or sudden
stop.
Unfastening the seat beltsTo unfasten the belt, press the button on the
buckle. The seat belt will automatically retract.Checking seat belt operationYour seat belt retractors are designed to lock
belt movement by two separate methods:
�When the belt is pulled quickly from the
retractor.
�When the vehicle slows down rapidly.
You can check the operation as follows:
�Grasp the shoulder belt and pull quicklyforward. The retractor should lock and restrict
further belt movement.
If the retractor does not lock during this check or
if you have any question about belt operation,
see your NISSAN dealer.
SSS0021
1-28
Seats, restraints and supplemental air bag systems
�
04.3.9/R50-D/V5
�
Page 41 of 306
Shoulder belt height adjustment (For
front seats)The shoulder belt anchor height should be ad-
justed to the position best suited for you (see
“Precautions on Seat Belt Usage” earlier in this
section). To adjust, pull the release buttons, then
move the shoulder belt anchor to the desired
position so that the belt passes over the shoul-
der. Release the adjustment buttons to lock the
shoulder belt anchor into position.
WARNING
�After adjustment, release the adjust-
ment button and try to move the
shoulder belt anchor up and down to
make sure it is securely fixed in po-
sition.
�The shoulder belt anchor height
should be adjusted to the position
best for you. Failure to do so may
reduce the effectiveness of the entire
restraint system and increase the
chance or severity of injury in an
accident.
Seat belt hookWhen the rear seat belt is not in use, hook it at
the belt hook.
SPA0739
SPA0531
Seats, restraints and supplemental air bag systems
1-29
�
04.3.9/R50-D/V5
�
Page 48 of 306
3. Remove all slack in the lap belt for a very tight
fit by pulling forcefully on the lap belt adjust-
ment.4. Before placing the child in the child restraint,
use force to tilt the child restraint from side to
side, and tug it forward to make sure that it is
securely held in place. It should not move
more than 1 inch (25 mm).
5. If it is not secure, try to tighten the belt again,
or put the restraint in another seat.
6. Check to make sure the child restraint is
properly secured prior to each use.
INSTALLATION ON REAR SEAT
OUTBOARD POSITIONS
Front facing
WARNING
�The three-point belt on your vehicle
is equipped with a locking mode re-
tractor which must be used when
installing a child restraint.
�Failure to do so will result in the child
SSS0308
SSS0309
SSS0252
1-36
Seats, restraints and supplemental air bag systems
�
04.3.9/R50-D/V5
�
Page 49 of 306

restraint not being properly secured.
It could tip over or otherwise be un-
secured and cause injury to the child
in a sudden stop or collision.
When you install a child restraint in a rear
outboard seat, follow these steps:
1. Position the child restraint on the seat. The
direction of the child restraint depends on the
type of the child restraint and the size of the
child. Adjust the head restraint to its highest
position or remove it if the child restraint uses
a top tether strap. Always follow the restraint
manufacturer’s instructions.
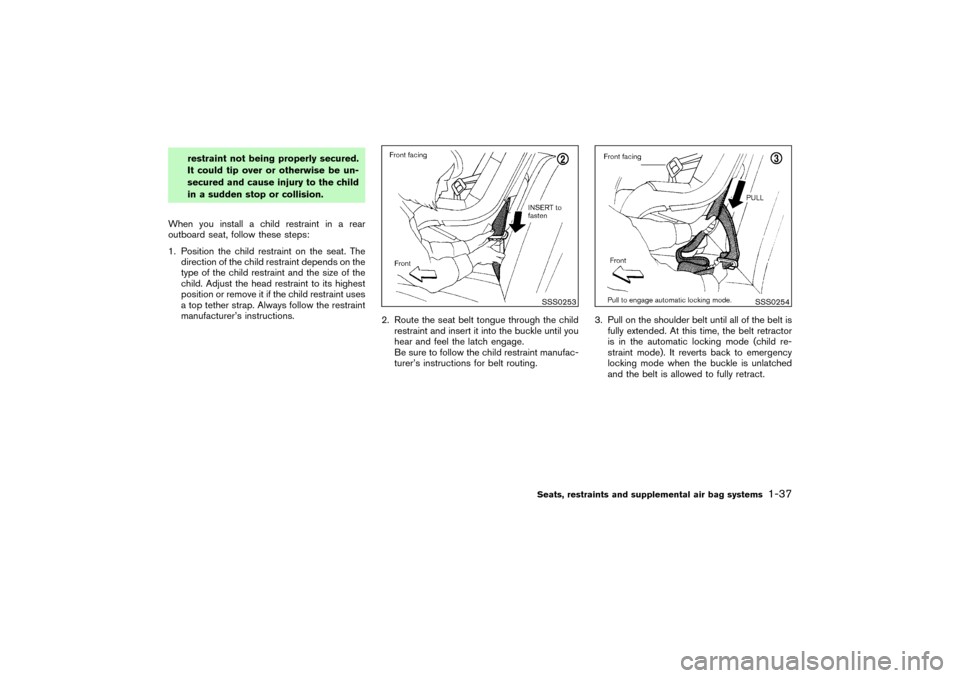
2. Route the seat belt tongue through the child
restraint and insert it into the buckle until you
hear and feel the latch engage.
Be sure to follow the child restraint manufac-
turer’s instructions for belt routing.3. Pull on the shoulder belt until all of the belt is
fully extended. At this time, the belt retractor
is in the automatic locking mode (child re-
straint mode). It reverts back to emergency
locking mode when the buckle is unlatched
and the belt is allowed to fully retract.
SSS0253
SSS0254
Seats, restraints and supplemental air bag systems
1-37
�
04.3.9/R50-D/V5
�
Page 50 of 306
4. Allow the belt to retract. Pull up on the belt to
remove any slack in the belt.5. Before placing the child in the child restraint,
use force to tilt the child restraint from side to
side, and tug it forward to make sure that it is
securely held in place. It should not move
more than 1 inch (25 mm).
6. Check that the retractor is in the automatic
locking mode by trying to pull more belt out of
the retractor. If you cannot pull any more belt
webbing out of the retractor, the belt is in the
automatic locking mode.
7. Check to make sure that the child restraint is
properly secured prior to each use. If the belt
is not locked, repeat steps 3 through 6.
After the child restraint is removed and the seatbelt is allowed to wind back into the retractor,
the automatic locking mode (child restraint
mode) is canceled; the seat belt only locks
during a sudden stop or impact.
SSS0062
SSS0255
1-38
Seats, restraints and supplemental air bag systems
�
04.3.9/R50-D/V5
�
Page 51 of 306
Rear facing
WARNING
�The three-point belt on your vehicle
is equipped with a locking mode re-
tractor which must be used when
installing a child restraint.
�Failure to do so will result in the child
restraint not being properly secured.
It could tip over or otherwise be un-
secured and cause injury to the childin a sudden stop or collision.
When you install a child restraint in a rear
outboard seat, follow these steps:
1. Position the child restraint on the seat. The
direction of the child restraint depends on the
type of the child restraint and the size of the
child. Always follow the restraint manufactur-
er’s instructions.
2. Route the seat belt tongue through the child
restraint and insert it into the buckle until you
hear and feel the latch engage. Be sure to
follow the child restraint manufacturer’s in-
structions for belt routing.
SSS0256
SSS0046
Seats, restraints and supplemental air bag systems
1-39
�
04.3.9/R50-D/V5
�
Page 52 of 306

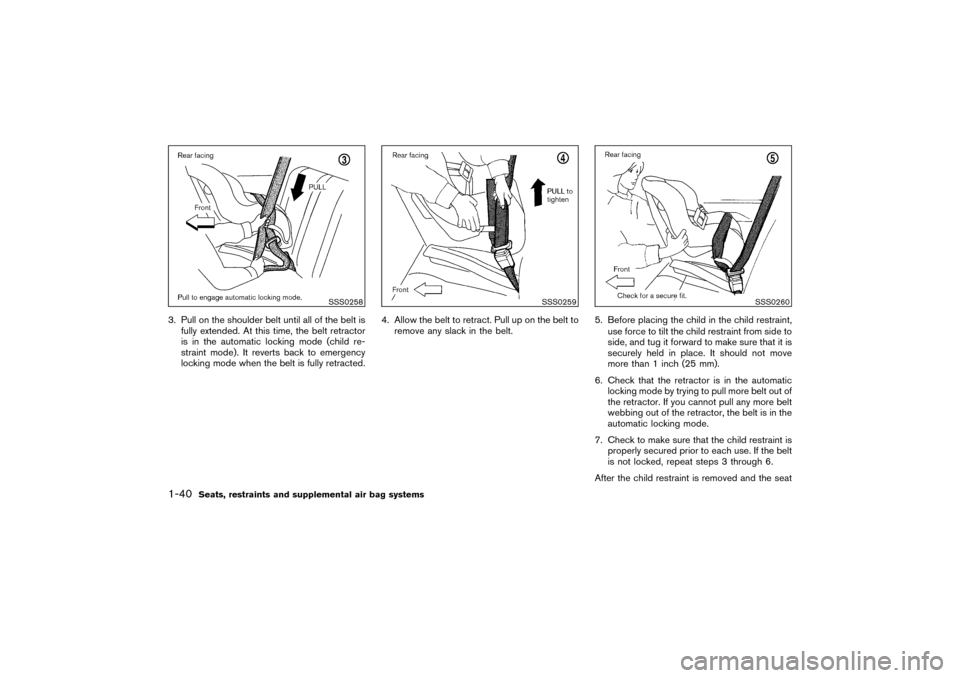
3. Pull on the shoulder belt until all of the belt is
fully extended. At this time, the belt retractor
is in the automatic locking mode (child re-
straint mode). It reverts back to emergency
locking mode when the belt is fully retracted.4. Allow the belt to retract. Pull up on the belt to
remove any slack in the belt.5. Before placing the child in the child restraint,
use force to tilt the child restraint from side to
side, and tug it forward to make sure that it is
securely held in place. It should not move
more than 1 inch (25 mm).
6. Check that the retractor is in the automatic
locking mode by trying to pull more belt out of
the retractor. If you cannot pull any more belt
webbing out of the retractor, the belt is in the
automatic locking mode.
7. Check to make sure that the child restraint is
properly secured prior to each use. If the belt
is not locked, repeat steps 3 through 6.
After the child restraint is removed and the seat
SSS0258
SSS0259
SSS0260
1-40
Seats, restraints and supplemental air bag systems
�
04.3.9/R50-D/V5
�
Page 53 of 306

belt is allowed to wind back into the retractor,
the automatic locking mode (child restraint
mode) is canceled; the seat belt only locks
during a sudden stop or impact.
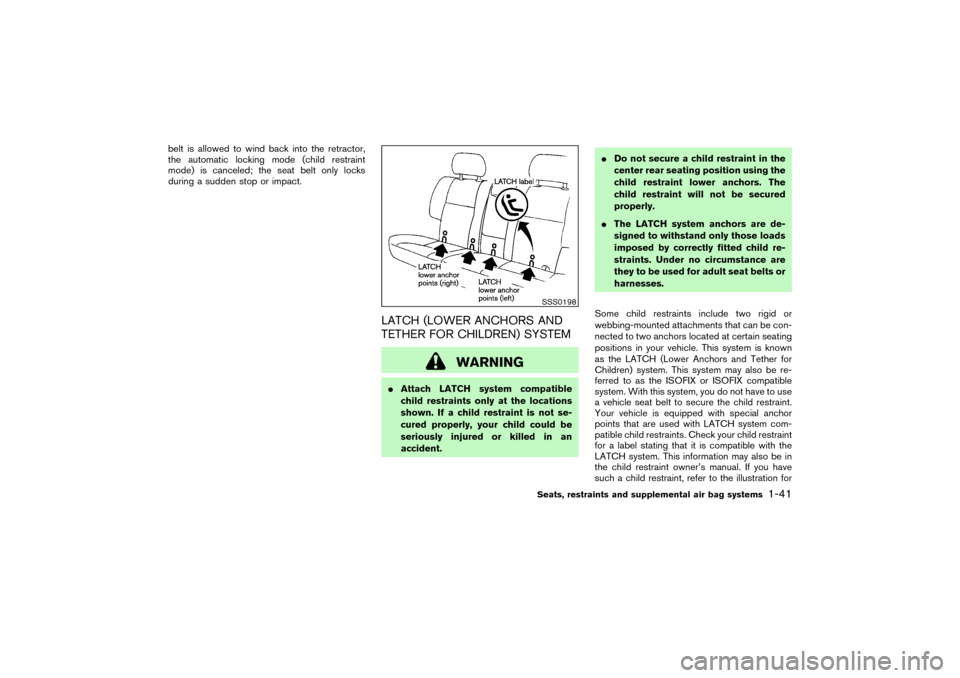
LATCH (LOWER ANCHORS AND
TETHER FOR CHILDREN) SYSTEM
WARNING
�Attach LATCH system compatible
child restraints only at the locations
shown. If a child restraint is not se-
cured properly, your child could be
seriously injured or killed in an
accident.�Do not secure a child restraint in the
center rear seating position using the
child restraint lower anchors. The
child restraint will not be secured
properly.
�The LATCH system anchors are de-
signed to withstand only those loads
imposed by correctly fitted child re-
straints. Under no circumstance are
they to be used for adult seat belts or
harnesses.
Some child restraints include two rigid or
webbing-mounted attachments that can be con-
nected to two anchors located at certain seating
positions in your vehicle. This system is known
as the LATCH (Lower Anchors and Tether for
Children) system. This system may also be re-
ferred to as the ISOFIX or ISOFIX compatible
system. With this system, you do not have to use
a vehicle seat belt to secure the child restraint.
Your vehicle is equipped with special anchor
points that are used with LATCH system com-
patible child restraints. Check your child restraint
for a label stating that it is compatible with the
LATCH system. This information may also be in
the child restraint owner’s manual. If you have
such a child restraint, refer to the illustration for
SSS0198Seats, restraints and supplemental air bag systems
1-41
�
04.3.9/R50-D/V5
�