Page 8 of 306
1. Hood (Page 3-9)
2. Headlight and turn signal switch (P.2-22)/
Bulbreplacement (P.8-29)
3. Windshield wiper and washer switch
(P.2-19)/Wiper replacement (P.8-21)
4. Interior light (P.2-42)
5. Sunroof (if so equipped)
6. Power windows (P.2-39)
7. Towing hook (P.6-12)
8. Fog light switch (if so equipped) (P.2-25)
9. Tires
— Wheel and tires (P.8-31, P.9-11)
— Flat tire (P.6-2)
10. Mirrors (P.3-16)
11. Doors
— Keys (P.3-2)
— Door locks (P.3-3)
— Keyfob(P.3-5)
SSI0010
EXTERIOR FRONT0-2
Illustrated table of contents
�
04.3.9/R50-D/V5
�
Page 10 of 306
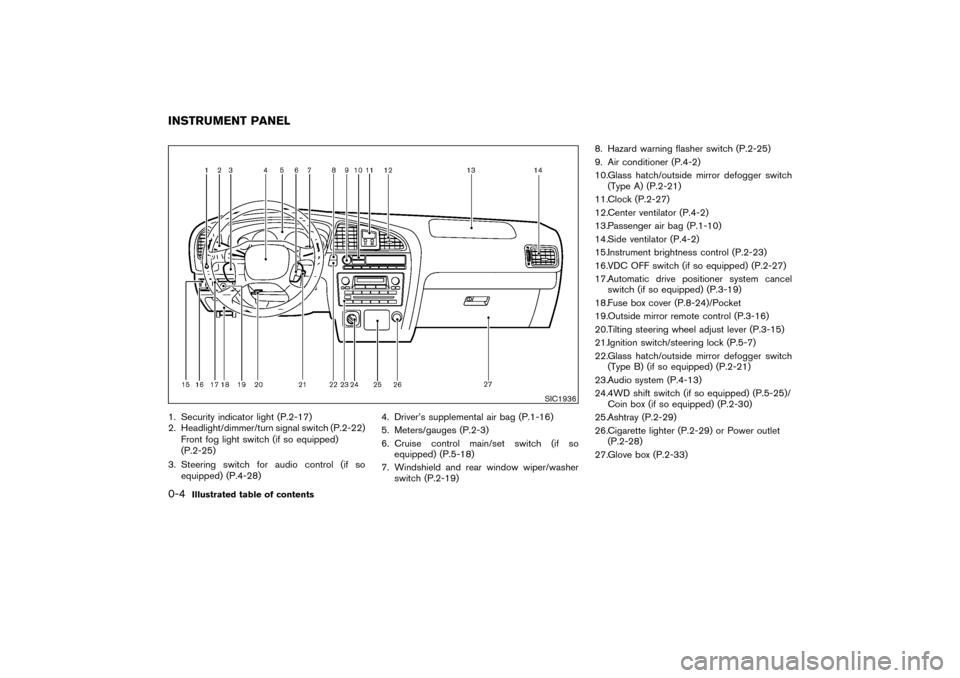
1. Security indicator light (P.2-17)
2. Headlight/dimmer/turn signal switch (P.2-22)
Front fog light switch (if so equipped)
(P.2-25)
3. Steering switch for audio control (if so
equipped) (P.4-28)4. Driver’s supplemental air bag (P.1-16)
5. Meters/gauges (P.2-3)
6. Cruise control main/set switch (if so
equipped) (P.5-18)
7. Windshield and rear window wiper/washer
switch (P.2-19)8. Hazard warning flasher switch (P.2-25)
9. Air conditioner (P.4-2)
10.Glass hatch/outside mirror defogger switch
(Type A) (P.2-21)
11.Clock (P.2-27)
12.Center ventilator (P.4-2)
13.Passenger air bag (P.1-10)
14.Side ventilator (P.4-2)
15.Instrument brightness control (P.2-23)
16.VDC OFF switch (if so equipped) (P.2-27)
17.Automatic drive positioner system cancel
switch (if so equipped) (P.3-19)
18.Fuse box cover (P.8-24)/Pocket
19.Outside mirror remote control (P.3-16)
20.Tilting steering wheel adjust lever (P.3-15)
21.Ignition switch/steering lock (P.5-7)
22.Glass hatch/outside mirror defogger switch
(Type B) (if so equipped) (P.2-21)
23.Audio system (P.4-13)
24.4WD shift switch (if so equipped) (P.5-25)/
Coin box (if so equipped) (P.2-30)
25.Ashtray (P.2-29)
26.Cigarette lighter (P.2-29) or Power outlet
(P.2-28)
27.Glove box (P.2-33)
SIC1936
INSTRUMENT PANEL0-4
Illustrated table of contents
�
04.3.9/R50-D/V5
�
Page 14 of 306
WARNING
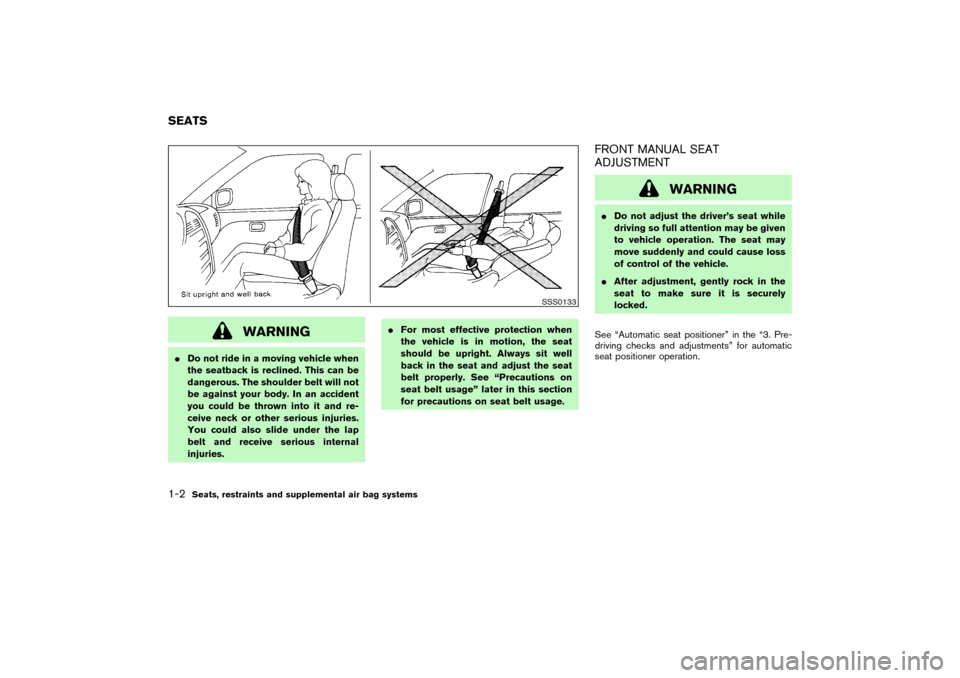
�Do not ride in a moving vehicle when
the seatback is reclined. This can be
dangerous. The shoulder belt will not
be against your body. In an accident
you could be thrown into it and re-
ceive neck or other serious injuries.
You could also slide under the lap
belt and receive serious internal
injuries.�For most effective protection when
the vehicle is in motion, the seat
should be upright. Always sit well
back in the seat and adjust the seat
belt properly. See “Precautions on
seat belt usage” later in this section
for precautions on seat belt usage.
FRONT MANUAL SEAT
ADJUSTMENT
WARNING
�Do not adjust the driver’s seat while
driving so full attention may be given
to vehicle operation. The seat may
move suddenly and could cause loss
of control of the vehicle.
�After adjustment, gently rock in the
seat to make sure it is securely
locked.
See “Automatic seat positioner” in the “3. Pre-
driving checks and adjustments” for automatic
seat positioner operation.
SSS0133
SEATS1-2
Seats, restraints and supplemental air bag systems
�
04.3.9/R50-D/V5
�
Page 15 of 306
Forward and backwardPull the lever up while you slide the seat forward
or backward to the desired position. Release the
lever to lock the seat in position.
RecliningTo recline the seatback, pull the lever up and
lean back. To bring the seatback forward again,
pull the lever and move your body forward. The
seatback will move forward.
The reclining feature allows adjustment of the
seatback for occupants of different sizes to help
obtain proper seat belt fit. (See “Precautions on
seat belt usage” later in this section.) Also, the
seatback may be reclined to allow occupants to
rest when the vehicle is parked.
Seat lifter (if so equipped for driver’s
seat)Turn either dial to adjust the angle and height of
the seat cushion to the desired position.
SSS0169
SSS0168
Seats, restraints and supplemental air bag systems
1-3
�
04.3.9/R50-D/V5
�
Page 20 of 306
unsecured cargo could cause per-
sonal injury.
�When returning the seatbacks to the
upright position, be certain they are
completely secured in the latched po-
sition. If they are not completely se-
cured, passengers may be injured in
an accident or sudden stop.
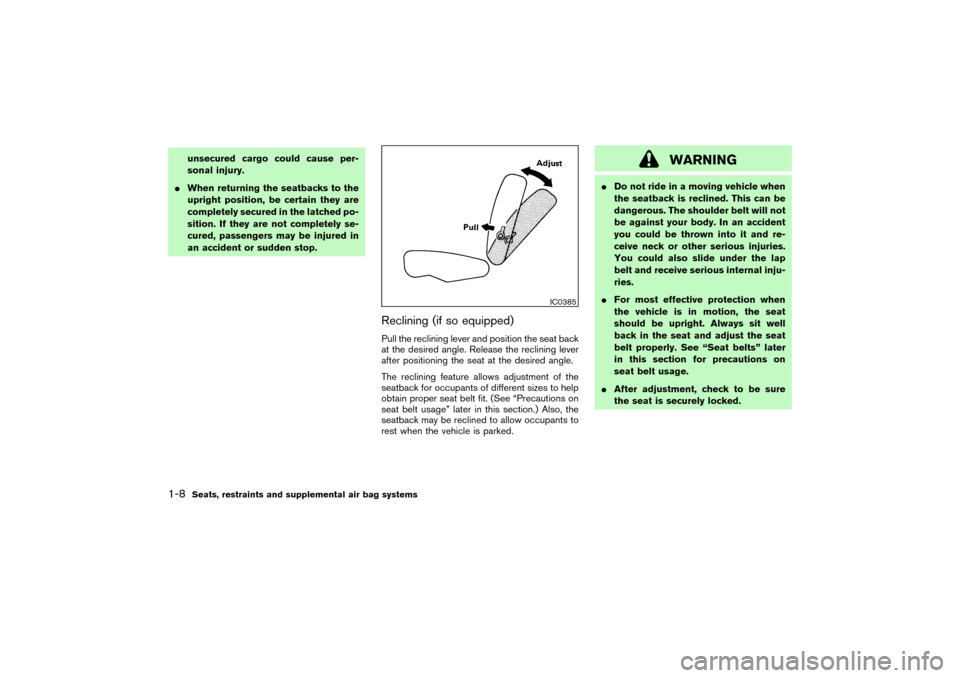
Reclining (if so equipped)Pull the reclining lever and position the seat back
at the desired angle. Release the reclining lever
after positioning the seat at the desired angle.
The reclining feature allows adjustment of the
seatback for occupants of different sizes to help
obtain proper seat belt fit. (See “Precautions on
seat belt usage” later in this section.) Also, the
seatback may be reclined to allow occupants to
rest when the vehicle is parked.
WARNING
�Do not ride in a moving vehicle when
the seatback is reclined. This can be
dangerous. The shoulder belt will not
be against your body. In an accident
you could be thrown into it and re-
ceive neck or other serious injuries.
You could also slide under the lap
belt and receive serious internal inju-
ries.
�For most effective protection when
the vehicle is in motion, the seat
should be upright. Always sit well
back in the seat and adjust the seat
belt properly. See “Seat belts” later
in this section for precautions on
seat belt usage.
�After adjustment, check to be sure
the seat is securely locked.
IC0385
1-8
Seats, restraints and supplemental air bag systems
�
04.3.9/R50-D/V5
�
Page 21 of 306
HEAD RESTRAINT ADJUSTMENT
WARNING
Head restraints should be adjusted
properly as they may provide significant
protection against injury in an accident.
Do not remove them. Check the adjust-
ment after someone else uses the seat.
To raise the head restraint, just pull it up. To
lower, push the lock knoband push the head
restraint down.Adjust the head restraints so the center is level
with the center of your ears.
ARMREST (if so equipped)Pull the armrest forward until it is horizontal.
SSS0125
SSS0178
SSS0216
Seats, restraints and supplemental air bag systems
1-9
�
04.3.9/R50-D/V5
�
Page 34 of 306
the supplemental air bag warning light illumi-
nates. The supplemental air bag warning light
will turn off after about 7 seconds if the system is
operational.
If any of the following conditions occur, the
supplemental front air bag, supplemental side air
bag (if so equipped) and curtain side-impact air
bag (if so equipped) systems, and pre-tensioner
seat belt need servicing:
�The supplemental air bag warning light re-
mains on after approximately 7 seconds.
�The supplemental air bag warning light
flashes intermittently.
�The supplemental air bag warning light does
not come on at all.
Under these conditions, the supplemental front
air bags, supplemental side air bags, curtain
side-impact air bags and/or pre-tensioner seat
belt may not operate properly. They must be
checked and repaired. Take your vehicle to the
nearest NISSAN dealer.
WARNING
If the supplemental air bag warning
light is on, it could mean that thesupplemental front air bag, supplemen-
tal side air bag, curtain side-impact air
bag systems and/or pre-tensioner seat
belt will not operate in an accident.
Repair and replacement procedureThe supplemental front air bags, supplemental
side air bags (if so equipped), curtain side-
impact air bags (if so equipped) and pre-
tensioner seat belt are designed to inflate on a
one-time-only basis. As a reminder, unless it is
damaged, the supplemental air bag warning light
will remain illuminated after inflation has oc-
curred. Repair and replacement of these sys-
tems should be done only by a NISSAN dealer.
When maintenance work is required on the
vehicle, the supplemental front air bags, side air
bags, curtain side-impact air bags, related parts
and pre-tensioner seat belt should be pointed
out to the person conducting the maintenance.
The ignition key should always be in the LOCK
position when working under the hood or inside
the vehicle.
WARNING
�Once the supplemental front air bag,
side air bag or curtain side-impact air
bag has inflated, the air bag module
will not function again and must be
replaced. Additionally, if any of the
supplemental front air bags inflate,
the pre-tensioner seat belts must
also be replaced. The air bag module
and pre-tensioner seat belt system
should be replaced by a NISSAN
dealer. The air bag modules and pre-
tensioner seat belt system cannot be
repaired.
�The supplemental front air bag and
side air bag, curtain side-impact air
bag systems and pre-tensioner seat
belt system should be inspected by a
NISSAN dealer if there is any damage
to the front end or side portion of the
vehicle.
�If you need to dispose of these
supplemental systems or scrap the
vehicle, contact a NISSAN dealer.
1-22
Seats, restraints and supplemental air bag systems
�
04.3.9/R50-D/V5
�
Page 39 of 306
you could be thrown into it and re-
ceive neck or other serious injuries.
You could also slide under the lap
belt and receive serious internal inju-
ries.
�For most effective protection when
the vehicle is in motion, the seat
should be upright. Always sit well
back in the seat and adjust the seat
belt properly.
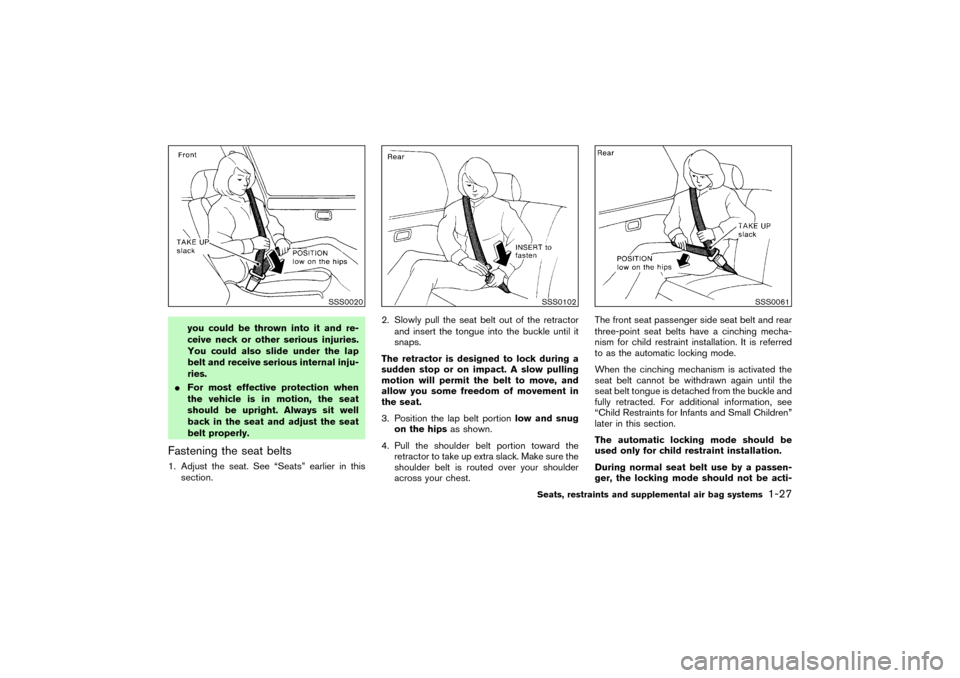
Fastening the seat belts1. Adjust the seat. See “Seats” earlier in this
section.2. Slowly pull the seat belt out of the retractor
and insert the tongue into the buckle until it
snaps.
The retractor is designed to lock during a
sudden stop or on impact. A slow pulling
motion will permit the belt to move, and
allow you some freedom of movement in
the seat.
3. Position the lap belt portionlow and snug
on the hipsas shown.
4. Pull the shoulder belt portion toward the
retractor to take up extra slack. Make sure the
shoulder belt is routed over your shoulder
across your chest.The front seat passenger side seat belt and rear
three-point seat belts have a cinching mecha-
nism for child restraint installation. It is referred
to as the automatic locking mode.
When the cinching mechanism is activated the
seat belt cannot be withdrawn again until the
seat belt tongue is detached from the buckle and
fully retracted. For additional information, see
“Child Restraints for Infants and Small Children”
later in this section.
The automatic locking mode should be
used only for child restraint installation.
During normal seat belt use by a passen-
ger, the locking mode should not be acti-
SSS0020
SSS0102
SSS0061
Seats, restraints and supplemental air bag systems
1-27
�
04.3.9/R50-D/V5
�