Page 407 of 3870

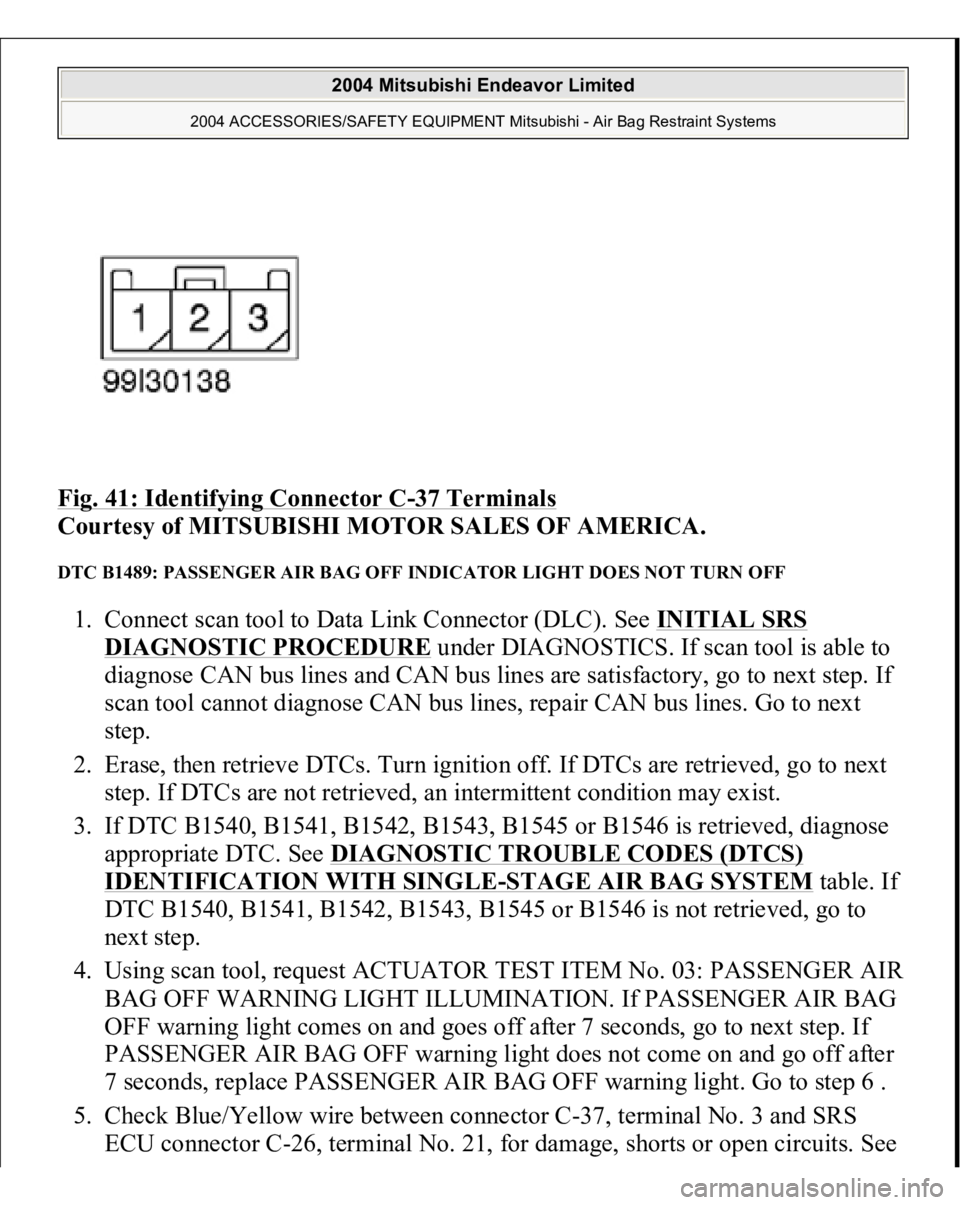
Fig. 41: Identifying Connector C
-37 Terminals
Courtesy of MITSUBISHI MOTOR SALES OF AMERICA.
DTC B1489: PASSENGER AIR BAG OFF INDICATOR LIGHT DOES NOT TURN OFF 1. Connect scan tool to Data Link Connector (DLC). See INITIAL SRS
DIAGNOSTIC PROCEDURE
under DIAGNOSTICS. If scan tool is able to
diagnose CAN bus lines and CAN bus lines are satisfactory, go to next step. If
scan tool cannot diagnose CAN bus lines, repair CAN bus lines. Go to next
step.
2. Erase, then retrieve DTCs. Turn ignition off. If DTCs are retrieved, go to next
step. If DTCs are not retrieved, an intermittent condition may exist.
3. If DTC B1540, B1541, B1542, B1543, B1545 or B1546 is retrieved, diagnose
appropriate DTC. See DIAGNOSTIC TROUBLE CODES (DTCS)
IDENTIFICATION WITH SINGLE
-STAGE AIR BAG SYSTEM
table. If
DTC B1540, B1541, B1542, B1543, B1545 or B1546 is not retrieved, go to
next step.
4. Using scan tool, request ACTUATOR TEST ITEM No. 03: PASSENGER AIR
BAG OFF WARNING LIGHT ILLUMINATION. If PASSENGER AIR BAG
OFF warning light comes on and goes off after 7 seconds, go to next step. If
PASSENGER AIR BAG OFF warning light does not come on and go off after
7 seconds, replace PASSENGER AIR BAG OFF warning light. Go to step 6 .
5. Check Blue/Yellow wire between connector C-37, terminal No. 3 and SRS
ECU connector C-26, terminal No. 21, for damage, shorts or open circuits. See
2004 Mitsubishi Endeavor Limited
2004 ACCESSORIES/SAFETY EQUIPMENT Mitsubishi - Air Bag Restraint Systems
Page 441 of 3870

terminal No. 2 and ignition switch connector C-308, terminal No. 2. If wire is
okay, go to step 8 . If wire is not okay, replace wire harness between occupant
classification ECU and ignition switch connector C-308. Go to step 8 .
6. Disconnect SRS ECU connector C-25. See SRS ELECTRONIC CONTROL UNIT (SRS ECU)
under REMOVAL & INSTALLATION. See Fig. 30
.
Inspect Sky Blue wire for an open or short circuit between connector D-38,
terminal No. 3 and SRS ECU connector C-25, terminal No. 66. See Fig. 33
. If
wire is okay, reconnect SRS components. Erase, then retrieve DTCs. If DTC
B1545 is retrieved, replace front seat slide adjuster. Go to next step. If wire
harness is not okay, replace wire harness. Go to step 8 .
7. Erase DTCs. Turn ignition on. If DTC B1546 is retrieved, replace SRS ECU.
Go to next step. If DTC B1546 is not retrieved, diagnosis is complete.
8. Erase, then retrieve DTCs. If DTC B1546 is retrieved, go to step 1 . If DTC
B1546 is not retrieved, system is normal at this time.
DTC B1547: CUT OFF FOR PASSENGER-SIDE AIR BAG MODULE 1. Connect scan tool to Data Link Connector (DLC). See INITIAL SRS
DIAGNOSTIC PROCEDURE
under DIAGNOSTICS. If scan tool is able to
diagnose CAN bus lines and CAN bus lines are satisfactory, go to next step. If
scan tool cannot diagnose CAN bus lines, repair CAN bus lines. Go to next
step.
2. Erase, then retrieve DTCs. Turn ignition off. If DTC B1547 is retrieved, go to
next step. If DTC B1547 is not retrieved, an intermittent condition may exist.
3. If DTCs other than DTC B1457 are retrieved, diagnose indicated DTC. See
DIAGNOSTIC TROUBLE CODES (DTCS) IDENTIFICATION WITH
SINGLE
-STAGE AIR BAG SYSTEM
table. If only DTC B1547 is
retrieved, go to next step.
4. Using scan tool, erase, then retrieve DTCs. If DTC B1547 is retrieved, replace
SRS ECU. See SRS ELECTRONIC CONTROL UNIT (SRS ECU)
under
REMOVAL & INSTALLATION. If DTC B1547 is not retrieved, diagnosis is
complete.
DTC B1552: CHANGING CIRCUIT SHORT 1. Connect scan tool to Data Link Connector
(DLC
). SeeINITIAL SRS
2004 Mitsubishi Endeavor Limited
2004 ACCESSORIES/SAFETY EQUIPMENT Mitsubishi - Air Bag Restraint Systems
Page 484 of 3870
Fig. 28: Number Name Table
Courtesy of MITSUBISHI MOTOR SALES OF AMERICA.
23. Remove the differential.
24. Remove the differential bearing outer race from the transaxle case.
2004 Mitsubishi Endeavor XLS
2004 TRANSMISSION Automatic Transaxle Overhaul - Endeavor
Page 525 of 3870
Fig. 69: Placing Special Tool On Top Of Brake Disc In Place Of Pressure Plate
Courtesy of MITSUBISHI MOTOR SALES OF AMERICA.
16. Move special tool MB991632 and measure its movement.
Standard value of end play (Reference): 1.09 - 1.55 mm (0.0429 - 0.0610
inch)
17. Select a pressure plate whose thickness corresponds to the measured amount of
movement from the followin
g table.
2004 Mitsubishi Endeavor XLS
2004 TRANSMISSION Automatic Transaxle Overhaul - Endeavor
Page 528 of 3870
Fig. 72: Pressure Plate Thickness Moving Amount Table
Courtesy of MITSUBISHI MOTOR SALES OF AMERICA.
18. Turn the transaxle over so that the installation surface of the torque converter
housing is facing up.
Install special tool MD998913 in a dial gauge, and then move special tool
MB991632 and measure its movement.
Standard value of end play (Reference): 1.65 - 2.11 mm (0.050 - 0.0831
inch)
2004 Mitsubishi Endeavor XLS
2004 TRANSMISSION Automatic Transaxle Overhaul - Endeavor
Page 529 of 3870
Fig. 73: Installing Special Tool In A Dial Gauge
Courtesy of MITSUBISHI MOTOR SALES OF AMERICA.
19. Select a pressure plate whose thickness corresponds to the measured amount of
movement from the table below.
2004 Mitsubishi Endeavor XLS
2004 TRANSMISSION Automatic Transaxle Overhaul - Endeavor
Page 532 of 3870
Fig. 76: Pressure Plate Thickness Moving Amount Table
Courtesy of MITSUBISHI MOTOR SALES OF AMERICA.
24. Tighten the mounting bolts of the output shaft bearing retainer to the specified
torque.
Tightening torque: 54 +/- 5 N.m (40 +/- 4 ft-lb)
CAUTION: Do not reuse the bolt, as it has had sealant
applied.
2004 Mitsubishi Endeavor XLS
2004 TRANSMISSION Automatic Transaxle Overhaul - Endeavor
Page 535 of 3870
Fig. 79: Using Special Tools And Tightening Jam Nut
Courtesy of MITSUBISHI MOTOR SALES OF AMERICA.
27. Move the output shaft to measure the end play and record the measurement
value.
28. Remove the parts that were installed in steps 21 to 25.
29. Add 1.88 mm (0.074 inch)* and 0.01 to 0.09 mm (0.0004 to 0.0035 inch)** to
the measured value in step 26 and select a spacer of the same thickness.
Adjustment spacer sizes are all listed on SERVICE SPECIFICATIONS
.
Select the most suitable one from among those listed.
30. Repeat steps 22 to 25 again, installing each part and using the appropriate
NOTE: *is the thickness of the spacer installed in step 21. **is
the preload of the output shaft.
2004 Mitsubishi Endeavor XLS
2004 TRANSMISSION Automatic Transaxle Overhaul - Endeavor