Page 734 of 3870
3. If the clearance is outside the standard value, check for air trapped in the brake
line and thickness of the disc brake pad. And then adjust and replace defective
parts as required.
4. Return the carpet etc. to its original position. BRAKE BOOSTER OPERATING TEST 1. For simple checking of the brake booster operation, carry out the following
tests:
1. Run the engine for one or two minutes, and then stop it. If the pedal
depresses fully the first time but gradually becomes higher when
depressed succeeding times, the booster is operating properly. If the pedal
height remains unchanged, the booster is defective. Go to step 2.
Fig. 19: Checking Brake Booster Operation
Courtesy of MITSUBISHI MOTOR SALES OF AMERICA.
2004 Mitsubishi Endeavor LS
2004 BRAKES Basic Brake System - Endeavor
Page 735 of 3870
2. With the engine stopped, step on the brake pedal several times. Then step
on the brake pedal and start the engine. If the pedal moves downward
slightly, the booster is in good condition. If there is no change, the booster
is defective. Go to step 3.
Fig. 20: Stepping On Pedal & Starting Engine
Courtesy of MITSUBISHI MOTOR SALES OF AMERICA.
3. With the engine running, step on the brake pedal and then stop the engine.
Hold the pedal depressed for 30 seconds. If the pedal height does not
change, the booster is in good condition, if the pedal rises, the booster is
defective.
2004 Mitsubishi Endeavor LS
2004 BRAKES Basic Brake System - Endeavor
Page 1066 of 3870

2004 ENGINE COOLING
Specifications & Drive Belt Routing - Endeavor
COOLING SYSTEM BLEEDING 1. Using LLC Changer (MB991871), refill cooling system with appropriate
mixture between 30-60% anti-freeze (depending on weather conditions). See
Fig. 1
. Typically a solution of 50% anti-freeze and 50% distilled water is
sufficient for most areas. A solution of 50% anti-freeze and 50% water has a
freezing point of -32.8°F (-31°C).
2. Reinstall the radiator cap.
3. Start the engine and let it warm up until the thermostat opens.
4. After repeatedly revving the engine up to 3000 RPM several times, shut off the
engine.
5. Remove the radiator cap after engine has become cold, completely fill the
radiator with coolant. Reinstall the cap.
6. Ensure coolant in the reserve tank is between the FULL and LOW marks. Add
coolant if necessar
y.
CAUTION: DO NOT use alcohol or methanol anti-freeze or any
engine coolants mixed with alcohol or methanol anti-
freeze. The use of an improper anti-freeze can cause
corrosion of the aluminum components.
CAUTION: DO NOT overfill the reserve tank.
2004 Mitsubishi Endeavor Limited
2004 ENGINE COOLING Specifications & Drive Belt Routing - Endeavor
2004 Mitsubishi Endeavor Limited
2004 ENGINE COOLING Specifications & Drive Belt Routing - Endeavor
Page 1532 of 3870

3. With the engine idling, change the engine load (shift from N to D range, for
example) to make sure that there is no change in the level of abnormal noise.
If there is a change in the level of abnormal noise, suspect a tapping noise due
to worn crankshaft bearing or connecting rod bearing (In this case, the lash
adjuster is in good condition.).
4. After completion of warm-up, run the engine at idle to check for abnormal
noise.
If the noise is reduced or disappears, clean the lash adjuster (Refer to
ROCKER ARMS AND CAMSHAFT
). As it is suspected that the noise is
due to seizure of the lash adjuster. If there is no change in the level of the
abnormal noise, proceed to step 5.
5. Run the engine to bleed the lash adjuster system (Refer to LASH ADJUSTER
CHECK
.).
6. If the abnormal noise does not disappear after air bleeding operation, clean the
lash adjuster (Refer to ROCKER ARMS AND CAMSHAFT
).
Bleeding lash adjuster system 1. Check engine oil and add or change oil if required. NOTE: Parkin
g the vehicle on a
grade for a lon
g time ma
y decrease
oil in the lash adjuster, causing air to enter the high
pressure chamber when starting the engine.
NOTE: After parking for many hours, oil may run out from the oil
passage and take time before oil is supplied to the lash
adjuster, causing air to enter the high pressure chamber.
NOTE: In the above cases, abnormal noise can be eliminated by
bleeding the lash adjuster system.
NOTE: If the engine oil level is low, air is sucked from the oil
2004 Mitsubishi Endeavor Limited
2004 ENGINE Engine - Endeavor
Page 1631 of 3870
Fig. 7: Identifying Connector C
-105
Courtesy of MITSUBISHI MOTOR SALES OF AMERICA.
CIRCUIT OPERATION Power is supplied to the radio and CD player or radio, CD player and CD changer
when the ignition switch is in the "ACC" position or "ON" position. When the
ignition is switched on, the radio and CD player or radio, CD player and CD
changer or radio, CD player and CD changer will return to the previous state when
the ignition was switch off at the last time. TECHNICAL DESCRIPTION (COMMENT) The cause is probably a faulty radio and CD player or radio, CD player and CD
chan
ger
power su
pply circuit.
2004 Mitsubishi Endeavor LS
2004 BODY & ACCESSORIES Radio With Tape Player & Cd Player - Endeavor
Page 1773 of 3870

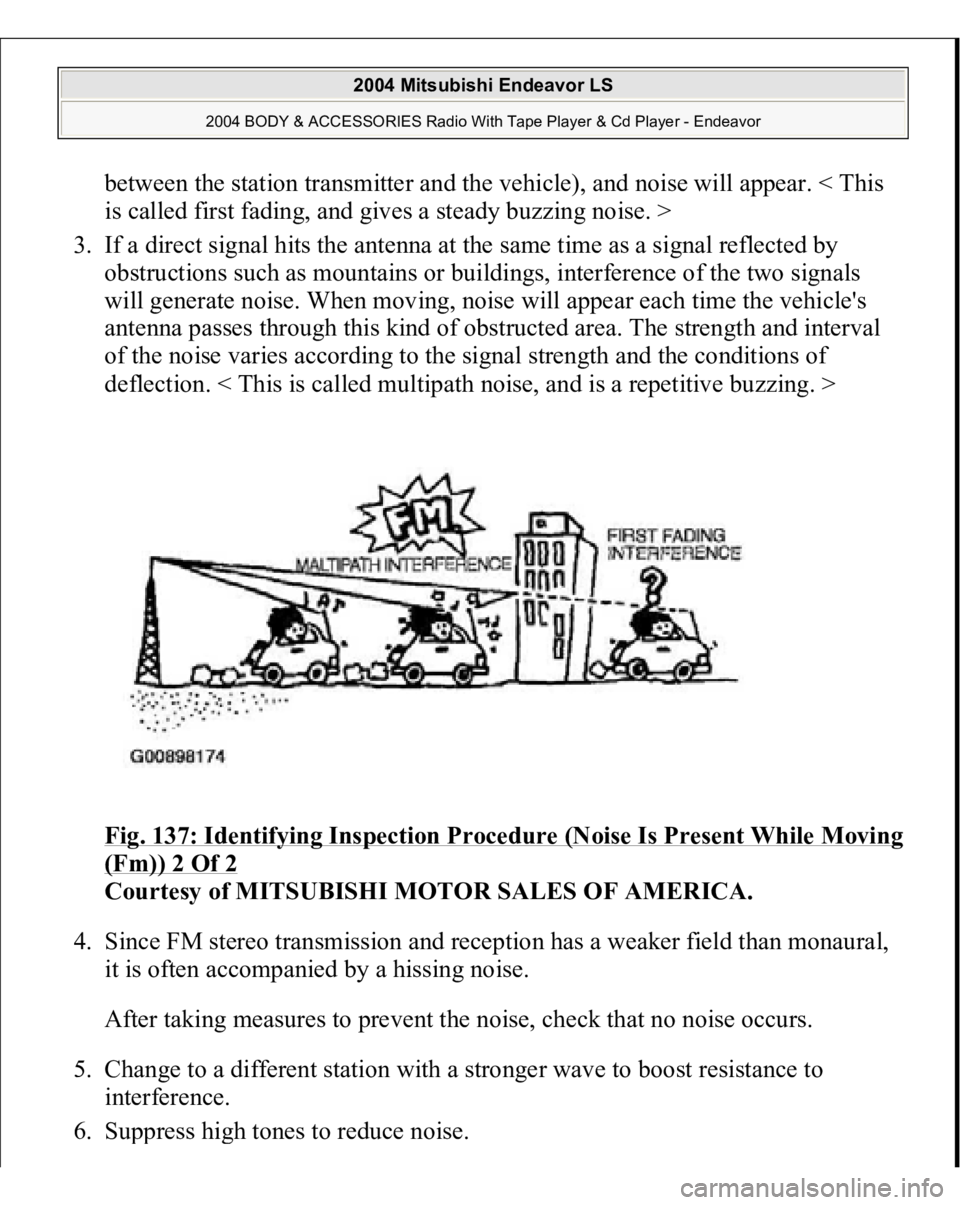
between the station transmitter and the vehicle), and noise will appear. < This
is called first fading, and gives a steady buzzing noise. >
3. If a direct signal hits the antenna at the same time as a signal reflected by
obstructions such as mountains or buildings, interference of the two signals
will generate noise. When moving, noise will appear each time the vehicle's
antenna passes through this kind of obstructed area. The strength and interval
of the noise varies according to the signal strength and the conditions of
deflection. < This is called multipath noise, and is a repetitive buzzing. >
Fig. 137: Identif
ying Ins
pection Procedure (Noise Is Present While Movin
g
(Fm)) 2 Of 2
Courtesy of MITSUBISHI MOTOR SALES OF AMERICA.
4. Since FM stereo transmission and reception has a weaker field than monaural,
it is often accompanied by a hissing noise.
After taking measures to prevent the noise, check that no noise occurs.
5. Change to a different station with a stronger wave to boost resistance to
interference.
6. Su
ppress hi
gh tones to reduce noise.
2004 Mitsubishi Endeavor LS
2004 BODY & ACCESSORIES Radio With Tape Player & Cd Player - Endeavor
Page 1804 of 3870

Q: Is the wiring harness between radio and CD player or radio, CD player
and CD changer connector C-105 (terminal 21) and the battery in good
condition?
YES: Repair or replace the radio and CD player or radio, CD player and
CD changer. Check that a memory is retained.
NO: Repair the wiring harness. Check that a memory is retained.
INSPECTION PROCEDURE 23: CD can not be Inserted. DIAGNOSIS
STEP 1. Check that a CD has been already loaded.
Q: Has a CD been already loaded?
YES: Take out the CD (If the CD can not be ejected, refer to
INSPECTION PROCEDURE 27
). Check that a CD can be inserted.
NO: Go to Step 2.
STEP 2. Check how a CD is inserted.
Ensure that the ignition switch is at 'ACC' or 'ON'.
Q: If you try to load the CD, does the CD stops halfway and then rejected?
YES: Refer to INSPECTION PROCEDURE 27
.
NO: Go to Step 3.
STEP 3. Check after the CD is loaded.
NOTE: If you try to load a CD when the ignition switch is at the
positions other than 'ACC' or 'ON,' the CD will not be
inserted completely and then rejected.
NOTE: Even though the CD is loaded, 'E01' (vehicles with
center display low type) or 'ERROR 01' (vehicles with
center display middle type) sometimes displayed with
the CD rejected because of vibration/shock or dew on
2004 Mitsubishi Endeavor LS
2004 BODY & ACCESSORIES Radio With Tape Player & Cd Player - Endeavor
Page 2390 of 3870
POTENTIOMETER CHECK While checking the air mix damper control motor, measure the resistances between
terminals numbers 3 and 5 and between numbers 3 and 7. At this time, the
resistances should change gradually within the standard value.
Standard value: 1.7 (MAX HOT) - 5.0 (MAX COOL) kohm MODE SELECTION DAMPER CONTROL MOTOR CHECK Check the mode selection dam
per control motor b
y the followin
g procedures.
Connect terminal 2 to the
negative battery terminal
the MAX HOT position
At the MAX HOT
position
Connect terminal 2 to the
positive battery terminal
Connect terminal 1 to the
negative battery terminal
The lever moves from the
MAX HOT position to
the MAX COOL position
CAUTION: Do not apply battery voltage when the damper is in
the FACE or DEF position.
2004 Mitsubishi Endeavor LS
2004 HVAC Heater Air Conditioning, Ventilation - Endeavor