Page 1313 of 3870

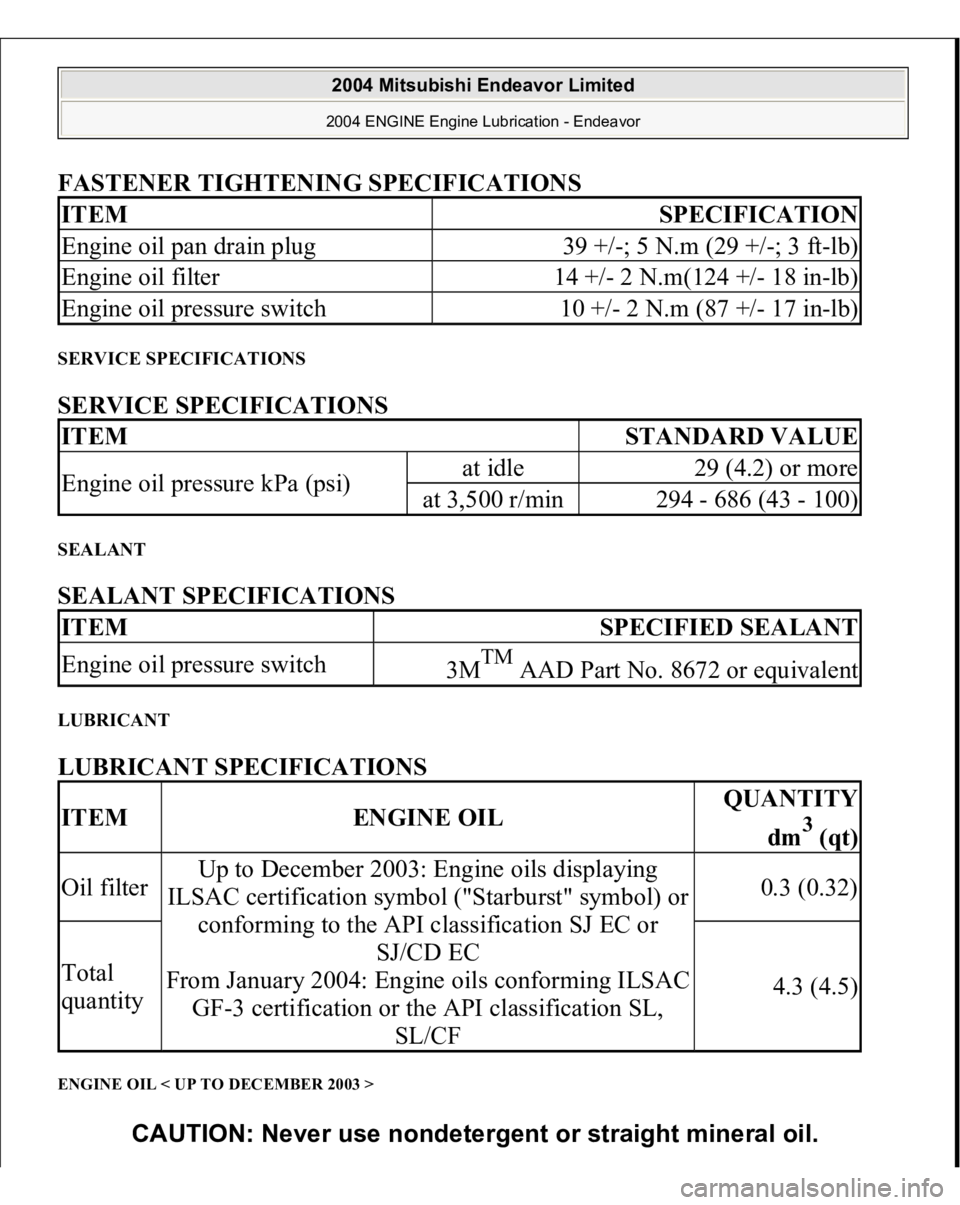
FASTENER TIGHTENING SPECIFICATIONS SERVICE SPECIFICATIONS SERVICE SPECIFICATIONS SEALANT SEALANT SPECIFICATIONS LUBRICANT LUBRICANT SPECIFICATIONS ENGINE OIL < UP TO DECEMBER 2003 > ITEM
SPECIFICATION
Engine oil pan drain plug
39 +/-; 5 N.m (29 +/-; 3 ft-lb)
Engine oil filter
14 +/- 2 N.m(124 +/- 18 in-lb)
Engine oil pressure switch
10 +/- 2 N.m (87 +/- 17 in-lb)
ITEM
STANDARD VALUE
Engine oil pressure kPa (psi)
at idle
29 (4.2) or more
at 3,500 r/min
294 - 686 (43 - 100)
ITEM
SPECIFIED SEALANT
Engine oil pressure switch
3M
TM
AAD Part No. 8672 or equivalent
ITEM
ENGINE OIL
QUANTITY
dm
3 (qt)
Oil filter
Up to December 2003: Engine oils displaying
ILSAC certification symbol ("Starburst" symbol) or
conforming to the API classification SJ EC or
SJ/CD EC
From January 2004: Engine oils conforming ILSAC
GF-3 certification or the API classification SL,
SL/CF
0.3 (0.32)
Total
quantity
4.3 (4.5)
CAUTION: Never use nondetergent or straight mineral oil.
2004 Mitsubishi Endeavor Limited 2004 ENGINE Engine Lubrication - Endeavor
Page 1365 of 3870
protrusion to be center.
Fig. 44: Checking Protrusion Of Injector
Courtesy of MITSUBISHI MOTOR SALES OF AMERICA.
>>C<< INJECTOR AND FUEL RAIL INSTALLATION 1. Apply clean engine oil to the O-ring.
2. Insert the fuel pressure regulator into the fuel rail.
3. Make sure the regulator rotates smoothly. If not, remove the fuel pressure
regulator to check the O-ring for damage, and replace the O-ring if necessary.
Then reinsert the fuel pressure regulator and chec
k that it rotates smoothly.
CAUTION: Do not let engine oil enter the fuel rail.
2004 Mitsubishi Endeavor Limited 2004 ENGINE Engine Overhaul - Endeavor
Page 1417 of 3870
Courtesy of MITSUBISHI MOTOR SALES OF AMERICA
.
REQUIRED SPECIAL TOOL
MD998054: Oil Pressure Switch Socket Wrench MD998717: Crankshaft Front Oil Seal Installer
REMOVAL SERVICE POINT << A >> OIL PAN, LOWER REMOVAL 1. Remove the lower oil pan mounting bolts.
2. Remove the lower oil pan by tapping on its side with a plastic hammer (mallet)
through a wooden plank held against it. < B > OIL PAN, UPPER REMOVAL 1. Remove the long bolts "A" shown in the illustration first.
CAUTION: Do not use a scraper or special tool to remove
the oil pan.
2004 Mitsubishi Endeavor Limited 2004 ENGINE Engine Overhaul - Endeavor
Page 1425 of 3870
Fig. 101: Installing Oil Filter
Courtesy of MITSUBISHI MOTOR SALES OF AMERICA.
>>E<< ENGINE OIL PRESSURE SWITCH 1. Apply 3M< SD >TM< /SD > AAD Part number 8672 or equivalent to the
thread of engine oil pressure switch.
CAUTION: Be careful not to block the oil passage with sealant.
2004 Mitsubishi Endeavor Limited 2004 ENGINE Engine Overhaul - Endeavor
Page 1426 of 3870
Fig. 102: Applying 3M AAD Part Number 8672 To Thread Of Engine Oil Pressure Switch
Courtesy of MITSUBISHI MOTOR SALES OF AMERICA.
2. Tighten the engine oil pressure switch together with the oil filter bracket to the
specified torque, using special tool MD998054.
Tightening torque: 10+/-2 N.m (87+/-17 in-lb)
2004 Mitsubishi Endeavor Limited 2004 ENGINE Engine Overhaul - Endeavor
Page 1427 of 3870
Fig. 103: Tightening Engine Oil Pressure Switch
Courtesy of MITSUBISHI MOTOR SALES OF AMERICA.
>>F<< OIL PAN, UPPER INSTALLATION 1. Clean both gasket surfaces of the upper oil pan and cylinder block.
2. Apply a 4 mm (0.2 inch) diameter bead of sealant. (Mitsubishi Genuine Parts
number MD970389 or equivalent) to the upper oil pan.
Apply sealant as indicated by the broken line in the illustration; the grooves
must be traced and the bolt holes must be surrounded with a bead of sealant.
CAUTION: When installing the upper oil pan, be sure not to
expel the sealant from the oil pan flange at
2004 Mitsubishi Endeavor Limited 2004 ENGINE Engine Overhaul - Endeavor
Page 1524 of 3870

Mixture Check)
Courtesy of MITSUBISHI MOTOR SALES OF AMERICA.
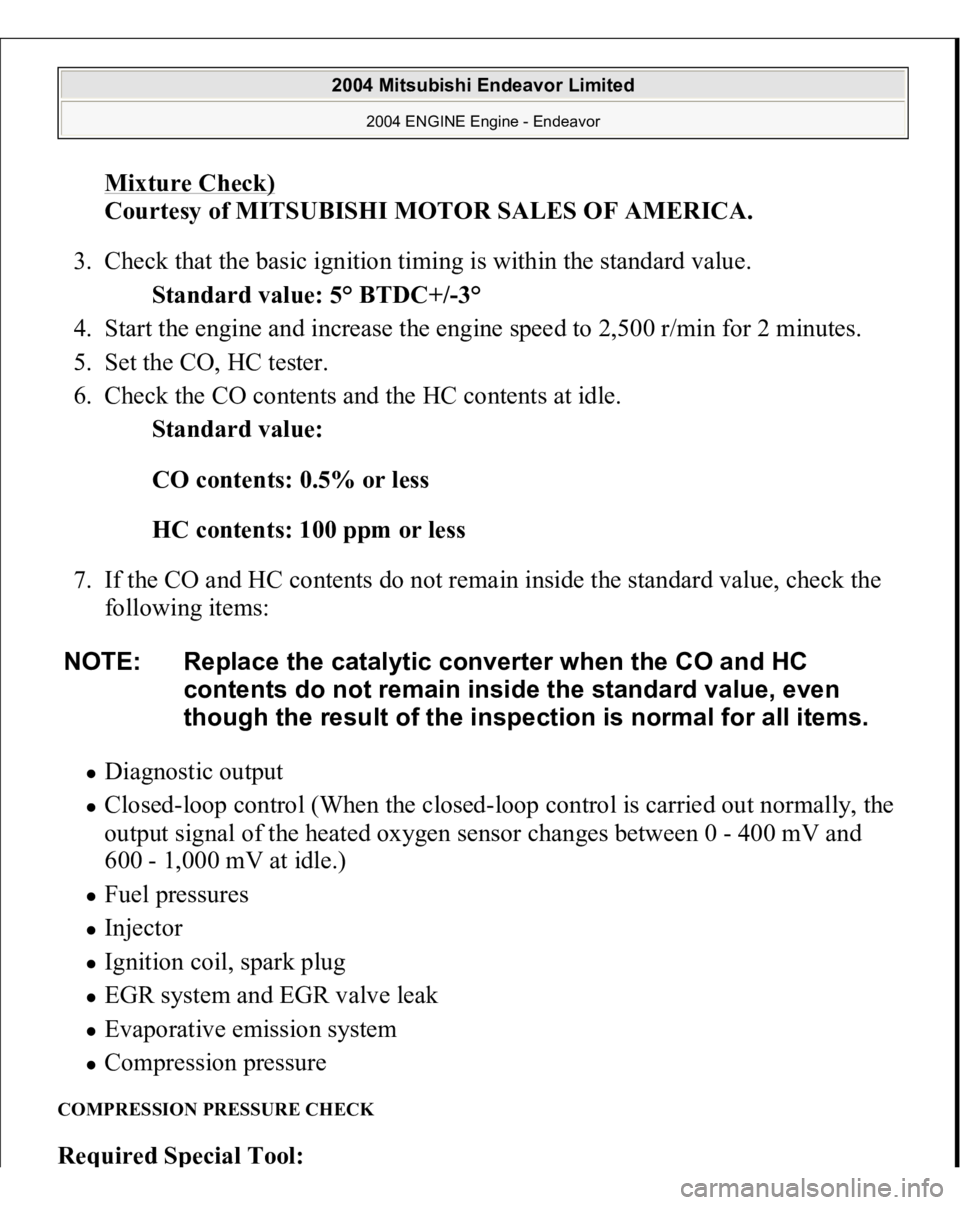
3. Check that the basic ignition timing is within the standard value.
Standard value: 5° BTDC+/-3°
4. Start the engine and increase the engine speed to 2,500 r/min for 2 minutes.
5. Set the CO, HC tester.
6. Check the CO contents and the HC contents at idle.
Standard value:
CO contents: 0.5% or less
HC contents: 100 ppm or less
7. If the CO and HC contents do not remain inside the standard value, check the
following items:
Diagnostic output Closed-loop control (When the closed-loop control is carried out normally, the
output signal of the heated oxygen sensor changes between 0 - 400 mV and
600 - 1,000 mV at idle.) Fuel pressures Injector Ignition coil, spark plug EGR system and EGR valve leak Evaporative emission system Compression pressure
COMPRESSION PRESSURE CHECK Re
quired S
pecial Tool
:
NOTE: Replace the catalytic converter when the CO and HC
contents do not remain inside the standard value, even
though the result of the inspection is normal for all items.
2004 Mitsubishi Endeavor Limited
2004 ENGINE Engine - Endeavor
Page 1527 of 3870
Fig. 22: Setting Compression Gauge To One Of Spark Plug Holes
Courtesy of MITSUBISHI MOTOR SALES OF AMERICA.
6. Crank the engine with the throttle valve fully open and measure the
compression pressure.
Standard value (at engine speed of 200 r/min): 1,548 kPa (225 psi)
Minimum limit (at engine speed of 200 r/min): 1,117 kPa (162 psi)
7. Measure the compression pressure for all the cylinders, and check that the
pressure difference of the cylinders are below the limit.
Limit: 98 kPa (14 psi)
8. If there is a cylinder with compression or a compression difference that is
outside the limit, pour a small amount of engine oil through the spark plug
hole, and repeat the operations in steps 6 to 8.
1. If the com
pression increases after oil is added, the cause of the
2004 Mitsubishi Endeavor Limited
2004 ENGINE Engine - Endeavor