Page 741 of 3870
The master cylinder used has no check valve, so if bleeding is carried out by the
following procedure, bleeding of air from the brake pipeline will become easier.
(When brake fluid is not contained in the master cylinder).
1. Fill the reserve tank with brake fluid.
2. Keep the brake pedal depressed.
3. Have another person cover the master cylinder outlet with a finger.
Fig. 26: Identifying Master Cylinder Outlet
Courtesy of MITSUBISHI MOTOR SALES OF AMERICA.
2004 Mitsubishi Endeavor LS
2004 BRAKES Basic Brake System - Endeavor
Page 742 of 3870
4. With the outlet still closed, release the brake pedal.
5. Repeat steps 2 - 4 three or four times to fill the inside of the master cylinder
with brake fluid. BRAKE LINE BLEEDING Start the en
gine and bleed the air in the se
quence shown in the fi
gure.
2004 Mitsubishi Endeavor LS
2004 BRAKES Basic Brake System - Endeavor
Page 743 of 3870
Fig. 27: Identifying Brake Line Bleeding Sequence
Courtesy of MITSUBISHI MOTOR SALES OF AMERICA.
BRAKE FLUID LEVEL SENSOR CHECK
2004 Mitsubishi Endeavor LS
2004 BRAKES Basic Brake System - Endeavor
Page 744 of 3870
The brake fluid level sensor is in good condition if there is no continuity when the
float surface is above "MIN" and if there is continuity when the float surface is
below "MIN".
Fig. 28: Checking Brake Fluid Level Sensor
Courtesy of MITSUBISHI MOTOR SALES OF AMERICA.
DISC BRAKE PAD CHECK AND REPLACEMENT NOTE: The brake pads (LH wheel) have indicators that contact the
brake disc when the brake pad thickness becomes 2 mm
(0.08 inch), and emit a squealing sound to warn the driver.
2004 Mitsubishi Endeavor LS
2004 BRAKES Basic Brake System - Endeavor
Page 762 of 3870

5. If the run-out cannot be corrected by changing the phase of the brake disc,
replace the brake disc or grind it with the on-the-car type brake lathe ("MAD,
DL-8700PF" or equivalent). MASTER CYLINDER FUNCTION CHECK 1. Remove the reservoir cap.
2. While watching the open reservoir from a distance of 50 cm (20 inches), have
an assistant depress the brake pedal. If there was a stream of brake fluid rising
from the reservoir, proceed to Step 3. If there was no stream of brake fluid
rising from the reservoir, repair or replace the master cylinder.
3. While watching the open reservoir from a distance of 50 cm (20 inches), have
the assistant release the brake pedal. If there was a small amount of air bubbles
rising through the brake fluid, master cylinder function is normal. If there were
no bubbles rising through the brake fluid, repair or replace the master cylinder. BRAKE PEDAL REMOVAL AND INSTALLATION
Fig. 42: Identifying M12 Flat Washer
Courtes
y of MITSUBISHI MOTOR SALES OF
A
Grind the brake disc with all wheel nuts dia
gon
equall
y tightened to the specified torque 100
N
lb). When all numbers of wheel nuts are not u
s
the ti
ghtenin
g torque is excessive or not equa
brake disc rotor or drum ma
y be deformed, re
s
judder.
2004 Mitsubishi Endeavor LS
2004 BRAKES Basic Brake System - Endeavor
Page 782 of 3870
<< B>> PISTON SEAL REMOVAL 1. Remove the piston seal with your finger tip.
2. Clean the piston surface and inner cylinder with alcohol brake fluid DOT 3 or
DOT 4.
Fig. 59: Cleaning Piston Surface And Inner Cylinder With Alcohol Brake
Fluid
Courtesy of MITSUBISHI MOTOR SALES OF AMERICA.
CAUTION: Do not use a flat-tipped screwdriver or similar tool to
remove the piston seal. These may damage the inner
side of the cylinder.
2004 Mitsubishi Endeavor LS
2004 BRAKES Basic Brake System - Endeavor
Page 786 of 3870
1. Remove the piston seal with your finger tip.
2. Clean piston surface and inner cylinder with alcohol or brake fluid DOT 3 or
DOT 4.
Fig. 63: Removing Piston Seal
Courtesy of MITSUBISHI MOTOR SALES OF AMERICA.
ASSEMBLY SERVICE POINT >>A<< REAR BRAKE PIN INSTALLATION
remove piston seal. These may damage the inner
side of the cylinder.
2004 Mitsubishi Endeavor LS
2004 BRAKES Basic Brake System - Endeavor
Page 1097 of 3870

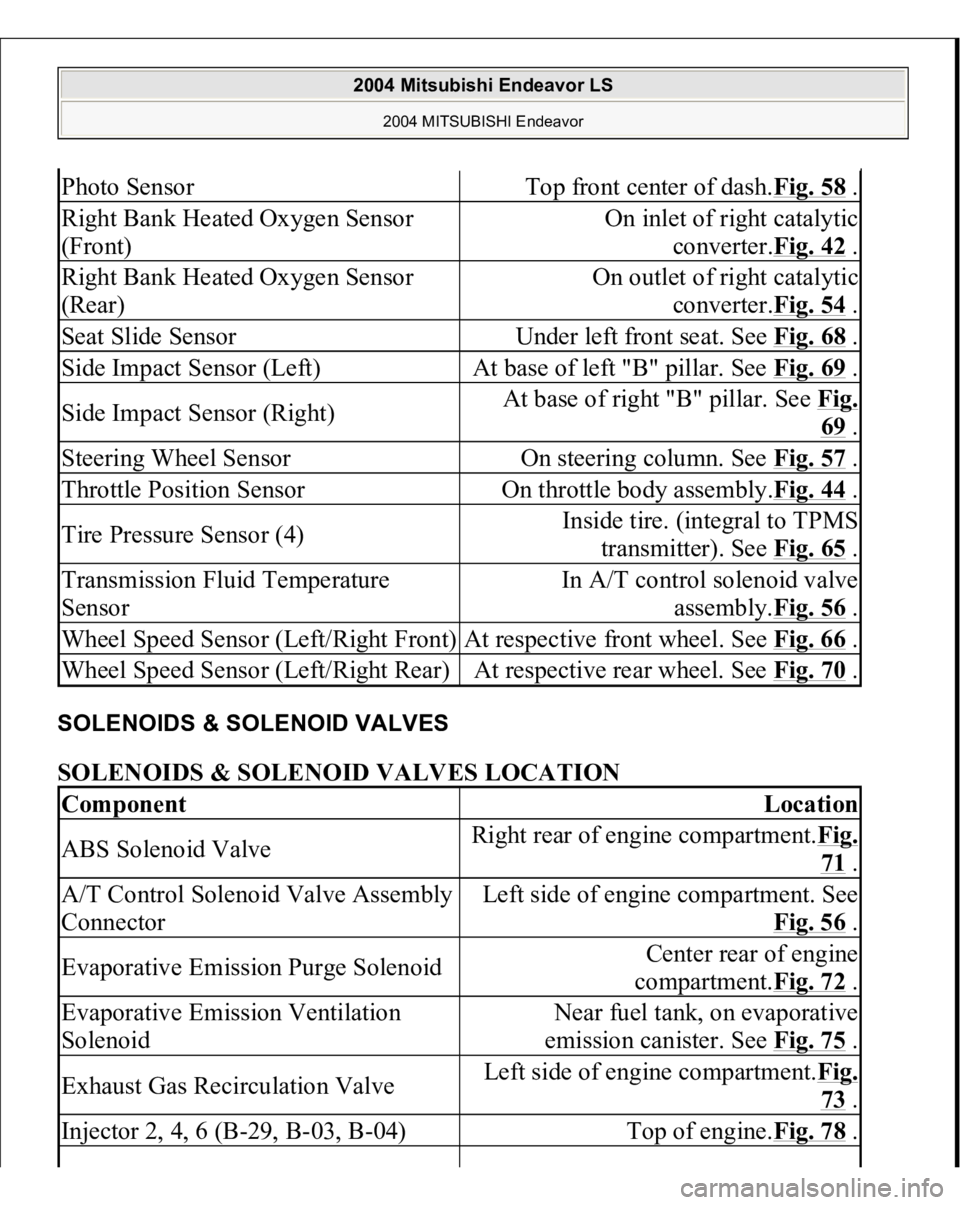
SOLENOIDS & SOLENOID VALVES SOLENOIDS & SOLENOID VALVES LOCATION Photo Sensor
Top front center of dash.Fig. 58
.
Right Bank Heated Oxygen Sensor
(Front)
On inlet of right catalytic
converter.Fig. 42
.
Right Bank Heated Oxygen Sensor
(Rear)
On outlet of right catalytic
converter.Fig. 54
.
Seat Slide Sensor
Under left front seat. See Fig. 68
.
Side Impact Sensor (Left)
At base of left "B" pillar. See Fig. 69
.
Side Impact Sensor (Right)
At base of right "B" pillar. See Fig.
69 .
Steering Wheel Sensor
On steering column. See Fig. 57
.
Throttle Position Sensor
On throttle body assembly.Fig. 44
.
Tire Pressure Sensor (4)
Inside tire. (integral to TPMS
transmitter). See Fig. 65
.
Transmission Fluid Temperature
Sensor
In A/T control solenoid valve
assembly.Fig. 56
.
Wheel Speed Sensor (Left/Right Front)
At respective front wheel. See Fig. 66
.
Wheel Speed Sensor (Left/Right Rear)
At respective rear wheel. See Fig. 70
.
Component
Location
ABS Solenoid Valve
Right rear of engine compartment.Fig.
71 .
A/T Control Solenoid Valve Assembly
Connector
Left side of engine compartment. See
Fig. 56
.
Evaporative Emission Purge Solenoid
Center rear of engine
compartment.Fig. 72
.
Evaporative Emission Ventilation
Solenoid
Near fuel tank, on evaporative
emission canister. See Fig. 75
.
Exhaust Gas Recirculation Valve
Left side of engine compartment.Fig.
73 .
Injector 2, 4, 6 (B-29, B-03, B-04)
Top of engine.Fig. 78
.
2004 Mitsubishi Endeavor LS
2004 MITSUBISHI Endeavor