Page 2440 of 4264
6A-20 ENGINE MECHANICAL (C24SE)
6. Install power steering pump and V-belt.
Adjust
Adjust power steering pump V-belt tension according to the
corresponding operation.
Installation
7. Install radiator according to the corresponding operation.
8. Install air inlet hose.
9. Install all electrical cable connections, hoses and lines to
engine.
10. Install accelerator cable from inlet pipe.
11. Install bonnet.
Inspection
1. Check engine oil level.
2. Fill up cooling system and bleed according to the
corresponding operation.
Page 2441 of 4264

ENGINE MECHANICAL (C24SE) 6A-21
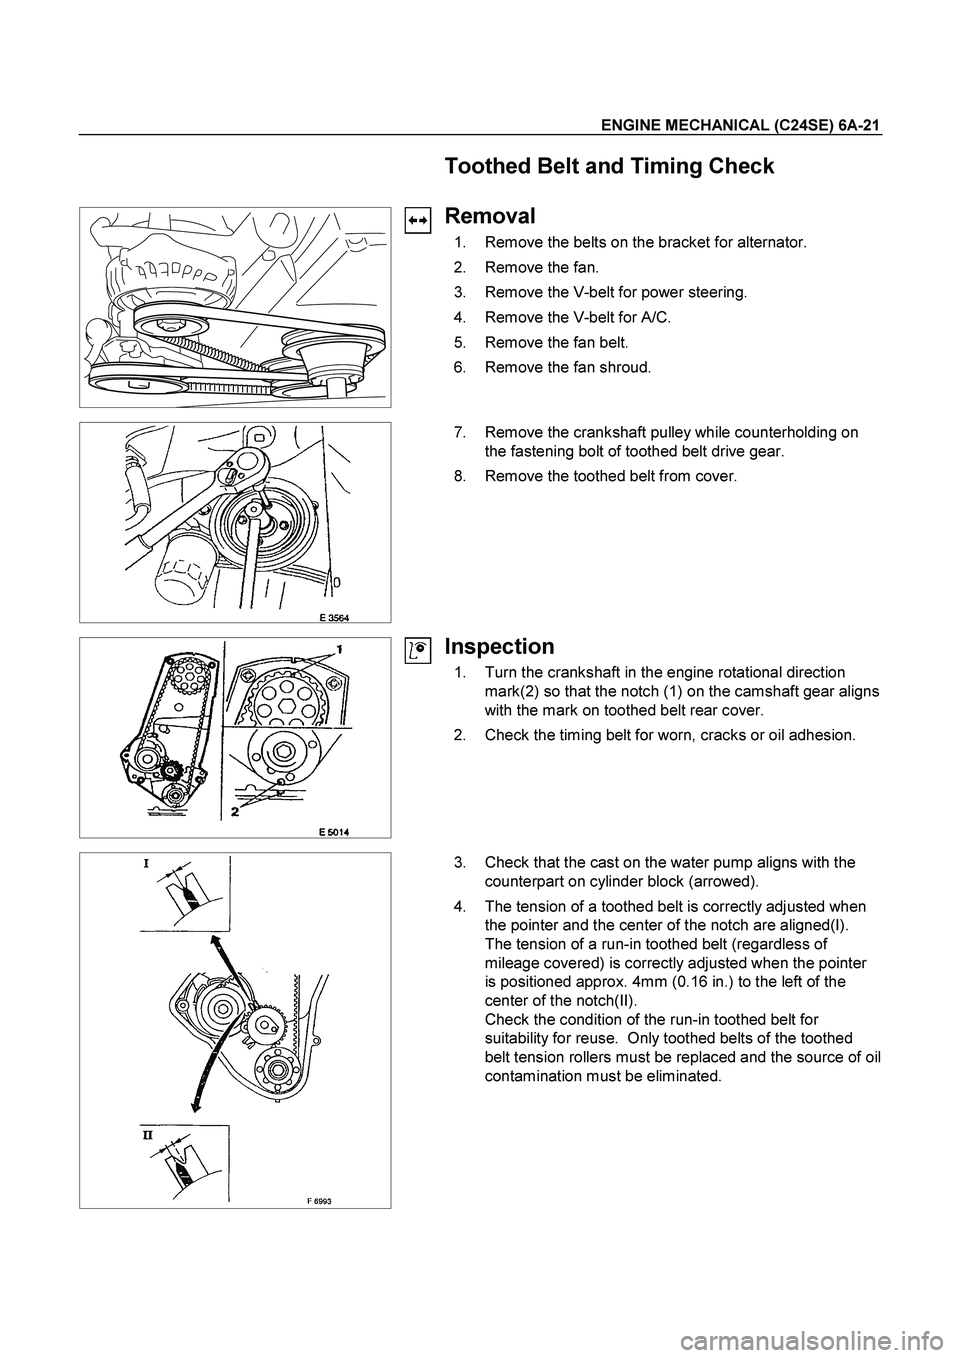
Toothed Belt and Timing Check
Removal
1. Remove the belts on the bracket for alternator.
2. Remove the fan.
3. Remove the V-belt for power steering.
4. Remove the V-belt for A/C.
5. Remove the fan belt.
6. Remove the fan shroud.
7. Remove the crankshaft pulley while counterholding on
the fastening bolt of toothed belt drive gear.
8. Remove the toothed belt from cover.
Inspection
1. Turn the crankshaft in the engine rotational direction
mark(2) so that the notch (1) on the camshaft gear aligns
with the mark on toothed belt rear cover.
2. Check the timing belt for worn, cracks or oil adhesion.
3. Check that the cast on the water pump aligns with the
counterpart on cylinder block (arrowed).
4. The tension of a toothed belt is correctly adjusted when
the pointer and the center of the notch are aligned(I).
The tension of a run-in toothed belt (regardless of
mileage covered) is correctly adjusted when the pointer
is positioned approx. 4mm (0.16 in.) to the left of the
center of the notch(II).
Check the condition of the run-in toothed belt for
suitability for reuse. Only toothed belts of the toothed
belt tension rollers must be replaced and the source of oil
contamination must be eliminated.
Page 2443 of 4264
ENGINE MECHANICAL (C24SE) 6A-23
Toothed Belt Tension, Adjust
(Engines with toothed belt tension
roller)
Removal
Refer to 6A-21. Toothed Belt and Timing check and removal
steps.
Adjust
1. Loosen the fastening bolt of the toothed belt tension
roller.
2. Turn the toothed belt tension roller at adjustment
eccentric (1) in the direction of arrow (counterclockwise),
until pointer (2) comes to the right stop.
3. If necessary tighten the fastening bolt of toothed belt
tension roller.
4. Rotate the crankshaft twice (720�
) in the engine
rotational direction until marks (2) and (1) align again.
5. Turn the eccentric in the direction of arrow (clockwise)
until pointer (1) and notch (2) are positioned to suit age of
toothed belt.
6. Rotate the crankshaft twice (720�
) in the engine
rotational direction again and correct adjustment if
necessary.
Installation
Refer to 6A-21. Toothed Belt and Timing check and installation
steps.
Page 2448 of 4264
6A-28 ENGINE MECHANICAL (C24SE)
2. Install cable to temperature sensor.
3. Install upper bolts of rear toothed belt rear cover.
4. Install camshaft timing gear then check timing according
to the corresponding operation.
5. Install camshaft housing cover.
6. Install toothed belt and front cover.
7. Fill up and bleed cooling system according to the
corresponding operation.
Tighten (Torque)
Thermostat housing to cylinder head - 15 N�m/1.5 kgf�m.
Seal Ring - Front Camshaft Housing, Replace
Removal
Mark running direction of toothed belt.
Remove toothed belt-see operation “Toothed Belt, Replace”.
Camshaft housing cover, camshaft pulley-counterhold on hex
of camshaft.
Removal
Screw self-tapping screw into seal ring.
Edge out seal ring.
Installation
Lightly coat sealing lip of seal ring with protective grease.
Install seal ring with 5-8840-0451-0 into camshaft housing-use
screw and washer of camshaft pulley.
Page 2453 of 4264
ENGINE MECHANICAL (C24SE) 6A-33
HYDRAULIC VALVE LIFTER
1. Hydraulic Valve Lifter
1. Oil reservoir
2. Piston with ball head (moving)
3. Pressure cylinder (fixed)
4. Check ball
5. Pressure chamber
6. Oil feed
Page 2456 of 4264

6A-36 ENGINE MECHANICAL (C24SE)
Clean
All sealing surfaces, drill holes in cylinder head bolts.
Check cylinder block and cylinder head for plane surface
according to the corresponding operations.
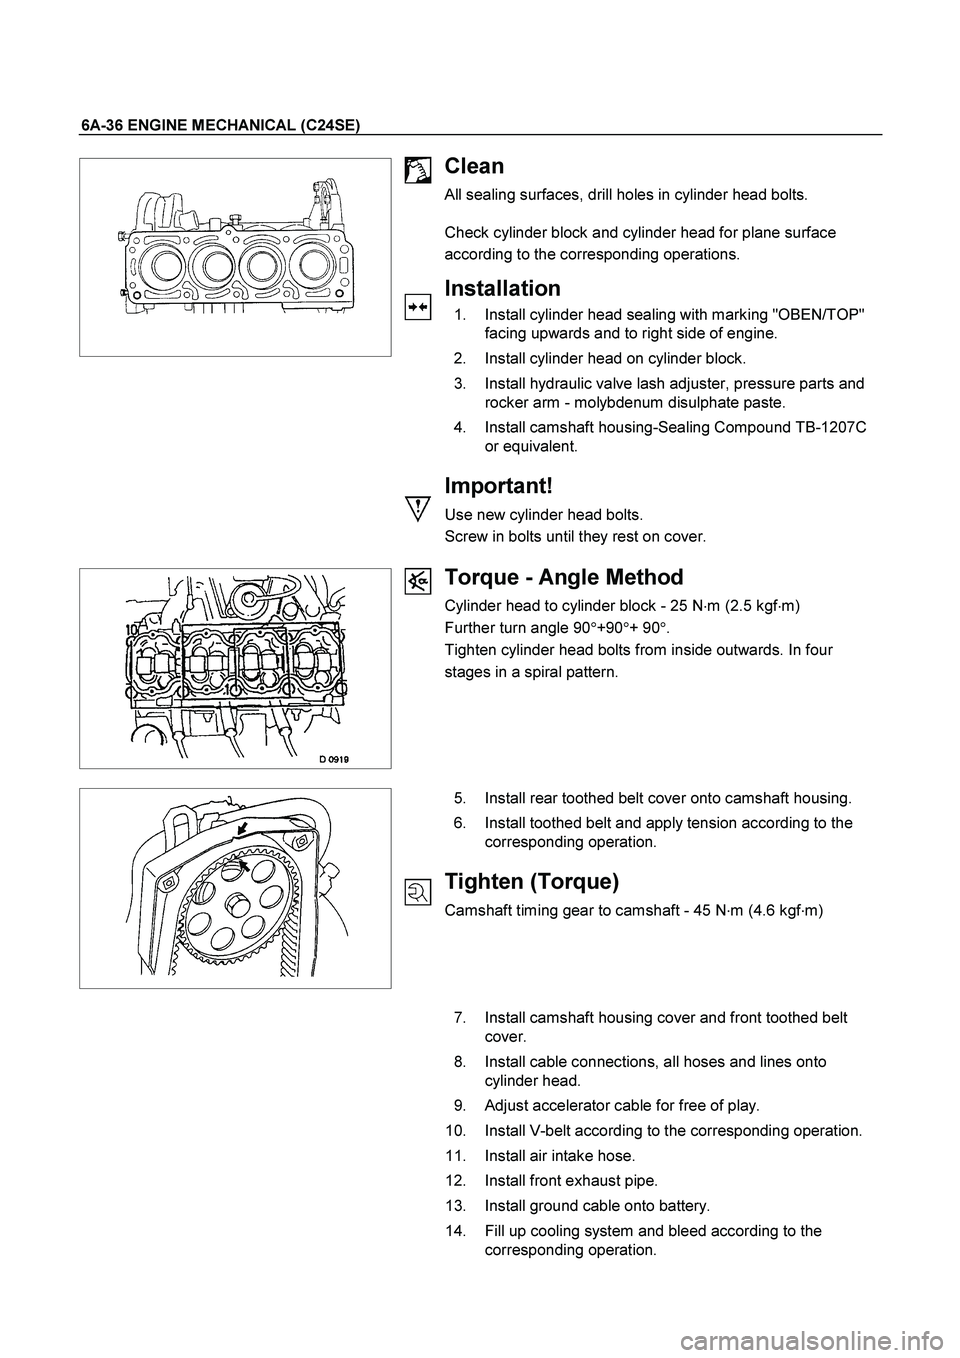
Installation
1. Install cylinder head sealing with marking "OBEN/TOP"
facing upwards and to right side of engine.
2. Install cylinder head on cylinder block.
3. Install hydraulic valve lash adjuster, pressure parts and
rocker arm - molybdenum disulphate paste.
4. Install camshaft housing-Sealing Compound TB-1207C
or equivalent.
Important!
Use new cylinder head bolts.
Screw in bolts until they rest on cover.
Torque - Angle Method
Cylinder head to cylinder block - 25 N�
m (2.5 kgf�
m)
Further turn angle 90�
+90�
+ 90�
.
Tighten cylinder head bolts from inside outwards. In four
stages in a spiral pattern.
5. Install rear toothed belt cover onto camshaft housing.
6. Install toothed belt and apply tension according to the
corresponding operation.
Tighten (Torque)
Camshaft timing gear to camshaft - 45 N�
m (4.6 kgf�
m)
7. Install camshaft housing cover and front toothed belt
cover.
8. Install cable connections, all hoses and lines onto
cylinder head.
9. Adjust accelerator cable for free of play.
10. Install V-belt according to the corresponding operation.
11. Install air intake hose.
12. Install front exhaust pipe.
13. Install ground cable onto battery.
14. Fill up cooling system and bleed according to the
corresponding operation.
Page 2459 of 4264
ENGINE MECHANICAL (C24SE) 6A-39
Camshaft Housing, Check for Plane Surface
Clean
Sealing surfaces.
Inspection
Check length and width of sealing surface for deformation and
diagnosis for warpage and use straight edge feeler gauge.
Measure
Height of camshaft housing (sealing surface to sealing
surface).
Dimension I: (74.0 mm)
Cylinder Head, Removal and Installation
Important
Only remove cylinder head with engine cold (room
temperature).
Removal
1. Remove the alternator, power steering and V-belts.
Removal
2. Loosen the fastening bolts from alternator.
3. Loosen the lower alternator fastening bolt by swinging
the alternator to the rear.
Removal
4. Remove the front toothed belt cover.
5. Remove the toothed belt from camshaft pulley.
See operation "Timing Check and Adjust".
Page 2460 of 4264
6A-40 ENGINE MECHANICAL (C24SE)
Removal
6. Remove the camshaft housing cover and camshaft
pulley by counter-holding at the hex head of camshaft.
Removal
7. Remove the fastening bolts from camshaft housing.
Removal
8. Remove the exhaust pipe from exhaust manifold.
9. Loosen the cylinder head bolts spirally from the outside
inwards (first 1/4, then 1/2 revolution).
Removal
1. Remove the camshaft housing from cylinder head.
2. Remove the cam followers, thrust pieces and hydraulic
valve lifters.
Note the allocation.
3. Remove the cylinder head.
Clean
Sealing surfaces, bores and threads of cylinder head bolts.
Inspection
Check cylinder head and cylinder block for plane surfface-see
operations “Cylinder Head, Check for Plane Surface” and
“Cylinder Block, Check for Plane Surface.”