Page 671 of 4264
ELECTRICAL-BODY AND CHASSIS 8A-13
PARTS FOR ELECTRICAL CIRCUIT
WIRING
Wire Color
All wires have color-coded insulation.
Wires belonging to system's main harness will have a single
color.
Wires belonging to a system's sub-circuits will have a colored
stripe.
Striped wires use the following code to show wire size and
colors.
Example: 0.5 G
/ R
Red (Stripe color)
Green (Base color)
Wire size (0.5mm
2)
Abbreviations are used to indicate wire color within a circuit
diagram.
Refer to the following table.
Wire Color-Coding
Color-Coding Meaning Color-Coding Meaning
B Black BR Brown
W White LG Light green
R Red GR Grey
G Green P Pink
Y Yellow LB Light blue
L Blue V Violet
O Orange
Page 673 of 4264

ELECTRICAL-BODY AND CHASSIS 8A-15
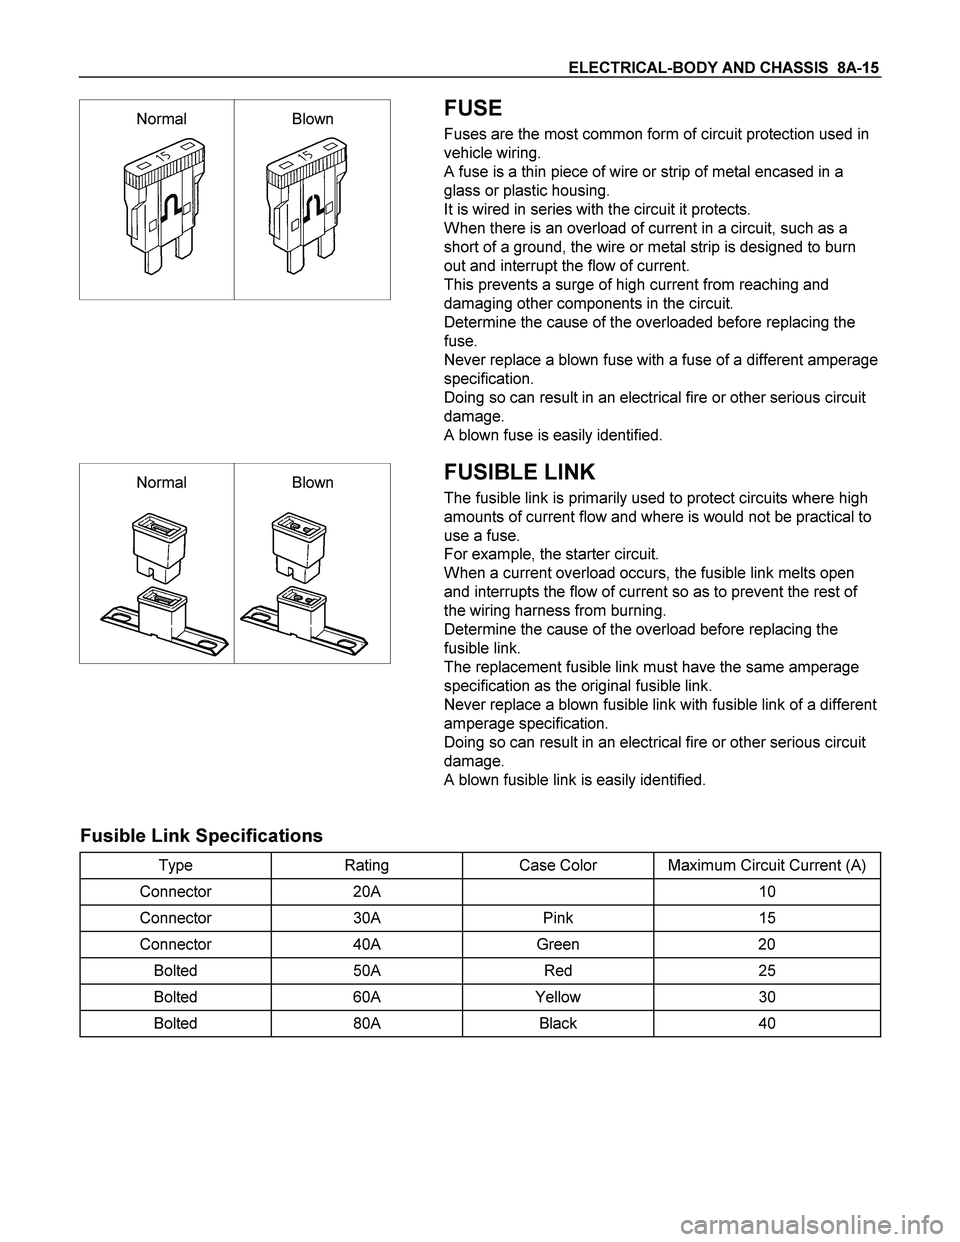
Normal Blown
FUSE
Fuses are the most common form of circuit protection used in
vehicle wiring.
A fuse is a thin piece of wire or strip of metal encased in a
glass or plastic housing.
It is wired in series with the circuit it protects.
When there is an overload of current in a circuit, such as a
short of a ground, the wire or metal strip is designed to burn
out and interrupt the flow of current.
This prevents a surge of high current from reaching and
damaging other components in the circuit.
Determine the cause of the overloaded before replacing the
fuse.
Never replace a blown fuse with a fuse of a different amperage
specification.
Doing so can result in an electrical fire or other serious circuit
damage.
A blown fuse is easily identified.
Normal Blown
FUSIBLE LINK
The fusible link is primarily used to protect circuits where high
amounts of current flow and where is would not be practical to
use a fuse.
For example, the starter circuit.
When a current overload occurs, the fusible link melts open
and interrupts the flow of current so as to prevent the rest of
the wiring harness from burning.
Determine the cause of the overload before replacing the
fusible link.
The replacement fusible link must have the same amperage
specification as the original fusible link.
Never replace a blown fusible link with fusible link of a different
amperage specification.
Doing so can result in an electrical fire or other serious circuit
damage.
A blown fusible link is easily identified.
Fusible Link Specifications
Type Rating Case Color Maximum Circuit Current (A)
Connector 20A 10
Connector 30A Pink 15
Connector 40A Green 20
Bolted 50A Red 25
Bolted 60A Yellow 30
Bolted 80A Black 40
Page 674 of 4264
8A-16 ELECTRICAL-BODY AND CHASSIS
RELAY
Battery and load location may require that a switch be placed
some distance from either component.
This means a longer wire and a higher voltage drop
1. The
installation of a relay between the battery and the load reduces
the voltage drop
2.
Because the switch controls the relay, amperage through the
switch can be reduced.
Relay Specifications and Configurations
Name/
Color Rated
voltage/ Coil
resistance Internal circuit Name/
color Rated
Voltage/Coil
resistance Internal circuit
1T
(MICRO
ISO)
/Black 12V
Approx. 92�
Minimum
operating
voltage: 7V at
20�C (77�F)
1M (MINI
ISO)
/Black 12V Approx.
94� Minimum
operating
voltage: 7V at
20�C (77�F)
1M
(MICRO
ISO)
/Black 12V
Approx. 132-3
� Minimum
operating
voltage: 7V at
20�C (77�F)
1M
(power)/
Black 12V Approx.
94� Minimum
operating
voltage: 7V at
20�C (77�F)
* Relay contact shown in the wiring diagram indicates condition before actuation.
Page 778 of 4264
8A-120 ELECTRICAL-BODY AND CHASSIS
TROUBLE SHOOTING
HEADLIGHT
1. Both the headlights (high and low beam) do not light
Checkpoint Trouble Cause Countermeasure
Repair the wiring
Poor ground point contact
NG
Repair open circuit or
connector contact
Repair open circuit
Repair or replace the
combination switch
Voltage between 1
B-60 -
ground
Open circuit between lighting
relay and lighting switch
Open circuit between battery
positive terminal and lighting
relay
Combination switch continuity
Poor switch contact or sw
faulty
Voltage between
5
X-12 - ground and
2
X-12 - ground
Reinstall or replace the
lighting relay
Lighting relay
Poor relay contact or relay
faulty
NG NG NG NG OK
OK
OK OK
Ground point contact (C-36)
Repair open circuit
Wiring continuity between
B-60 - C-36
Open circuit
NG OK
Page 779 of 4264

ELECTRICAL-BODY AND CHASSIS 8A-121
2. High or low beam does not light on both headlights
Checkpoint Trouble Cause Countermeasure
Repair or replace the
combination switch
Dimmer�passing switch
continuity
Poor switch contact or switch
faulty
NG
Repair open circuit or
connector contact
Voltage between
4
X-4 - ground and
4
B-60 - ground
Open circuit between
headlight and dimmer�passing
switch
NG OK
3. RH (or LH) high and low beam does not light
Replace the headlight bulb
Headlight connector continuity
Blown filament or air leakage
NG
Repair or replace the wire
and/or connector
Wiring continuity between
connector 3
C-19 - fuse No.
EB-7 or 3
C-26 fuse No.
EB-8
Open circuit and/or poor
connector contact
NG OK
Reinstall or replace fuse No.
EB-7 or No. EB-8
Fuse No. EB-7 (10A) or
No. EB-8 (10A) (Relay and
fuse box)
(No. EB-7 RH, No. EB-8: LH)
Poor installation or blown fuse
NG
OK
4. High or low beam does not light on one headlight (RH or LH)
Replace the headlight
assemblyHeadlight connector continuityBlown filament NG
Repair open circuit or
connector contactWiring continuity between
headlight and dimmer�passing
switchOpen circuit between
headlight and dimmer�passing
switch NG OK
Page 780 of 4264

8A-122 ELECTRICAL-BODY AND CHASSIS
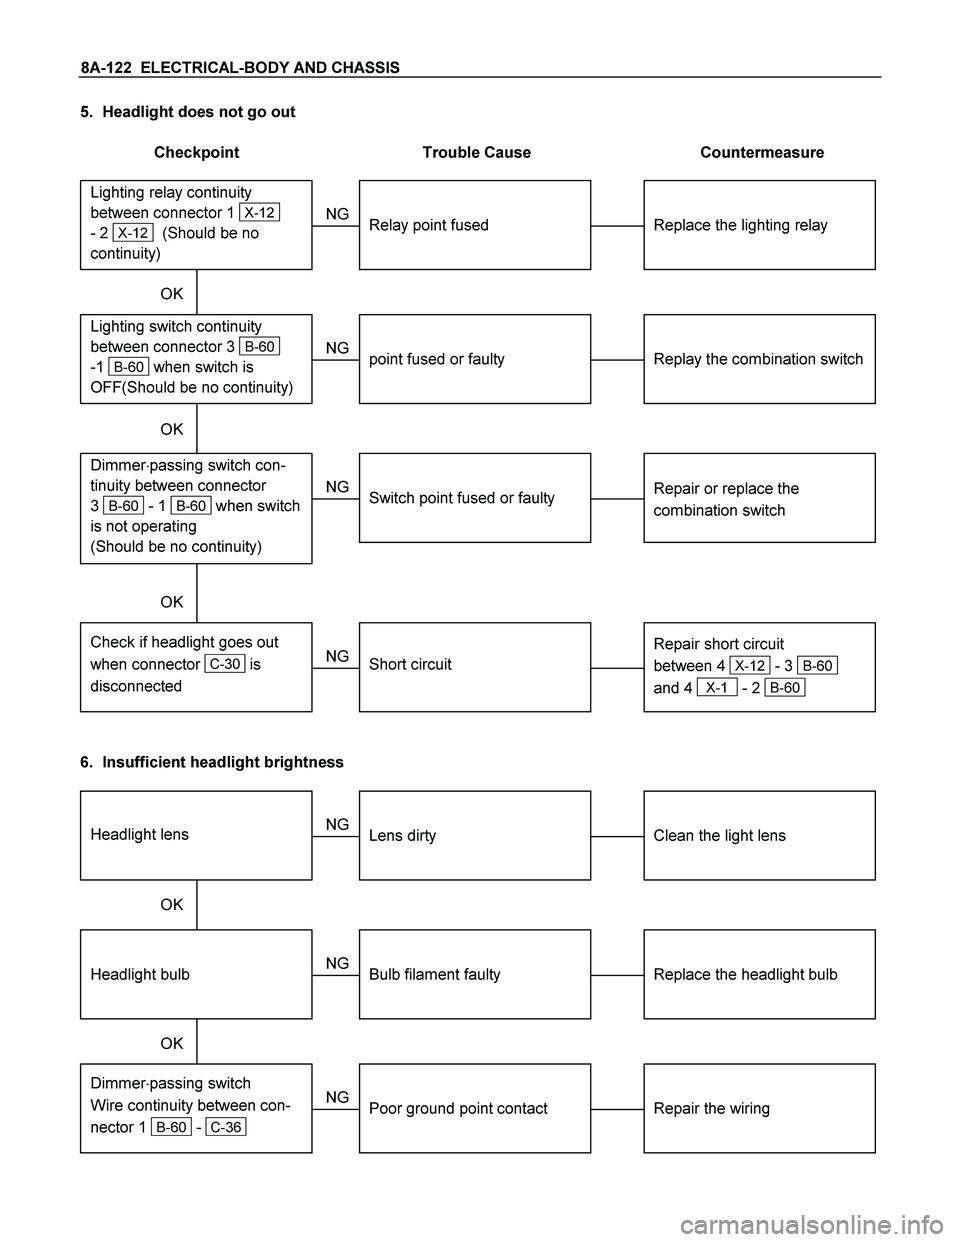
5. Headlight does not go out
Checkpoint Trouble Cause Countermeasure
Replace the lighting relay
Lighting relay continuity
between connector 1
X-12
- 2
X-12 (Should be no
continuity)
Relay point fused
NG
Replay the combination switch
Lighting switch continuity
between connector 3
B-60
-1
B-60 when switch is
OFF(Should be no continuity)
point fused or faulty
NG
OK OK
Repair or replace the
combination switch
Dimmer�passing switch con-
tinuity between connector
3
B-60 - 1 B-60 when switch
is not operating
(Should be no continuity)
Switch point fused or faulty
NG
Repair short circuit
between 4
X-12 - 3 B-60
and 4
X-1 - 2 B-60
Check if headlight goes out
when connector
C-30 is
disconnected
Short circuit
NG OK
6. Insufficient headlight brightness
Replace the headlight bulb
Headlight bulb
Bulb filament faulty
NG
Repair the wiring
Dimmer�passing switch
Wire continuity between con-
nector 1
B-60 - C-36
Poor ground point contact
NG OK
Clean the light lens
Headlight lens
Lens dirty
NG
OK
Page 789 of 4264

ELECTRICAL-BODY AND CHASSIS 8A-131
LICENSE PLATE LIGHT
Removal
1. Remove the lens cover 1 and the connector 2.
2. Pull the bulb
3 to remove it.
Installation
Follow the removal procedure in the reverse order to install the
license plate light.
Pay close attention to the important points mentioned in the
following paragraphs.
Bulb
Be absolutely sure that the license plate light bulb is correctly
installed.
This will prevent a poor contact and open circuit.
HEADLIGHT BEAM SWITCH
(COMBINATION SWITCH)
Removal
1. Disconnect the battery ground cable.
2. Remove the screws on the lower part of the steering wheel.
3. Remove the horn pad.
4. Remove the wiring connector.
5. Remove the steering wheel fixing nuts.
6. Remove the steering wheel.
Refer to the "STEERING" Section of this manual.
7. Remove the Instrument panel lower cover.
8. Remove the steering column cover.
9. Disconnect the connector.
10. Remove the headlight beam switch (lever) from the steering
shaft (combination switch).
Installation
Follow the removal procedure in the reverse order to install the
headlight beam switch (lever).
Pay close attention to the important points mentioned in the
following paragraphs.
Connector
Be absolutely sure that the headlight beam switch connector is
securely connected.
This will prevent a poor contact and an open circuit.
Page 850 of 4264
8A-192 ELECTRICAL-BODY AND CHASSIS
REMOVAL AND INSTALLATION
DOME LIGHT
Removal
1. Remove the dome light lens 1 free.
2. Remove two dome light fixing screws.
3. Remove the wiring connector.
4. Remove the dome light.
5. Pull the bulb
2 to remove it.
Installation
Follow the removal procedure in the reverse order to install the
dome light.
Pay close attention to the important points mentioned in the
following paragraphs.
Bulb
Be absolutely sure that the dome light bulb is correctly
installed.
This will prevent a poor contact and an open circuit.