Page 2394 of 4264
6G-10 ENGINE LUBRICATION (6VE1 3.5L)
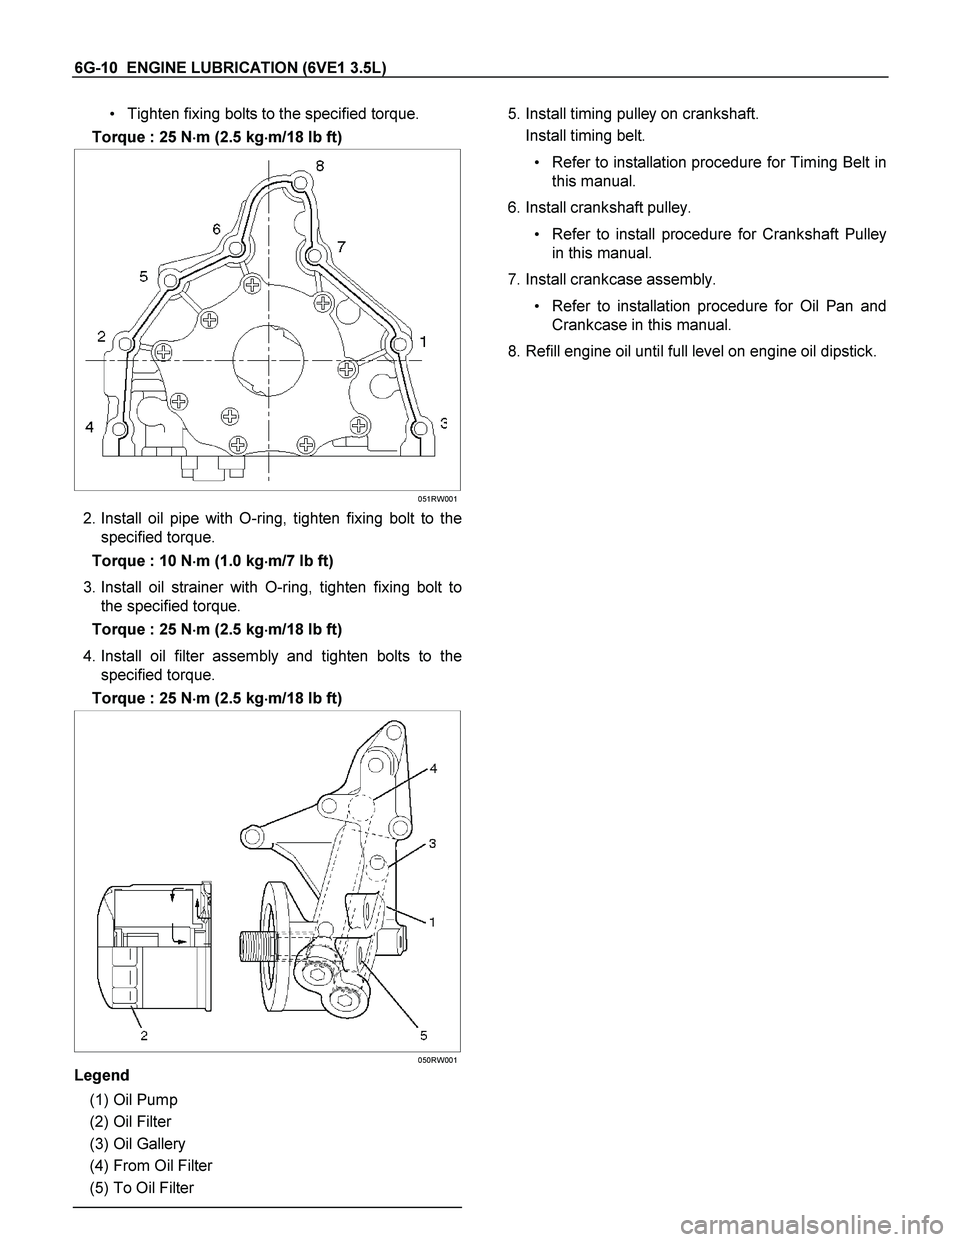
Tighten fixing bolts to the specified torque.
Torque : 25 N�
�� �m (2.5 kg�
�� �m/18 lb ft)
051RW001
2. Install oil pipe with O-ring, tighten fixing bolt to the
specified torque.
Torque : 10 N�
�� �m (1.0 kg�
�� �m/7 lb ft)
3. Install oil strainer with O-ring, tighten fixing bolt to
the specified torque.
Torque : 25 N�
�� �m (2.5 kg�
�� �m/18 lb ft)
4. Install oil filter assembly and tighten bolts to the
specified torque.
Torque : 25 N�
�� �m (2.5 kg�
�� �m/18 lb ft)
050RW001
Legend
(1) Oil Pump
(2) Oil Filter
(3) Oil Gallery
(4) From Oil Filter
(5) To Oil Filter
5. Install timing pulley on crankshaft.
Install timing belt.
Refer to installation procedure for Timing Belt in
this manual.
6. Install crankshaft pulley.
Refer to install procedure for Crankshaft Pulley
in this manual.
7. Install crankcase assembly.
Refer to installation procedure for Oil Pan and
Crankcase in this manual.
8. Refill engine oil until full level on engine oil dipstick.
Page 2395 of 4264
ENGINE LUBRICATION (6VE1 3.5L) 6G-11
Oil Pump Oil Seal
Removal
1. Disconnect battery ground cable.
2. Drain engine oil.
3. Remove crankshaft pulley.
Refer to removal procedure for Crankshaf
t
Pulley in this manual.
4. Remove timing belt.
Refer to removal procedure for Timing Belt in
this manual.
5. Remove timing pulley from crankshaft.
6. Remove oil pump oil seal using a sealer puller.
NOTE: Take care not to damage sealing surfaces of oil
pump and crankshaft when removing oil seal.
Installation
1. Install oil pump oil seal, apply engine oil to oil seal
lip, then install oil seal using 5–8840–2287–0
installer.
015RS001
2. Install timing pulley to crankshaft.
3. Install timing belt.
Refer to installation procedure for Timing Belt in
this manual.
4. Install crankshaft pulley.
Refer to installation procedure for Crankshaf
t
Pulley in this manual.
5. Refill engine oil until full level.
Page 2396 of 4264
6G-12 ENGINE LUBRICATION (6VE1 3.5L)
Main Data and Specifications
General Specifications
Item Specifications
Oil capacity 5.3 liters
Torque Specifications
Crankcase, Oil pan, Timing belt tensioner, Timing pulley, timing belt cover, Oil pump, Oil gallery, Oil strainer
N�
�� �m (kg�
�� �m/lb ft)
RTW46GLF000101
Page 2416 of 4264
6-10 ENGINE DIAGNOSIS (C24SE)
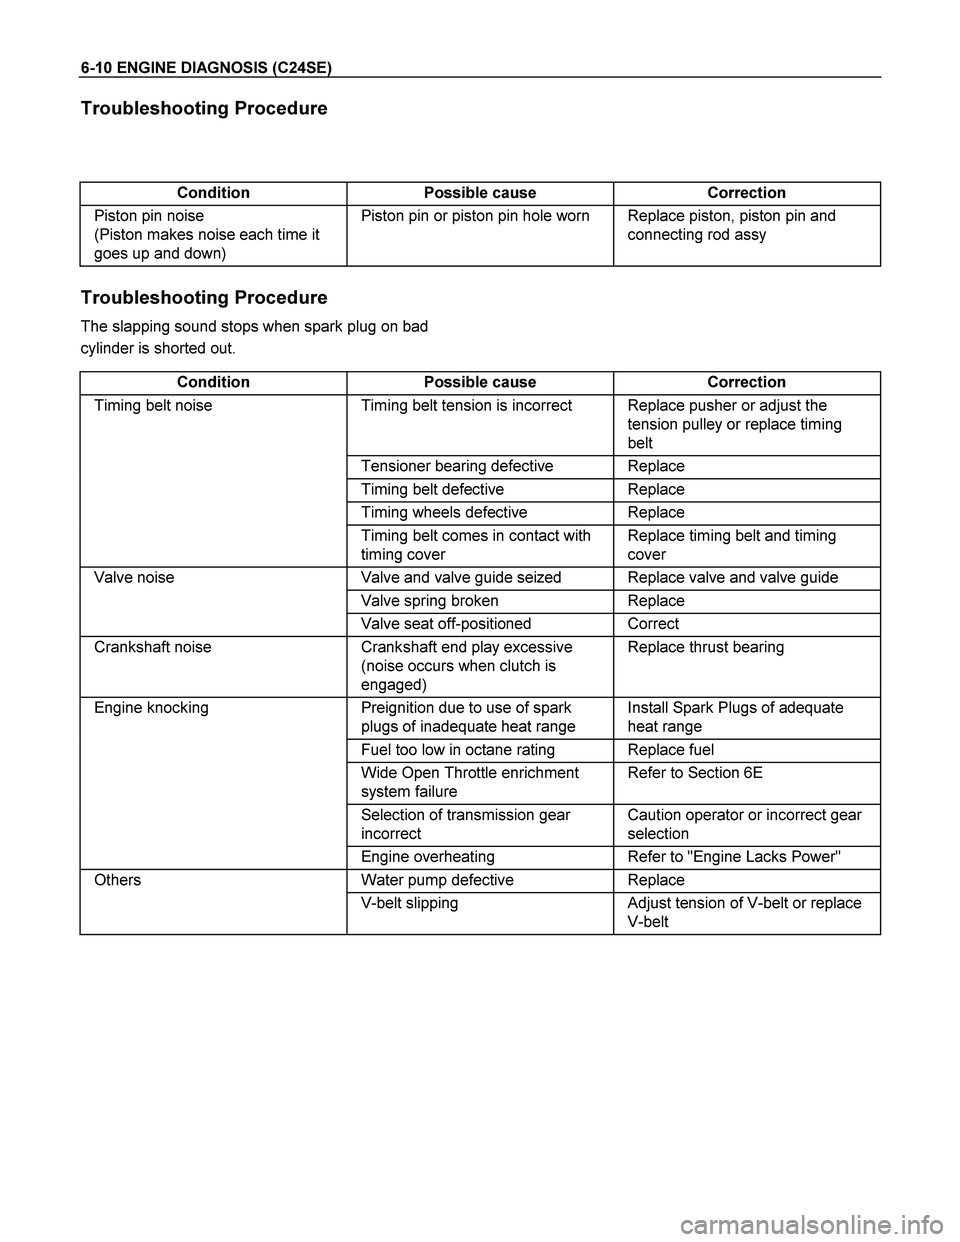
Troubleshooting Procedure
Condition Possible cause Correction
Piston pin noise
(Piston makes noise each time it
goes up and down) Piston pin or piston pin hole worn Replace piston, piston pin and
connecting rod assy
Troubleshooting Procedure
The slapping sound stops when spark plug on bad
cylinder is shorted out.
Condition Possible cause Correction
Timing belt noise Timing belt tension is incorrect Replace pusher or adjust the
tension pulley or replace timing
belt
Tensioner bearing defective Replace
Timing belt defective Replace
Timing wheels defective Replace
Timing belt comes in contact with
timing cover Replace timing belt and timing
cover
Valve noise Valve and valve guide seized Replace valve and valve guide
Valve spring broken Replace
Valve seat off-positioned Correct
Crankshaft noise Crankshaft end play excessive
(noise occurs when clutch is
engaged) Replace thrust bearing
Engine knocking Preignition due to use of spark
plugs of inadequate heat range Install Spark Plugs of adequate
heat range
Fuel too low in octane rating Replace fuel
Wide Open Throttle enrichment
system failure Refer to Section 6E
Selection of transmission gear
incorrect Caution operator or incorrect gear
selection
Engine overheating Refer to "Engine Lacks Power"
Others Water pump defective Replace
V-belt slipping Adjust tension of V-belt or replace
V-belt
Page 2421 of 4264
ENGINE MECHANICAL (C24SE) 6A-1
SECTION 6A
ENGINE MECHANICAL
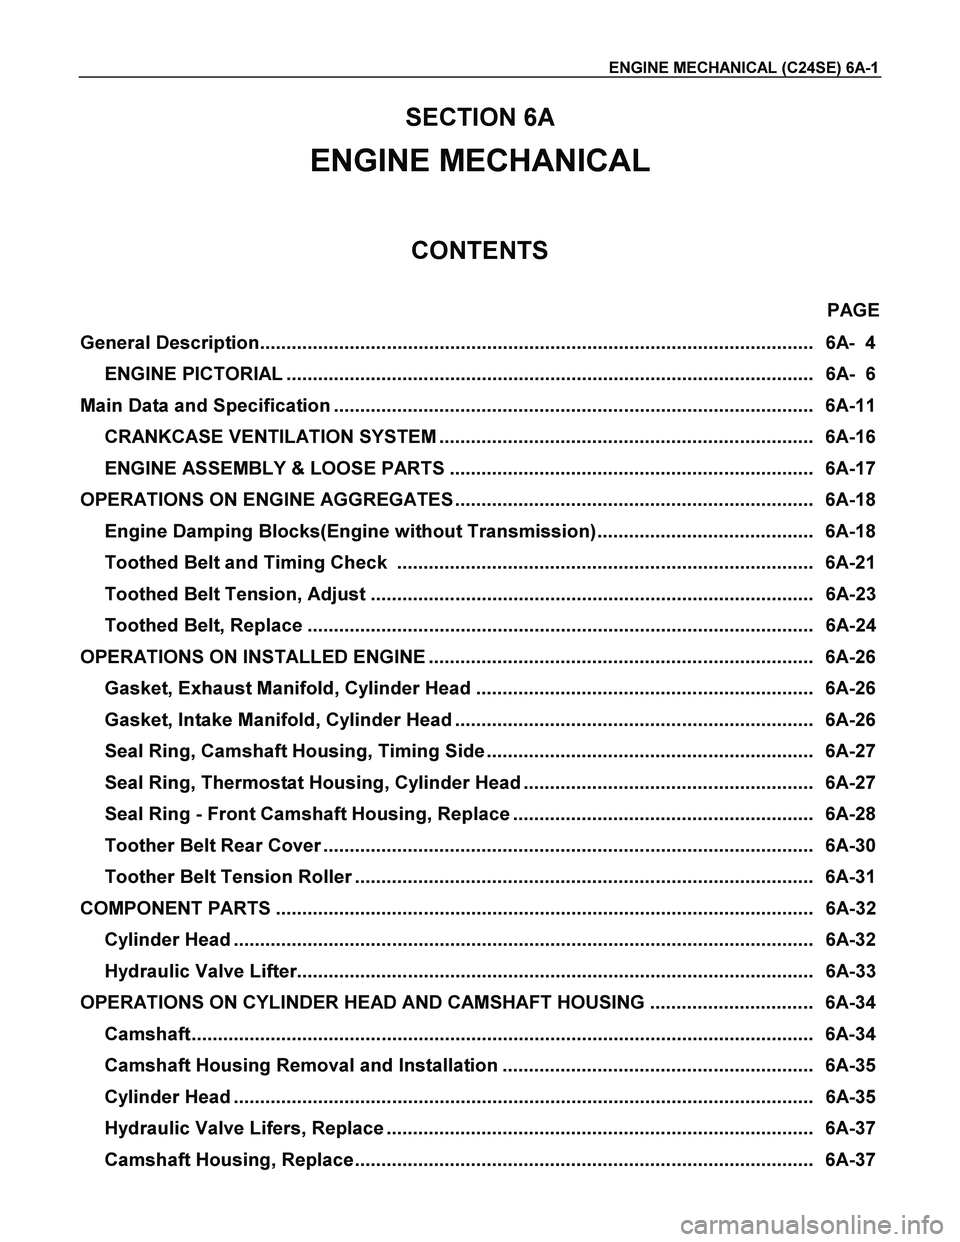
CONTENTS
PAGE
General Description......................................................................................................... 6A- 4
ENGINE PICTORIAL .................................................................................................... 6A- 6
Main Data and Specification ........................................................................................... 6A-11
CRANKCASE VENTILATION SYSTEM ....................................................................... 6A-16
ENGINE ASSEMBLY & LOOSE PARTS ..................................................................... 6A-17
OPERATIONS ON ENGINE AGGREGATES .................................................................... 6A-18
Engine Damping Blocks(Engine without Transmission)......................................... 6A-18
Toothed Belt and Timing Check ............................................................................... 6A-21
Toothed Belt Tension, Adjust .................................................................................... 6A-23
Toothed Belt, Replace ................................................................................................ 6A-24
OPERATIONS ON INSTALLED ENGINE ......................................................................... 6A-26
Gasket, Exhaust Manifold, Cylinder Head ................................................................ 6A-26
Gasket, Intake Manifold, Cylinder Head .................................................................... 6A-26
Seal Ring, Camshaft Housing, Timing Side .............................................................. 6A-27
Seal Ring, Thermostat Housing, Cylinder Head ....................................................... 6A-27
Seal Ring - Front Camshaft Housing, Replace ......................................................... 6A-28
Toother Belt Rear Cover ............................................................................................. 6A-30
Toother Belt Tension Roller ....................................................................................... 6A-31
COMPONENT PARTS ...................................................................................................... 6A-32
Cylinder Head .............................................................................................................. 6A-32
Hydraulic Valve Lifter.................................................................................................. 6A-33
OPERATIONS ON CYLINDER HEAD AND CAMSHAFT HOUSING ............................... 6A-34
Camshaft...................................................................................................................... 6A-34
Camshaft Housing Removal and Installation ........................................................... 6A-35
Cylinder Head .............................................................................................................. 6A-35
Hydraulic Valve Lifers, Replace ................................................................................. 6A-37
Camshaft Housing, Replace....................................................................................... 6A-37
Page 2431 of 4264
ENGINE MECHANICAL (C24SE) 6A-11
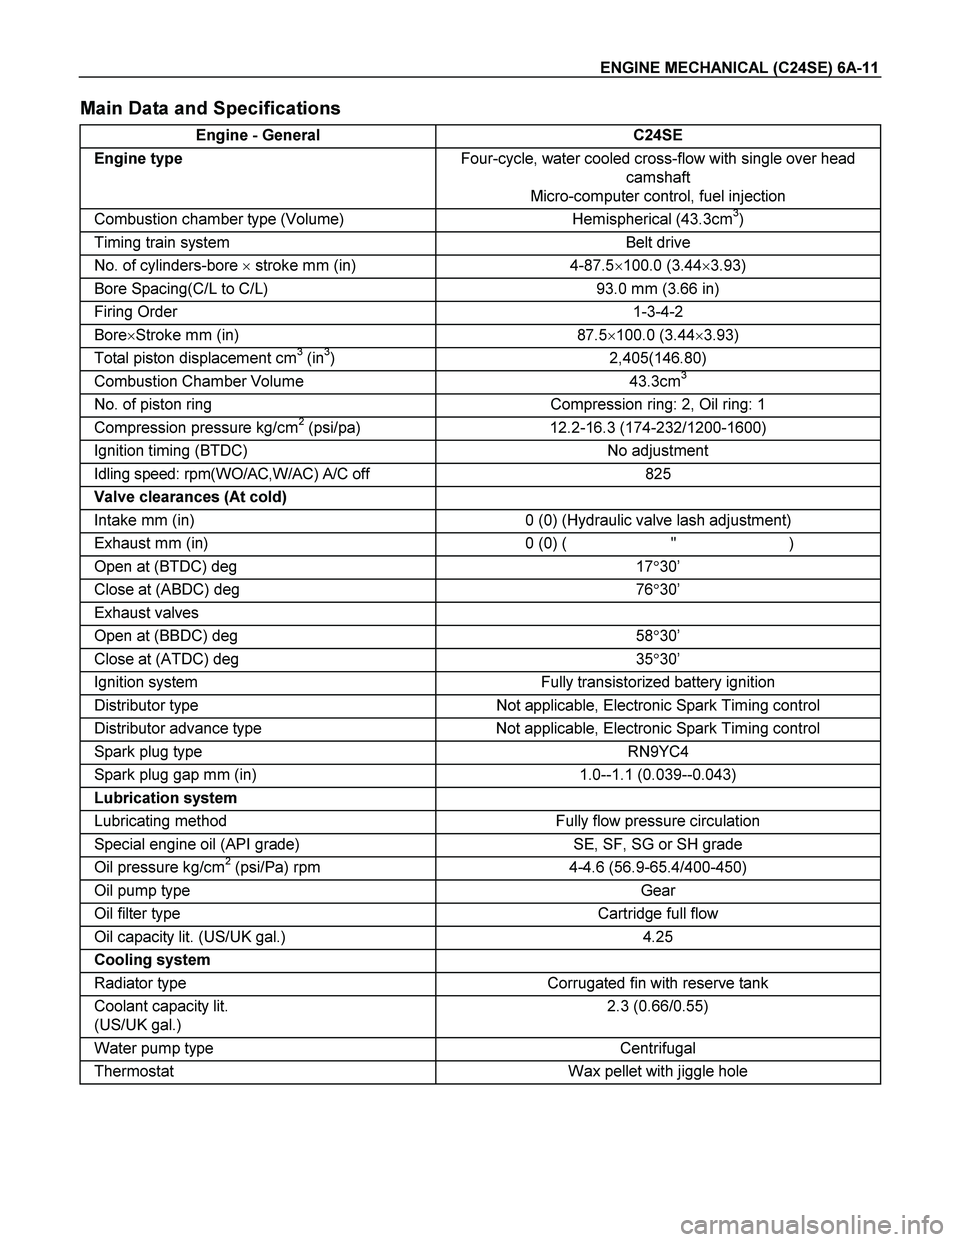
Main Data and Specifications
Engine - General C24SE
Engine type Four-cycle, water cooled cross-flow with single over head
camshaft
Micro-computer control, fuel injection
Combustion chamber type (Volume) Hemispherical (43.3cm3)
Timing train system Belt drive
No. of cylinders-bore � stroke mm (in) 4-87.5�100.0 (3.44�3.93)
Bore Spacing(C/L to C/L) 93.0 mm (3.66 in)
Firing Order 1-3-4-2
Bore�Stroke mm (in) 87.5�100.0 (3.44�3.93)
Total piston displacement cm3 (in3) 2,405(146.80)
Combustion Chamber Volume 43.3cm3
No. of piston ring Compression ring: 2, Oil ring: 1
Compression pressure kg/cm2 (psi/pa) 12.2-16.3 (174-232/1200-1600)
Ignition timing (BTDC) No adjustment
Idling speed: rpm(WO/AC,W/AC) A/C off 825
Valve clearances (At cold)
Intake mm (in) 0 (0) (Hydraulic valve lash adjustment)
Exhaust mm (in) 0 (0) ( " )
Open at (BTDC) deg 17�30’
Close at (ABDC) deg 76�30’
Exhaust valves
Open at (BBDC) deg 58�30’
Close at (ATDC) deg 35�30’
Ignition system Fully transistorized battery ignition
Distributor type Not applicable, Electronic Spark Timing control
Distributor advance type Not applicable, Electronic Spark Timing control
Spark plug type RN9YC4
Spark plug gap mm (in) 1.0--1.1 (0.039--0.043)
Lubrication system
Lubricating method Fully flow pressure circulation
Special engine oil (API grade) SE, SF, SG or SH grade
Oil pressure kg/cm2 (psi/Pa) rpm 4-4.6 (56.9-65.4/400-450)
Oil pump type Gear
Oil filter type Cartridge full flow
Oil capacity lit. (US/UK gal.) 4.25
Cooling system
Radiator type Corrugated fin with reserve tank
Coolant capacity lit.
(US/UK gal.) 2.3 (0.66/0.55)
Water pump type Centrifugal
Thermostat Wax pellet with jiggle hole
Page 2441 of 4264
ENGINE MECHANICAL (C24SE) 6A-21
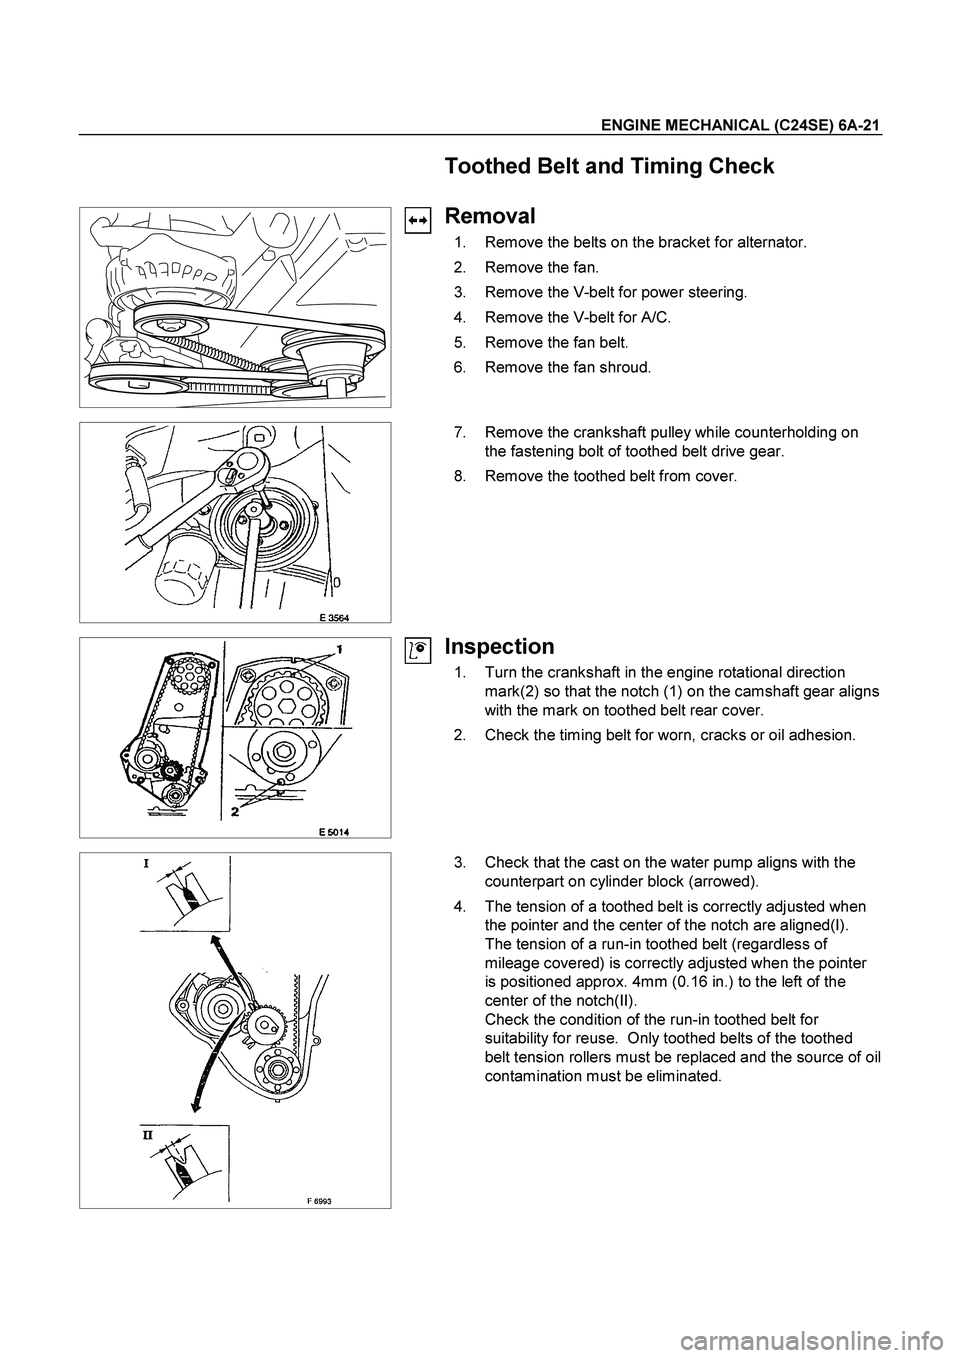
Toothed Belt and Timing Check
Removal
1. Remove the belts on the bracket for alternator.
2. Remove the fan.
3. Remove the V-belt for power steering.
4. Remove the V-belt for A/C.
5. Remove the fan belt.
6. Remove the fan shroud.
7. Remove the crankshaft pulley while counterholding on
the fastening bolt of toothed belt drive gear.
8. Remove the toothed belt from cover.
Inspection
1. Turn the crankshaft in the engine rotational direction
mark(2) so that the notch (1) on the camshaft gear aligns
with the mark on toothed belt rear cover.
2. Check the timing belt for worn, cracks or oil adhesion.
3. Check that the cast on the water pump aligns with the
counterpart on cylinder block (arrowed).
4. The tension of a toothed belt is correctly adjusted when
the pointer and the center of the notch are aligned(I).
The tension of a run-in toothed belt (regardless of
mileage covered) is correctly adjusted when the pointer
is positioned approx. 4mm (0.16 in.) to the left of the
center of the notch(II).
Check the condition of the run-in toothed belt for
suitability for reuse. Only toothed belts of the toothed
belt tension rollers must be replaced and the source of oil
contamination must be eliminated.
Page 2443 of 4264
ENGINE MECHANICAL (C24SE) 6A-23
Toothed Belt Tension, Adjust
(Engines with toothed belt tension
roller)
Removal
Refer to 6A-21. Toothed Belt and Timing check and removal
steps.
Adjust
1. Loosen the fastening bolt of the toothed belt tension
roller.
2. Turn the toothed belt tension roller at adjustment
eccentric (1) in the direction of arrow (counterclockwise),
until pointer (2) comes to the right stop.
3. If necessary tighten the fastening bolt of toothed belt
tension roller.
4. Rotate the crankshaft twice (720�
) in the engine
rotational direction until marks (2) and (1) align again.
5. Turn the eccentric in the direction of arrow (clockwise)
until pointer (1) and notch (2) are positioned to suit age of
toothed belt.
6. Rotate the crankshaft twice (720�
) in the engine
rotational direction again and correct adjustment if
necessary.
Installation
Refer to 6A-21. Toothed Belt and Timing check and installation
steps.