2004 ISUZU TF SERIES mass air flow
[x] Cancel search: mass air flowPage 1500 of 4264
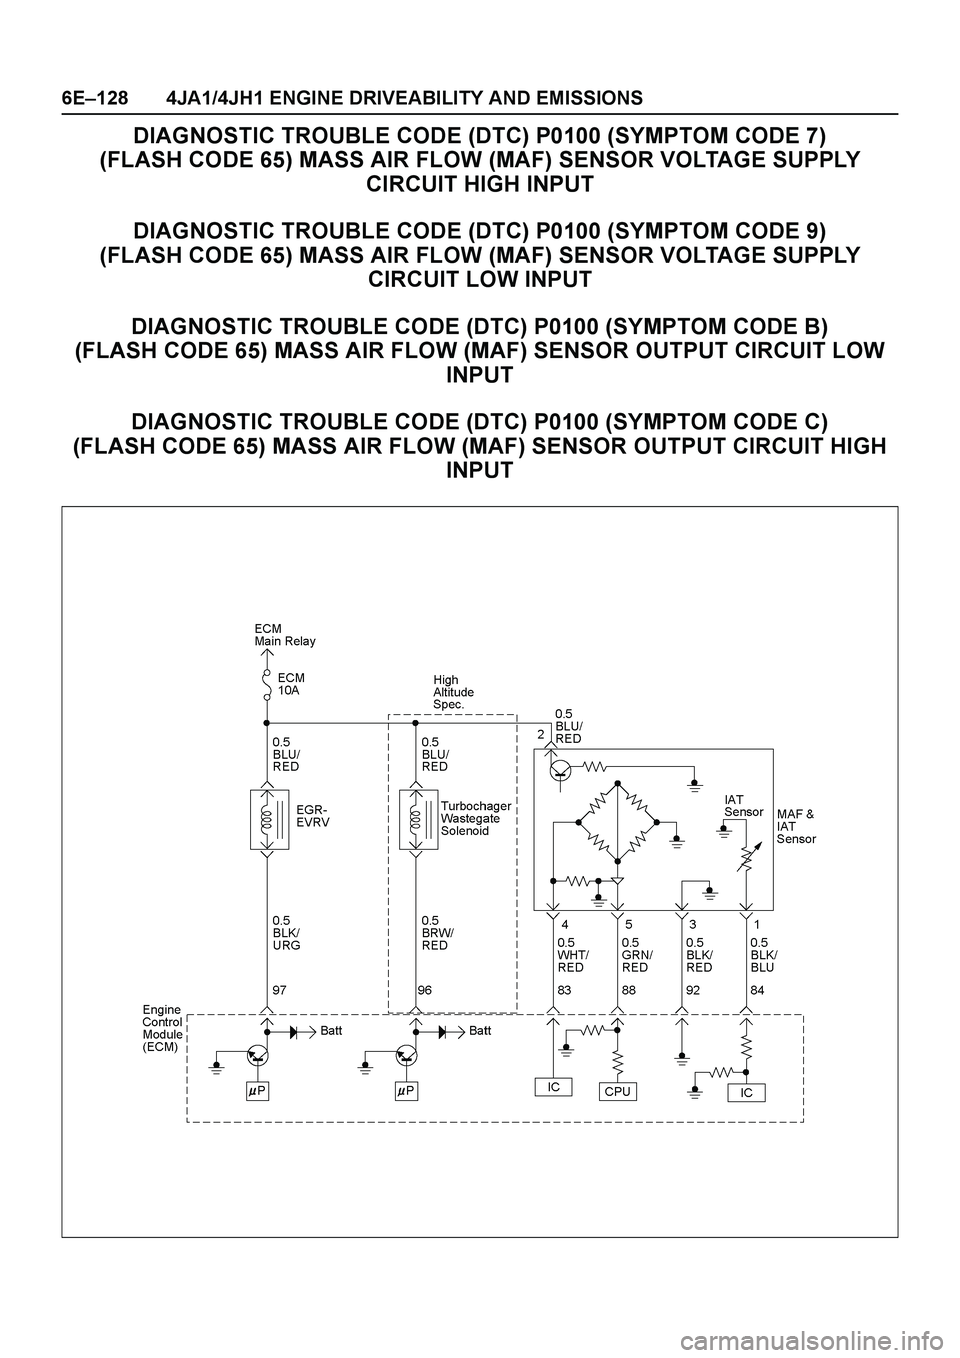
6E–128 4JA1/4JH1 ENGINE DRIVEABILITY AND EMISSIONS
DIAGNOSTIC TROUBLE CODE (DTC) P0100 (SYMPTOM CODE 7)
(FLASH CODE 65) MASS AIR FLOW (MAF) SENSOR VOLTAGE SUPPLY
CIRCUIT HIGH INPUT
DIAGNOSTIC TROUBLE CODE (DTC) P0100 (SYMPTOM CODE 9)
(FLASH CODE 65) MASS AIR FLOW (MAF) SENSOR VOLTAGE SUPPLY
CIRCUIT LOW INPUT
DIAGNOSTIC TROUBLE CODE (DTC) P0100 (SYMPTOM CODE B)
(FLASH CODE 65) MASS AIR FLOW (MAF) SENSOR OUTPUT CIRCUIT LOW
INPUT
DIAGNOSTIC TROUBLE CODE (DTC) P0100 (SYMPTOM CODE C)
(FLASH CODE 65) MASS AIR FLOW (MAF) SENSOR OUTPUT CIRCUIT HIGH
INPUT
Page 1501 of 4264
4JA1/4JH1 ENGINE DRIVEABILITY AND EMISSIONS 6E–129
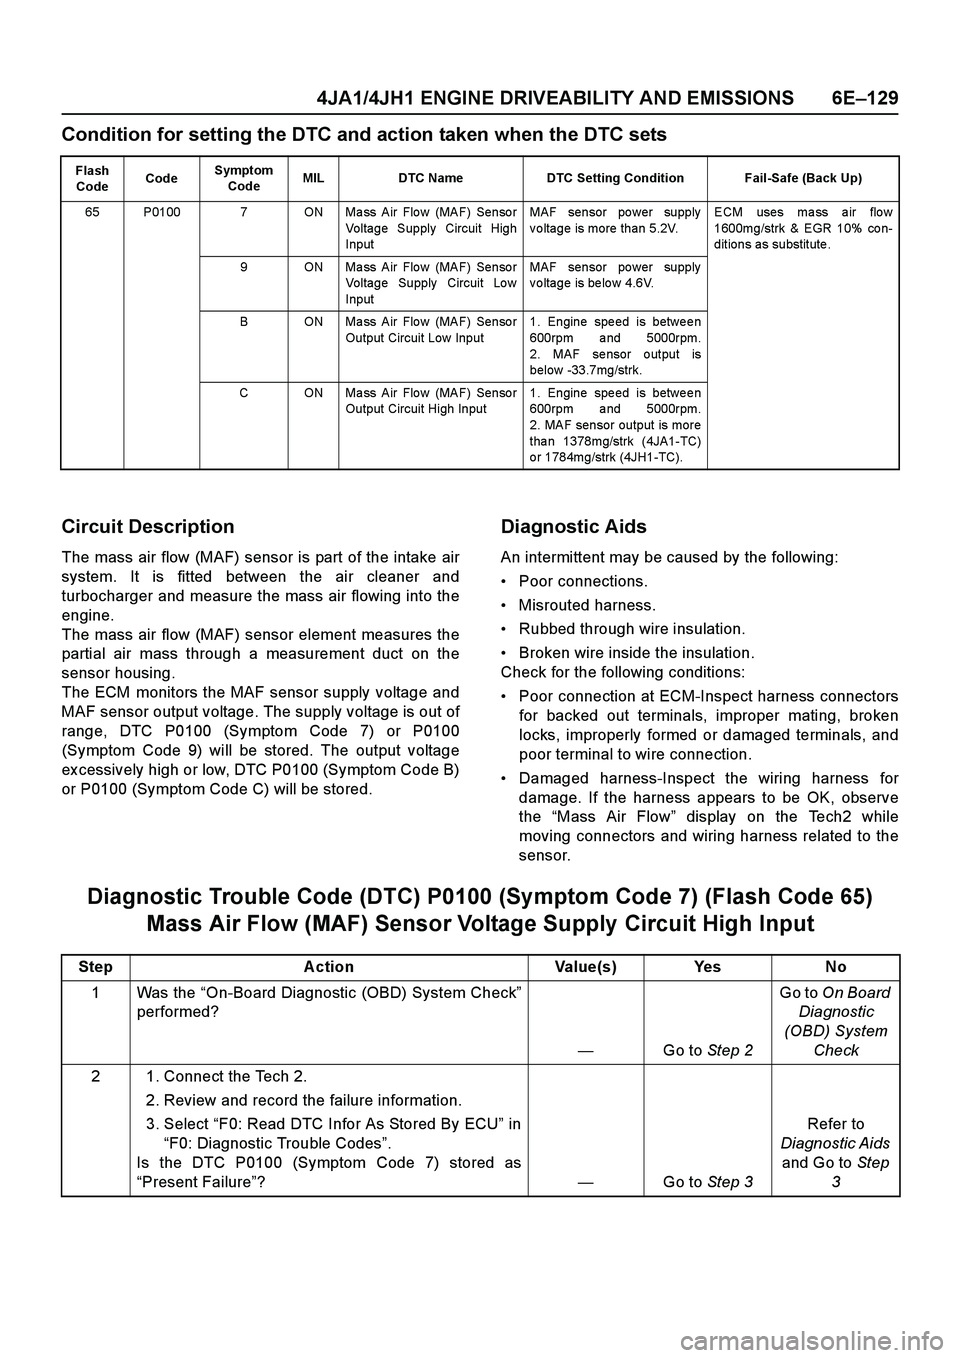
Condition for setting the DTC and action taken when the DTC sets
Circuit Description
The mass air flow (MAF) sensor is part of the intake air
system. It is fitted between the air cleaner and
turbocharger and measure the mass air flowing into the
engine.
The mass air flow (MAF) sensor element measures the
partial air mass through a measurement duct on the
sensor housing.
The ECM monitors the MAF sensor supply voltage and
MAF sensor output voltage. The supply voltage is out of
range, DTC P0100 (Symptom Code 7) or P0100
(Symptom Code 9) will be stored. The output voltage
ex cessively high or low, DTC P0100 (Symptom Code B)
or P0100 (Symptom Code C) will be stored.
Diagnostic Aids
An intermittent may be caused by the following:
Poor connections.
Misrouted harness.
Rubbed through wire insulation.
Broken wire inside the insulation.
Check for the following conditions:
Poor connection at ECM-Inspect harness connectors
for backed out terminals, improper mating, broken
locks, improperly formed or damaged terminals, and
poor terminal to wire connection.
Damaged harness-Inspect the wiring harness for
damage. If the harness appears to be OK, observe
the “Mass Air Flow” display on the Tech2 while
moving connectors and wiring harness related to the
sensor.
Diagnostic Trouble Code (DTC) P0100 (Symptom Code 7) (Flash Code 65)
Mass Air Flow (MAF) Sensor Voltage Supply Circuit High Input
Flash
CodeCodeSymptom
CodeMIL DTC Name DTC Setting Condition Fail-Safe (Back Up)
65 P0100 7 ON Ma ss Air Flo w (MAF) Senso r
Voltage Supply Circuit High
InputMAF sensor power supply
voltage is more than 5.2V.ECM uses ma ss a ir flo w
1600mg/strk & EGR 10% co n-
ditions as substitute.
9 ON Mass Air Flow (MAF) Sensor
Voltage Supply Circuit Low
InputMAF sensor power supply
voltage is below 4.6V.
B ON Mass Air Flow (MAF) Sensor
Output Circuit Low Input1. Engine speed is between
600rpm and 5000rpm.
2. MAF se nsor o utput is
below -33.7mg/strk.
C ON Mass Air Flow (MAF) Sensor
Output Circuit High Input1. Engine speed is between
600rpm and 5000rpm.
2. MAF sensor output is more
tha n 1378mg/strk (4JA1-TC)
o r 1784mg/strk (4JH1-TC).
Step Action Value(s) Yes No
1Was the “On-Board Diagnostic (OBD) System Check”
performed?
—Go to Step 2Go to On Board
Diagnostic
(OBD) System
Check
2 1. Connect the Tech 2.
2. Review and record the failure information.
3. Select “F0: Read DTC Infor As Stored By ECU” in
“F0: Diagnostic Trouble Codes”.
Is the DTC P0100 (Symptom Code 7) stored as
“Present Failure”?—Go to Step 3Refer to
Diagnostic Aids
and Go to Step
3
Page 1504 of 4264
6E –132 4JA1/4JH1 ENGINE DRIVEABILITY AND EMISSIONS
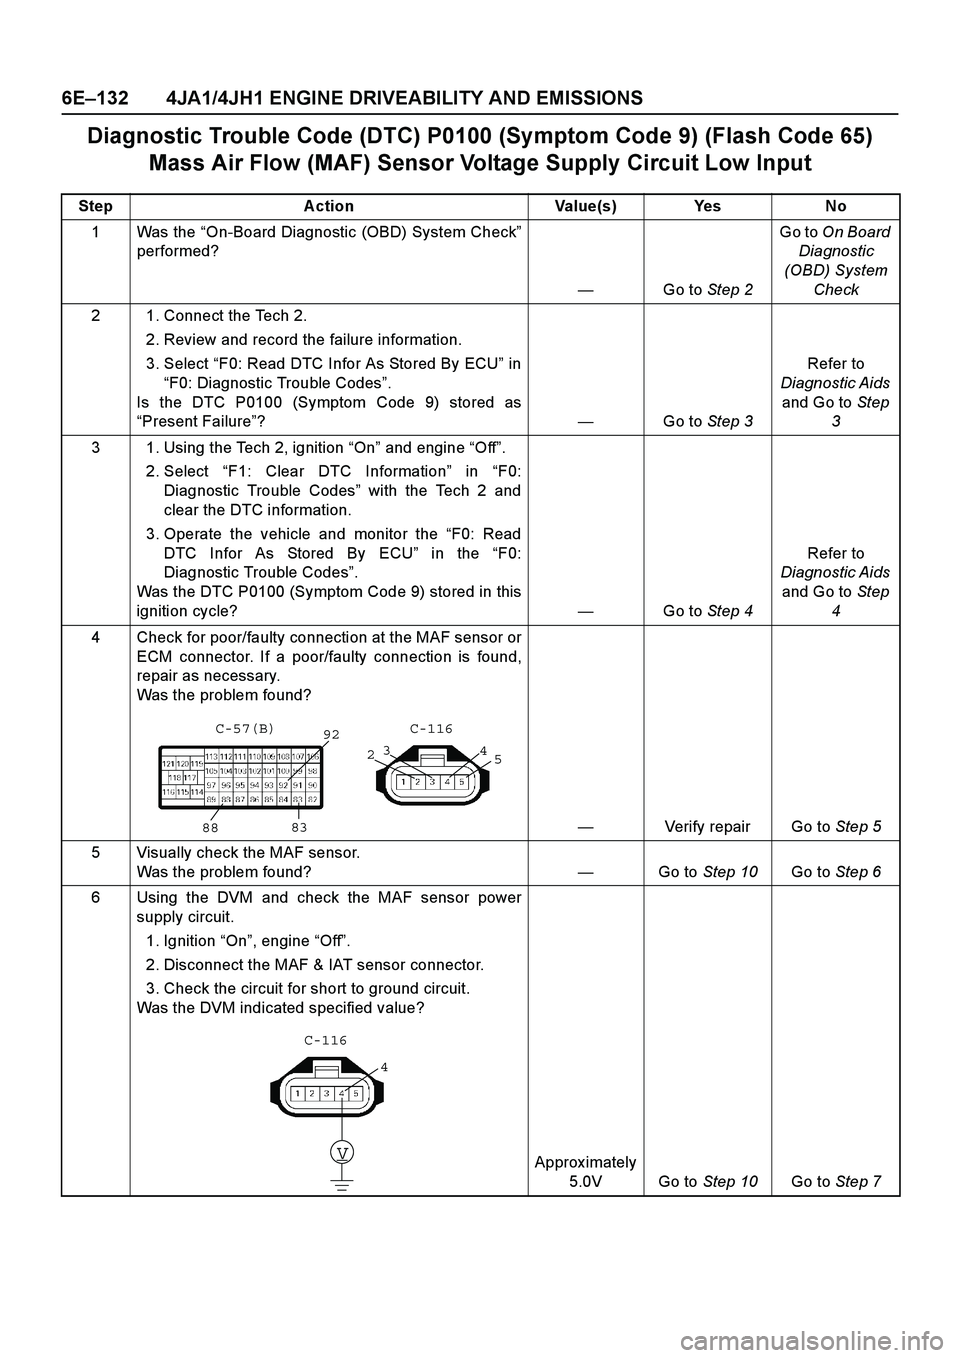
Diagnostic Trouble Code (DTC) P0100 (Symptom Code 9) (Flash Code 65)
Mass Air Flow (MAF) Sensor Voltage Supply Circuit Low Input
Step Action Value(s) Yes No
1Was the “On-Board Diagnostic (OBD) System Check ”
performed?
— Go to Step 2 Go to
On Board
Diagnostic
(OBD) System Check
2 1. Connect the Tech 2. 2. Review and record the failure information.
3. Select “F0: Read DTC Infor As Stored By ECU ” in
“ F0: Diagnostic Trouble Codes ”.
Is the DTC P0100 (Symptom Code 9) stored as
“ Present Failure ”? —Go to Step 3 Refer to
Diagnostic Aids and Go to Step
3
3 1. Using the Tech 2, ignition “On ” and engine “Off ”.
2. Select “F1: Clear DTC Information ” in “F0:
Diagnostic Trouble Codes ” with the Tech 2 and
clear the DTC information.
3. Operate the vehicle and monitor the “F0: Read
DTC Infor As Stored By ECU ” in the “F0:
Diagnostic Trouble Codes ”.
Was the DTC P0100 (Symptom Code 9) stored in this
ignition cycle? —Go to Step 4 Refer to
Diagnostic Aids and Go to Step
4
4 Check for poor/faulty connection at the MAF sensor or ECM connector. If a poor/faulty connection is found,
repair as necessary.
Was the problem found?
— Verify repair Go to Step 5
5 Visually check the MAF sensor. Was the problem found? —Go to Step 10 Go to Step 6
6 Using the DVM and check the MAF sensor power supply circuit.
1. Ignition “On ”, engine “Off ”.
2. Disconnect the MAF & IAT sensor connector.
3. Check the circuit for short to ground circuit.
Was the DVM indicated specified value?
Approx imately 5.0V Go to Step 10Go to Step 7
92
88 83
2 3
4
5
C-116
C-57(B)
V
4
C-116
Page 1506 of 4264
6E –134 4JA1/4JH1 ENGINE DRIVEABILITY AND EMISSIONS
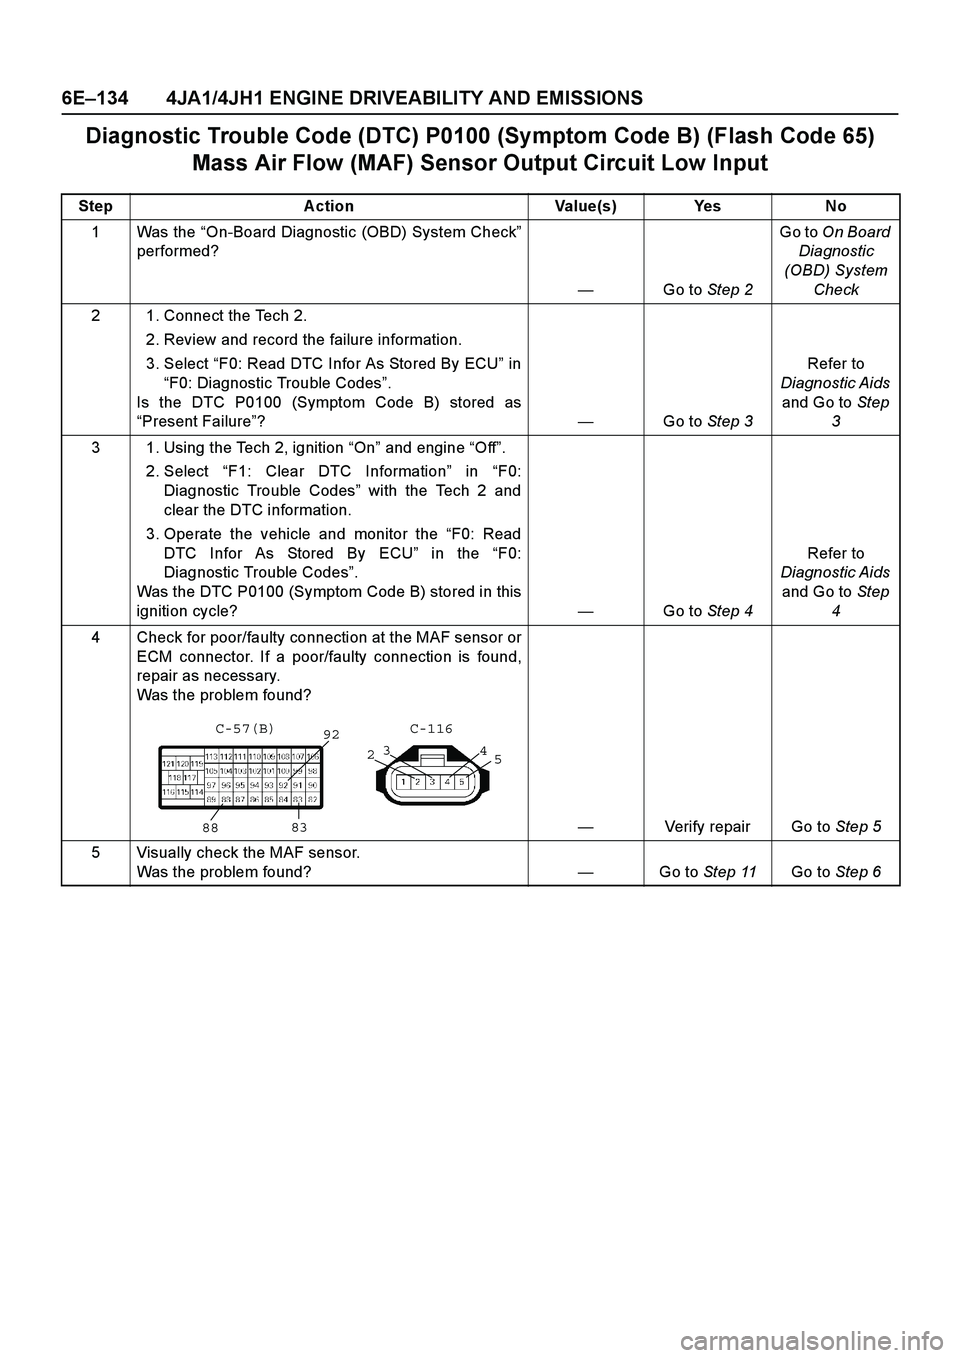
Diagnostic Trouble Code (DTC) P0100 (Symptom Code B) (Flash Code 65)
Mass Air Flow (MAF) Sensor Output Circuit Low Input
Step Action Value(s) Yes No
1Was the “On-Board Diagnostic (OBD) System Check ”
performed?
— Go to Step 2 Go to
On Board
Diagnostic
(OBD) System Check
2 1. Connect the Tech 2. 2. Review and record the failure information.
3. Select “F0: Read DTC Infor As Stored By ECU ” in
“ F0: Diagnostic Trouble Codes ”.
Is the DTC P0100 (Symptom Code B) stored as
“ Present Failure ”? —Go to Step 3 Refer to
Diagnostic Aids and Go to Step
3
3 1. Using the Tech 2, ignition “On ” and engine “Off ”.
2. Select “F1: Clear DTC Information ” in “F0:
Diagnostic Trouble Codes ” with the Tech 2 and
clear the DTC information.
3. Operate the vehicle and monitor the “F0: Read
DTC Infor As Stored By ECU ” in the “F0:
Diagnostic Trouble Codes ”.
Was the DTC P0100 (Symptom Code B) stored in this
ignition cycle? —Go to Step 4 Refer to
Diagnostic Aids and Go to Step
4
4 Check for poor/faulty connection at the MAF sensor or ECM connector. If a poor/faulty connection is found,
repair as necessary.
Was the problem found?
— Verify repair Go to Step 5
5 Visually check the MAF sensor. Was the problem found? —Go to Step 11 Go to Step 6
92
88 83
2 3
4
5
C-116
C-57(B)
Page 1509 of 4264
4JA1/4JH1 ENGINE DRIVEABILITY AND EMISSIONS 6E –137
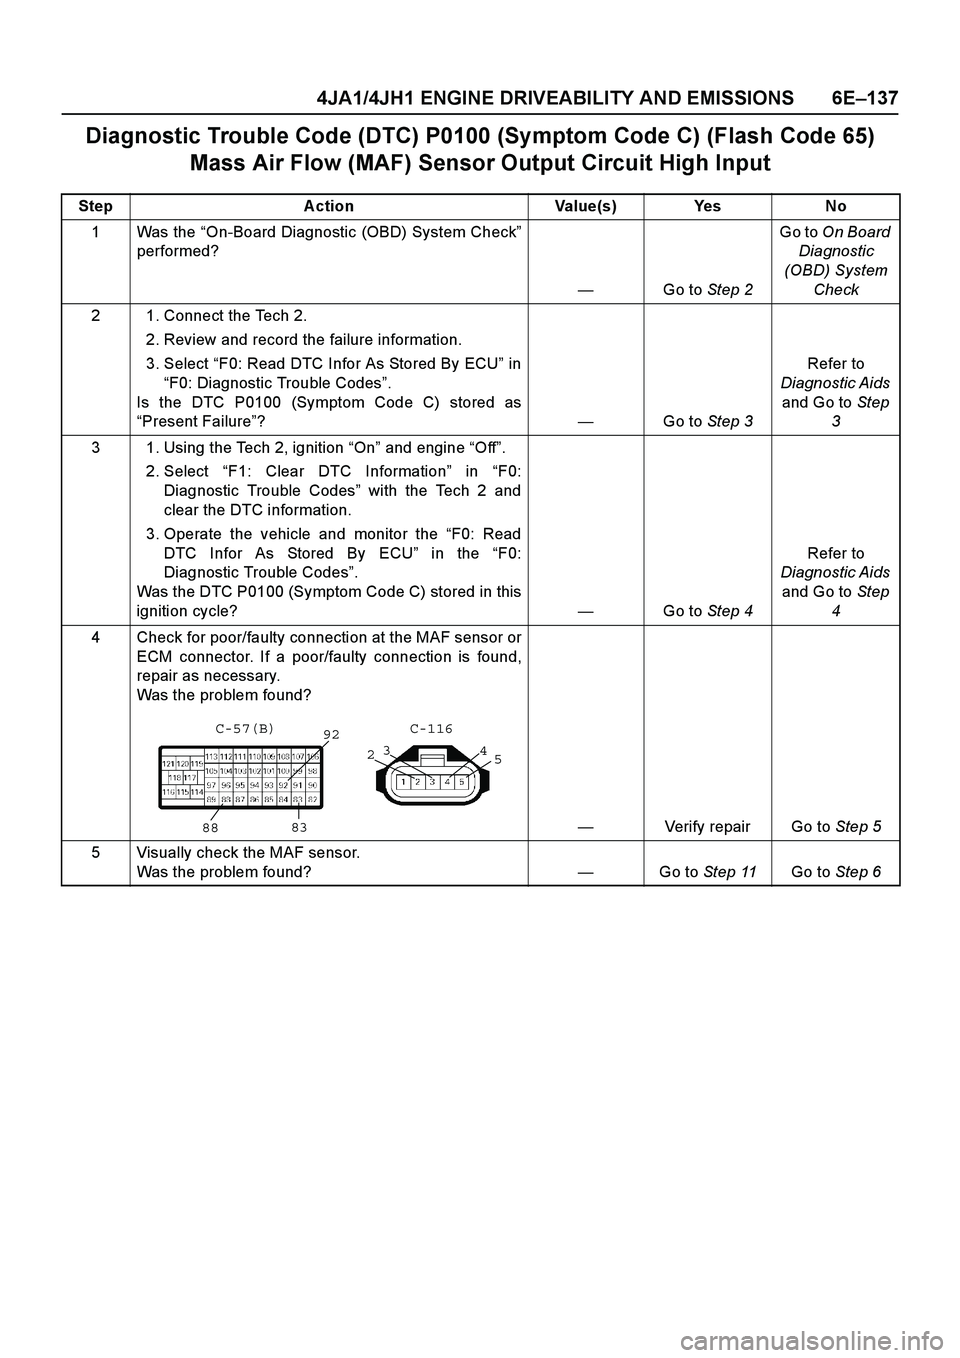
Diagnostic Trouble Code (DTC) P0100 (Symptom Code C) (Flash Code 65)
Mass Air Flow (MAF) Sensor Output Circuit High Input
Step Action Value(s) Yes No
1Was the “On-Board Diagnostic (OBD) System Check ”
performed?
— Go to Step 2 Go to
On Board
Diagnostic
(OBD) System Check
2 1. Connect the Tech 2. 2. Review and record the failure information.
3. Select “F0: Read DTC Infor As Stored By ECU ” in
“ F0: Diagnostic Trouble Codes ”.
Is the DTC P0100 (Symptom Code C) stored as
“ Present Failure ”? —Go to Step 3 Refer to
Diagnostic Aids and Go to Step
3
3 1. Using the Tech 2, ignition “On ” and engine “Off ”.
2. Select “F1: Clear DTC Information ” in “F0:
Diagnostic Trouble Codes ” with the Tech 2 and
clear the DTC information.
3. Operate the vehicle and monitor the “F0: Read
DTC Infor As Stored By ECU ” in the “F0:
Diagnostic Trouble Codes ”.
Was the DTC P0100 (Symptom Code C) stored in this
ignition cycle? —Go to Step 4 Refer to
Diagnostic Aids and Go to Step
4
4 Check for poor/faulty connection at the MAF sensor or ECM connector. If a poor/faulty connection is found,
repair as necessary.
Was the problem found?
— Verify repair Go to Step 5
5 Visually check the MAF sensor. Was the problem found? —Go to Step 11 Go to Step 6
92
88 83
2 3
4
5
C-116
C-57(B)
Page 1600 of 4264
6E–228 4JA1/4JH1 ENGINE DRIVEABILITY AND EMISSIONS
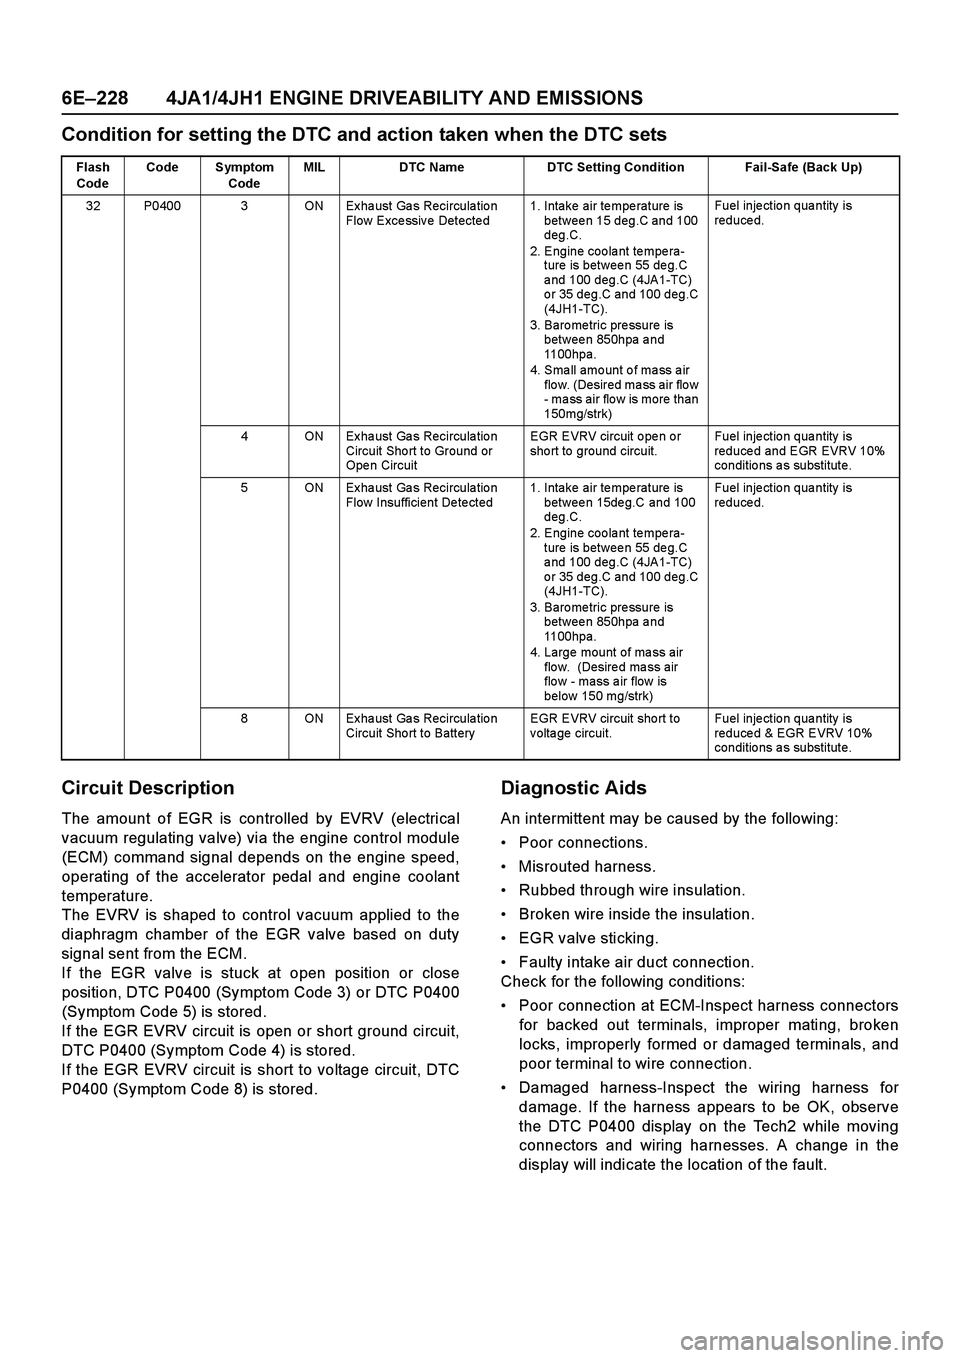
Condition for setting the DTC and action taken when the DTC sets
Circuit Description
The amount of EGR is controlled by EVRV (electrical
vacuum regulating valve) via the engine control module
(ECM) command signal depends on the engine speed,
operating of the accelerator pedal and engine coolant
temperature.
The EVRV is shaped to control vacuum applied to the
diaphragm chamber of the EGR valve based on duty
signal sent from the ECM.
If the EGR valve is stuck at open position or close
position, DTC P0400 (Symptom Code 3) or DTC P0400
(Symptom Code 5) is stored.
If the EGR EVRV circuit is open or short ground circuit,
DTC P0400 (Symptom Code 4) is stored.
If the EGR EVRV circuit is short to voltage circuit, DTC
P0400 (Symptom Code 8) is stored.
Diagnostic Aids
An intermittent may be caused by the following:
Poor connections.
Misrouted harness.
Rubbed through wire insulation.
Broken wire inside the insulation.
EGR valve sticking.
Faulty intake air duct connection.
Check for the following conditions:
Poor connection at ECM-Inspect harness connectors
for backed out terminals, improper mating, broken
locks, improperly formed or damaged terminals, and
poor terminal to wire connection.
Damaged harness-Inspect the wiring harness for
damage. If the harness appears to be OK, observe
the DTC P0400 display on the Tech2 while moving
connectors and wiring harnesses. A change in the
display will indicate the location of the fault.
Flash
CodeCode Symptom
CodeMIL DTC Name DTC Setting Condition Fail-Safe (Back Up)
32 P0400 3 ON Ex ha ust Ga s Recircula tio n
Flow Excessive Detected1. Intake air temperature is
between 15 deg.C and 100
deg.C.
2. Engine coolant tempera-
ture is betwee n 55 de g.C
and 100 deg.C (4JA1-TC)
or 35 deg.C and 100 deg.C
(4JH1-TC).
3. Baro me tric pre ssure is
betwee n 850hpa a nd
1100hpa.
4. Small amount of mass air
flo w. (Desired ma ss air flo w
- mass air flow is more than
150mg/strk)Fuel inje ctio n qua ntity is
reduced.
4 ON Ex ha ust Ga s Recircula tio n
Circuit Sho rt to Ground or
Ope n CircuitEGR EVRV circuit open or
sho rt to ground circuit.Fuel inje ctio n qua ntity is
reduced and EGR EVRV 10%
conditio ns a s substitute.
5 ON Ex ha ust Ga s Recircula tio n
Flow Insufficient Detected1. Intake air temperature is
betwee n 15de g.C and 100
deg.C.
2. Engine coolant tempera-
ture is betwee n 55 de g.C
and 100 deg.C (4JA1-TC)
or 35 deg.C and 100 deg.C
(4JH1-TC).
3. Baro me tric pre ssure is
betwee n 850hpa a nd
1100hpa.
4. Large mount of mass air
flo w. (Desire d ma ss air
flo w - mass a ir flow is
below 150 mg/strk)Fuel inje ctio n qua ntity is
reduced.
8 ON Ex ha ust Ga s Recircula tio n
Circuit Sho rt to BatteryEGR EVRV circuit sho rt to
voltage circuit.Fuel inje ctio n qua ntity is
reduced & EGR EVRV 10%
conditio ns a s substitute.
Page 1733 of 4264
4JA1/4JH1 ENGINE DRIVEABILITY AND EMISSIONS 6E–361
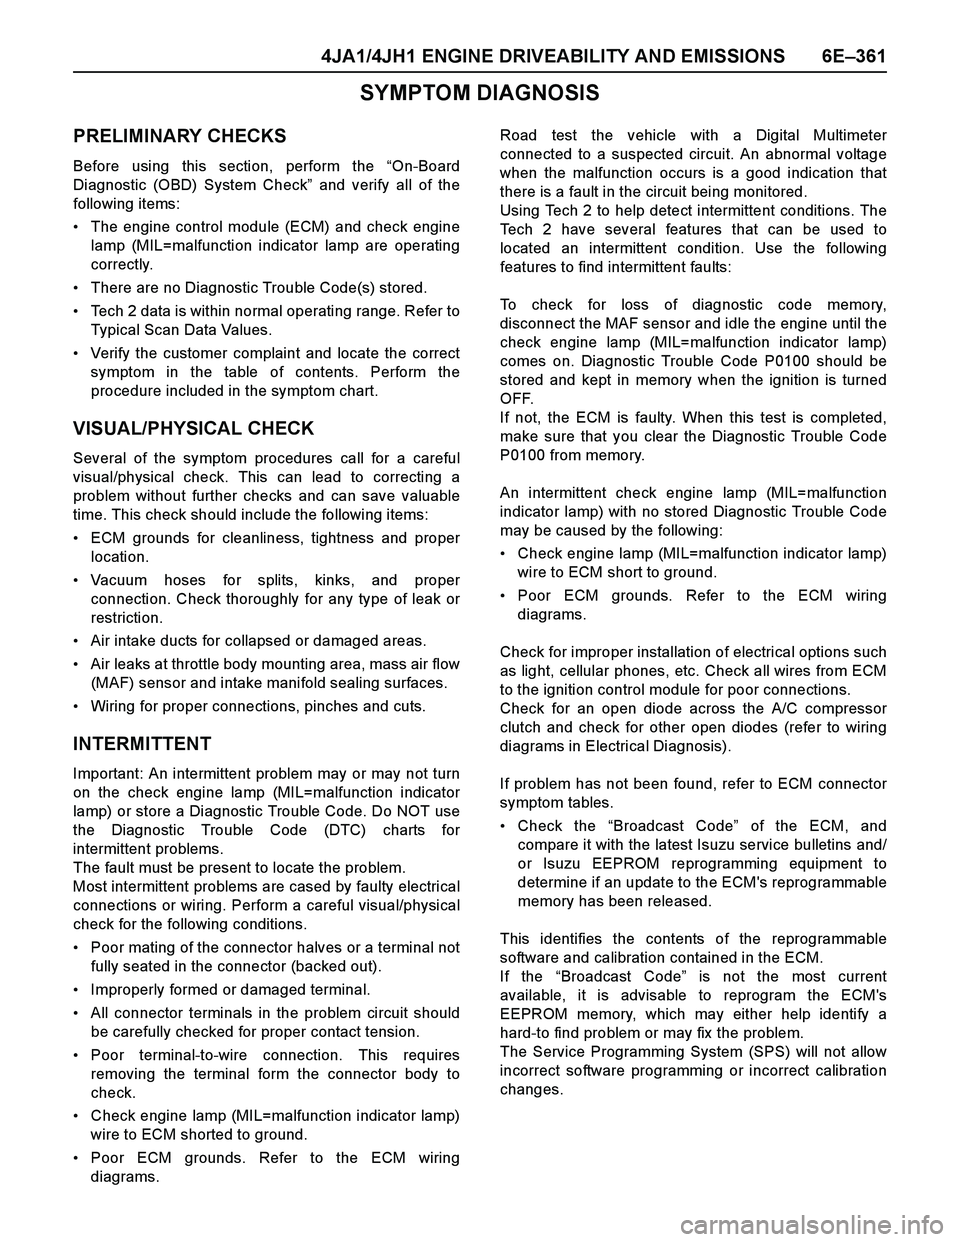
SYMPTOM DIAGNOSIS
PRELIMINARY CHECKS
Before using this section, perform the “On-Board
Diagnostic (OBD) System Check” and verify all of the
following items:
The engine control module (ECM) and check engine
lamp (MIL=malfunction indicator lamp are operating
correctly.
There are no Diagnostic Trouble Code(s) stored.
Tech 2 data is within normal operating range. Refer to
Typical Scan Data Values.
Verify the customer complaint and locate the correct
symptom in the table of contents. Perform the
procedure included in the symptom chart.
VISUAL/PHYSICAL CHECK
Several of the symptom procedures call for a careful
visual/physical check. This can lead to correcting a
problem without further checks and can save valuable
time. This check should include the following items:
ECM grounds for cleanliness, tightness and proper
location.
Vacuum hoses for splits, kinks, and proper
connection. Check thoroughly for any type of leak or
restriction.
Air intake ducts for collapsed or damaged areas.
Air leaks at throttle body mounting area, mass air flow
(MAF) sensor and intake manifold sealing surfaces.
Wiring for proper connections, pinches and cuts.
INTERMITTENT
Important: An intermittent problem may or may not turn
on the check engine lamp (MIL=malfunction indicator
lamp) or store a Diagnostic Trouble Code. Do NOT use
the Diagnostic Trouble Code (DTC) charts for
intermittent problems.
The fault must be present to locate the problem.
Most intermittent problems are cased by faulty electrical
connections or wiring. Perform a careful visual/physical
check for the following conditions.
Poor mating of the connector halves or a terminal not
fully seated in the connector (backed out).
Improperly formed or damaged terminal.
All connector terminals in the problem circuit should
be carefully checked for proper contact tension.
Poor terminal-to-wire connection. This requires
removing the terminal form the connector body to
check.
Check engine lamp (MIL=malfunction indicator lamp)
wire to ECM shorted to ground.
Poor ECM grounds. Refer to the ECM wiring
diagrams.Road test the vehicle with a Digital Multimeter
connected to a suspected circuit. An abnormal voltage
when the malfunction occurs is a good indication that
there is a fault in the circuit being monitored.
Using Tech 2 to help detect intermittent conditions. The
Tech 2 have several features that can be used to
located an intermittent condition. Use the following
features to find intermittent faults:
To check for loss of diagnostic code memory,
disconnect the MAF sensor and idle the engine until the
check engine lamp (MIL=malfunction indicator lamp)
comes on. Diagnostic Trouble Code P0100 should be
stored and kept in memory when the ignition is turned
OFF.
If not, the ECM is faulty. When this test is completed,
make sure that you clear the Diagnostic Trouble Code
P0100 from memory.
An intermittent check engine lamp (MIL=malfunction
indicator lamp) with no stored Diagnostic Trouble Code
may be caused by the following:
Check engine lamp (MIL=malfunction indicator lamp)
wire to ECM short to ground.
Poor ECM grounds. Refer to the ECM wiring
diagrams.
Check for improper installation of electrical options such
as light, cellular phones, etc. Check all wires from ECM
to the ignition control module for poor connections.
Check for an open diode across the A/C compressor
clutch and check for other open diodes (refer to wiring
diagrams in Electrical Diagnosis).
If problem has not been found, refer to ECM connector
symptom tables.
Check the “Broadcast Code” of the ECM, and
compare it with the latest Isuzu service bulletins and/
or Isuzu EEPROM reprogramming equipment to
determine if an update to the ECM's reprogrammable
memory has been released.
This identifies the contents of the reprogrammable
software and calibration contained in the ECM.
If the “Broadcast Code” is not the most current
available, it is advisable to reprogram the ECM's
EEPROM memory, which may either help identify a
hard-to find problem or may fix the problem.
The Service Programming System (SPS) will not allow
incorrect software programming or incorrect calibration
changes.
Page 1743 of 4264
4JA1/4JH1 ENGINE DRIVEABILITY AND EMISSIONS 6E–371
8 1. Using the Tech 2, ignition “On” and engine “Off”.
2. Monitor the “Neutral Switch” in the data display.
Does the Tech 2 indicate correct “Neutral Switch”
status depending on any shift positions?
If a problem is found, repair as necessary.
Was the problem found?—Verify repair Go to Step 9
9 1. Using the Tech 2, ignition “On” and engine “Run”.
2. Monitor the “A/C Information Switch” in the data
display.
Does the Tech 2 indicate correct “A/C Information
Switch” status depending on A/C switch position?
If a problem is found, repair as necessary.
Was the problem found?—Verify repair Go to Step 10
10 1. Using the Tech 2, display the ECT sensor and IAT
sensor value.
2. Check the displayed value.
Does the Tech 2 indicate correct temperature
depending on engine condition?
If a problem is found, repair as necessary.
Was the problem found?—Verify repair Go to Step 11
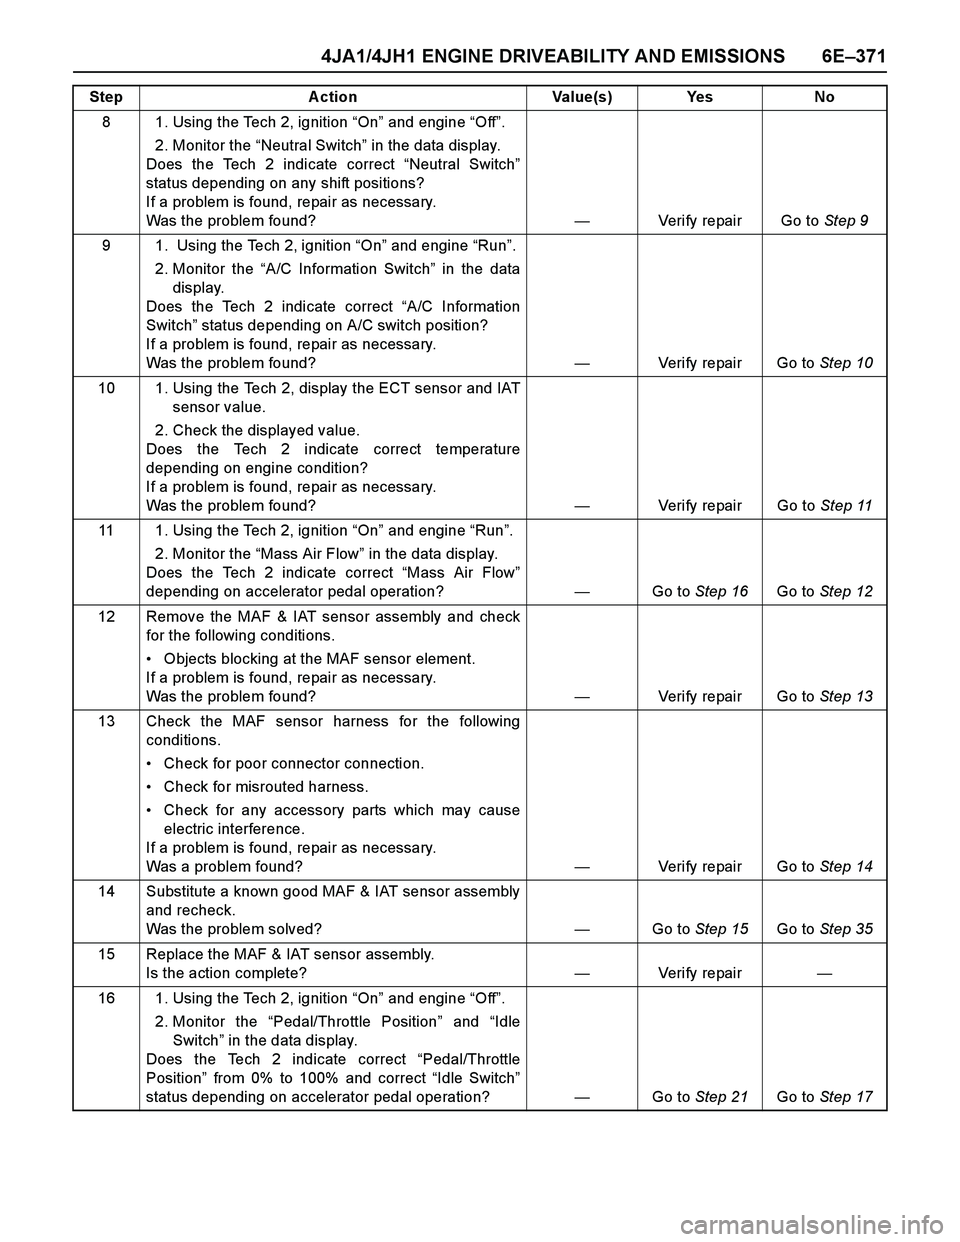
11 1. Using the Tech 2, ignition “On” and engine “Run”.
2. Monitor the “Mass Air Flow” in the data display.
Does the Tech 2 indicate correct “Mass Air Flow”
depending on accelerator pedal operation? —Go to Step 16Go to Step 12
12 Remove the MAF & IAT sensor assembly and check
for the following conditions.
Objects blocking at the MAF sensor element.
If a problem is found, repair as necessary.
Was the problem found?—Verify repair Go to Step 13
13 Check the MAF sensor harness for the following
conditions.
Check for poor connector connection.
Check for misrouted harness.
Check for any accessory parts which may cause
electric interference.
If a problem is found, repair as necessary.
Was a problem found? —Verify repair Go to Step 14
14 Substitute a known good MAF & IAT sensor assembly
and recheck.
Was the problem solved?—Go to Step 15Go to Step 35
15 Replace the MAF & IAT sensor assembly.
Is the action complete?—Veri fy repai r—
16 1. Using the Tech 2, ignition “On” and engine “Off”.
2. Monitor the “Pedal/Throttle Position” and “Idle
Switch” in the data display.
Does the Tech 2 indicate correct “Pedal/Throttle
Position” from 0% to 100% and correct “Idle Switch”
status depending on accelerator pedal operation?—Go to Step 21Go to Step 17 Step Action Value(s) Yes No