Page 468 of 4264
5C-42 BRAKES
REASSEMBLY
CALIPER ASSEMBLY
Disassembly Steps
1. Body ; caliper
2. Ring seal
3. Dust seal ; piston
4. Piston
5. Bleeder
6. Cap
Important Operations
1. Body ; Caliper
2. Ring Seal
Apply clean brake fluid to the ring seal and cylinder wall, then
insert the ring seal into the cylinder.
Ensure that the piston ring seal are not twisted in the caliper
bore grooves.
Page 469 of 4264

BRAKES 5C-43
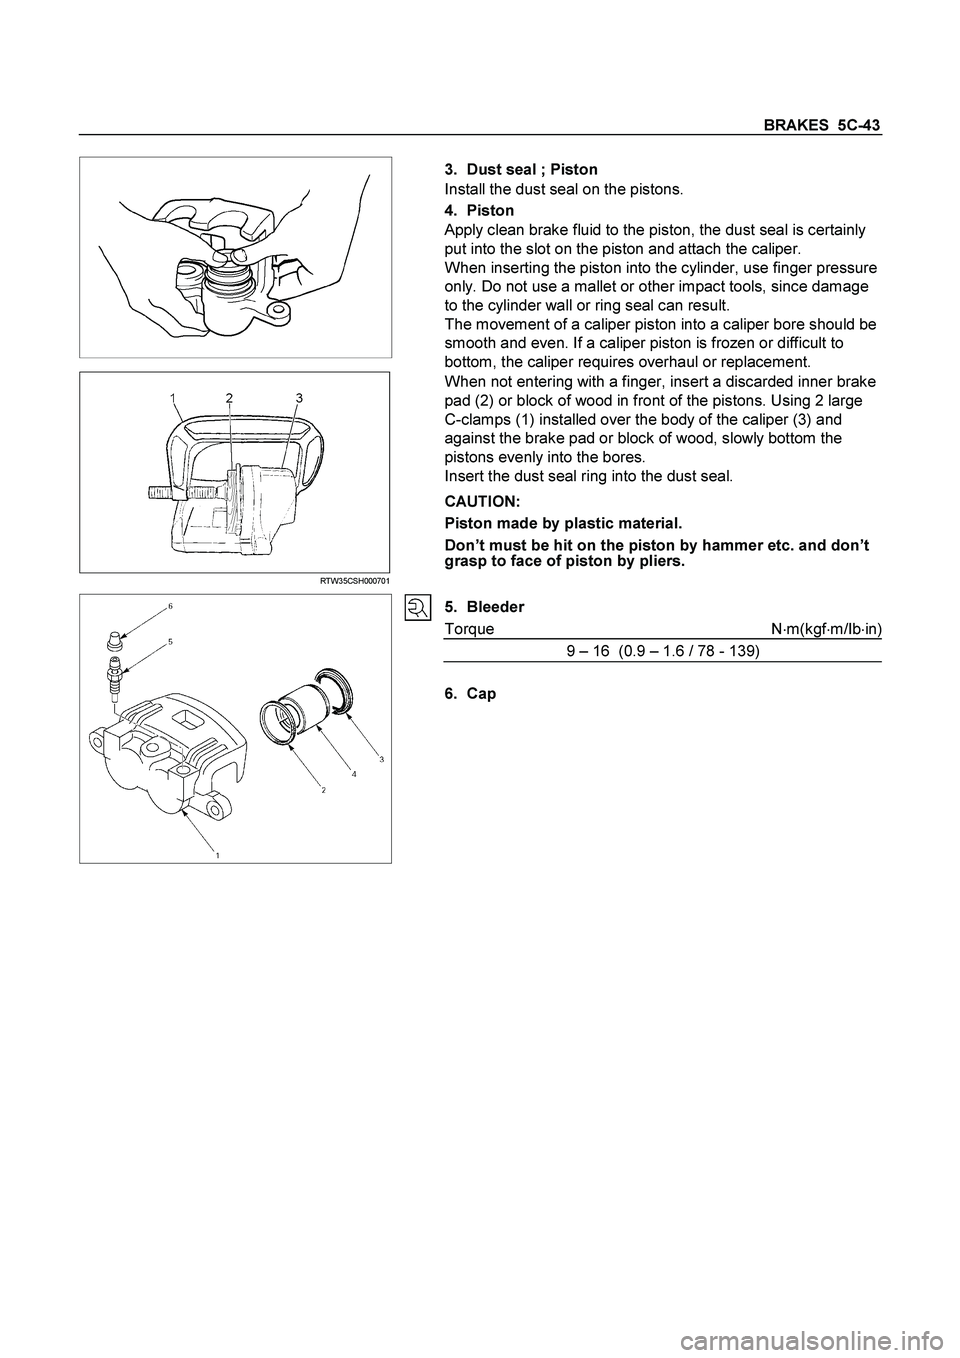
3. Dust seal ; Piston
Install the dust seal on the pistons.
4. Piston
Apply clean brake fluid to the piston, the dust seal is certainly
put into the slot on the piston and attach the caliper.
When inserting the piston into the cylinder, use finger pressure
only. Do not use a mallet or other impact tools, since damage
to the cylinder wall or ring seal can result.
The movement of a caliper piston into a caliper bore should be
smooth and even. If a caliper piston is frozen or difficult to
bottom, the caliper requires overhaul or replacement.
RTW35CSH000701
When not entering with a finger, insert a discarded inner brake
pad (2) or block of wood in front of the pistons. Using 2 large
C-clamps (1) installed over the body of the caliper (3) and
against the brake pad or block of wood, slowly bottom the
pistons evenly into the bores.
Insert the dust seal ring into the dust seal.
CAUTION:
Piston made by plastic material.
Don’t must be hit on the piston by hammer etc. and don’t
grasp to face of piston by pliers.
5. Bleeder
Torque N�m(kgf�m/Ib�in)
9 – 16 (0.9 – 1.6 / 78 - 139)
6. Cap
Page 472 of 4264
5C-46 BRAKES
Clean wheel Cylinder Parts
Always use clean brake fluid to clean wheel cylinder parts.
Note:
Do not use mineral-vase cleaning solvents such as
gasoline, kerosene, acetone, paint thinner, or carbon
tetrachloride.
Piston Cups
Inspect the piston cups for wear, distortion, fatigue, fatigue or
other abnormal conditions.
Measuring the Brake Drum
mm(in)
Standard Limit
Inside diameter 254 (10.000) 255.5 (10.059)
Run out 0.08 (0.003) 0.15 (0.006)
Inside diameter 295 (11.614) 296.5 (11.673)TFR (HIGH RIDE)
TFS Run out 0.08 (0.003) 0.15(0.006)
TFR
Page 474 of 4264
5C-48 BRAKES
Important Operations
Note :
�
Wash the disassembled parts in clean brake fluid.
�
Use compressed air to clean the ports.
�
Protect the disassembled part surfaces from dust and othe
r
foreign material contamination.
�
Before reassembly, check the part surfaces for dust and
other foreign material contamination.
�
Be sure to replace the designated parts with new ones.
4. Piston Assembly
Install new piston cups on each piston so that the flared end of
the cups are turned to the inboard side of the pistons.
Attach the return spring and the boot to the piston.
Be sure to use new piston cup and boot.
�
Apply brake fluid to the piston and the inner face of the
boots.
�
Note the direction of piston cup.
5. Bleeder ; Wheel Cylinder
Torque N�m(kgf�m/Ib�in)
6 - 8 (0.6 – 0.8 / 52 - 69)
9. Wheel Cylinder Assembly
10. Bolt ; Wheel cylinder
Torque N�
m(kgf�
m/Ib�
ft)
7 - 11 (0.7 – 1.1 / 61 - 95)
Page 478 of 4264
5C-52 BRAKES
MASTER CYLINDER
REMOVAL AND INSTALLATION
MASTER CYLINDER ASSEMBLY
This illustration is based on RHD model.
330R300008
Removal Steps
� 1. Brake line
2. Nut ; master cylinder to vacuum booster
3. Master cylinder assembly
Installation Steps
3. Master cylinder assembly
� 2. Nut ; master cylinder to vacuum booster
� 1. Brake line
Important Operation - Removal
1. Brake Line
Be very careful not to spill brake fluid on the painted surface.
Damage to the painted surface will result.
Important Operation - Installation
2. Nut ; Master Cylinder to Vacuum Booster
Torque N �m (kgf �m/lb �ft)
12 – 18 (1.2 – 1.8 / 9 – 13)
1. Brake Line
Torque N �
m (kgf �
m/lb �
ft)
13 – 19 (1.3 – 1.9 / 9 – 14)
Page 479 of 4264
BRAKES 5C-53
DISASSEMBLY
RTW35CMF000401
Disassembly Steps
1. Cap
2. Diaphragm
3. Bolt
4. Resever tank
5. Grommet
�
6. Snap ring
� 7. Stop pin
� 8. Primary piston
� 9. Secondary piston
10. Cylinder body
Note :
� Be sure to replace the designated with new ones.
� Wash the disassembled parts in clean brake fluid.
� Use compressed air to clean the ports.
� Do not allow dirt and dust to contaminate the disassembled
parts.
Page 480 of 4264
5C-54 BRAKES
Important Operations
When disassembling, inspecting or reassembling the master
cylinder assembly, take care not to bring the parts into contact
with mineral oil or dust. Wash the piston cups only with brake
fluid. Do not use gasoline or other mineral-base cleaning
solvents.
6. Ring ; Snap
Remove the snap ring from the cylinder body with pushing in
the primary and secondary pistons.
7. Stop Pin
Remove the stop pin from the cylinder body with pushing in the
primary and secondary pistons.
8. Piston Assembly ; Primary and Spring
9. Piston Assembly ; Secondary and Spring
Don’t remove the spring from the piston.
Page 481 of 4264
BRAKES 5C-55
INSPECTION AND REPAIR
Make necessary correction or parts replacement if wear damage or any other abnormal conditions are found
through inspection.
�
Cylinder inside face
�
Piston
�
Piston cap
�
Piston cap spacer
�
Return port
� Return spring
Visual Check
Inspect the following parts for wear, distortion, cuts, nicks,
corrosion, or other abnormal conditions.
Return Port
Check the return port for obstructions and if necessary, clean
with a tag wire.
Blow away foreign matter with compressed air.
Primary Piston
After reassembly, push in the primary piston to see that returns
smoothly.
Repeat the test two or three times to see that brake fluid is
forced out from the front and rear outlets.