Page 1169 of 4264

ENGINE MECHANICAL 6A – 29
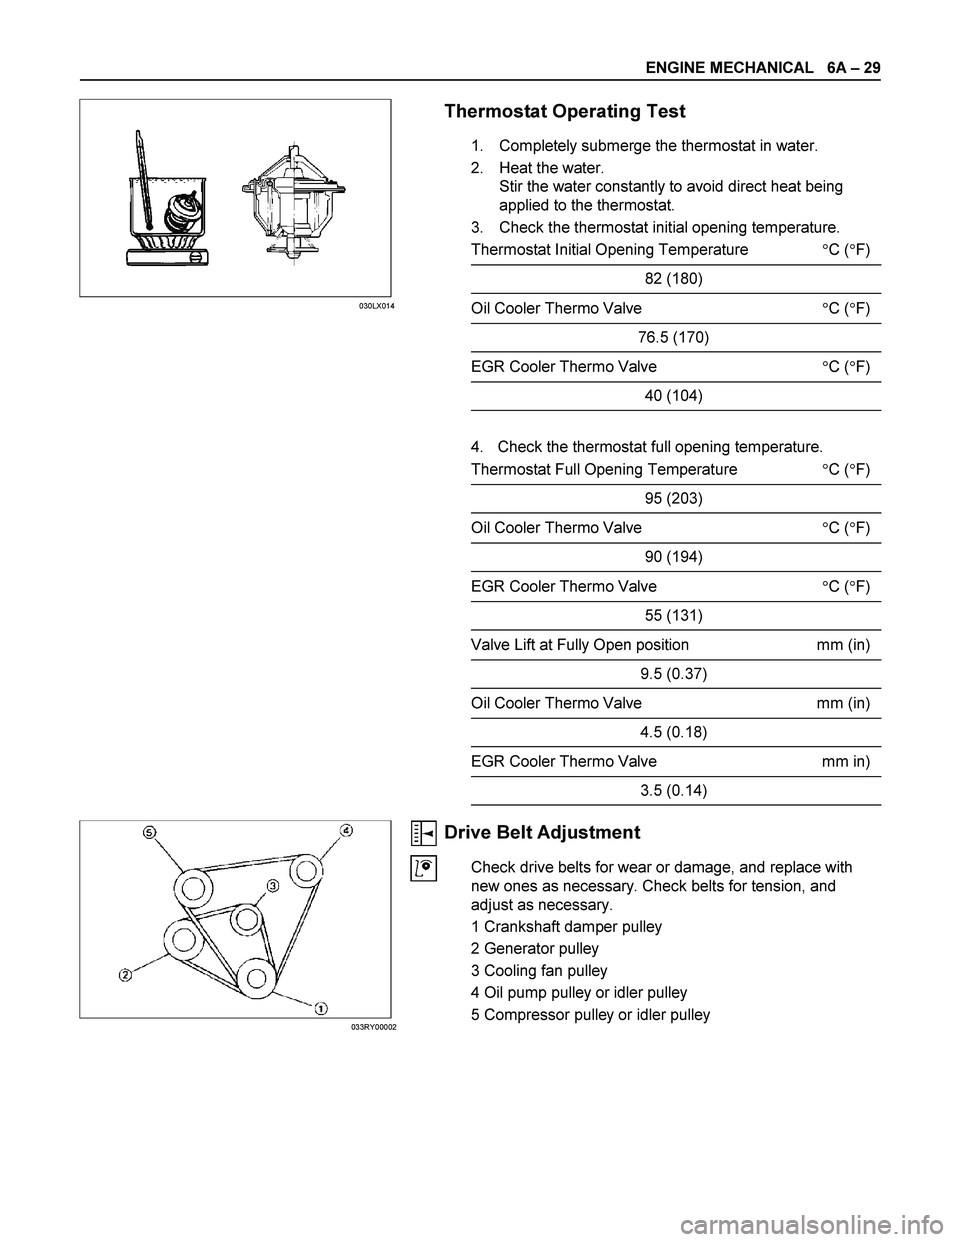
Thermostat Operating Test
1. Completely submerge the thermostat in water.
2. Heat the water.
Stir the water constantly to avoid direct heat being
applied to the thermostat.
3. Check the thermostat initial opening temperature.
Thermostat Initial Opening Temperature �C (�F)
82 (180)
Oil Cooler Thermo Valve �C (�F)
76.5 (170)
EGR Cooler Thermo Valve �C (�F)
40 (104)
4. Check the thermostat full opening temperature.
Thermostat Full Opening Temperature �C (�F)
95 (203)
Oil Cooler Thermo Valve �C (�F)
90 (194)
EGR Cooler Thermo Valve �C (�F)
55 (131)
Valve Lift at Fully Open position mm (in)
9.5 (0.37)
Oil Cooler Thermo Valve mm (in)
4.5 (0.18)
EGR Cooler Thermo Valve mm in)
3.5 (0.14)
Drive Belt Adjustment
Check drive belts for wear or damage, and replace with
new ones as necessary. Check belts for tension, and
adjust as necessary.
1 Crankshaft damper pulley
2 Generator pulley
3 Cooling fan pulley
4 Oil pump pulley or idler pulley
5 Compressor pulley or idler pulley
030LX014
033RY00002
Page 1182 of 4264
6A – 42 ENGINE MECHANICAL
ENGINE REPAIR KIT
RTW36ALF000601
Removal Steps
1. Cylinder head gasket
2. Head cover gasket
3. Head cover cap nut gasket
4. Drain cock gasket
5. Crankshaft rear oil seal
6. Gear case gasket
7. Oil pan drain plug gasket
8. Oil pan gasket
9. Oil filter gasket
10. Joint bolt gasket 11. Vacuum pump gasket
12. Water pump O-ring
13. Water outlet pipe gasket
14. Intake pipe gasket
15. Thermostat housing gasket
16. Intake manifold gasket
17. Exhaust manifold gasket
18. Nozzle holder O-ring
19. Nozzle holder gasket
20. Crankshaft front oil seal
NOTE
Discard all O-rings, gaskets, and seals removed at disassembly and replace them with new ones. Reuse of
these parts will result in oil, water, and gas leakage.
Page 1183 of 4264
ENGINE MECHANICAL 6A – 43
ENGINE OVERHAUL
REMOVAL
EXTERNAL PARTS
RTW36AMF000401
Removal Steps
1. Clutch Assembly or Flex Plate
2. Intake Pipe and Throttle Body
3-1. EGR Pipe
3-2. EGR cooler (EURO III model only)
4. EGR Valve
5. Oil Level Gauge
6. Fuel Filter Assembly (Except EURO III)
7. Fuel Filter Bracket (Except EURO III)
8. Fuel Injection Pipe with Clip
9. Power Steering Oil Pump Bracket
10. Intake Manifold
11. Engine Mounting Bracket and Foot
12. Injection Pump Cover
13. Injection Pump
14. Starter Motor
15. Oil Pressure Warning Switch
16. Fuel Leak Off Pipe
17. Oil Cooler Water Pipe
18. Cooling Fan Pulley
19. Heat Protector
20. Catalytic Converter
21. Turbocharger
22. Compressor Bracket
23. Vacuum Pump Oil Return Hose
24. Generator and Adjusting Plate
25. Water Inlet Pipe
26. Generator Bracket
27. Oil Cooler with Oil Filter
28. Exhaust Manifold
Page 1186 of 4264
6A – 46 ENGINE MECHANICAL
13. Injection Pump
Rrefer to secton 6C-19 (Injection Iump)
14. Starter Motor
15. Oil Pressure Warning Switch
16. Fuel Leak Off Pipe
17. Oil Cooler Water Pipe
18. Cooling Fan Pulley
19. Heat Protector
20. Catalytic Converter
21. Turbocharger
1) Disconnect the water hose between thermostat
housing cover and turbocharger.
2) Disconnect the water hose between water inlet pipe
and turbocharger.
3) Remove the oil feed pipe.
4) Remove the oil return pipe.
5) Remove the turbocharger and the gasket.
NOTE:
Plug the turbocharger body oil ports and water ports after
removing the turbocharger assembly to prevent the entry
of foreign material.
22. Compressor Bracket
23. Vacuum Pump Oil Return Hose
24. Generator and Adjusting Plate
25. Water Inlet Pipe
26. Generator Bracket
27. Oil Cooler with Oil Filter
28. Exhaust Manifold
027R100007
037RY00001
Page 1188 of 4264
6A – 48 ENGINE MECHANICAL
RTW46ALF000101
Disassembly Steps-2
9. Crankshaft damper pulley
10. Timing gear case cove
11. Water pump
12. Idle gear "B" and shaft
13. Idle gear "A"
14. Idle gear shaft
15. Crankshaft timing gear
16. Injection pump
Page 1191 of 4264

ENGINE MECHANICAL 6A – 51
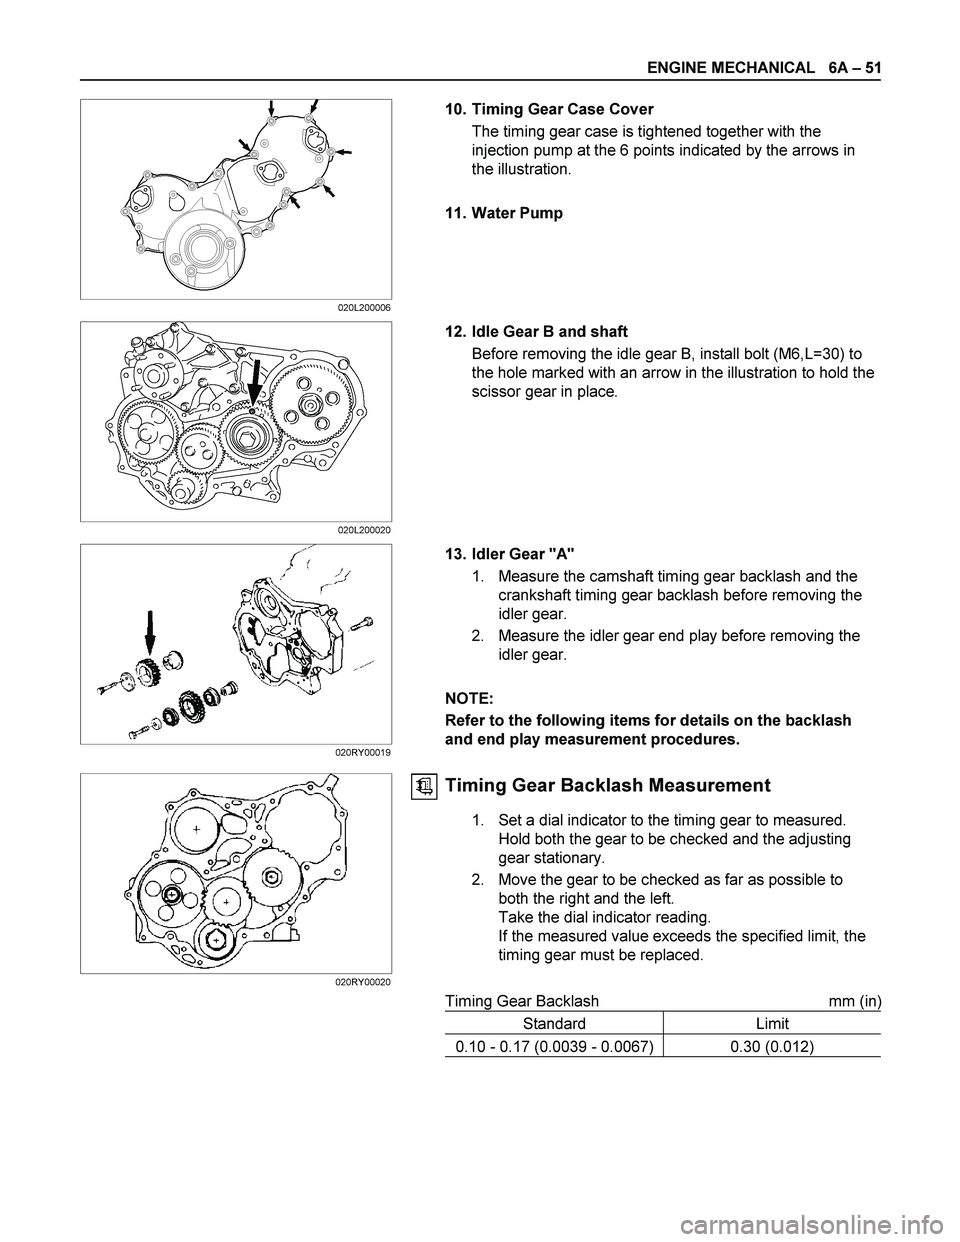
10. Timing Gear Case Cover
The timing gear case is tightened together with the
injection pump at the 6 points indicated by the arrows in
the illustration.
11. Water Pump
12. Idle Gear B and shaft
Before removing the idle gear B, install bolt (M6,L=30) to
the hole marked with an arrow in the illustration to hold the
scissor gear in place.
13. Idler Gear "A"
1. Measure the camshaft timing gear backlash and the
crankshaft timing gear backlash before removing the
idler gear.
2. Measure the idler gear end play before removing the
idler gear.
NOTE:
Refer to the following items for details on the backlash
and end play measurement procedures.
Timing Gear Backlash Measurement
1. Set a dial indicator to the timing gear to measured.
Hold both the gear to be checked and the adjusting
gear stationary.
2. Move the gear to be checked as far as possible to
both the right and the left.
Take the dial indicator reading.
If the measured value exceeds the specified limit, the
timing gear must be replaced.
Timing Gear Backlash mm (in)
Standard Limit
0.10 - 0.17 (0.0039 - 0.0067) 0.30 (0.012)
020L200006
020L200020
020RY00019
020RY00020
Page 1242 of 4264
6A – 102 ENGINE MECHANICAL
RTW46ALF000501
Reassembly Steps-2
19.
Crankshaft timing gear 23.
Injection pump
20.
Idler gear shaft 24.
Water pump
21.
Idler gear "A" 25.
Timing gear case cover
22.
Idler gear "B" and shaft 26.
Crankshaft damper pulley
Page 1255 of 4264

ENGINE MECHANICAL 6A – 115
RTW46ASH002201
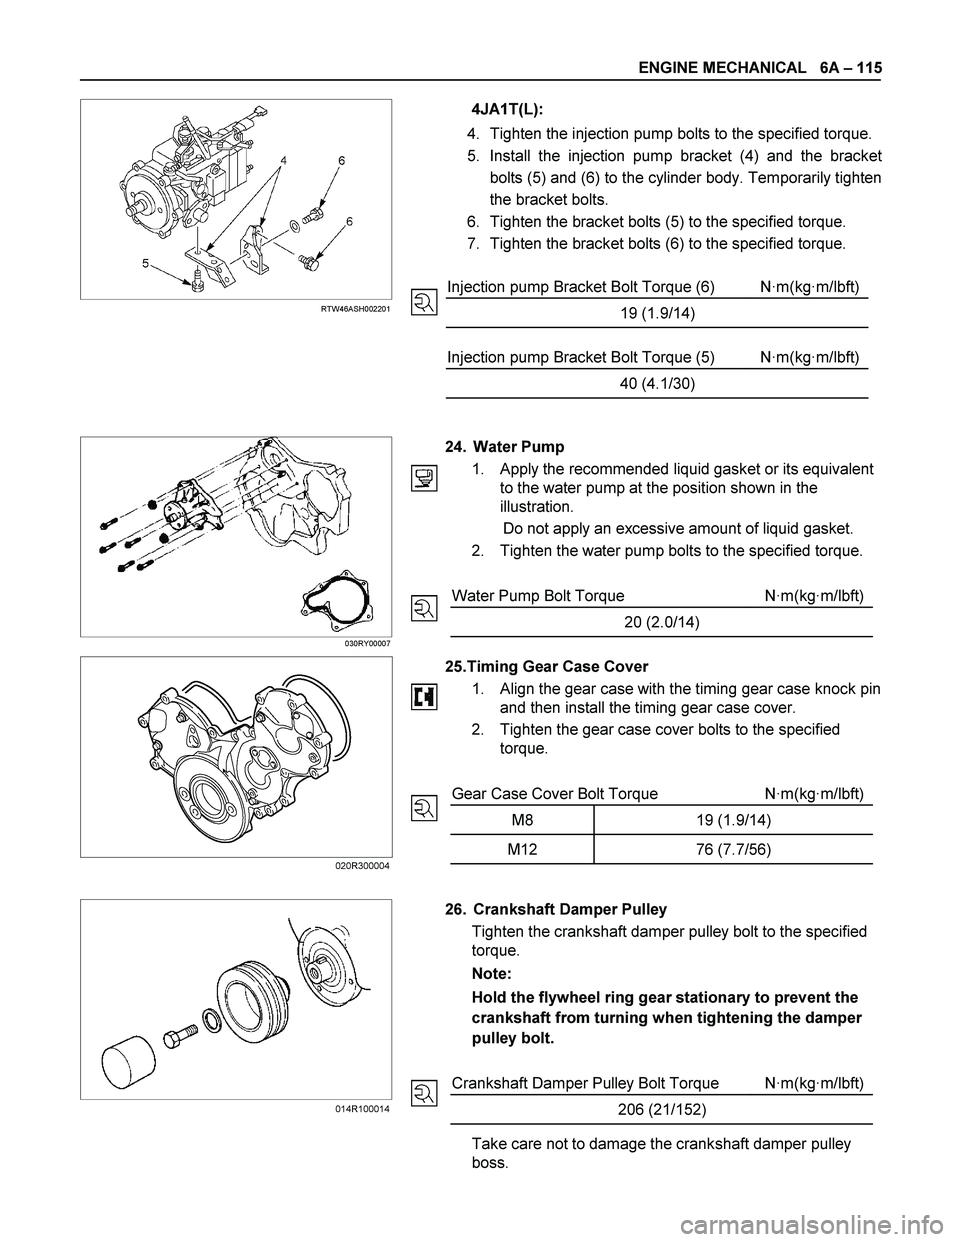
4JA1T(L):
4. Tighten the injection pump bolts to the specified torque.
5. Install the injection pump bracket (4) and the bracke
t
bolts (5) and (6) to the cylinder body. Temporarily tighten
the bracket bolts.
6. Tighten the bracket bolts (5) to the specified torque.
7. Tighten the bracket bolts (6) to the specified torque.
Injection pump Bracket Bolt Torque (6) N·m(kg·m/lbft)
19 (1.9/14)
Injection pump Bracket Bolt Torque (5) N·m(kg·m/lbft)
40 (4.1/30)
030RY00007
24. Water Pump
1. Apply the recommended liquid gasket or its equivalent
to the water pump at the position shown in the
illustration.
Do not apply an excessive amount of liquid gasket.
2. Tighten the water pump bolts to the specified torque.
Water Pump Bolt Torque N·m(kg·m/lbft)
20 (2.0/14)
25.Timing Gear Case Cover
1.
Align the gear case with the timing gear case knock pin
and then install the timing gear case cover.
2. Tighten the gear case cover bolts to the specified
torque.
Gear Case Cover Bolt Torque N·m(kg·m/lbft)
M8 19 (1.9/14)
M12 76 (7.7/56)
26. Crankshaft Damper Pulley
Tighten the crankshaft damper pulley bolt to the specified
torque.
Note:
Hold the flywheel ring gear stationary to prevent the
crankshaft from turning when tightening the damper
pulley bolt.
Crankshaft Damper Pulley Bolt Torque N·m(kg·m/lbft)
206 (21/152)
Take care not to damage the crankshaft damper pulley
boss.
014R100014 020R300004