Page 1142 of 3371

WARNING LAMPS
DI-39
C
D
E
F
G
H
I
J
L
MA
B
DI
Revision: August 20072004 QX56
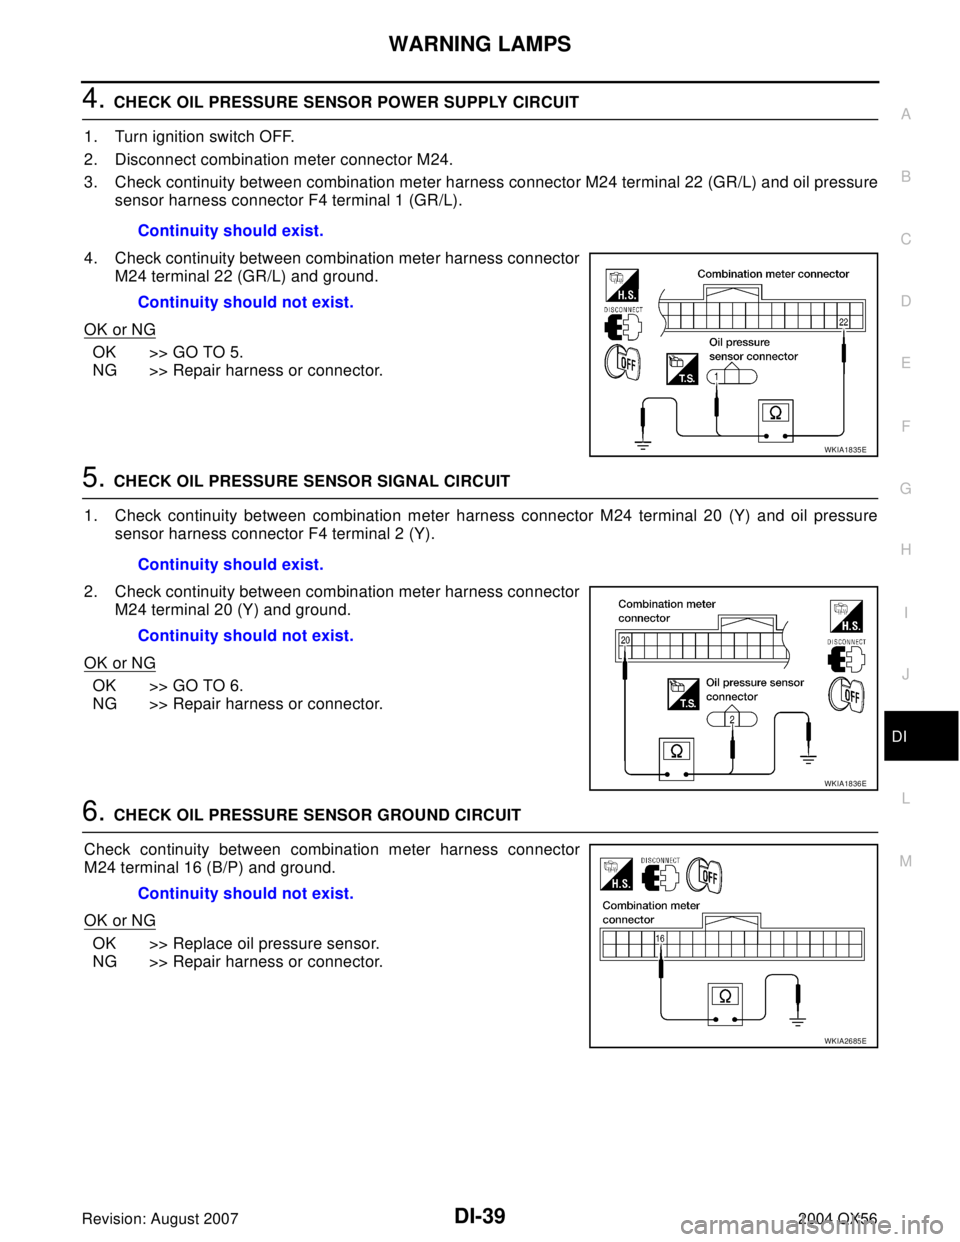
4. CHECK OIL PRESSURE SENSOR POWER SUPPLY CIRCUIT
1. Turn ignition switch OFF.
2. Disconnect combination meter connector M24.
3. Check continuity between combination meter harness connector M24 terminal 22 (GR/L) and oil pressure
sensor harness connector F4 terminal 1 (GR/L).
4. Check continuity between combination meter harness connector
M24 terminal 22 (GR/L) and ground.
OK or NG
OK >> GO TO 5.
NG >> Repair harness or connector.
5. CHECK OIL PRESSURE SENSOR SIGNAL CIRCUIT
1. Check continuity between combination meter harness connector M24 terminal 20 (Y) and oil pressure
sensor harness connector F4 terminal 2 (Y).
2. Check continuity between combination meter harness connector
M24 terminal 20 (Y) and ground.
OK or NG
OK >> GO TO 6.
NG >> Repair harness or connector.
6. CHECK OIL PRESSURE SENSOR GROUND CIRCUIT
Check continuity between combination meter harness connector
M24 terminal 16 (B/P) and ground.
OK or NG
OK >> Replace oil pressure sensor.
NG >> Repair harness or connector.Continuity should exist.
Continuity should not exist.
WKIA1835E
Continuity should exist.
Continuity should not exist.
WKIA1836E
Continuity should not exist.
WKIA2685E
Page 1143 of 3371
DI-40
WARNING LAMPS
Revision: August 20072004 QX56
Oil Pressure Warning Lamp Does Not Turn Off (Oil Pressure Is Normal)EKS007EB
NOTE:
For oil pressure inspection, refer to LU-7, "
OIL PRESSURE CHECK" .
1. CHECK ENGINE OIL PRESSURE GAUGE OPERATION
Observe operation of engine oil pressure gauge.
Does engine oil pressure gauge function properly?
YES >> Replace the combination meter. Refer to DI-25, "Removal and Installation of Combination Meter"
.
NO >> Go to DI-19, "
Engine Oil Pressure Signal Inspection" .
Page 1145 of 3371
DI-42
A/T INDICATOR
Revision: August 20072004 QX56
A/T Indicator Does Not IlluminateEKS007ED
1. CHECK SELF-DIAGNOSIS OF COMBINATION METER
Perform combination meter self-diagnosis. Refer to DI-13, "
SELF-DIAGNOSIS FUNCTION" .
OK or NG
OK >> GO TO 2.
NG >> Replace the combination meter. Refer to DI-25, "
Removal and Installation of Combination Meter"
.
2. CHECK TCM
Perform self-diagnosis of TCM. Refer to AT - 9 3 , "
SELF-DIAGNOSTIC RESULT MODE" .
OK or NG
OK >> Replace the combination meter. Refer to DI-25, "Removal and Installation of Combination Meter"
.
NG >> Refer to DI-13, "
SELF-DIAGNOSIS FUNCTION" .
Page 1147 of 3371

DI-44
WARNING CHIME
Revision: August 20072004 QX56
System DescriptionEKS007EF
FUNCTION
Power is supplied at all times
�through 50A fusible link (letter f , located in the fuse and fusible link box)
�to BCM terminal 70, and
�through 10A fuse [No. 19, located in the fuse block (J/B)]
�to key switch and key lock solenoid terminal 3.
With ignition switch in ON or START position, power is supplied
�through 10A fuse [No. 59, located in the fuse and relay box)
�to BCM terminal 38.
Ground is supplied
�to BCM terminal 67
�through body grounds M57, M61, and M79.
NOTE:
When ignition key warning chime, light warning chime, and seat belt warning chime are required at the same
time, the priorities for each chime are the following.
1. Light warning chime
2. Ignition key warning chime
3. Seat belt warning chime
IGNITION KEY WARNING CHIME
With the key inserted in the ignition switch, the ignition switch in OFF position, and the driver's door open, the
warning chime will sound.
Power is supplied
�through key switch and key lock solenoid terminal 4
�to BCM terminal 37.
Ground is supplied
�to BCM terminal 47
�through front door switch LH terminal 2.
Front door switch LH is case grounded.
BCM detects key inserted into the ignition switch, and sends key warning signal to combination meter via CAN
communication lines. When the combination meter receives key warning signal, it sounds warning chime.
LIGHT WARNING CHIME
With the key removed from the ignition switch, the driver's door open, and the lighting switch (part of the com-
bination switch) in 1st or 2nd position, the warning chime will sound. [Except when headlamp battery saver
control operates (5 minutes after ignition switch is turned to OFF or ACC position) and headlamps do not illu-
minate.]
Signal is supplied
�from combination switch (lighting switch) terminals 1, 2, 3, 4, 5, 6, 7, 8, 9 and 10
�to BCM terminals 2, 3, 4, 5, 6, 32, 33, 34, 35 and 36.
NOTE:
BCM detected lighting switch in 1st or 2nd position. Refer to BCS-3, "
COMBINATION SWITCH READING
FUNCTION" .
Ground is supplied
�to BCM terminal 47
�through front door switch LH terminal 2.
Front door switch LH is case grounded.
BCM detects headlamps are illuminated, and sends light warning signal to combination meter CAN communi-
cation lines. When the combination meter receives light warning signal, it sounds warning chime.
SEAT BELT WARNING CHIME
When the ignition switch is turned ON with the seat belt unfastened (seat belt buckle switch LH unfastened),
warning chime will sound for approximately 6 seconds.
Page 1148 of 3371
WARNING CHIME
DI-45
C
D
E
F
G
H
I
J
L
MA
B
DI
Revision: August 20072004 QX56
Ground is supplied
�to combination meter terminal 27
�through seat belt buckle pre-tensioner assembly LH (seat belt buckle switch) terminal 1.
Seat belt buckle pre-tensioner assembly LH (seat belt buckle switch) terminal 2 is grounded through body
grounds B7 and B19.
The combination meter sends seat belt buckle switch LH unfastened signal to BCM via CAN communication
line.
BCM receives seat belt buckle switch LH unfastened signal from combination meter via CAN communication
line, and sends seat belt warning signal to the combination meter via CAN communication line. When the
combination meter receives the seat belt warning signal, it sounds the warning chime. The BCM controls the
(6 second) duration of the seat belt warning chime.
CAN Communication System DescriptionEKS007EG
Refer to LAN-5, "CAN COMMUNICATION" .
Page 1151 of 3371
DI-48
WARNING CHIME
Revision: August 20072004 QX56
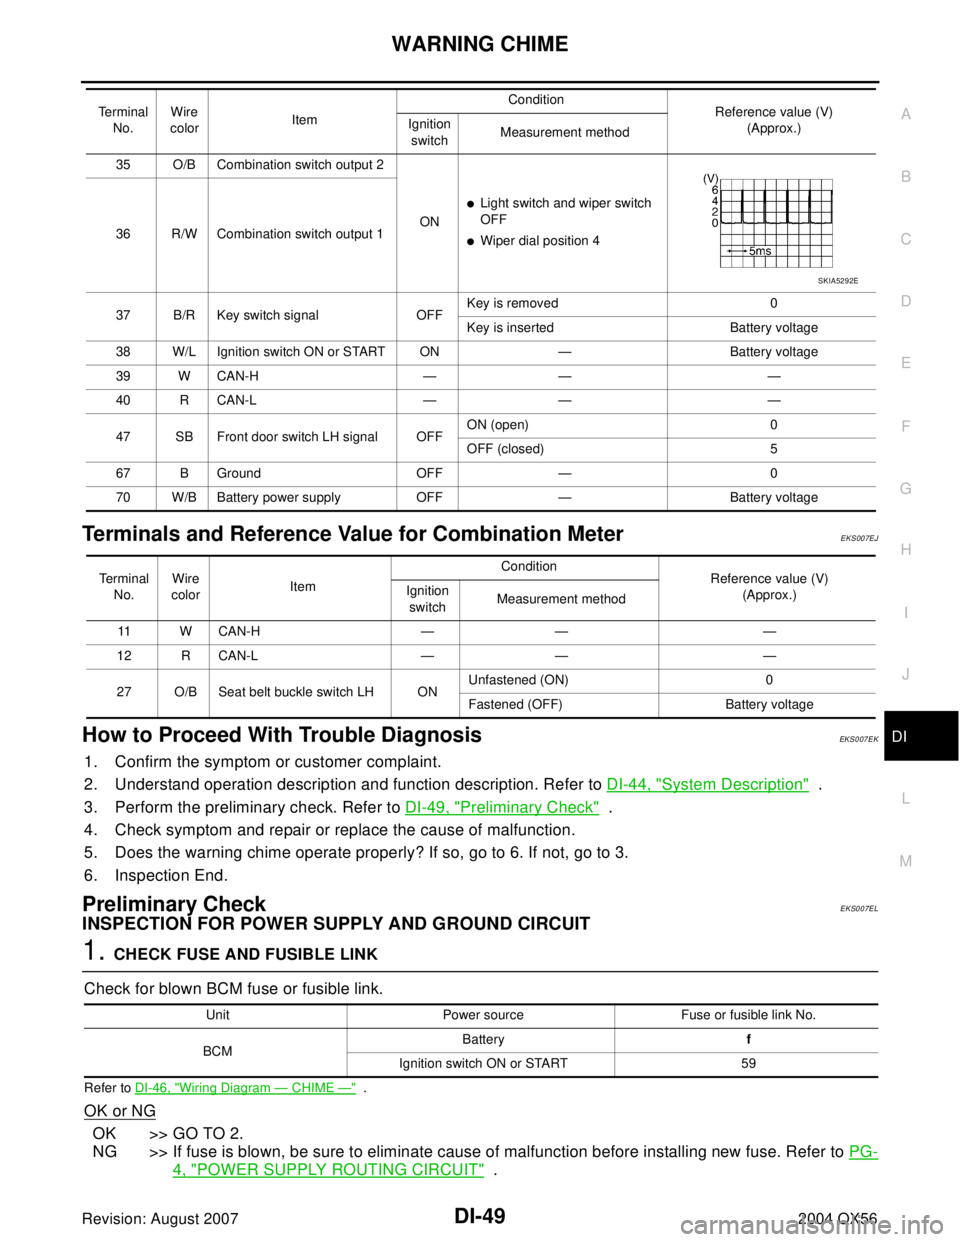
Terminals and Reference Value for BCMEKS007EI
Terminal
No.Wire
colorItem Condition
Reference value (V)
(Approx.) Ignition
switchMeasurement method
2 SB Combination switch input 5 ON
�Light switch and wiper switch
OFF
�Wiper dial position 4
3 G/Y Combination switch input 4 ON
�Light switch and wiper switch
OFF
�Wiper dial position 4
4 Y Combination switch input 3 ON
�Light switch and wiper switch
OFF
�Wiper dial position 4
5 G/B Combination switch input 2
ON
�Light switch and wiper switch
OFF
�Wiper dial position 4 6 V Combination switch input 1
32 R/G Combination switch output 5 ON
�Light switch and wiper switch
OFF
�Wiper dial position 4
33 R/Y Combination switch output 4 ON
�Light switch and wiper switch
OFF
�Wiper dial position 4
34 L Combination switch output 3 ON
�Light switch and wiper switch
OFF
�Wiper dial position 4
SKIA5291E
SKIA5292E
SKIA5291E
SKIA5292E
SKIA5291E
SKIA5292E
SKIA5291E
Page 1152 of 3371

WARNING CHIME
DI-49
C
D
E
F
G
H
I
J
L
MA
B
DI
Revision: August 20072004 QX56
Terminals and Reference Value for Combination MeterEKS007EJ
How to Proceed With Trouble DiagnosisEKS007EK
1. Confirm the symptom or customer complaint.
2. Understand operation description and function description. Refer to DI-44, "
System Description" .
3. Perform the preliminary check. Refer to DI-49, "
Preliminary Check" .
4. Check symptom and repair or replace the cause of malfunction.
5. Does the warning chime operate properly? If so, go to 6. If not, go to 3.
6. Inspection End.
Preliminary CheckEKS007EL
INSPECTION FOR POWER SUPPLY AND GROUND CIRCUIT
1. CHECK FUSE AND FUSIBLE LINK
Check for blown BCM fuse or fusible link.
Refer to DI-46, "Wiring Diagram — CHIME —" .
OK or NG
OK >> GO TO 2.
NG >> If fuse is blown, be sure to eliminate cause of malfunction before installing new fuse. Refer to PG-
4, "POWER SUPPLY ROUTING CIRCUIT" .
35 O/B Combination switch output 2
ON
�Light switch and wiper switch
OFF
�Wiper dial position 4 36 R/W Combination switch output 1
37 B/R Key switch signal OFFKey is removed 0
Key is inserted Battery voltage
38 W/L Ignition switch ON or START ON — Battery voltage
39 W CAN-H — — —
40 R CAN-L — — —
47 SB Front door switch LH signal OFFON (open) 0
OFF (closed) 5
67 B Ground OFF — 0
70 W/B Battery power supply OFF — Battery voltage Te r m i n a l
No.Wire
colorItem Condition
Reference value (V)
(Approx.) Ignition
switchMeasurement method
SKIA5292E
Te r m i n a l
No.Wire
colorItem Condition
Reference value (V)
(Approx.) Ignition
switchMeasurement method
11 W C A N - H — — —
12 R CAN-L — — —
27 O/B Seat belt buckle switch LH ONUnfastened (ON) 0
Fastened (OFF) Battery voltage
Unit Power source Fuse or fusible link No.
BCMBatteryf
Ignition switch ON or START 59
Page 1156 of 3371

WARNING CHIME
DI-53
C
D
E
F
G
H
I
J
L
MA
B
DI
Revision: August 20072004 QX56
Display Item List
All Warning Chimes Do Not OperateEKS007EN
1. CHECK BCM CHIME OPERATION
Select “BUZZER” on CONSULT-II, and perform “LIGHT WARN
ALM”, "IGN KEY WARN ALM", OR "SEAT BELT WARN" active test.
Does chime sound?
YES >> Replace the BCM. Refer to BCS-19, "Removal and
Installation of BCM" .
NO >> Replace the combination meter. Refer to DI-25,
"Removal and Installation of Combination Meter" .
Key Warning Chime and Light Warning Chime Do Not Operate (Seat Belt Warn-
ing Chime Does Operate)
EKS007EO
1. CHECK BCM INPUT SIGNAL
With CONSULT-II
1. Select "BCM" on CONSULT-II.
2. With "DATA MONITOR" of "BUZZER", confirm "DOOR SW-DR"
changes with the status of front door LH.
Without CONSULT-II
Check voltage between BCM harness connector M19 terminal 47
(SB) and ground.
OK or NG
OK >> Replace the BCM. Refer to BCS-19, "Removal and
Installation of BCM" .
NG >> GO TO 2.
Monitored Item CONSULT-II display Description
CAN communication CAN communication [U1000] Malfunction is detected in CAN communication.
CAN communication system CAN communication system 1 to 6 [U1000] Malfunction is detected in CAN system.
SKIA6331E
When front door LH is
opened: DOOR SW-DR ON
When front door LH is
closed: DOOR SW-DR OFF
LKIA0335E
When front door LH is
opened: Approx. 0V
When front door LH is
closed: Approx. 5V
WKIA1515E