Page 957 of 4449
BL-150
DOOR
Revision: 2004 November 2004 FX35/FX45
3. Remove the door-side hinge mounting nuts, and remove the
door assembly.
INSTALLATION
Install in the reverse order of removal.
Removal and Installation of Rear DoorAIS004NX
CAUTION:
�When removing and installing the rear door assembly, support the door with a jack and cloth to
protect the door and body.
�When removing and installing rear door assembly, be sure to carry out the fitting adjustment Refer
to BL-148, "
Fitting Adjustment" .
�Check the hinge rotating part for poor lubrication. If necessary, apply “body grease”.
�After installing, apply touch-up paint (the body color) onto the head of the hinge mounting nuts.
�Operate with two workers, because of its heavy weight.
�After installing, check operation.
REMOVAL
1. Grommet is pulled out, and the Rear door harness connector is
detached.
2. Remove the mounting bolts of the check link on the vehicle.
PIIA6021E
PIIA2787E
PIIA6022E
Page 958 of 4449
DOOR
BL-151
C
D
E
F
G
H
J
K
L
MA
B
BL
Revision: 2004 November 2004 FX35/FX45
3. Remove the door-side hinge mounting nuts, and remove the
door assembly.
INSTALLATION
Install in the reverse order of removal.
Removal and Installation of Door Weathers tripAIS004NY
REMOVAL
1. Remove the mounting bolts of the check link on the vehicle. Refer toBL-149, "Removal and Installation of
Front Door" orBL-150, "Removal and Installation of Rear Door" .
2. Remove the weatherstrip clips and remove weatherstrip.
INSTALLATION
Install in the reverse order of removal.
PIIA6023E
1. Weatherstrip 2. Clip
PIIA6024E
Page 959 of 4449

BL-152
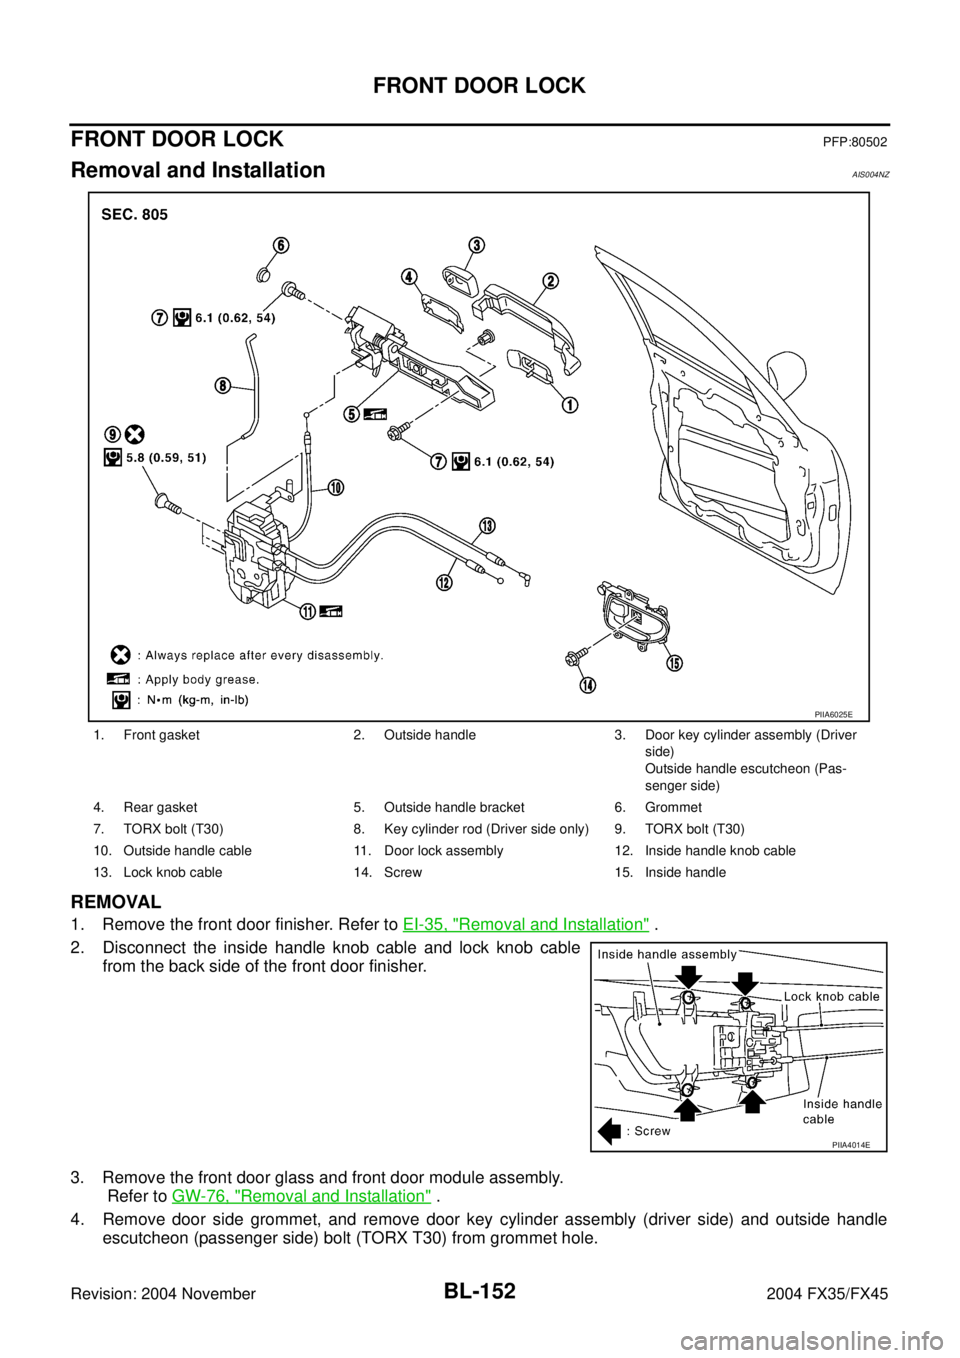
FRONT DOOR LOCK
Revision: 2004 November 2004 FX35/FX45
FRONT DOOR LOCKPFP:80502
Removal and InstallationAIS004NZ
REMOVAL
1. Remove the front door finisher. Refer to EI-35, "Removal and Installation" .
2. Disconnect the inside handle knob cable and lock knob cable
from the back side of the front door finisher.
3. Remove the front door glass and front door module assembly.
Refer to GW-76, "
Removal and Installation" .
4. Remove door side grommet, and remove door key cylinder assembly (driver side) and outside handle
escutcheon (passenger side) bolt (TORX T30) from grommet hole.
1. Front gasket 2. Outside handle 3. Door key cylinder assembly (Driver
side)
Outside handle escutcheon (Pas-
senger side)
4. Rear gasket 5. Outside handle bracket 6. Grommet
7. TORX bolt (T30) 8. Key cylinder rod (Driver side only) 9. TORX bolt (T30)
10. Outside handle cable 11. Door lock assembly 12. Inside handle knob cable
13. Lock knob cable 14. Screw 15. Inside handle
PIIA6025E
PIIA4014E
Page 960 of 4449
FRONT DOOR LOCK
BL-153
C
D
E
F
G
H
J
K
L
MA
B
BL
Revision: 2004 November 2004 FX35/FX45
CAUTION:
Do not forcibly remove the TORX bolt (T30).
5. Reach to separate the key cylinder rod connection (on the handle).
6. While pulling the outside handle, remove door key cylinder
assembly (driver side) and outside handle escutcheon (passen-
ger side).
7. Disconnect the door request switch connector. (intelligent key only)
8. While pulling outside handle, slide toward rear of vehicle to
remove outside handle.
9. Remove the front gasket and rear gasket.
PIIA3553E
PIIA3554E
PIIA3555E
PIIA3557E
Page 963 of 4449
BL-156
REAR DOOR LOCK
Revision: 2004 November 2004 FX35/FX45
REAR DOOR LOCKPFP:82502
Removal and InstallationAIS004O2
REMOVAL
1. Remove the rear door finisher. Refer to EI-35, "Removal and Installation" .
2. Disconnect the inside handle knob cable and lock knob cable
from the back side of the front door finisher.
3. Remove the rear door sealing, glass and corner piece assembly. Refer to GW-80, "
Removal and Installa-
tion" .
4. Remove door side grommet, and remove outside handle escutcheon bolt (TORX T30) from grommet
hole.
1. Front gasket 2. Outside handle 3. Outside handle escutcheon
4. Rear gasket 5. Outside handle bracket 6. Grommet
7. TORX bolt (T30) 8. Outside handle cable 9. TORX bolts (T30)
10. Door lock assembly 11. Inside handle knob cable 12. Lock knob cable
13. Screw 14. Inside handle
PIIA6027E
PIIA4014E
Page 964 of 4449
REAR DOOR LOCK
BL-157
C
D
E
F
G
H
J
K
L
MA
B
BL
Revision: 2004 November 2004 FX35/FX45
CAUTION:
Do not forcibly remove the TORX bolt (T30).
5. While pulling the outside handle, remove outside handle
escutcheon.
6. While pulling outside handle, slide toward rear of vehicle to
remove outside handle.
7. Remove the front gasket and rear gasket.
PIIA3553E
PIIA6344E
PIIA3555E
PIIA3557E
Page 965 of 4449
BL-158
REAR DOOR LOCK
Revision: 2004 November 2004 FX35/FX45
8. Remove the TORX bolt (T30), and remove the outside handle
bracket.
9. While pulling outside handle, slide toward front of vehicle to
remove outside handle bracket.
10. Reach to separate outside handle cable connection.
11. Remove the TORX bolts (T30) of door lock assembly.
12. Disconnect the door lock actuator connector and remove door lock assembly.
INSTALLATION
Install in the reverse order of removal.
CAUTION:
To install each rod, be sure to rotate the rod holder until a click is felt.
PIIA7117E
PIIA3558E
PIIA5059E
PIIA1090E
Page 966 of 4449
BACK DOOR
BL-159
C
D
E
F
G
H
J
K
L
MA
B
BL
Revision: 2004 November 2004 FX35/FX45
BACK DOORPFP:90100
Fitting AdjustmentAIS004O4
VERTICAL/LATERAL CLEARANCE ADJUSTMENT
1. With the striker released, loosen the bumper rubber lock nuts.
2. Close the back door lightly and adjust the surface height by rotating the bumper rubber and, then open the
back door to finally tighten the back door lock mounting bolts and bumper rubber lock nuts to the specified
torque.
Back Door AssemblyAIS004O5
REMOVAL
1. Remove roof rear garnish assembly. Refer to EI-44, "Removal and Installation" .
2. Disconnect the back door harness connector and AV antenna
feeder.
3. Washer hose is separated in the connection part.
4. Support the back door lock with a proper material to prevent it
from falling.
WARNING:
Body injury may occur if no supporting rod is holding the
back door open when removing the damper stay.
1. Bumper rubber 2. Back door striker 3. Screw
PIIB0208E
PIIA6028E
PIIA6061E