Page 2785 of 4449
![INFINITI FX35 2004 Service Manual EM-60
[VQ35DE]
FRONT TIMING CHAIN CASE
Revision: 2004 November 2004 FX35/FX45
�Apply liquid gasket to top surface of oil pan (upper) as shown
in the figure with tube presser [SST: WS39930000 ( – )].](/manual-img/42/57021/w960_57021-2784.png "INFINITI FX35 2004 Service Manual EM-60
[VQ35DE]
FRONT TIMING CHAIN CASE
Revision: 2004 November 2004 FX35/FX45
�Apply liquid gasket to top surface of oil pan (upper) as shown
in the figure with tube presser [SST: WS39930000 ( – )].")
EM-60
[VQ35DE]
FRONT TIMING CHAIN CASE
Revision: 2004 November 2004 FX35/FX45
�Apply liquid gasket to top surface of oil pan (upper) as shown
in the figure with tube presser [SST: WS39930000 ( – )].
Use Genuine RTV Silicone Sealant or equivalent. Refer to
GI-48, "
RECOMMENDED CHEMICAL PRODUCTS AND
SEALANTS".
c. Install new O-rings on rear timing chain case.
d. Assemble front timing chain case as follows.
i. Fit lower end of front timing chain case tightly onto top face of oil
pan (upper). From the fitting point, make entire front timing chain
case contact rear timing chain case completely.
CAUTION:
Be careful that oil pan gasket is in place.
ii. While pressing front timing chain case from its front and top as
shown in the figure, install bolts and temporarily tighten them.
For bolt length and positions, refer to the step 6.
iii. Hammer dowel pin until the outer end becomes flush with sur-
face.
6. Tighten bolts to the specified torque in order as shown in the fig-
ure.
�After tightening, retighten them to specified torque in numeri-
cal order as shown in the figure.
PBIC1099E
SBIA0497E
PBIC1100E
PBIC1115E
8 mm (0.31 in) dia. bolts : 1, 2
: 28.4 N·m (2.9 kg-m, 21 ft-lb)
6 mm (0.24 in) dia. bolts : Except the above
: 12.7 N·m (1.3 kg-m, 9 ft-lb)
KBIA1303E
Page 2786 of 4449
![INFINITI FX35 2004 Service Manual FRONT TIMING CHAIN CASE
EM-61
[VQ35DE]
C
D
E
F
G
H
I
J
K
L
MA
EM
Revision: 2004 November 2004 FX35/FX45
7. Install two mounting bolts in front of oil pan (upper) in numerical
order as shown in the fig](/manual-img/42/57021/w960_57021-2785.png "INFINITI FX35 2004 Service Manual FRONT TIMING CHAIN CASE
EM-61
[VQ35DE]
C
D
E
F
G
H
I
J
K
L
MA
EM
Revision: 2004 November 2004 FX35/FX45
7. Install two mounting bolts in front of oil pan (upper) in numerical
order as shown in the fig")
FRONT TIMING CHAIN CASE
EM-61
[VQ35DE]
C
D
E
F
G
H
I
J
K
L
MA
EM
Revision: 2004 November 2004 FX35/FX45
7. Install two mounting bolts in front of oil pan (upper) in numerical
order as shown in the figure.
8. Install oil pan (lower). Refer to EM-30, "
OIL PAN AND OIL STRAINER" .
9. Install right and left intake valve timing control covers as follows:
a. Install seal rings in shaft grooves.
b. Apply liquid gasket to intake valve timing control covers with
tube presser [SST: WS39930000 ( – )].
Use Genuine RTV Silicone Sealant or equivalent. Refer to
GI-48, "
RECOMMENDED CHEMICAL PRODUCTS AND
SEALANTS".
c. Install collared O-ring in front timing chain case oil hole (left and
right sides).
d. Being careful not to move seal ring from the installation groove,
align dowel pins on chain case with the holes to install intake
valve timing control covers.
e. Tighten bolts in the numerical order as shown in the figure.
10. Install crankshaft pulley as follows:
a. Fix crankshaft using ring gear stopper [SST: KV10117700 (J-44716)].
b. Install crankshaft pulley, taking care not to damage front oil seal.
�When press-fitting crankshaft pulley with a plastic hammer, tap on its center portion (not circumfer-
ence).
c. Tighten bolt. : 17.2 N·m (1.8 kg-m, 13 ft-lb)
PBIC1116E
SBIA0492E
PBIC2045E
: 11.3 N·m (1.2 kg-m, 8 ft-lb)
PBIC0918E
: 44.1 N·m (4.5 kg-m, 33 ft-lb)
Page 2803 of 4449
EM-78
[VQ35DE]
TIMING CHAIN
Revision: 2004 November 2004 FX35/FX45
16. Install new O-rings on rear timing chain case.
17. Install front oil seal on front timing chain case.
�Apply new engine oil to the oil seal edges.
�Install it so that each seal lip is oriented as shown in the fig-
ure.
�Using suitable drift, press-fit oil seal until it becomes flush with
front timing chain case end face.
�Make sure the garter spring is in position and seal lip is not
inverted.
18. Install water pump cover and chain tensioner cover to front tim-
ing chain case.
�Apply liquid gasket to front timing chain case front side as
shown in the figure with tube presser [SST: WS39930000 ( –
)].
Use Genuine RTV Silicone Sealant or equivalent. Refer to
GI-48, "
RECOMMENDED CHEMICAL PRODUCTS AND
SEALANTS".
SBIA0497E
SEM715A
PBIC0790E
SEM744GA
Page 2804 of 4449
![INFINITI FX35 2004 Service Manual TIMING CHAIN
EM-79
[VQ35DE]
C
D
E
F
G
H
I
J
K
L
MA
EM
Revision: 2004 November 2004 FX35/FX45
19. Install front timing chain case as follows:
a. Apply liquid gasket to front timing chain case back side](/manual-img/42/57021/w960_57021-2803.png "INFINITI FX35 2004 Service Manual TIMING CHAIN
EM-79
[VQ35DE]
C
D
E
F
G
H
I
J
K
L
MA
EM
Revision: 2004 November 2004 FX35/FX45
19. Install front timing chain case as follows:
a. Apply liquid gasket to front timing chain case back side")
TIMING CHAIN
EM-79
[VQ35DE]
C
D
E
F
G
H
I
J
K
L
MA
EM
Revision: 2004 November 2004 FX35/FX45
19. Install front timing chain case as follows:
a. Apply liquid gasket to front timing chain case back side as
shown in the figure with tube presser [SST: WS39930000 ( – )].
Use Genuine RTV Silicone Sealant or equivalent. Refer to
GI-48, "
RECOMMENDED CHEMICAL PRODUCTS AND
SEALANTS".
b. Install dowel pin on rear timing chain case into dowel pin hole on
front timing chain case.
c. Tighten bolts to the specified torque in order as shown in the fig-
ure.
d. After tightening, retighten them to specified torque in numerical
order shown in figure.
20. After installing front timing chain case, check the surface height
difference between the following parts on the oil pan mounting
surface.
�If not within specification, repeat the installation procedure.
21. Install right and left intake valve timing control covers as follows:
a. Install seal rings in shaft grooves.
b. Apply liquid gasket to intake valve timing control covers as
shown in the figure with tube presser [SST: WS39930000 ( – )].
Use Genuine RTV Silicone Sealant or equivalent. Refer to
GI-48, "
RECOMMENDED CHEMICAL PRODUCTS AND
SEALANTS".
PBIC1133E
8 mm (0.31 in) dia. bolts : 1, 2
: 28.4 N·m (2.9 kg-m, 21 ft-lb)
6 mm (0.24 in) dia. bolts : Except the above
: 12.7 N·m (1.3 kg-m, 9 ft-lb)
KBIA1303E
Standard
Front timing chain case to rear timing chain case:
–0.14 to 0.14 mm (–0.005 to 0.0055 in)
SEM943G
SBIA0492E
Page 2822 of 4449
OIL SEAL
EM-97
[VQ35DE]
C
D
E
F
G
H
I
J
K
L
MA
EM
Revision: 2004 November 2004 FX35/FX45
2. Apply new engine oil to the oil and dust seal lips.
3. Apply liquid gasket to rear oil seal retainer with tube presser
[SST: WS39930000 ( – )] as shown in the figure.
Use Genuine RTV Silicone Sealant or equivalent. Refer to
GI-48, "
RECOMMENDED CHEMICAL PRODUCTS AND
SEALANTS" .
�Assembly should be done within 5 minutes after coating.
4. Install rear oil seal retainer to cylinder block.
5. Perform steps in the reverse order of removal for the following operations.
PBIC0922E
Page 2851 of 4449
![INFINITI FX35 2004 Service Manual EM-126
[VQ35DE]
CYLINDER BLOCK
Revision: 2004 November 2004 FX35/FX45
ASSEMBLY
1. Fully air-blow engine coolant and engine oil passages in cylinder block, cylinder bore and crankcase to
remove any for](/manual-img/42/57021/w960_57021-2850.png "INFINITI FX35 2004 Service Manual EM-126
[VQ35DE]
CYLINDER BLOCK
Revision: 2004 November 2004 FX35/FX45
ASSEMBLY
1. Fully air-blow engine coolant and engine oil passages in cylinder block, cylinder bore and crankcase to
remove any for")
EM-126
[VQ35DE]
CYLINDER BLOCK
Revision: 2004 November 2004 FX35/FX45
ASSEMBLY
1. Fully air-blow engine coolant and engine oil passages in cylinder block, cylinder bore and crankcase to
remove any foreign material.
CAUTION:
Use a goggles to protect your eye.
2. Install each water drain plug to cylinder block as shown in the
figure.
�Apply liquid gasket to the thread of water drain plugs.
Use Genuine RTV Silicone Sealant or equivalent. Refer to
GI-48, "
RECOMMENDED CHEMICAL PRODUCTS AND
SEALANTS" .
3. Install each plug to cylinder block as shown in the figure if
removed.
�Apply liquid gasket to the thread of plugs and install plugs with
new gaskets.
Use Genuine High Strength Thread Locking Sealant or
equivalent. Refer to GI-48, "
RECOMMENDED CHEMICAL
PRODUCTS AND SEALANTS" .
Use Genuine RTV Silicone Sealant or equivalent. Refer to GI-48, "
RECOMMENDED CHEMICAL
PRODUCTS AND SEALANTS" .
4. Install oil jet.
�Insert oil jet dowel pin into cylinder block dowel pin hole, and
tighten mounting bolts.Water drain plug (front) “A”:
: 9.8 N·m (1.0 kg-m, 87 in-lb)
Water drain plug (RH) “B”:
: 19.6 N·m (2.0 kg-m, 14 ft-lb)
Water drain plug (LH) “C”:
: 19.6 N·m (2.0 kg-m, 14 ft-lb)
Plug (RH) “D”:
: 12.3 N·m (1.3 kg-m, 9 ft-lb)
Plug (rear) “E”:
: 62 N·m (6.3 kg-m, 46 ft-lb)
Plug (LH) “F”:
: 62 N·m (6.3 kg-m, 46 ft-lb)
PBIC2610E
PBIC0898E
Page 2855 of 4449
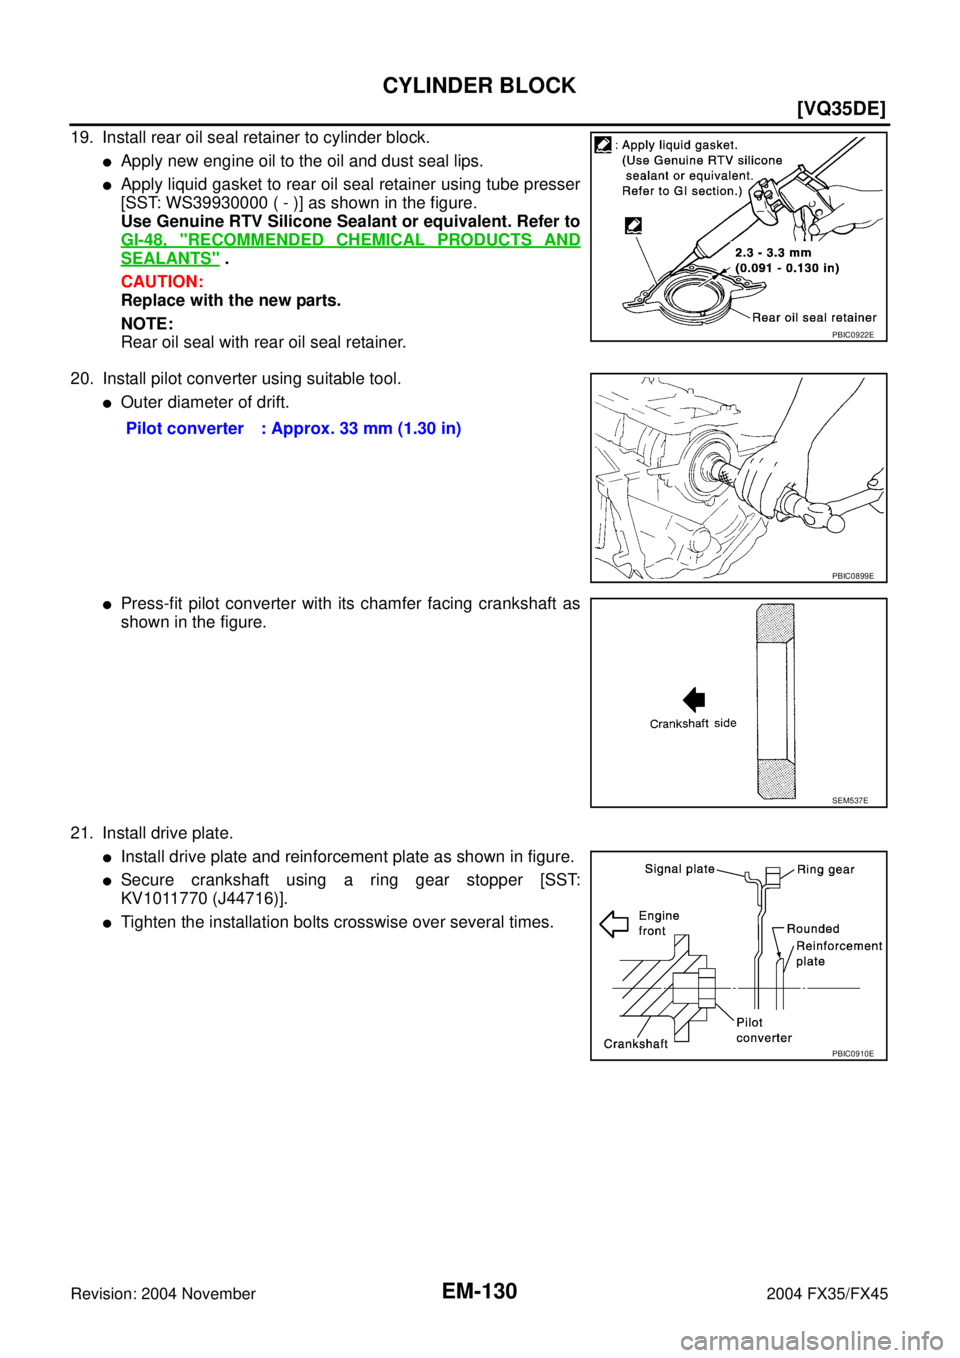
EM-130
[VQ35DE]
CYLINDER BLOCK
Revision: 2004 November 2004 FX35/FX45
19. Install rear oil seal retainer to cylinder block.
�Apply new engine oil to the oil and dust seal lips.
�Apply liquid gasket to rear oil seal retainer using tube presser
[SST: WS39930000 ( - )] as shown in the figure.
Use Genuine RTV Silicone Sealant or equivalent. Refer to
GI-48, "
RECOMMENDED CHEMICAL PRODUCTS AND
SEALANTS" .
CAUTION:
Replace with the new parts.
NOTE:
Rear oil seal with rear oil seal retainer.
20. Install pilot converter using suitable tool.
�Outer diameter of drift.
�Press-fit pilot converter with its chamfer facing crankshaft as
shown in the figure.
21. Install drive plate.
�Install drive plate and reinforcement plate as shown in figure.
�Secure crankshaft using a ring gear stopper [SST:
KV1011770 (J44716)].
�Tighten the installation bolts crosswise over several times.
PBIC0922E
Pilot converter : Approx. 33 mm (1.30 in)
PBIC0899E
SEM537E
PBIC0910E
Page 2886 of 4449
![INFINITI FX35 2004 Service Manual PRECAUTIONS
EM-161
[VK45DE]
C
D
E
F
G
H
I
J
K
L
MA
EM
Revision: 2004 November 2004 FX35/FX45
3. Attach liquid gasket tube to tube presser [SST: WS39930000
(—)].
Use Genuine RTV Silicone Sealant or e](/manual-img/42/57021/w960_57021-2885.png "INFINITI FX35 2004 Service Manual PRECAUTIONS
EM-161
[VK45DE]
C
D
E
F
G
H
I
J
K
L
MA
EM
Revision: 2004 November 2004 FX35/FX45
3. Attach liquid gasket tube to tube presser [SST: WS39930000
(—)].
Use Genuine RTV Silicone Sealant or e")
PRECAUTIONS
EM-161
[VK45DE]
C
D
E
F
G
H
I
J
K
L
MA
EM
Revision: 2004 November 2004 FX35/FX45
3. Attach liquid gasket tube to tube presser [SST: WS39930000
(—)].
Use Genuine RTV Silicone Sealant or equivalent. Refer to
GI-48, "
RECOMMENDED CHEMICAL PRODUCTS AND
SEALANTS" .
4. Apply liquid gasket without breaks to the specified location with the specified dimensions.
�If there is a groove for the liquid gasket application, apply liquid gasket to the groove.
�As for the bolt holes, normally apply liquid gasket inside the
holes. Occasionally, it should be applied outside the holes.
Make sure to read the text of this manual.
�Within five minutes of liquid gasket application, install the mat-
ing component.
�If liquid gasket protrudes, wipe it off immediately.
�Do not retighten after the installation.
�Wait 30 minutes or more after installation before refilling
engine with engine oil and engine coolant.
CAUTION:
If there are specific instructions in this manual, observe
them.
EMA0622D
SEM159F

![INFINITI FX35 2004 Service Manual OIL SEAL
EM-97
[VQ35DE]
C
D
E
F
G
H
I
J
K
L
MA
EM
Revision: 2004 November 2004 FX35/FX45
2. Apply new engine oil to the oil and dust seal lips.
3. Apply liquid gasket to rear oil seal retainer with tu](/manual-img/42/57021/w960_57021-2821.png "INFINITI FX35 2004 Service Manual OIL SEAL
EM-97
[VQ35DE]
C
D
E
F
G
H
I
J
K
L
MA
EM
Revision: 2004 November 2004 FX35/FX45
2. Apply new engine oil to the oil and dust seal lips.
3. Apply liquid gasket to rear oil seal retainer with tu")