Page 1193 of 4449
![INFINITI FX35 2004 Service Manual CO-4
[VQ35DE]
PRECAUTIONS
Revision: 2004 November 2004 FX35/FX45
3. Attach liquid gasket tube to tube presser [SST: WS39930000 ( –
)].
Use Genuine RTV Silicone Sealant or equivalent. Refer to
GI-48,](/manual-img/42/57021/w960_57021-1192.png "INFINITI FX35 2004 Service Manual CO-4
[VQ35DE]
PRECAUTIONS
Revision: 2004 November 2004 FX35/FX45
3. Attach liquid gasket tube to tube presser [SST: WS39930000 ( –
)].
Use Genuine RTV Silicone Sealant or equivalent. Refer to
GI-48,")
CO-4
[VQ35DE]
PRECAUTIONS
Revision: 2004 November 2004 FX35/FX45
3. Attach liquid gasket tube to tube presser [SST: WS39930000 ( –
)].
Use Genuine RTV Silicone Sealant or equivalent. Refer to
GI-48, "
RECOMMENDED CHEMICAL PRODUCTS AND
SEALANTS" .
4. Apply liquid gasket without breaks to the specified location with
the specified dimensions.
�If there is a groove for the liquid gasket application, apply liq-
uid gasket to the groove.
�As for the bolt holes, normally apply liquid gasket inside the
holes. Occasionally, it should be applied outside the holes.
Make sure to read the text of service manual.
�Within five minutes of liquid gasket application, install the mat-
ing component.
�If liquid gasket protrudes, wipe it off immediately.
�Do not retighten mounting bolts and nuts after the installation.
�After 30 minutes or more have passed from the installation, fill
engine oil and engine coolant.
CAUTION:
If there are specific instructions in this manual, observe them.
EMA0622D
SEM159F
Page 2732 of 4449
![INFINITI FX35 2004 Service Manual PRECAUTIONS
EM-7
[VQ35DE]
C
D
E
F
G
H
I
J
K
L
MA
EM
Revision: 2004 November 2004 FX35/FX45
3. Attach liquid gasket tube to tube presser [SST: WS39930000 ( –
)].
Use Genuine RTV Silicone Sealant or e](/manual-img/42/57021/w960_57021-2731.png "INFINITI FX35 2004 Service Manual PRECAUTIONS
EM-7
[VQ35DE]
C
D
E
F
G
H
I
J
K
L
MA
EM
Revision: 2004 November 2004 FX35/FX45
3. Attach liquid gasket tube to tube presser [SST: WS39930000 ( –
)].
Use Genuine RTV Silicone Sealant or e")
PRECAUTIONS
EM-7
[VQ35DE]
C
D
E
F
G
H
I
J
K
L
MA
EM
Revision: 2004 November 2004 FX35/FX45
3. Attach liquid gasket tube to tube presser [SST: WS39930000 ( –
)].
Use Genuine RTV Silicone Sealant or equivalent. Refer to
GI-48, "
RECOMMENDED CHEMICAL PRODUCTS AND
SEALANTS" .
4. Apply liquid gasket without breaks to the specified location with
the specified dimensions.
�If there is a groove for the liquid gasket application, apply liq-
uid gasket to the groove.
�As for the bolt holes, normally apply liquid gasket inside the
holes. Occasionally, it should be applied outside the holes.
Make sure to read the text of service manual.
�Within five minutes of liquid gasket application, install the mat-
ing component.
�If liquid gasket protrudes, wipe it off immediately.
�Do not retighten mounting bolts and nuts after the installation.
�After 30 minutes or more have passed from the installation, fill
engine oil and engine coolant.
CAUTION:
If there are specific instructions in this manual, observe them.
EMA0622D
SEM159F
Page 2758 of 4449
![INFINITI FX35 2004 Service Manual OIL PAN AND OIL STRAINER
EM-33
[VQ35DE]
C
D
E
F
G
H
I
J
K
L
MA
EM
Revision: 2004 November 2004 FX35/FX45
b. Apply liquid gasket to oil pan gaskets as shown in the figure.
Use Genuine RTV Silicone Seal](/manual-img/42/57021/w960_57021-2757.png "INFINITI FX35 2004 Service Manual OIL PAN AND OIL STRAINER
EM-33
[VQ35DE]
C
D
E
F
G
H
I
J
K
L
MA
EM
Revision: 2004 November 2004 FX35/FX45
b. Apply liquid gasket to oil pan gaskets as shown in the figure.
Use Genuine RTV Silicone Seal")
OIL PAN AND OIL STRAINER
EM-33
[VQ35DE]
C
D
E
F
G
H
I
J
K
L
MA
EM
Revision: 2004 November 2004 FX35/FX45
b. Apply liquid gasket to oil pan gaskets as shown in the figure.
Use Genuine RTV Silicone Sealant or equivalent. Refer to
GI-48, "
RECOMMENDED CHEMICAL PRODUCTS AND
SEALANTS" .
�To install, align protrusion of oil pan gasket with notches of
front timing chain case and rear oil seal retainer.
�Install oil pan gasket with smaller arc to front timing chain
case side.
c. Install new O-rings on cylinder block and oil pump side.
d. Apply a continuous bead of liquid gasket with tube presser [SST:
WS39930000 ( – )] to the cylinder block mating surface of oil
pan (upper) to a limited portion as shown in the figure.
Use Genuine RTV Silicone Sealant or equivalent. Refer to
GI-48, "
RECOMMENDED CHEMICAL PRODUCTS AND
SEALANTS" .
CAUTION:
�For bolt holes with marks (5 locations), apply liquid
gasket outside the holes.
�Apply a bead of 4.5 to 5.5 mm (0.177 to 0.217 in) in diame-
ter to area “A”.
�Attaching should be done within 5 minutes after coating.
e. Install oil pan (upper).
SEM964E
PBIC1145E
PBIC1144E
PBIC2300E
Page 2759 of 4449
EM-34
[VQ35DE]
OIL PAN AND OIL STRAINER
Revision: 2004 November 2004 FX35/FX45
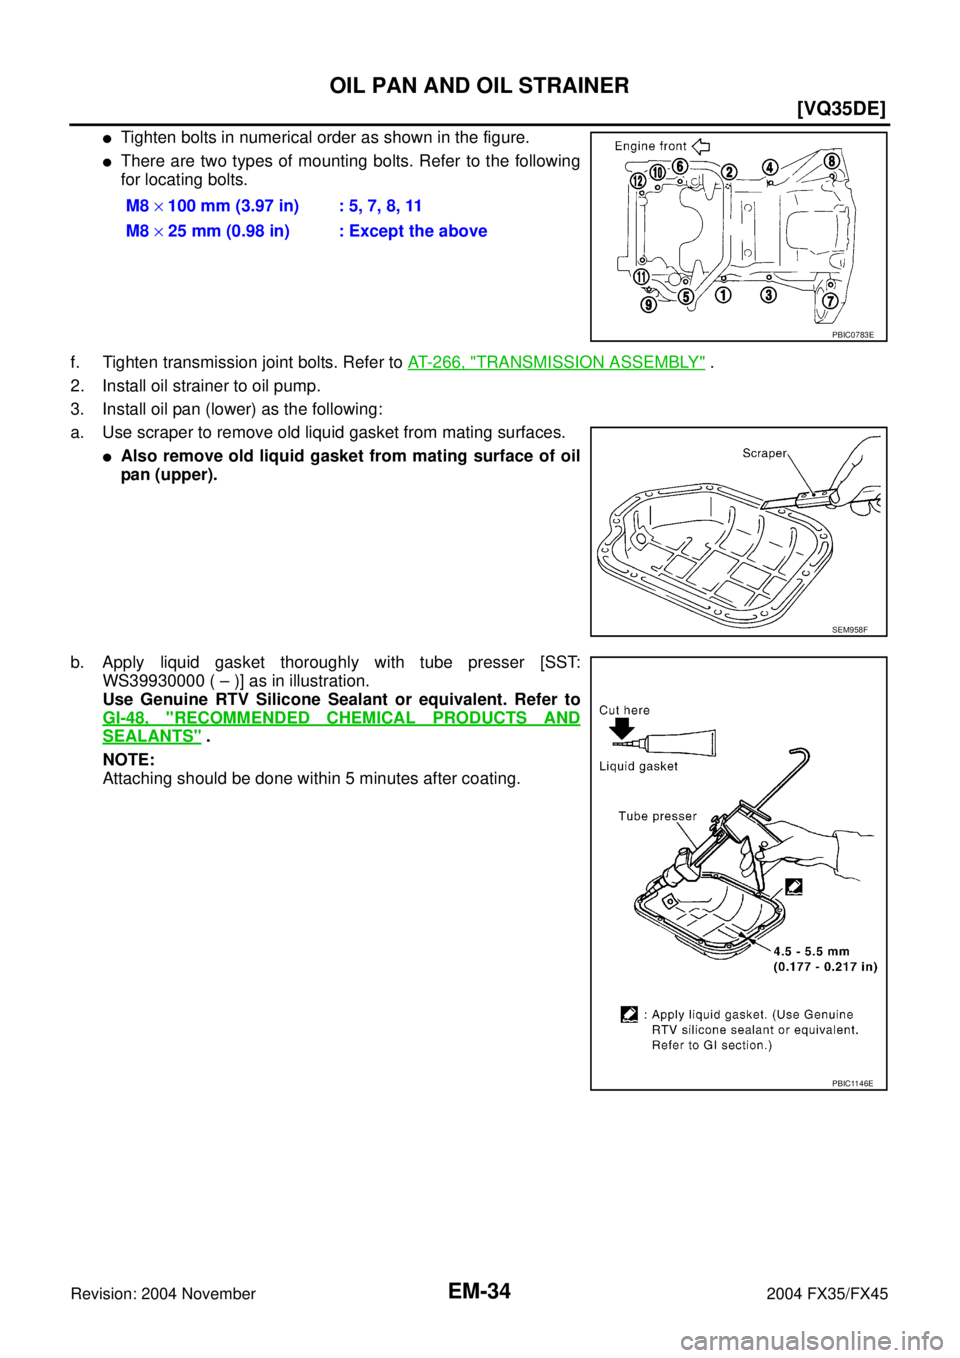
�Tighten bolts in numerical order as shown in the figure.
�There are two types of mounting bolts. Refer to the following
for locating bolts.
f. Tighten transmission joint bolts. Refer to AT- 2 6 6 , "
TRANSMISSION ASSEMBLY" .
2. Install oil strainer to oil pump.
3. Install oil pan (lower) as the following:
a. Use scraper to remove old liquid gasket from mating surfaces.
�Also remove old liquid gasket from mating surface of oil
pan (upper).
b. Apply liquid gasket thoroughly with tube presser [SST:
WS39930000 ( – )] as in illustration.
Use Genuine RTV Silicone Sealant or equivalent. Refer to
GI-48, "
RECOMMENDED CHEMICAL PRODUCTS AND
SEALANTS" .
NOTE:
Attaching should be done within 5 minutes after coating.M8 × 100 mm (3.97 in) : 5, 7, 8, 11
M8 × 25 mm (0.98 in) : Except the above
PBIC0783E
SEM958F
PBIC1146E
Page 2764 of 4449
![INFINITI FX35 2004 Service Manual OIL PAN AND OIL STRAINER
EM-39
[VQ35DE]
C
D
E
F
G
H
I
J
K
L
MA
EM
Revision: 2004 November 2004 FX35/FX45
INSTALLATION
1. Install axle pipe to oil pan, if removed.
�Lubricate O-ring groove of axle pipe](/manual-img/42/57021/w960_57021-2763.png "INFINITI FX35 2004 Service Manual OIL PAN AND OIL STRAINER
EM-39
[VQ35DE]
C
D
E
F
G
H
I
J
K
L
MA
EM
Revision: 2004 November 2004 FX35/FX45
INSTALLATION
1. Install axle pipe to oil pan, if removed.
�Lubricate O-ring groove of axle pipe")
OIL PAN AND OIL STRAINER
EM-39
[VQ35DE]
C
D
E
F
G
H
I
J
K
L
MA
EM
Revision: 2004 November 2004 FX35/FX45
INSTALLATION
1. Install axle pipe to oil pan, if removed.
�Lubricate O-ring groove of axle pipe, O-ring, and O-ring joint
of oil pan with new engine oil.
Unit: mm (in)
�Install axle pipe to oil pan from axle pipe flange side (LH side)
using a suitable drift [43 - 57 mm (1.69 - 2.24 in)].
CAUTION:
Insert it with care to prevent O-ring from sliding.
2. Install oil pan (upper) as the following:
a. Use scraper to remove old liquid gasket from mating surfaces.
CAUTION:
Do not scratch or damage the mating surfaces when clean-
ing off old liquid gasket.
�Also remove old liquid gasket from mating surface of cylinder
block.
�Remove old liquid gasket from the bolt holes and threads.
b. Apply liquid gasket to oil pan gaskets as shown in the figure.
Use Genuine RTV Silicone Sealant or equivalent. Refer to
GI-48, "
RECOMMENDED CHEMICAL PRODUCTS AND
SEALANTS" .
Item O-ring inner diameter
Final drive side (RH side) 32 (1.26)
Axle pipe flange side (LH side) 34 (1.34)
SBIA0470E
SBIA0471E
MEM108A
SEM964E
Page 2765 of 4449
![INFINITI FX35 2004 Service Manual EM-40
[VQ35DE]
OIL PAN AND OIL STRAINER
Revision: 2004 November 2004 FX35/FX45
�To install, align protrusion of oil pan gasket with notches of
front timing chain case and rear oil seal retainer.
�Inst](/manual-img/42/57021/w960_57021-2764.png "INFINITI FX35 2004 Service Manual EM-40
[VQ35DE]
OIL PAN AND OIL STRAINER
Revision: 2004 November 2004 FX35/FX45
�To install, align protrusion of oil pan gasket with notches of
front timing chain case and rear oil seal retainer.
�Inst")
EM-40
[VQ35DE]
OIL PAN AND OIL STRAINER
Revision: 2004 November 2004 FX35/FX45
�To install, align protrusion of oil pan gasket with notches of
front timing chain case and rear oil seal retainer.
�Install oil pan gasket with smaller arc to front timing chain
case side.
c. Install new O-rings on cylinder block and oil pump side.
d. Apply a continuous bead of liquid gasket with tube presser [SST:
WS39930000 ( – )] to the cylinder block mating surface of oil
pan (upper) to a limited portion as shown in the figure.
Use Genuine RTV Silicone Sealant or equivalent. Refer to
GI-48, "
RECOMMENDED CHEMICAL PRODUCTS AND
SEALANTS" .
CAUTION:
�For bolt holes with marks (5 locations), apply liquid
gasket outside the holes.
�Apply a bead of 4.5 to 5.5 mm (0.177 to 0.217 in) in diame-
ter to area “A”.
�Attaching should be done within 5 minutes after coating.
e. Install oil pan (upper).
�Tighten bolts in numerical order as shown in the figure.
�There are two types of mounting bolts. Refer to the following
for locating bolts.
f. Tighten transmission joint bolts. Refer to AT- 2 6 6 , "
TRANSMISSION ASSEMBLY" .
3. Install oil strainer to oil pump.
PBIC1145E
PBIC1144E
PBIC2300E
M8 × 100 mm (3.97 in) : 5, 7, 8, 11
M8 × 25 mm (0.98 in) : Except the above
PBIC0783E
Page 2766 of 4449
![INFINITI FX35 2004 Service Manual OIL PAN AND OIL STRAINER
EM-41
[VQ35DE]
C
D
E
F
G
H
I
J
K
L
MA
EM
Revision: 2004 November 2004 FX35/FX45
4. Install oil pan (lower) in the order below.
a. Apply liquid gasket thoroughly with tube pres](/manual-img/42/57021/w960_57021-2765.png "INFINITI FX35 2004 Service Manual OIL PAN AND OIL STRAINER
EM-41
[VQ35DE]
C
D
E
F
G
H
I
J
K
L
MA
EM
Revision: 2004 November 2004 FX35/FX45
4. Install oil pan (lower) in the order below.
a. Apply liquid gasket thoroughly with tube pres")
OIL PAN AND OIL STRAINER
EM-41
[VQ35DE]
C
D
E
F
G
H
I
J
K
L
MA
EM
Revision: 2004 November 2004 FX35/FX45
4. Install oil pan (lower) in the order below.
a. Apply liquid gasket thoroughly with tube presser [SST:
WS39930000 ( – )] as in illustration.
Use Genuine RTV Silicone Sealant or equivalent. Refer to
GI-48, "
RECOMMENDED CHEMICAL PRODUCTS AND
SEALANTS" .
NOTE:
Attaching should be done within 5 minutes after coating.
b. Tighten bolts in numerical order as shown in the figure.
5. Install oil pan drain plug.
�Refer to illustration of components of former page for installation direction of washer.
6. Install in the reverse order of removal after this step.
NOTE:
At least 30 minutes after oil pan is installed, pour engine oil.
INSPECTION AFTER INSTALLATION
1. Check the engine oil level and add engine oil. Refer to LU-7, "ENGINE OIL" .
2. Start engine, and check there is no leak of engine oil.
3. Stop engine and wait for 10 minutes.
4. Check the engine oil level again. Refer to LU-7, "
ENGINE OIL" .
PBIC1146E
PBIC0782E
Page 2784 of 4449
![INFINITI FX35 2004 Service Manual FRONT TIMING CHAIN CASE
EM-59
[VQ35DE]
C
D
E
F
G
H
I
J
K
L
MA
EM
Revision: 2004 November 2004 FX35/FX45
4. Install water pump cover and chain tensioner cover to front tim-
ing chain case.
�Apply liqui](/manual-img/42/57021/w960_57021-2783.png "INFINITI FX35 2004 Service Manual FRONT TIMING CHAIN CASE
EM-59
[VQ35DE]
C
D
E
F
G
H
I
J
K
L
MA
EM
Revision: 2004 November 2004 FX35/FX45
4. Install water pump cover and chain tensioner cover to front tim-
ing chain case.
�Apply liqui")
FRONT TIMING CHAIN CASE
EM-59
[VQ35DE]
C
D
E
F
G
H
I
J
K
L
MA
EM
Revision: 2004 November 2004 FX35/FX45
4. Install water pump cover and chain tensioner cover to front tim-
ing chain case.
�Apply liquid gasket to front timing chain case front side as
shown in the figure with tube presser [SST: WS39930000 ( –
)].
Use Genuine RTV Silicone Sealant or equivalent. Refer to
GI-48, "
RECOMMENDED CHEMICAL PRODUCTS AND
SEALANTS".
5. Install front timing chain case as follows:
a. Apply liquid gasket to front timing chain case back side as
shown in the figure with tube presser [SST: WS39930000 ( – )].
Use Genuine RTV Silicone Sealant or equivalent. Refer to
GI-48, "
RECOMMENDED CHEMICAL PRODUCTS AND
SEALANTS".
b. Install oil pan gasket front side.
�Apply liquid gasket to oil pan gasket as shown in the figure
with tube presser [SST: WS39930000 ( – )].
Use Genuine RTV Silicone Sealant or equivalent. Refer to
GI-48, "
RECOMMENDED CHEMICAL PRODUCTS AND
SEALANTS".
�Align notch of front timing chain case with protrusion of oil pan
gasket.
SEM744GA
PBIC1133E
SEM964E
PBIC1114E