Page 79 of 296
 is used, the engine’s f uel
system is disabled.
When you turn the ignition switch to
ON (II),")
The Immobilizer System protects
your vehicle f rom thef t. If an
improperly-coded key (or other
device) is used, the engine’s f uel
system is disabled.
When you turn the ignition switch to
ON (II), the Immobilizer System
indicator should come on f or a f ew
seconds, then go out. If the indicator
starts to blink, it means the system
does not recognize the coding of the
key. Turn the ignition switch to
LOCK (0), remove the key, reinsert
it, and turn the switch to ON (II)
again.The system may not recognize your
key’s coding if another immobilizer
key or other metal object (i.e. key
f ob) is near the ignition switch when
you insert the key.
If the system repeatedly does not
recognize the coding of your key,
contact your Honda dealer.
Do not attempt to alter this system
or add other devices to it. Electrical
problems could result that may make
your vehicle undriveable.
If you have lost your key and you
cannot start the engine, contact a
Honda dealer.As required by the FCC:
This device complies with Part 15 of theFCC rules. Operation is subject to thef ollowing two conditions: (1) This devicemay not cause harmf ul interf erence, and(2) this device must accept anyinterf erence received, includinginterf erence that may cause undesiredoperation.
Changes or modif ications not expresslyapproved by the party responsible f orcompliance could void the user’sauthority to operate the equipment.
This device complies with IndustryCanada Standard RSS-210.Operation is subject to the f ollowing twoconditions: (1) this device may not causeinterf erence, and (2) this device mustaccept any interf erence that may causeundesired operation of the device.
Immobilizer Syst em
Inst rument s and Cont rols76
Page 84 of 296

�µ�µ�µ
Pressthisbuttontolock
all doors and the tailgate. Some
exterior and interior lights will f lash.
This button does not work if any
door or the tailgate is not f ully closed
or key is in the ignition switch. Press this button once
to unlock the driver’s door. Push it
twice to unlock the other doors and
the tailgate. Some exterior and
interior lights will f lash twice when
you push the button the f irst time. If
you do not open any door or the
tailgate within 30 seconds, they will
automatically relock.
When you press the UNLOCK
button, the f ront and rear individual
map lights and the cargo area light,
depending on their switch positions,
will come on (see page ). If you
do not open any door or the tailgate,
the lights stay on for about 10
seconds, then go out. If you relock
thedoorsandthetailgatewiththe
remote transmitter before 10
seconds have elapsed, the lights will
go of f immediately. Pressthisbuttonfor
about 1 second to attract attention;
thehornwillsoundandtheexterior
lights will f lash f or about 30 seconds.
To cancel panic mode, press any
other button on the remote
transmitter or turn the ignition
switch to ON (II).
113
CONT INUED
On EX and EX-L models
Remote Transmitter
Inst rument s and Cont rols
LOCK UNL OCK
PA NIC
81
LED
UNLOCK
BUTTON LOCK
BUTTON
PANIC
BUTTON
Page 89 of 296

To open and close a power sliding
door, press the appropriate button
f or at least two seconds. If you f orget
to unlock the door, you will hear
three beeps. Unlock the door and try
again.
To stop movement, push the
appropriate door button; you will
hear three beeps. Push the same
button again and the door will
reverse direction.Each sliding door has a lock knob
under the inside door handle. Slide
the lock knob f orward to unlock, and
backward to lock.
Whenyoudrivewithchildreninyour
vehicle, use the childproof door
locks (see page ). This will
prevent children f rom opening the
doors accidentally.When you release the f uel f ill door,
the driver’s side sliding door
automatically locks so it cannot open
and interfere with the fuel door. If a
passenger attempts to unlock the
door by cycling the lock knob several
times, the door can be opened.
If a passenger needs to get out while
you are ref ueling, instruct that
person to exit on the passenger’s
side.
Af ter you close the f uel f ill door, you
must manually unlock the sliding
door.
79
Remote Transmitter
Sliding Doors
Inst rument s and Cont rols
L ocking the Doors Ref ueling
86
LOCK KNOB
Unlock Lock
DRIVER’S
SIDE
SLIDING
DOOR
BUTTON
LED
PASSENGER’S
SIDE SLIDING
DOOR
BUTTON
Page 90 of 296
�µ
When parking f acing downhill, make
sure the doors are latched in the
f ully open position, and then hold the
door open f or your passengers. Do
not pull the inside or outside door
handle, or the door will slam shut.
Make sure the
MAIN switch is in the ON position.
When parking f acing downhill on a
steep grade, the power sliding doors
may not open or close as they do
normally. If the Power Sliding Door indicator
comesonandstayson,thereisa
problem in the system. Turn the
MAIN switch to OFF, and have the
system inspected by a Honda dealer.If the battery is disconnected or goes
dead, close the sliding door
completely by hand, or turn the
MAIN switch on, and hold the door
switch until each door closes
completely. If it still does not operate
properly af ter the battery is
reconnected, have your vehicle
checked by a Honda dealer.On EX, EX-L models
Sliding Doors
Inst rument s and Cont rols
Parking Facing Downhill
Power Sliding Door Problems
87
POWER SLIDING DOOR INDICATOR
Page 91 of 296
There are bucket seats with
armrests for two front passengers,
bucket seats with armrests for two
passengers in the second row, and a
bench seat f or three passengers in
the third row.
For greater cargo capacity, the seats
in the second row can be removed,
andthebenchseatinthethirdrow
can be f olded into the f loor.
Seats
Inst rument s and Cont rols
Passenger Seating
Convert ible Second Row BucketSeat s
88
Page 92 of 296
�µ
To adjust the bucket seats in the
second row, pull up the lever on the
front of the seat bottom.
The EX and EX-L models have a
power adjustable driver’s seat. All
other models have manual driver’s
seat adjustments.
The f ront passenger’s seat, and the
seats in the second and third rows
adjust manually.
Make all seat adjustments bef ore
you start driving.
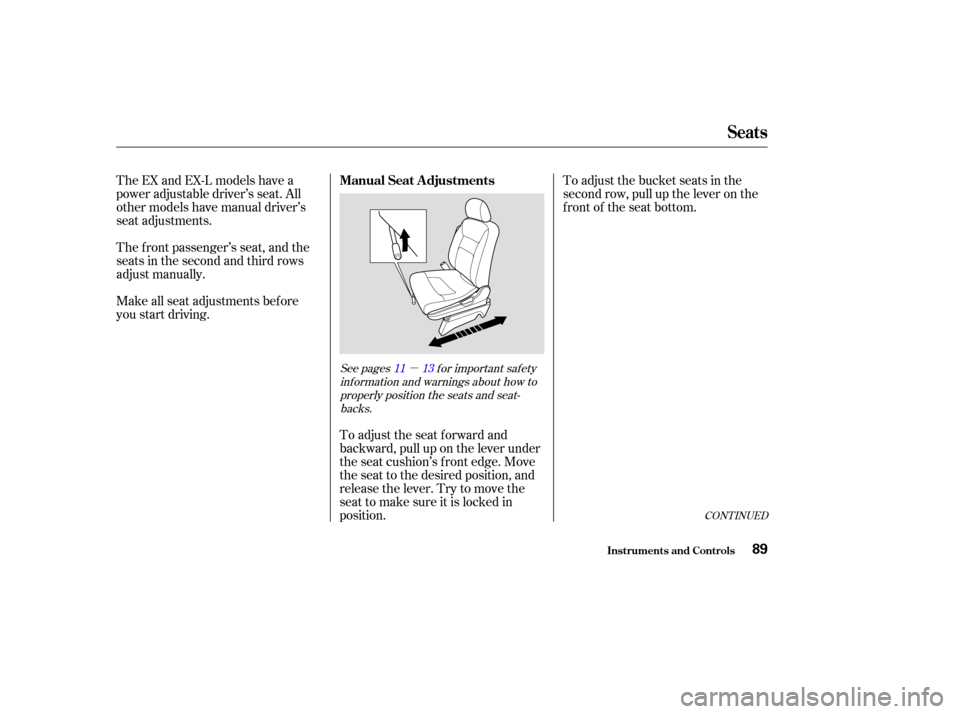
To adjust the seat forward and
backward, pull up on the lever under
the seat cushion’s f ront edge. Move
the seat to the desired position, and
releasethelever.Trytomovethe
seat to make sure it is locked in
position.
CONT INUED
See pages f or important saf etyinf ormation and warnings about how toproperly position the seats and seat-backs. 11 13
Seats
Inst rument s and Cont rols
Manual Seat Adjustments
89
Page 93 of 296
The height of your driver’s seat is
adjustable. Turn the front dial on the
outside of the seat cushion to raise
the front of the seat bottom, and turn
the rear dial to raise the rear.
Make all adjustments bef ore you
start driving.
To change the seat-back angle of the
bucket seats in the second row, pull
forwardontheleverontheoutside
of the seat-back. To change the seat-back angle of the
f ront seat, pull up on the lever on the
outside of the seat bottom.
To adjust the seat-back angle of the
third seat, open the tailgate. Pull the
handle on the back of the seat-back,
move the seat-back to the desired
position, and release the handle. Let
the seat-back latch in the new
position.
On LX model
Seats
Inst rument s and Cont rols
Driver’s Seat Manual Height
Adjustment
90
HANDLE
Page 95 of 296
See page f or important saf etyinf ormation and a warning about how toproperly position the head restraints. 13
On EX and EX-L models
Your vehicle is equipped with head
restraints in all seating positions to
help protect you and your
passengers f rom whiplash and other
injuries.
An armrest is located on each of the
frontseatsandoneachsideof the
second row seats. Pivot it down to
use it. When you remove the bucket
seats in the second row, pivot the
armrests up out of the way.
To change the lumbar support, move
the lever on the right side of the
seat-back forward or backward.
Keep moving the lever f orward or
backward until you f ind a suitable
position. They are most ef f ective when you
adjust them so the back of the
occupant’s head rests against the
center of the restraint.
Seats
Inst rument s and Cont rols
Head Restraints
Armrests
Driver’s L umbar Support
92