Page 6 of 296
�Î
�Î
To use the horn, press the pad around the ‘‘H’’ logo.
:
Your Vehicle at a Glance
3
TRACTION CONTROL SYSTEM
POWER SLIDING
DOOR SWITCHES HEADLIGHTS/
TURN SIGNALS
REAR WINDOW
DEFOGGER
WINDSHIELD
WIPERS/WASHERS
CRUISE
CONTROL
HORN
STEERING WHEEL
ADJUSTMENT
CRUISE
CONTROL MIRROR
CONTROLS
(P.192)
(P.71)(P.73)CLOCK
(P.105)
(P.73)
(P. 32)
(P.69)
(P.160)
(P.74)
(P.160) (P.102) (P.85)
LIGHT CONTROL
SWITCH
AUDIO SYSTEM/
REAR
ENTERTAINMENT
SYSTEM
(P.126, 145)
(P. 112 )
STEERING WHEEL
AUDIO CONTROLS
(P.143) HAZARD WARNING
BUTTON
PASSENGER
AIRBAG OFF
INDICATOR
Page 60 of 296

This section gives inf ormation about
the controls and displays that
contribute to the daily operation of
your Honda. All the essential
controls are within easy reach............................
Control Locations .58
............................
Instrument Panel .59
..........
Instrument Panel Indicators . 60
..
Maintenance Required Indicator . 65
.............................................
Gauges .66
Controls Near the Steering ...........................................
Wheel .68
.
Windshield Wipers and Washers . 69
......................................
Turn Signal .71
........................................
Headlights .71
........
Instrument Panel Brightness . 72
..............................
Hazard Warning .73
.................
Rear Window Def ogger . 73
..........
Steering Wheel Adjustment . 74
...............................
Keys and Locks .75
........................
Immobilizer System .76
................................
Ignition Switch .77
......................................
Door Locks .78
......................
Power Door Locks .78
..............
Childproof Door Locks . 79
........................................
Tailgate .79
.......................
Remote Transmitter .81
...................................
Sliding Doors .84
.................................................
Seats .88
....................................
Seat Heaters .98
..............................
Power Windows .99 ...........................................
Mirrors .102
...............................
Parking Brake .103
.........
Interior Convenience Items . 104
..........................................
Clock .105
.............................
Center Table .105
.....................
Beverage Holders .106
....................
Sunglasses Holder .107
...................................
Sun Visor .108
............................
Vanity Mirror .108
...................
Rear Compartment . 108
..................................
Glove Box .109
........
Accessory Power Sockets . 109
...........................
Center Pocket .110
...............................
Coin Holder .110
...............................
Storage Box .111
..................................
Coat Hook .111
...............................
Interior Lights .112
Instruments and Controls
Inst rument s and Cont rols57
Page 71 of 296
�Î
�Î
To use the horn, press the pad around the ‘‘H’’ logo.
Controls Near the Steering Wheel
Inst rument s and Cont rols68
REAR WINDOW
DEFOGGER
LIGHT CONTROL
SWITCH
HORN
TILT
ADJUSTMENT
HEADLIGHTS/
TURN SIGNALS
CRUISE
CONTROL WINDSHIELD
WIPERS/WASHERS
POWER SLIDING DOOR
(EX and EX-L models)
MIRROR CONTROL SHIFT LEVER
TRACTION CONTROL
SYSTEM HAZARD WARNING
BUTTON
PASSENGER AIRBAG
OFF INDICATOR
Page 77 of 296
Thedefoggerwiresontheinsideof
the rear window can be accidentally
damaged. When cleaning the glass,
always wipe side-to-side.Make any steering wheel adjustment
bef ore you start driving.
Push the lever under the steering
column all the way down. Push the lever up to lock the
steering wheel in position.
Make sure you have securely
locked the steering wheel in place
by trying to move it up and down. Move the steering wheel so it
points toward your chest, not
towardyourface.Makesureyou
can see the instrument panel
gauges and indicators.
3.
4.
1. 2.
See page f or important saf ety
inf ormation about how to properlyposition the steering wheel. 17
Rear Window Def ogger, Steering Wheel A djustment
Inst rument s and Cont rols
Steering Wheel A djustment
74
LX model
Adjusting the steering wheel
position while driving may
cause you to lose control of the
vehicle and be seriously injured
inacrash.
Adjust the steering wheel only
when the vehicle is stopped.
Page 92 of 296
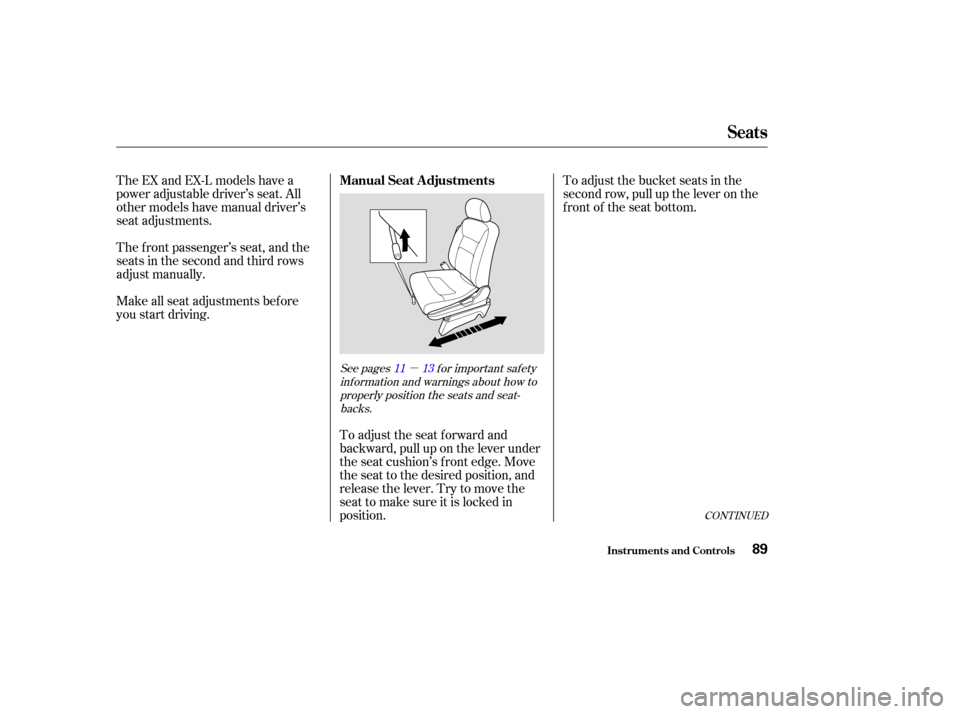
�µ
To adjust the bucket seats in the
second row, pull up the lever on the
front of the seat bottom.
The EX and EX-L models have a
power adjustable driver’s seat. All
other models have manual driver’s
seat adjustments.
The f ront passenger’s seat, and the
seats in the second and third rows
adjust manually.
Make all seat adjustments bef ore
you start driving.
To adjust the seat forward and
backward, pull up on the lever under
the seat cushion’s f ront edge. Move
the seat to the desired position, and
releasethelever.Trytomovethe
seat to make sure it is locked in
position.
CONT INUED
See pages f or important saf etyinf ormation and warnings about how toproperly position the seats and seat-backs. 11 13
Seats
Inst rument s and Cont rols
Manual Seat Adjustments
89
Page 93 of 296
The height of your driver’s seat is
adjustable. Turn the front dial on the
outside of the seat cushion to raise
the front of the seat bottom, and turn
the rear dial to raise the rear.
Make all adjustments bef ore you
start driving.
To change the seat-back angle of the
bucket seats in the second row, pull
forwardontheleverontheoutside
of the seat-back. To change the seat-back angle of the
f ront seat, pull up on the lever on the
outside of the seat bottom.
To adjust the seat-back angle of the
third seat, open the tailgate. Pull the
handle on the back of the seat-back,
move the seat-back to the desired
position, and release the handle. Let
the seat-back latch in the new
position.
On LX model
Seats
Inst rument s and Cont rols
Driver’s Seat Manual Height
Adjustment
90
HANDLE
Page 94 of 296
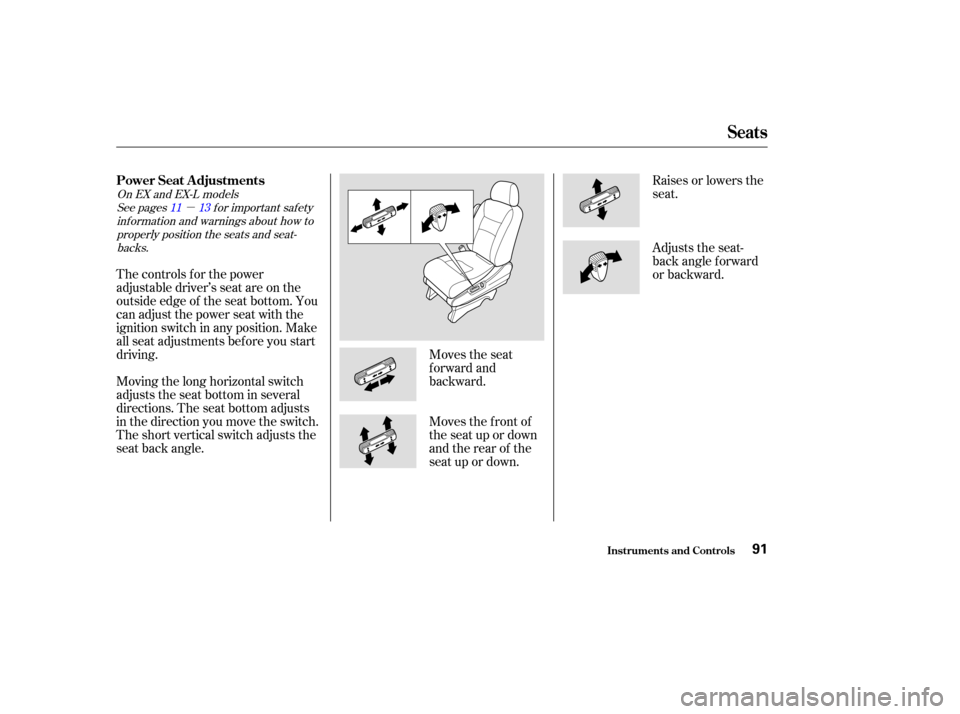
�µ
Moves the seat
forward and
backward.Raises or lowers the
seat.
The controls f or the power
adjustable driver’s seat are on the
outside edge of the seat bottom. You
can adjust the power seat with the
ignition switch in any position. Make
all seat adjustments bef ore you start
driving.
Moving the long horizontal switch
adjusts the seat bottom in several
directions. The seat bottom adjusts
in the direction you move the switch.
The short vertical switch adjusts the
seat back angle. Moves the f ront of
the seat up or down
and the rear of the
seat up or down.Adjusts the seat-
back angle f orward
or backward.
See pages f or important saf ety
inf ormation and warnings about how toproperly position the seats and seat-backs.
On EX and EX-L models
11 13
Seats
Inst rument s and Cont rols
Power Seat A djustments
91
Page 98 of 296
Both seats can be removed to give
more cargo capacity.
To remove a seat:Unhook the f ront of the seat f rom
the f loor by pulling it back slightly,
then pivoting it upward.
Always remove an unsecured seat
f rom the vehicle bef ore driving. A
seat that is not locked in place could
be thrown about and cause injury in
a sudden stop or crash.To reinstall the seat, hook the f ront
of the seat to the f loor, then push the
back into the locks. Make sure both
the f ront and the back of the seat are
securely latched bef ore driving.
Pull up the seat-back angle
adjustment lever, and fold the seat-
back f orward.
Unlock the seat f rom the f loor by
pulling the lock release lever under the seat cushion’s f ront edge and
lifting the rear of the seat.
Seats
Inst rument s and Cont rols
Removing the Bucket Seats in the
Second Row
95
LOCK RELEASE LEVER