2004 FIAT MULTIPLA sat nav
[x] Cancel search: sat navPage 50 of 202

49
CONNECT NAV
NAVIGATOR
DYNAMIC TRAVEL GUIDE
(where fitted)
When the “DYnamic travel guide”
function is on, the satellite sound/nav-
igation system analyses and process-
es the traffic messages to compute the
route.
Traffic messages are broadcast by
RDS stations with TMC service (Traf-
fic Message Channel).
Proceed as follows to activate the
“Dynamic travel guide” function:
1) during “Route guidance” press the
MEN button (10). The main navigation
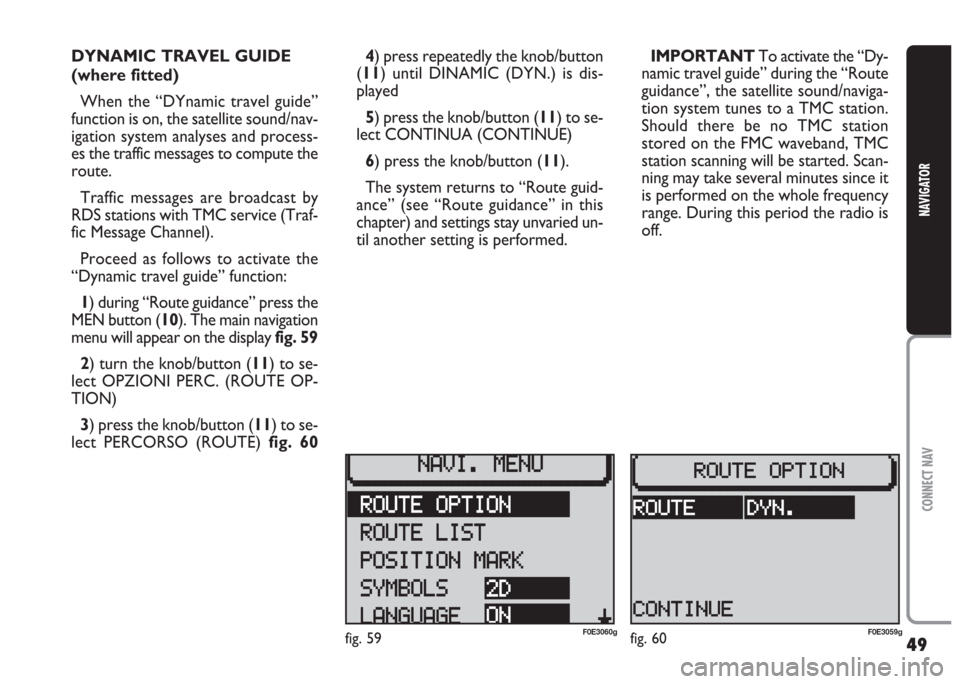
menu will appear on the display fig. 59
2) turn the knob/button (11) to se-
lect OPZIONI PERC. (ROUTE OP-
TION)
3) press the knob/button (11) to se-
lect PERCORSO (ROUTE) fig. 604) press repeatedly the knob/button
(11) until DINAMIC (DYN.) is dis-
played
5) press the knob/button (11) to se-
lect CONTINUA (CONTINUE)
6) press the knob/button (11).
The system returns to “Route guid-
ance” (see “Route guidance” in this
chapter) and settings stay unvaried un-
til another setting is performed.IMPORTANT To activate the “Dy-
namic travel guide” during the “Route
guidance”, the satellite sound/naviga-
tion system tunes to a TMC station.
Should there be no TMC station
stored on the FMC waveband, TMC
station scanning will be started. Scan-
ning may take several minutes since it
is performed on the whole frequency
range. During this period the radio is
off.
fig. 59F0E3060gfig. 60F0E3059g
Page 51 of 202

50
CONNECT NAV
NAVIGATOR
TOURIST GUIDE
INFORMATION
(where fitted)
You can access tourist information
during navigation.
1) Press the NAV button (12). The
main navigation menu will appear on
the displayfig. 61;
Tourist information on the destina-
tions can be recalled when using a nav-
igation CD.Information is contained in directo-
ries on the following topics: accomo-
dation, restaurants, tourist informa-
tion, amusements, etc…
The guide name will appear in the
main navigation menu if there is only
one guide on the CD. Proceed as fol-
lows:
1) Press the NAV button (12). The
main navigation menu will appear on
the display fig. 59
2) select the tourist guide (e.g. MERI-
ANscout) in the main navigation menu
by turning the knob/button (11)If more than one guides are available
on the CD, the list of guides will ap-
pear on the display. Proceed as fol-
lows:
1) select the required tourist guide
by pressing the knob/button (11)
2) confirm the selection by pressing
the knob/button (11)
3) enter the name of the town for
which information is required with
editing menu under SELEZIONE LO-
CALITÀ (DEST. ENTRY) (see “Desti-
nation entry” in the “Satellite naviga-
tion” chapter).
Press ESC (9) to return to the pre-
vious menu.
fig. 61F0E3068g
Page 56 of 202

55
CONNECT NAV
NAVIGATOR
GPS STATUS AND POSITION
INFORMATION
Proceed as follows to display infor-
mation concerning the number of GPS
satellites which can be received and
the car position:
1) press the NAV button (12). The
main navigation menu will be displayed
2) select INFO GPS (GPS STATUS)
by turning the knob/button (11)
3) confirm the selection by pressing
the knob/button (11).
Press ESC (9) to return to the pre-
vious menu.AVOIDING TAILBACKS
DURING NAVIGATION
The sound/navigation system can de-
tour tailbacks or road interruptions
during navigation.
IMPORTANT Only the options
for which data is available on the nav-
igation CD are offered. A lock symbol
Swill appear next to the unavailable
options.
Proceed as follows:
1) press the
kbutton (7). The IM-
POSTAZIONI (SETTINGS) menu will
appear on the displayfig. 712) position the cursor on INGOR-
GO DAVANT (TRAFFIC AHEAD)
with the knob/ button (11). The IN-
GORGO DAVANTI (TRAFFIC
AHEAD) menu will appear and the
cursor moves next to FINO (TO)
fig. 72
3) press the knob/button (11)
4) position the cursor on DA
(FROM) with the knob/button (11)
5) indicate from which distance with
respect to your position to start the
detour with the knob/button (11)
6) position the cursor on FINO (TO)
with the knob/button (11)
fig. 71F0E3064gfig. 72F0E3065g
Page 58 of 202

57
CONNECT NAV
NAVIGATOR
3) select the first route section you
want to delete from the list (it is bet-
ter to select a long route) with the
knob/button (11)
4) press the knob/button (11): a ring
will be displayed in front of the se-
lected route
5) turn the knob/button (11) until se-
lecting the last route to delete from
the list (it is better to select a long
route)
6) press the knob/button (11). The
main navigation menu will appear on
the display and a new route is calcu-
lated. The message NEW CALC will
appear on the display.Proceed as follows to delete/edit the
route section:
1) press the
kbutton (7). The IM-
POSTAZIONI (SETTINGS) menu will
appear on the display fig. 71
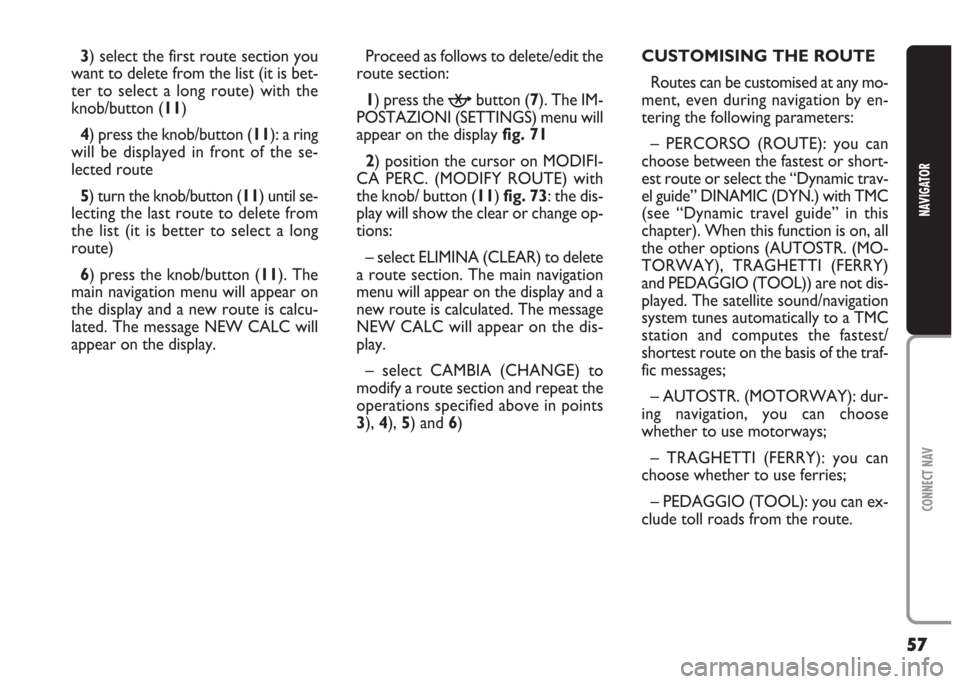
2) position the cursor on MODIFI-
CA PERC. (MODIFY ROUTE) with
the knob/ button (11) fig. 73: the dis-
play will show the clear or change op-
tions:
– select ELIMINA (CLEAR) to delete
a route section. The main navigation
menu will appear on the display and a
new route is calculated. The message
NEW CALC will appear on the dis-
play.
– select CAMBIA (CHANGE) to
modify a route section and repeat the
operations specified above in points
3), 4), 5) and 6)CUSTOMISING THE ROUTE
Routes can be customised at any mo-
ment, even during navigation by en-
tering the following parameters:
– PERCORSO (ROUTE): you can
choose between the fastest or short-
est route or select the “Dynamic trav-
el guide” DINAMIC (DYN.) with TMC
(see “Dynamic travel guide” in this
chapter). When this function is on, all
the other options (AUTOSTR. (MO-
TORWAY), TRAGHETTI (FERRY)
and PEDAGGIO (TOOL)) are not dis-
played. The satellite sound/navigation
system tunes automatically to a TMC
station and computes the fastest/
shortest route on the basis of the traf-
fic messages;
– AUTOSTR. (MOTORWAY): dur-
ing navigation, you can choose
whether to use motorways;
– TRAGHETTI (FERRY): you can
choose whether to use ferries;
– PEDAGGIO (TOOL): you can ex-
clude toll roads from the route.
Page 62 of 202

61
CONNECT NAV
NAVIGATOR
3) press the knob/button (11) to dis-
play ON or OFF. The default setting
is ON.
SWITCHING ROUTE TIME
INFORMATION ON AND OFF
The time required to reach the des-
tinations can be displayed.
Proceed as follows to switch the
route time information on and off:1) press the MEN button (10) in the
main navigation menu or in the route
guidance menu to open the navigation
setup menu
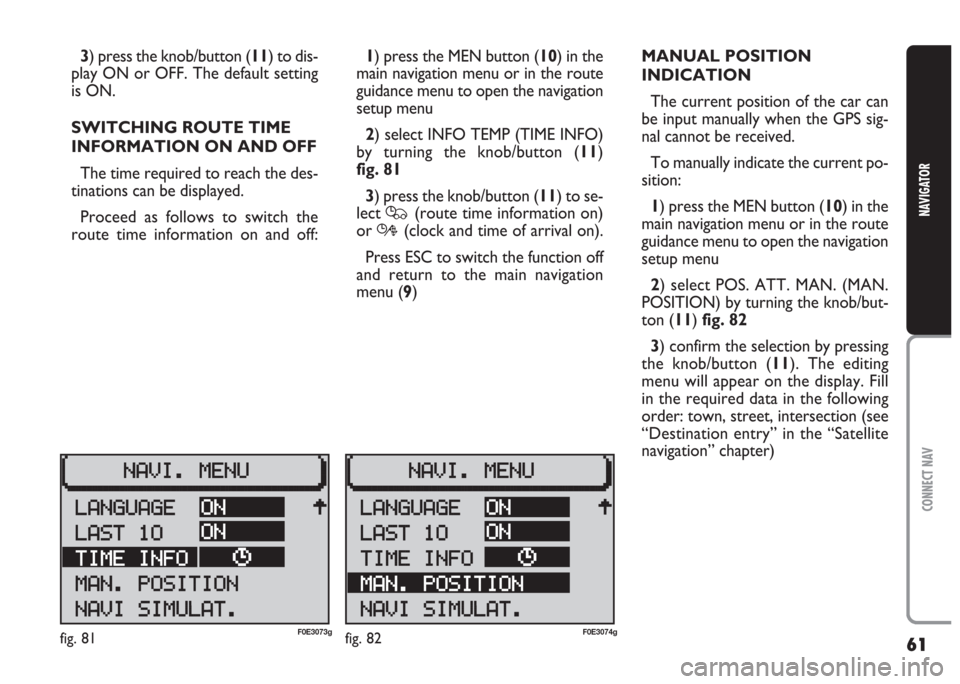
2) select INFO TEMP (TIME INFO)
by turning the knob/button (11)
fig. 81
3) press the knob/button (11) to se-
lect
Q(route time information on)
or
R(clock and time of arrival on).
Press ESC to switch the function off
and return to the main navigation
menu (9)MANUAL POSITION
INDICATION
The current position of the car can
be input manually when the GPS sig-
nal cannot be received.
To manually indicate the current po-
sition:
1) press the MEN button (10) in the
main navigation menu or in the route
guidance menu to open the navigation
setup menu
2) select POS. ATT. MAN. (MAN.
POSITION) by turning the knob/but-
ton (11) fig. 82
3) confirm the selection by pressing
the knob/button (11). The editing
menu will appear on the display. Fill
in the required data in the following
order: town, street, intersection (see
“Destination entry” in the “Satellite
navigation” chapter)
fig. 81F0E3073gfig. 82F0E3074g
Page 63 of 202

62
CONNECT NAV
NAVIGATOR
4) when you have finished defining
the position, press the knob/button
(11) for longer than two seconds to
confirm or select the (
j) symbol and
confirm. The main navigation menu
will appear on the display.
IMPORTANT Certain road inter-
sections (e.g. straight road intersection
with loop road) are not suitable for in-
dicating the car position. NAVIGATION SIMULATION
The sound/navigation system can
simulate a trip. The device simulates
navigation by providing realistic visual
instructions, voice messages and
acoustic signals.
Proceed as follows to start a simu-
lation:
1) enter a destination (see “Destina-
tion entry” in the “Satellite navigation”
chapter)
2) press the MEN button (10) in the
main navigation menu or in the route
guidance menu to open the navigation
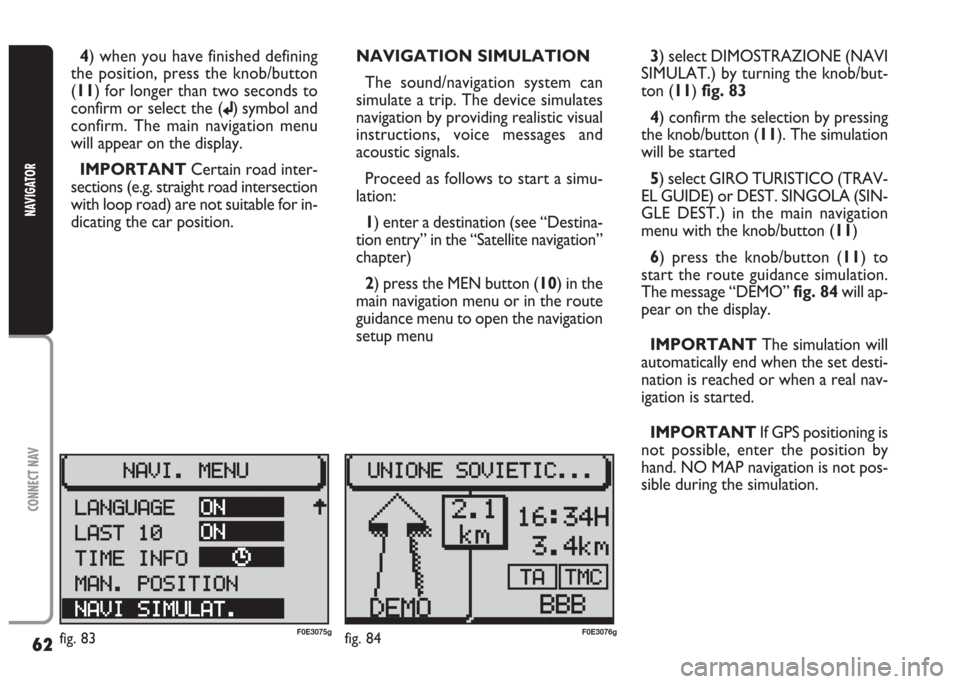
setup menu 3) select DIMOSTRAZIONE (NAVI
SIMULAT.) by turning the knob/but-
ton (11) fig. 83
4) confirm the selection by pressing
the knob/button (11). The simulation
will be started
5) select GIRO TURISTICO (TRAV-
EL GUIDE) or DEST. SINGOLA (SIN-
GLE DEST.) in the main navigation
menu with the knob/button (11)
6) press the knob/button (11) to
start the route guidance simulation.
The message “DEMO” fig. 84will ap-
pear on the display.
IMPORTANT The simulation will
automatically end when the set desti-
nation is reached or when a real nav-
igation is started.
IMPORTANT If GPS positioning is
not possible, enter the position by
hand. NO MAP navigation is not pos-
sible during the simulation.
fig. 83F0E3075gfig. 84F0E3076g
Page 70 of 202

69
CONNECT NAV
NAVIGATOR
Switching the time status
on and off
Proceed as follows to switch the
time status function on and off:
1) open the IMPOSTAZIONI (SET-
TINGS) menu fig. 85as shown above
2) select OROLOGIO (CLOCK) by
turning the knob/button (11)
3) press the knob/button (11) to
confirm the selection
4) select VISUALIZZA (DISPLAY) by
turning the knob/button (11)
5) press the knob/button (11) to se-
lect ON or OFF
Setting the exact time
manually
Proceed as follows to set manually
the exact time (e.g.: when no GPS
satellite signal is received):1) open the IMPOSTAZIONI (SET-
TINGS) menu fig. 85as shown above
2) select OROLOGIO (CLOCK) by
turning the knob/button (11)
3) press the knob/button (11) to
confirm the selection
4) select IMPOSTAZIONI (SET-
TINGS) by turning the knob/button
(11)
5) select ORA SISTEM. (SYS. TIME)
by turning the knob/button (11)
6) press the knob/button (11) to
confirm the selection: hours are dis-
played with reverse writing
7) turn the knob/button (11) to set
hours
8) press the knob/button (11) to
confirm the selection: minutes are dis-
played with reverse writing
9) turn the knob/button (11) to set
minutes
10) press the knob/button (11) to
confirm the selectionSELECTING THE LANGUAGE
You can select the language for mes-
sages on the display. “Metric” (dis-
tances in kilometres) and “imperial”
(distances in miles) versions are of-
fered for English
1) open the IMPOSTAZIONI (SET-
TINGS) menu fig. 85as shown above
2) select LINGUA (LANGUAGE) by
turning the knob/button (11)
3) press the knob/button (11) to
confirm the selection. A list of avail-
able languages will be displayed
IMPORTANT For certain coun-
tries (e.g. Denmark, Sweden and Por-
tugal), the voice messages related to
Navigation are in English whereas dis-
played messages are written in the lan-
guage of each country.
Page 71 of 202

70
CONNECT NAV
NAVIGATOR
GPS STATUS (INFO GPS)
Proceed as follows to display the
number of GPS satellites which can be
received and the car position:
1) press the NAV button (12) to
open the main navigation menu
2) press the MEN button (10) to
open the IMPOSTAZIONI (SET-
TINGS) menu
3) select INSTALLAZIONE (IN-
STALL) by turning the knob/button
(11) fig. 96 4) select the required language by
turning the knob/button (11)
5) confirm the selection by pressing
the knob/button (11).
A new language will be loaded. At the
end of the loading operation with a
CD inserted in the drive a confirma-
tion voice message will be heard.
The device will return to the IM-
POSTAZIONI (SETTINGS) menu.4) press the knob/button (11) to
confirm the selection. The INSTAL-
LAZIONE (INSTALL) menu will ap-
pear on the displayfig. 97
5) select INFO GPS (GPS STATUS)
by turning the knob/button (11)
6) confirm the selection by pressing
the knob/button (11).
Press ESC (9) to return to the pre-
vious menu.
fig. 92F0E3080gfig. 93F0E3088g