2004 FIAT MULTIPLA warning
[x] Cancel search: warningPage 5 of 202
4
CONNECT NAV
NAVIGATOR
IMPORTANT WARNINGS
FOR USE AND FOR DRIVING
SAFETY
The Satellite Navigator is an inte-
grated system which allows to easily
operate the major functions of your
car.
To avoid hazardous situations for
yourself and other road users when
using the Satellite Navigator you
should take the following advice:
– the navigation system must be used
keeping full control of the car. If in
doubt, stop the car to carry out the
various operations;
– serious accidents can be caused by
distractions or by not following the
flow of traffic;
– get to know the sound/navigation
system and its controls before
starting off;– enter the destination only when
the car is stationary;
– close the front panel when travel-
ling.
The navigation system will guide you
to your destination and indicate vari-
ations to the route stored on the nav-
igation CD. This is because the system
takes traffic information into account
when calculating to recommend the
best route possible. The system, how-
ever, cannot consider traffic condi-
tions, sudden interruptions or other
problems.
The navigation system assists the dri-
ver during the trip and recommends
the best route to be followed to reach
the preset destination by means of
voice and graphic instructions.IMPORTANTThe suggestions
provided by the navigation system do
not lessen the driver’s responsibility
when driving the car to observe the
highway code and the traffic signs.
Road safety is always and only the sole
responsibility of the driver.
All manoeuvres must be made re-
specting the highway code regardless
of the advice provided by the naviga-
tion system. The navigation system will
compute a new route and provide in-
structions should you detour from the
recommended route.
U U
S S
E E
F F
U U
L L
A A
D D
V V
I I
C C
E E
Page 10 of 202

9
CONNECT NAV
NAVIGATOR
AUDIO SECTION
– Separate bass/treble settings.
– Right/left and front/rear channel
balance.
– Automatic LOUDNESS function.SATELLITE NAVIGATION
SECTION
– Voice messages for the route to
be followed.
– Driving advice, distance and
probable time required to reach the
destination on the display.
– Possibility of entering special or
different destinations.
– Possibility of storing destinations.Fuses
The Satellite/Navigation system is
protected by a 10A fuse fig. 5.
fig. 5F0E0309m
Multimedia CDs contain
sound and data tracks.
Playing these CDs can cause noise
loud enough to jeopardise road
safety and damage final stages and
speakers.
WARNING
Page 14 of 202

13
CONNECT NAV
NAVIGATOR
ADJUSTING THE VOLUME
To turn the volume up: turn the
knob/button (16) clockwise.
To turn the volume down: turn the
knob/button (16) anticlockwise.
The volume is graphically shown on
the display during the adjustment
(sound source main menu only) fig. 8.IMPORTANTThe volume of a
navigation voice message can be
changed, regardless of the basic sound
source volume.Automatic muting during
a phone call
If a cellular phone is fitted, the
sound/navigation system volume will
be automatically muted during the call
and the telephone symbol will appear
on the display.
If the phone call is made when the ac-
tive navigation function is on, the dis-
play continues to show driving info and
voice messages stay active.
fig. 8F0E3021g
If you drive with the volume
too high you put both your
own life and that of others in jeop-
ardy. You should adjust the volume
so that you can hear noises from
outside the car (e.g. horns, ambu-
lance/ police sirens, etc.).
WARNING
Page 22 of 202
21
CONNECT NAV
NAVIGATOR
PTY FUNCTION
(PROGRAM TYPE)
PTY is an RDS function. The stations
use PTY to broadcast the contents of
their programmes (POP, ROCK, etc.)
to help you make your choice.
The programme contents will appear
for a few seconds when the PTY func-
tion is on and a new station is tuned
to. The contents will not be displayed
if the station does not use the PTY
function.Switching on and off
Proceed as follows to switch the PTY
function on and off:
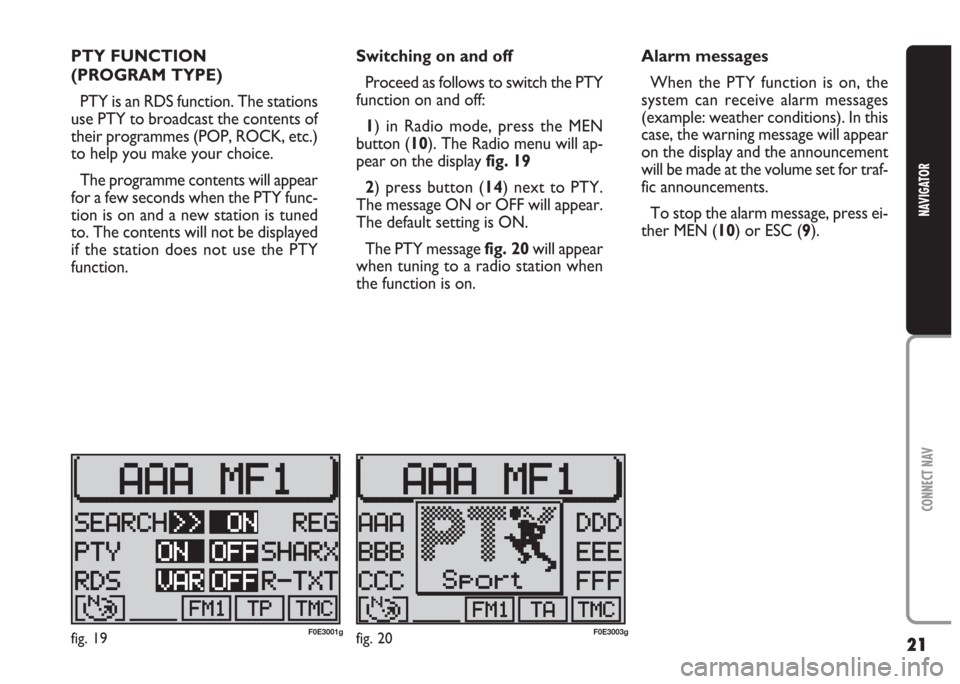
1) in Radio mode, press the MEN
button (10). The Radio menu will ap-
pear on the display fig. 19
2) press button (14) next to PTY.
The message ON or OFF will appear.
The default setting is ON.
The PTY message fig. 20will appear
when tuning to a radio station when
the function is on.Alarm messages
When the PTY function is on, the
system can receive alarm messages
(example: weather conditions). In this
case, the warning message will appear
on the display and the announcement
will be made at the volume set for traf-
fic announcements.
To stop the alarm message, press ei-
ther MEN (10) or ESC (9).
fig. 19F0E3001gfig. 20F0E3003g
Page 28 of 202
27
CONNECT NAV
NAVIGATOR
C C
O O
M M
P P
A A
C C
T T
D D
I I
S S
C C
( (
C C
D D
) )
Audio CDs can be played with the in-
ternal CD player or with the CD
CHANGER(where fitted).
During CD playback, either the track
number and the playing time, or the
track number only, will appear on the
display (according to the settings, see
CD
FUNCTIONSin this chapter).
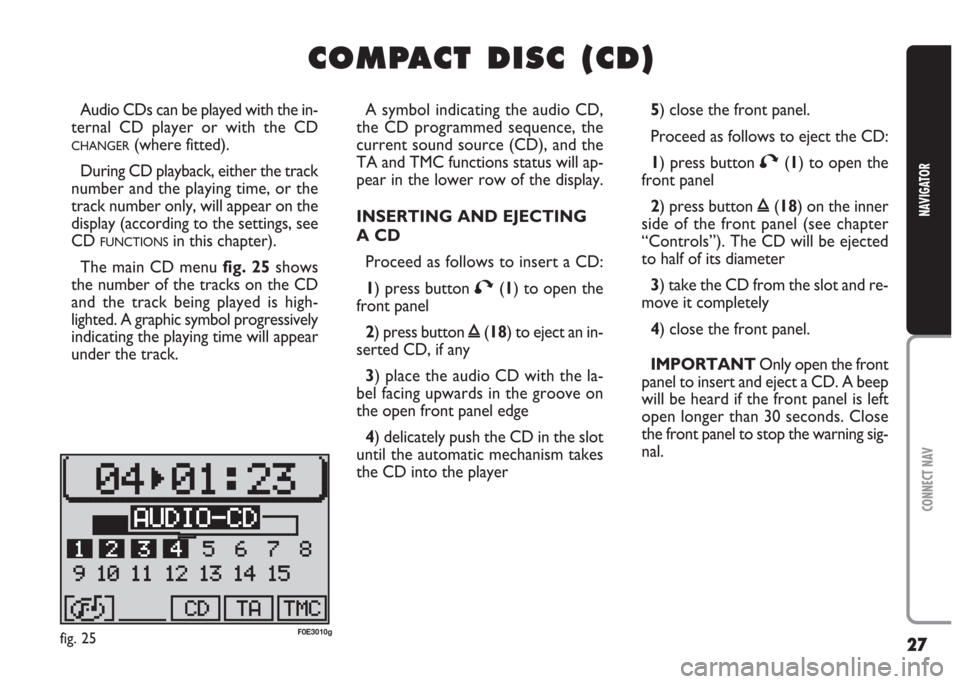
The main CD menu fig. 25shows
the number of the tracks on the CD
and the track being played is high-
lighted. A graphic symbol progressively
indicating the playing time will appear
under the track.A symbol indicating the audio CD,
the CD programmed sequence, the
current sound source (CD), and the
TA and TMC functions status will ap-
pear in the lower row of the display.
INSERTING AND EJECTING
A CD
Proceed as follows to insert a CD:
1) press button
T(1) to open the
front panel
2) press button
ı(18) to eject an in-
serted CD, if any
3) place the audio CD with the la-
bel facing upwards in the groove on
the open front panel edge
4) delicately push the CD in the slot
until the automatic mechanism takes
the CD into the player5) close the front panel.
Proceed as follows to eject the CD:
1) press button
T(1) to open the
front panel
2) press button
ı(18) on the inner
side of the front panel (see chapter
“Controls”). The CD will be ejected
to half of its diameter
3) take the CD from the slot and re-
move it completely
4) close the front panel.
IMPORTANT Only open the front
panel to insert and eject a CD. A beep
will be heard if the front panel is left
open longer than 30 seconds. Close
the front panel to stop the warning sig-
nal.
fig. 25F0E3010g
Page 29 of 202
28
CONNECT NAV
NAVIGATOR
PLAYING A CD
(INTERNAL PLAYER)
Playback will start automatically as
soon as a CD is inserted.
If you are using another source and
a CD is inserted in the internal player,
press the CD-C button (15). The main
CD menu fig. 25will appear on the
display and the CD playback will start.CD FUNCTIONS
Proceed as follows if the last source
was the CD
CHANGER(where fitted)
and there are one or more audio CDs
inside:
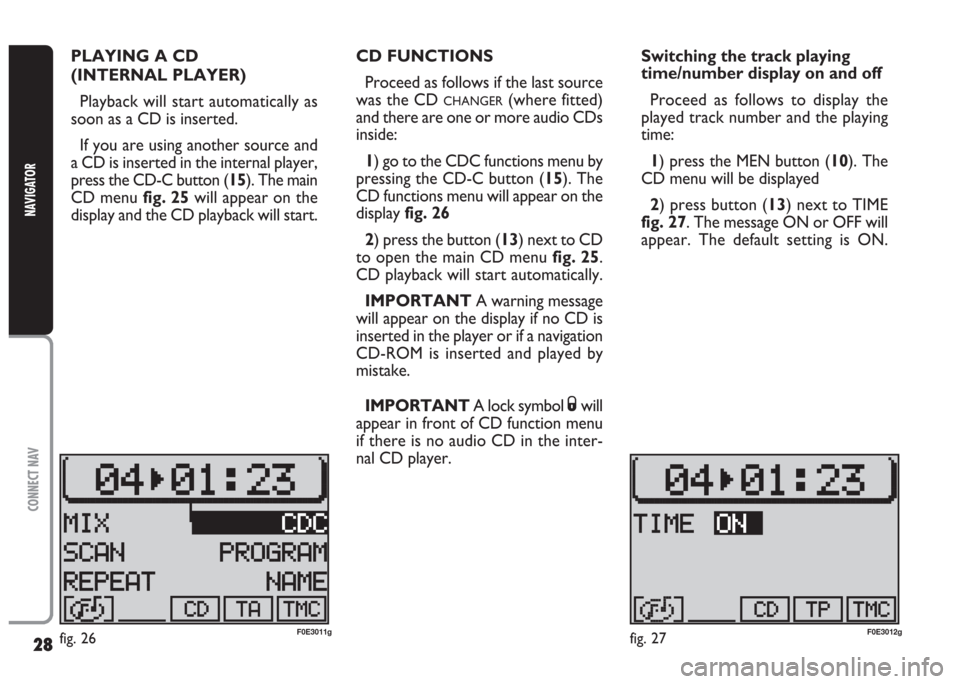
1) go to the CDC functions menu by
pressing the CD-C button (15). The
CD functions menu will appear on the
display fig. 26
2) press the button (13) next to CD
to open the main CD menu fig. 25.
CD playback will start automatically.
IMPORTANT A warning message
will appear on the display if no CD is
inserted in the player or if a navigation
CD-ROM is inserted and played by
mistake.
IMPORTANT A lock symbol
Swill
appear in front of CD function menu
if there is no audio CD in the inter-
nal CD player.Switching the track playing
time/number display on and off
Proceed as follows to display the
played track number and the playing
time:
1) press the MEN button (10). The
CD menu will be displayed
2) press button (13) next to TIME
fig. 27. The message ON or OFF will
appear. The default setting is ON.
fig. 26F0E3011gfig. 27F0E3012g
Page 66 of 202
65
CONNECT NAV
NAVIGATOR
Adjusting display brightness
Proceed as follows to adjust display
brightness:
1) Open the IMPOSTAZIONI (SET-
TINGS) menu fig. 85as described
above
2) Select DISPLAY by turning the
knob/button (11)
3) Press the knob/button (11) to
confirm the selection
4) Select LUMINOSITÀ (BRIGHT-
NESS) by turning the knob/button (11)
fig. 86
5) press the knob/button (11) to
confirm the selection
6) select GIORNO (DAY) or
NOTTE (NIGHT) by turning the
knob/button (11) to adjust brightness
7) press the knob/button (11) to
confirm the setting.
Press ESC (9) to return to the pre-
vious menu.ADJUSTING POWER-ON, TA
ANNOUNCEMENT,
MESSAGE
The power-on volume (ACCENS.)
(POWER-ON), the minimum traffic
announcement volume (TA-MIN), the
minimum volume for voice messages
and warnings (NAV-MIN) can be set
in the IMPOSTAZIONI (SETTINGS)
menu.
IMPORTANT The system volume
overrides the IMPOSTAZIONI (SET-
TINGS) volume when it is higher than
the minimum setup volume. Adjusting the fade effect
Proceed as follows to adjust the fade
effect:
1) open the IMPOSTAZIONI (SET-
TINGS) menu fig. 85as described
above
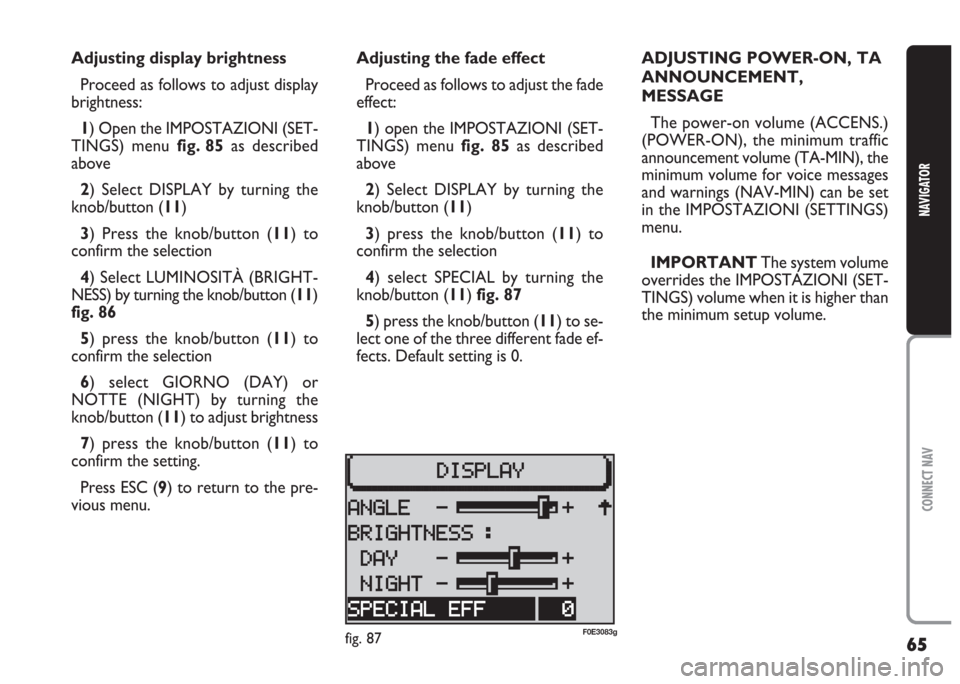
2) Select DISPLAY by turning the
knob/button (11)
3) press the knob/button (11) to
confirm the selection
4) select SPECIAL by turning the
knob/button (11) fig. 87
5) press the knob/button (11) to se-
lect one of the three different fade ef-
fects. Default setting is 0.
fig. 87F0E3083g
Page 67 of 202
66
CONNECT NAV
NAVIGATOR
IMPORTANT The minimum vol-
ume is a form of limitation. If the vol-
ume was lower than the minimum set-
up volume when the system was
switched off this will override the IM-
POSTAZIONI (SETTINGS) volume. If
on the other hand the volume was
higher, the minimum volume will be
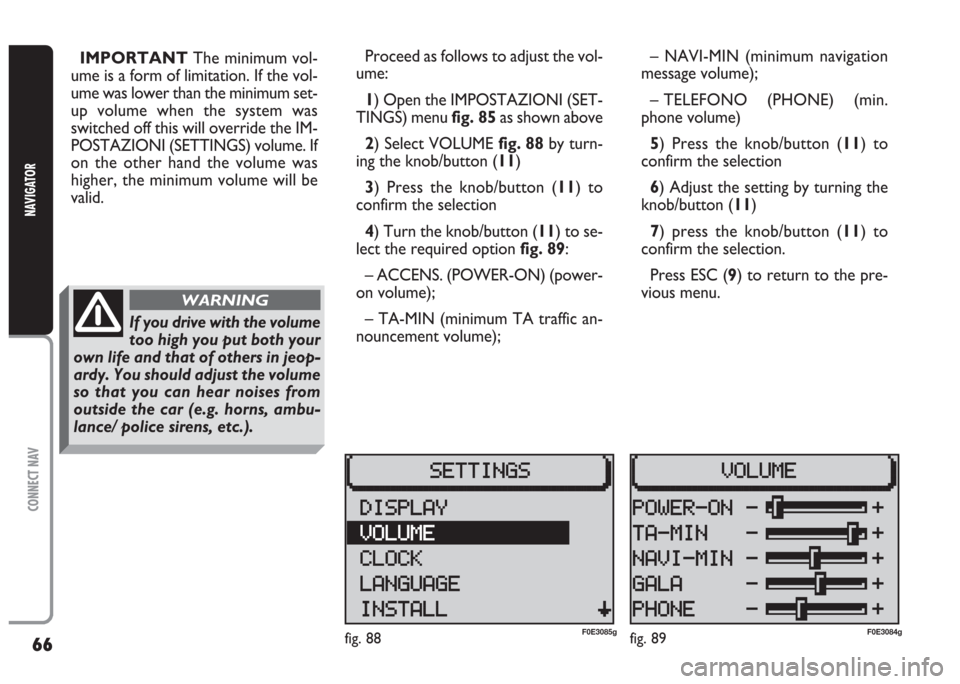
valid.Proceed as follows to adjust the vol-
ume:
1) Open the IMPOSTAZIONI (SET-
TINGS) menu fig. 85as shown above
2) Select VOLUME fig. 88 by turn-
ing the knob/button (11)
3) Press the knob/button (11) to
confirm the selection
4) Turn the knob/button (11) to se-
lect the required option fig. 89:
– ACCENS. (POWER-ON) (power-
on volume);
– TA-MIN (minimum TA traffic an-
nouncement volume);– NAVI-MIN (minimum navigation
message volume);
– TELEFONO (PHONE) (min.
phone volume)
5) Press the knob/button (11) to
confirm the selection
6) Adjust the setting by turning the
knob/button (11)
7) press the knob/button (11) to
confirm the selection.
Press ESC (9) to return to the pre-
vious menu.
fig. 89F0E3084gfig. 88F0E3085g
If you drive with the volume
too high you put both your
own life and that of others in jeop-
ardy. You should adjust the volume
so that you can hear noises from
outside the car (e.g. horns, ambu-
lance/ police sirens, etc.).
WARNING