2004 DAEWOO NUBIRA battery
[x] Cancel search: batteryPage 1849 of 2643
FIVE–SPEED MANUAL TRANSAXLE 5B – 25
DAEWOO V–121 BL4
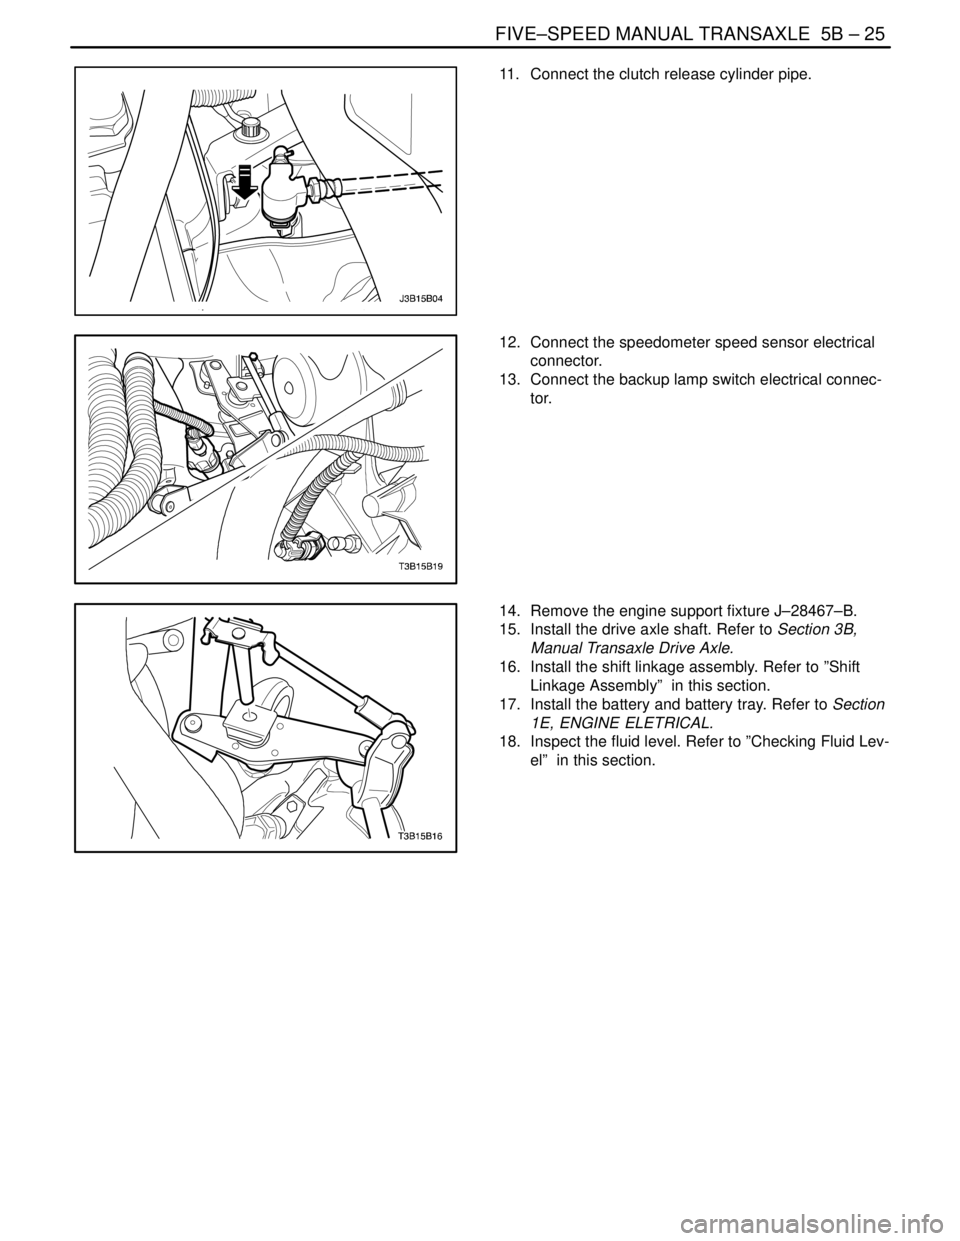
11. Connect the clutch release cylinder pipe.
12. Connect the speedometer speed sensor electrical
connector.
13. Connect the backup lamp switch electrical connec-
tor.
14. Remove the engine support fixture J–28467–B.
15. Install the drive axle shaft. Refer to Section 3B,
Manual Transaxle Drive Axle.
16. Install the shift linkage assembly. Refer to ”Shift
Linkage Assembly” in this section.
17. Install the battery and battery tray. Refer to Section
1E, ENGINE ELETRICAL.
18. Inspect the fluid level. Refer to ”Checking Fluid Lev-
el” in this section.
Page 1888 of 2643

SECTION : 5C
CLUTCH
CAUTION : Disconnect the negative battery cable before removing or installing any electrical unit or when a tool
or equipment could easily come in contact with exposed electrical terminals. Disconnecting this cable will help
prevent personal injury and damage to the vehicle. The ignition must also be in LOCK unless otherwise noted.
TABLE OF CONTENTS
SPECIFICATIONS5C–1 . . . . . . . . . . . . . . . . . . . . . . . . . .
Fastener Tightening Specifications 5C–1. . . . . . . . . . .
SPECIAL TOOLS5C–2 . . . . . . . . . . . . . . . . . . . . . . . . . . .
Special Tools Table 5C–2. . . . . . . . . . . . . . . . . . . . . . . .
DIAGNOSIS5C–2 . . . . . . . . . . . . . . . . . . . . . . . . . . . . . . . .
Clutch Operation 5C–2. . . . . . . . . . . . . . . . . . . . . . . . . .
COMPONENT LOCATOR5C–4 . . . . . . . . . . . . . . . . . . . .
Clutch Components 5C–4. . . . . . . . . . . . . . . . . . . . . . . .
MAINTENANCE AND REPAIR5C–6 . . . . . . . . . . . . . . .
ON–VEHICLE SERVICE 5C–6. . . . . . . . . . . . . . . . . . . . .
Clutch Pedal 5C–6. . . . . . . . . . . . . . . . . . . . . . . . . . . . . . Clutch Pedal Adjustment 5C–7. . . . . . . . . . . . . . . . . . . .
Clutch Release Point Adjustment 5C–8. . . . . . . . . . . .
Air Bleeding 5C–8. . . . . . . . . . . . . . . . . . . . . . . . . . . . . . .
Pressure Plate and Clutch Disc 5C–8. . . . . . . . . . . . . .
Clutch Master Cylinder Assembly 5C–10. . . . . . . . . . .
Concentric Slave Cylinder 5C–12. . . . . . . . . . . . . . . . . .
GENERAL DESCRIPTION AND SYSTEM
OPERATION5C–14 . . . . . . . . . . . . . . . . . . . . . . . . . . . . .
Driving Members 5C–14. . . . . . . . . . . . . . . . . . . . . . . . .
Driven Members 5C–14. . . . . . . . . . . . . . . . . . . . . . . . . .
Operating Members 5C–14. . . . . . . . . . . . . . . . . . . . . . .
SPECIFICATIONS
FASTENER TIGHTENING SPECIFICATIONS
ApplicationNSmLb–FtLb–In
Clutch Master Cylinder nuts2216–
Concentric Slave Cylinder Retaining Bolts7–62
Concentric Slave Cylinder–to–Clutch Oil Pipe Screw1511–
Pressure Plate–to–Flywheel Bolts1511–
Page 1893 of 2643
5C – 6ICLUTCH
DAEWOO V–121 BL4
MAINTENANCE AND REPAIR
ON–VEHICLE SERVICE
CLUTCH PEDAL
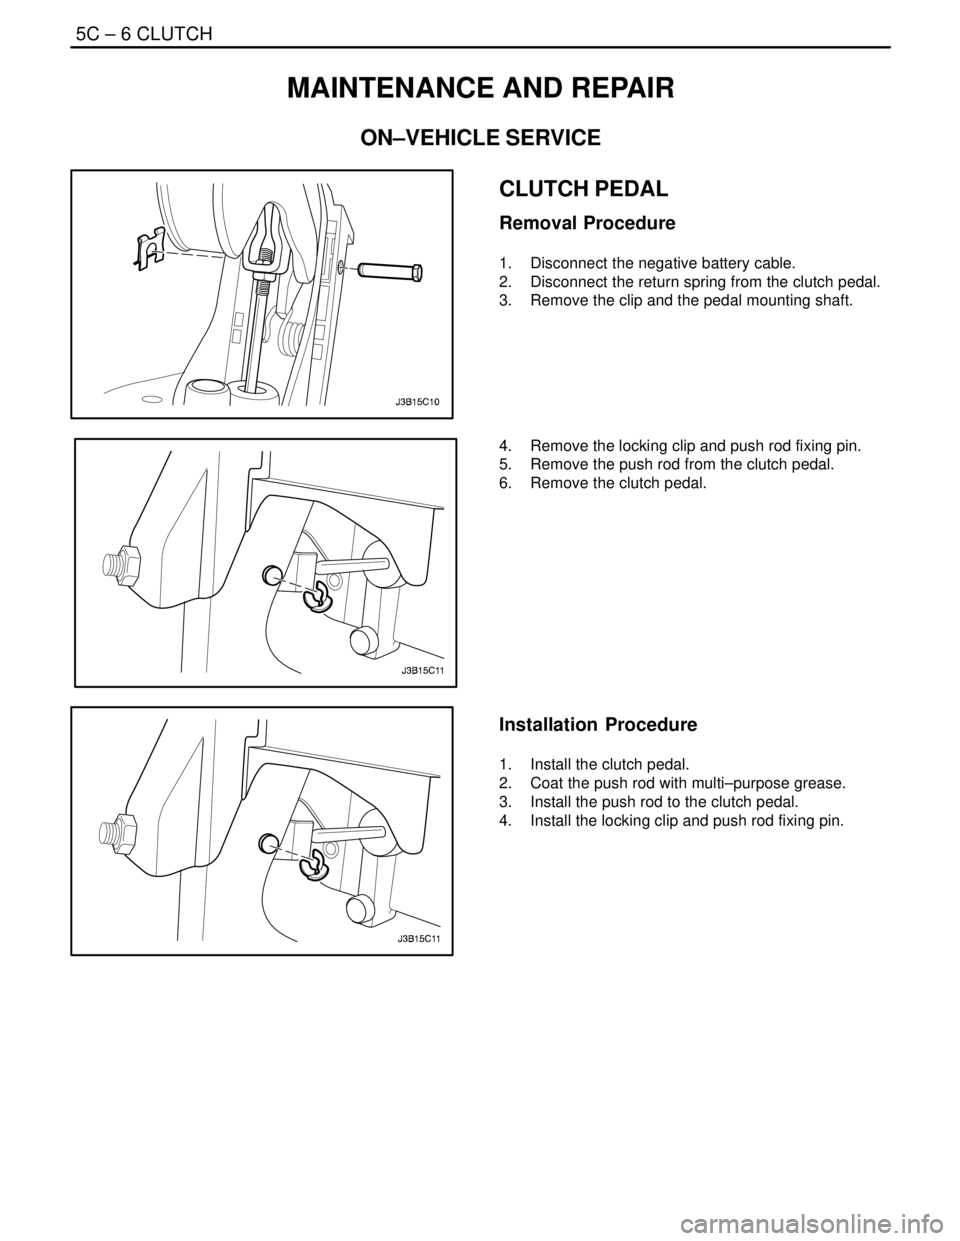
Removal Procedure
1. Disconnect the negative battery cable.
2. Disconnect the return spring from the clutch pedal.
3. Remove the clip and the pedal mounting shaft.
4. Remove the locking clip and push rod fixing pin.
5. Remove the push rod from the clutch pedal.
6. Remove the clutch pedal.
Installation Procedure
1. Install the clutch pedal.
2. Coat the push rod with multi–purpose grease.
3. Install the push rod to the clutch pedal.
4. Install the locking clip and push rod fixing pin.
Page 1894 of 2643
CLUTCH 5C – 7
DAEWOO V–121 BL4
5. Coat the pedal mounting shaft with multi–purpose
grease.
6. Install the clip and the pedal mounting shaft.
7. Connect the return spring to the clutch pedal.
8. Adjust the clutch pedal play. Refer to ”Clutch Pedal
Adjustment” in this section.
9. Connect the negative battery cable.
CLUTCH PEDAL ADJUSTMENT
Adjustment Procedure
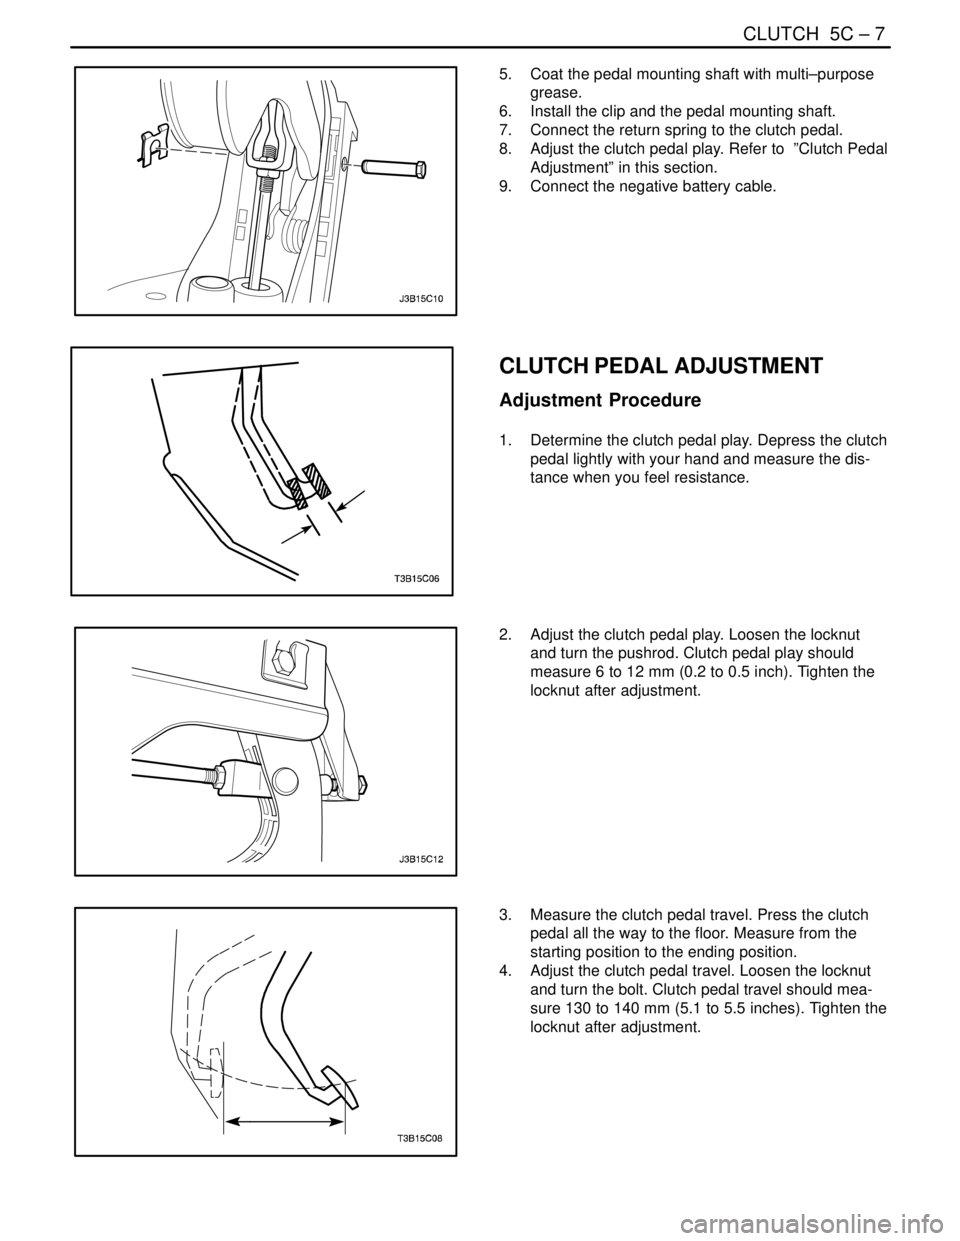
1. Determine the clutch pedal play. Depress the clutch
pedal lightly with your hand and measure the dis-
tance when you feel resistance.
2. Adjust the clutch pedal play. Loosen the locknut
and turn the pushrod. Clutch pedal play should
measure 6 to 12 mm (0.2 to 0.5 inch). Tighten the
locknut after adjustment.
3. Measure the clutch pedal travel. Press the clutch
pedal all the way to the floor. Measure from the
starting position to the ending position.
4. Adjust the clutch pedal travel. Loosen the locknut
and turn the bolt. Clutch pedal travel should mea-
sure 130 to 140 mm (5.1 to 5.5 inches). Tighten the
locknut after adjustment.
Page 1895 of 2643
5C – 8ICLUTCH
DAEWOO V–121 BL4
CLUTCH RELEASE POINT
ADJUSTMENT
Adjustment Procedure
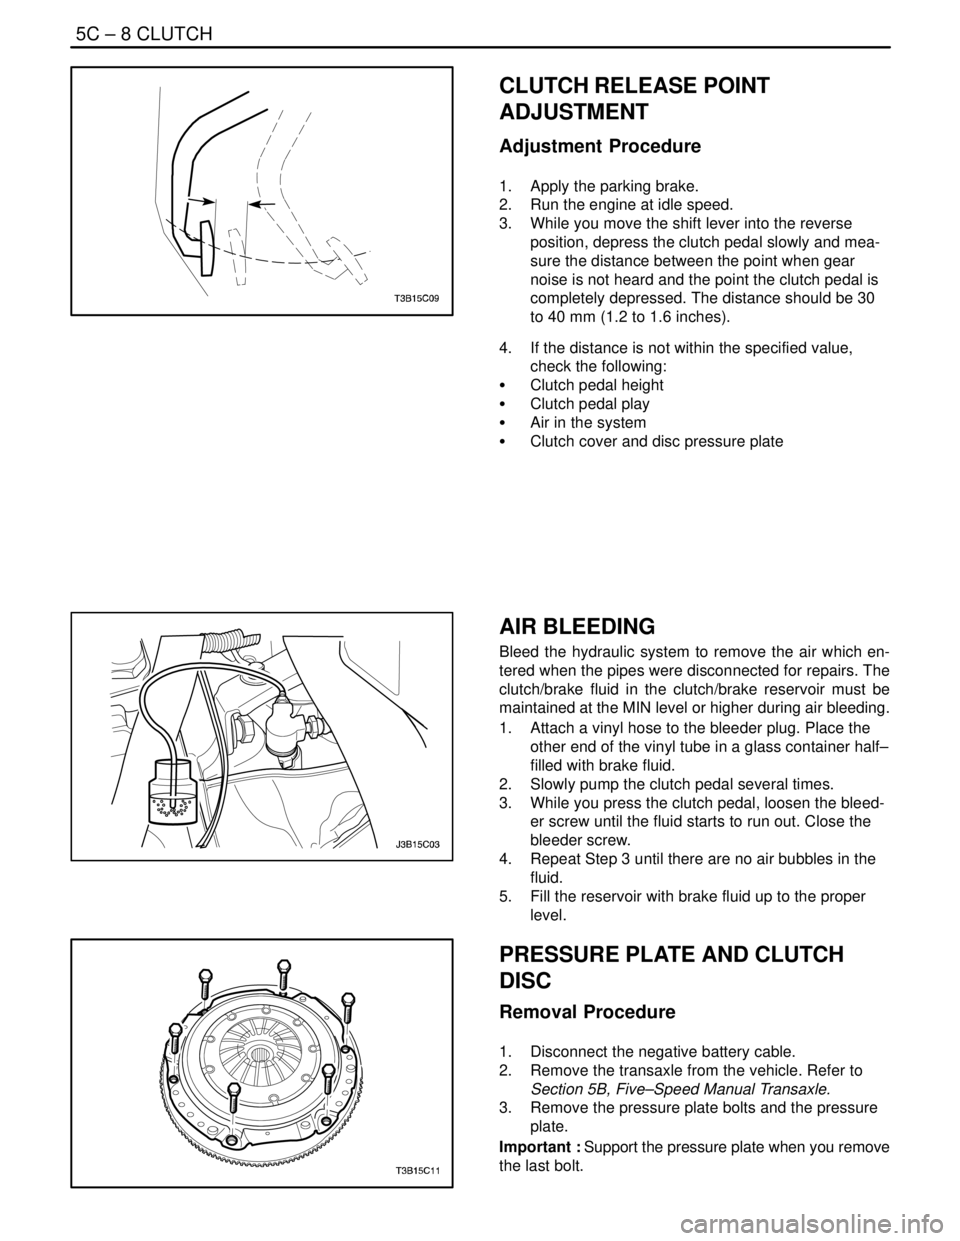
1. Apply the parking brake.
2. Run the engine at idle speed.
3. While you move the shift lever into the reverse
position, depress the clutch pedal slowly and mea-
sure the distance between the point when gear
noise is not heard and the point the clutch pedal is
completely depressed. The distance should be 30
to 40 mm (1.2 to 1.6 inches).
4. If the distance is not within the specified value,
check the following:
S Clutch pedal height
S Clutch pedal play
S Air in the system
S Clutch cover and disc pressure plate
AIR BLEEDING
Bleed the hydraulic system to remove the air which en-
tered when the pipes were disconnected for repairs. The
clutch/brake fluid in the clutch/brake reservoir must be
maintained at the MIN level or higher during air bleeding.
1. Attach a vinyl hose to the bleeder plug. Place the
other end of the vinyl tube in a glass container half–
filled with brake fluid.
2. Slowly pump the clutch pedal several times.
3. While you press the clutch pedal, loosen the bleed-
er screw until the fluid starts to run out. Close the
bleeder screw.
4. Repeat Step 3 until there are no air bubbles in the
fluid.
5. Fill the reservoir with brake fluid up to the proper
level.
PRESSURE PLATE AND CLUTCH
DISC
Removal Procedure
1. Disconnect the negative battery cable.
2. Remove the transaxle from the vehicle. Refer to
Section 5B, Five–Speed Manual Transaxle.
3. Remove the pressure plate bolts and the pressure
plate.
Important : Support the pressure plate when you remove
the last bolt.
Page 1897 of 2643
5C – 10ICLUTCH
DAEWOO V–121 BL4
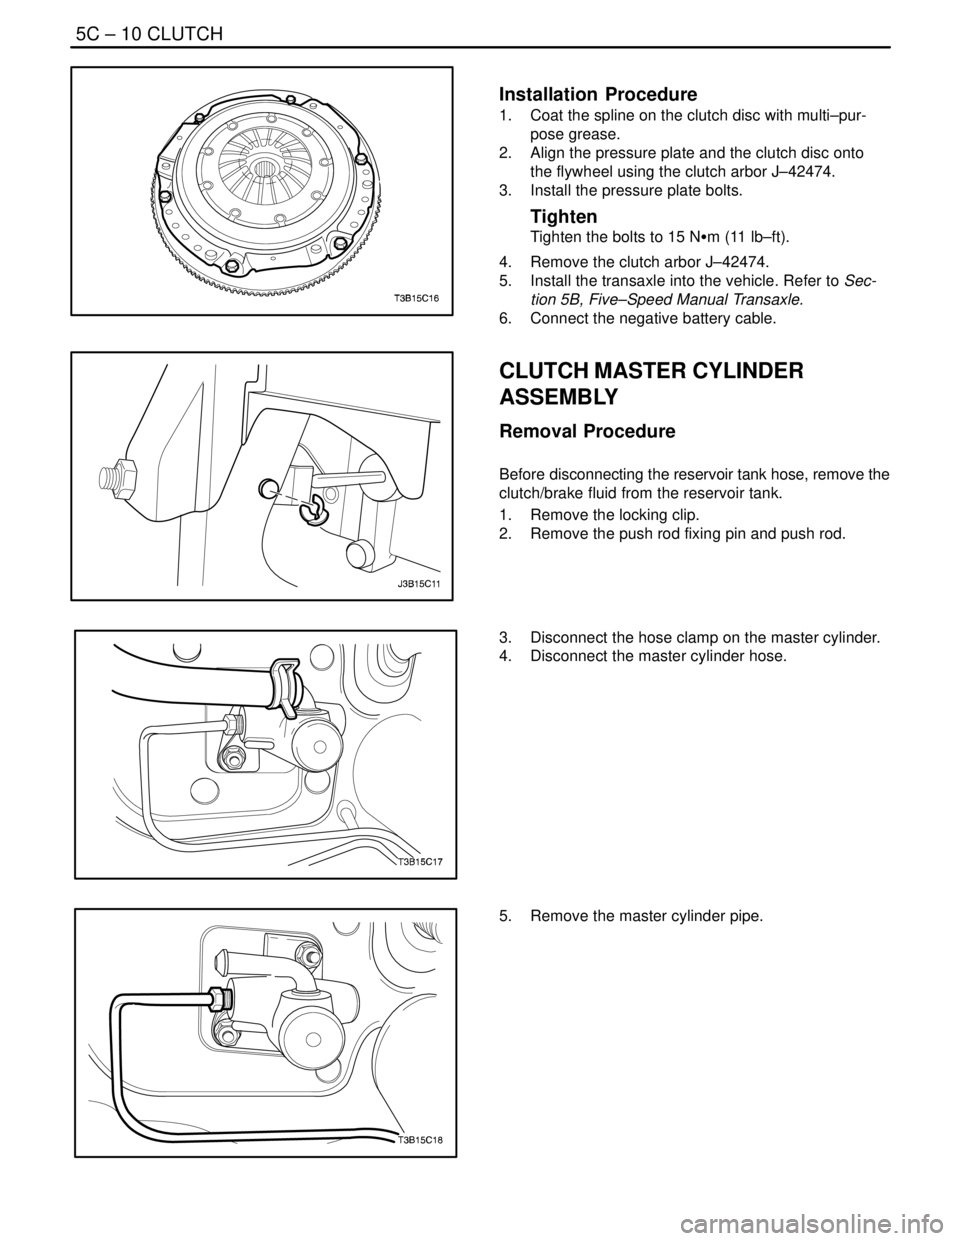
Installation Procedure
1. Coat the spline on the clutch disc with multi–pur-
pose grease.
2. Align the pressure plate and the clutch disc onto
the flywheel using the clutch arbor J–42474.
3. Install the pressure plate bolts.
Tighten
Tighten the bolts to 15 NSm (11 lb–ft).
4. Remove the clutch arbor J–42474.
5. Install the transaxle into the vehicle. Refer to Sec-
tion 5B, Five–Speed Manual Transaxle.
6. Connect the negative battery cable.
CLUTCH MASTER CYLINDER
ASSEMBLY
Removal Procedure
Before disconnecting the reservoir tank hose, remove the
clutch/brake fluid from the reservoir tank.
1. Remove the locking clip.
2. Remove the push rod fixing pin and push rod.
3. Disconnect the hose clamp on the master cylinder.
4. Disconnect the master cylinder hose.
5. Remove the master cylinder pipe.
Page 1918 of 2643

SECTION : 6C
POWER STEERING GEAR
CAUTION : Disconnect the negative battery cable before removing or installing any electrical unit or when a tool
or equipment could easily come in contact with exposed electrical terminals. Disconnecting this cable will help
prevent personal injury and damage to the vehicle. The ignition must also be in LOCK unless otherwise noted.
TABLE OF CONTENTS
SPECIFICATIONS6C–1 . . . . . . . . . . . . . . . . . . . . . . . . . .
General Specifications 6C–1. . . . . . . . . . . . . . . . . . . . .
Fastener Tightening Specifications 6C–2. . . . . . . . . . .
SPECIAL TOOLS6C–2 . . . . . . . . . . . . . . . . . . . . . . . . . . .
Special Tools Table 6C–2. . . . . . . . . . . . . . . . . . . . . . . .
DIAGNOSIS6C–3 . . . . . . . . . . . . . . . . . . . . . . . . . . . . . . . .
Power Rack and Pinion Steering Gear 6C–3. . . . . . . .
Power Rack and Pinion Steering Gear Bench
Testing 6C–5. . . . . . . . . . . . . . . . . . . . . . . . . . . . . . . . .
Speed Sensitive Power Steering System 6C–6. . . . . .
Speed Sensitive Power Steering System Operating
With Full Assist At All Times 6C–7. . . . . . . . . . . . . . .
Speed Sensitive Power Steering System Operating
with Decreased Assist At All Times 6C–9. . . . . . . . .
MAINTENANCE AND REPAIR6C–11 . . . . . . . . . . . . . .
ON–VEHICLE SERVICE 6C–11. . . . . . . . . . . . . . . . . . . .
Rack and Pinion Assembly 6C–11. . . . . . . . . . . . . . . . . Outer Tie Rod 6C–14. . . . . . . . . . . . . . . . . . . . . . . . . . . .
Dust Boot 6C–15. . . . . . . . . . . . . . . . . . . . . . . . . . . . . . . .
Straight–Ahead Check 6C–16. . . . . . . . . . . . . . . . . . . .
Intermediate Shaft and Dash Seal 6C–17. . . . . . . . . .
Hydraulic Cylinder Lines 6C–20. . . . . . . . . . . . . . . . . . .
Speed Sensitive Power Steering Control
Module 6C–21. . . . . . . . . . . . . . . . . . . . . . . . . . . . . . . .
UNIT REPAIR 6C–22. . . . . . . . . . . . . . . . . . . . . . . . . . . . .
Rack and Pinion 6C–22. . . . . . . . . . . . . . . . . . . . . . . . . .
Stub Shaft Seals and Upper and Lower
Bearing 6C–26. . . . . . . . . . . . . . . . . . . . . . . . . . . . . . . .
Rack Bearing 6C–29. . . . . . . . . . . . . . . . . . . . . . . . . . . .
Rack Bearing Preload Adjustment 6C–30. . . . . . . . . . .
Valve and Pinion 6C–30. . . . . . . . . . . . . . . . . . . . . . . . . .
GENERAL DESCRIPTION AND SYSTEM
OPERATION6C–33 . . . . . . . . . . . . . . . . . . . . . . . . . . . . .
Power Rack and Pinion 6C–33. . . . . . . . . . . . . . . . . . . .
Speed Sensitive Power Steering System 6C–33. . . . .
SPECIFICATIONS
GENERAL SPECIFICATIONS
ApplicationDescription
Capacity1.1 Liter (1.16 qt)
LubricantPower Steering Fluid DEXRON®–II or III
Page 1924 of 2643

POWER STEERING GEAR 6C – 7
DAEWOO V–121 BL4
SPEED SENSITIVE POWER STEERING SYSTEM
OPERATING WITH FULL ASSIST AT ALL TIMES
StepActionValue(s)YesNo
1Perform an initial inspection of the power steering
system.
Is the system operational?–Go to Step 2Go to
Section 6A,
Power Steering
System
2Check the speedometer.
Is the speedometer inoperative?–Go to
Section5,
TransaxleGo to Step 3
3Check the diagnostic trouble codes at the engine
control module (ECM).
Is the ECM code 24 set?–Go to
Section1F,
Engine
ControlsGo to Step 4
41. Turn the ignition ON.
2. Disconnect the electronic variable orifice (EVO)
solenoid actuator electrical connector at the
power steering pump.
3. Probe terminal 1 of the EVO actuator connec-
tor with a voltmeter.
Does the voltmeter display the specified value?–Go to Step 6Go to Step 5
5Repair the open or short in the circuit between termi-
nal 1 of the EVO solenoid actuator electrical connec-
tor and terminal 2 on the speed sensitive power
steering (SSPS) control module connector.
Is the repair complete?–System OK–
61. Remove the EVO solenoid actuator from the
power steering pump.
2. Turn the actuator upside down to position the
pintle.
3. Stimulate the actuator by connecting it to the
battery.
Does the actuator click?–Go to Step 8Go to Step 7
7Replace the EVO solenoid actuator.
Is the repair complete?–System OK–
81. Turn the ignition OFF.
2. Remove the SSPS control module from the
control module bracket.
3. Disconnect the SSPS control module connec-
tor.
4. Connect a test light from terminal 8 on the
SSPS control module connector to the ground.
5. Turn the ignition ON.
Is the test light on?–Go to Step 14Go to Step 9
9Check the ignition fuse.
Is the ignition fuse open?–Go to Step 10Go to Step 11
10Replace the ignition fuse.
Is the repair complete?–System OK–
11Check for an open or short in the circuit between ter-
minal 8 of the control module connector and the I/P
fuse block.
Is the connection faulty?–Go to Step 12Go to Step 13