2004 DAEWOO NUBIRA tires
[x] Cancel search: tiresPage 5 of 2643

v
TABLE OF CONTENTS
Section 0B General Information
Section 1 Engine
Section 1A General Engine Information
Section 1C1 1.4L/1.6L DOHC Engine Mechanical
Section 1C2 1.8L DOHC Engine Mechanical
Section 1D Engine Cooling
Section 1E Engine Electrical
Section 1F Engine Controls
Section 1G Engine Exhaust
Section 2 Suspension
Section 2A Suspension Diagnosis
Section 2B Wheel Alignment
Section 2C Front Suspension
Section 2D Rear Suspension
Section 2E Tires and Wheels
Section 3 Driveline/Axle
Section 3A Automatic Transaxle Drive Axle
Section 3B Manual Transaxle Drive Axle
Section 4 Brakes
Section 4A Hydraulic Brakes
Section 4B Master Cylinder
Section 4C Power Booster
Section 4D Front Disc Brakes
Section 4E1 Rear Disc Brakes
Section 4E2 Rear Drum Brakes
Section 4F Antilock Brake System
Section 4G Parking Brake
Section 5 Transmission/Transaxle
Section 5A1 ZF 4HP16 Automatic Transaxle
Section 5A2 AISIN Automatic Transaxle
Section 5B Five-Speed Manual Transaxle
Section 5C Clutch
Section 6 Steering
Section 6A Power Steering System
Section 6B Power Steering PumpSection 6C Power Steering Gear
Section 6E Steering Wheel and Column
Section 7 Heating, Ventilation, and Air
Conditioning (HVAC)
Section 7A Heating and Ventilation System
Section 7B Manual Control Heating, Ventilation,
and Air Conditioning System
Section 7D Automatic Temperature Control HVAC
Section 8 Restraints
Section 8A Seat Belts
Section 8B Supplemental Inflatable Restraints
(SIR)
Section 9 Body and Accessories
Section 9A Body Wiring System
Section 9B Lighting Systems
Section 9C Horns
Section 9D Wipers/Washer Systems
Section 9E Instrumentation/Driver Information
Section 9F Audio Systems
Section 9G Interior Trim
Section 9H Seats
Section 9I Waterleaks
Section 9J Windnoise
Section 9K Squeaks and Rattles
Section 9L Glass and Mirrors
Section 9M Exterior Trim
Section 9N Frame and Underbody
Section 9O Bumpers and Fascias
Section 9P Doors
Section 9Q Roof
Section 9R Body Front End
Section 9S Body Rear End
Section 9T1 Remote Keyless Entry and Anti–Theft
System
Section 9T2 Immobilizer Anti–Theft System
Page 16 of 2643

GENERAL INFORMATION 0B – 9
DAEWOO V–121 BL4
MAINTENANCE AND REPAIR
MAINTENANCE AND LUBRICATION
NORMAL VEHICLE USE
The maintenance instructions contained in the mainte-
nance schedule are based on the assumption that the ve-
hicle will be used for the following reasons:
S To carry passengers and cargo within the limitation
indicated on the tire placard located on the edge of
the driver’s door.
S To be driven on reasonable road surfaces and with-
in legal operating limits.
EXPLANATION OF SCHEDULED
MAINTENANCE SERVICES
The services listed in the maintenance schedule are fur-
ther explained below. When the following maintenance
services are performed, make sure all the parts are re-
placed and all the necessary repairs are done before driv-
ing the vehicle. Always use the proper fluid and lubricants.
Drive Belt Inspection
When a separate belt drives the power steering pump, the
air conditioning compressor and the generator, inspect it
for cracks, fraying, wear and proper tension. Adjust or re-
place the belt as needed.
Engine Oil and Oil Filter Change
API Classifications of Engine Oil
The International Lubricant Standardization and Approval
Committee (ILSAC) and American Petroleum Institute
classifies engine oils according to their performance quali-
ty. Always use oil rated API–SL (ILSAC GF–III) or better.
Engine Oil Viscosity
Engine oil viscosity (thickness) has an effect on fuel econ-
omy and cold weather operation. Lower viscosity engine
oils can provide better fuel economy and cold weather per-
formance; however, higher temperature weather condi-
tions require higher viscosity engine oils for satisfactory lu-
brication. Using oils of any viscosity other than those
viscosities recommended could result in engine damage.
Cooling System Service
Drain, flush and refill the system with new coolant. Refer
to ”Recommended Fluids And Lubricants” in this section.
Fuel Micro–Filter Replacement
Replace the engine fuel filter every 45,000 km (27,000
miles).
Air Cleaner Element Replacement
Replace the air cleaner element every 45,000 km (27,000
miles).Replace the air cleaner more often under dusty conditions.
Throttle Body Mounting Bolt Torque
Check the torque of the mounting bolts.
Tighten the throttle body mounting bolts to 15 NSm (11 lb–
ft) if necessary.
Spark Plug Replacement
Replace spark plugs with the same type.
Spark Plug Wire Replacement
Clean wires and inspect them for burns, cracks or other
damage. Check the wire boot fit at the DIS module and at
the spark plugs. Replace the wires as needed.
Brake System Service
Check the disc brake pads and the drum brake linings ev-
ery 15,000 km (9,000 miles) or 12 months. Check the pad
and the lining thickness carefully. If the pads or the linings
are not expected to last to the next scheduledmaintenance
service, replace the pads or the linings. Check the breath-
er hole in the brake fluid reservoir cap to be sure it is free
from dirt and the passage is open.
Transaxle Service
The manual transaxle fluid does not require changing. For
automatic transaxles, refer to ”Scheduled Maintenance
Charts” in this section.
Tire and Wheel Inspection and Rotation
Check the tires for abnormal wear or damage. To equalize
wear and obtain maximum tire life, rotate the tires. If irreg-
ular or premature wear exists, check the wheel alignment
and check for damaged wheels. While the tires and
wheels are removed, inspect the brakes. Refer to ”Each
Time The Oil Is Changed” in this section.
Tire Rotation
Page 19 of 2643

0B – 12IGENERAL INFORMATION
DAEWOO V–121 BL4
OWNER INSPECTIONS AND SERVICES
WHLE OPERATING THE VEHICLE
Horn Operation
Blow the horn occasionally tomake sure it works. Check
all the button locations.
Brake System Operation
Be alert for abnormal sounds, increased brake pedal trav-
el or repeated pulling to one side when braking. Also, if the
brake warning light goes on, or flashes, something may be
wrong with part of the brake system.
Exhaust System Operation
Be alert to any changes in the sound of the system or the
smell of the fumes. These are signs that the system may
be leaking or overheating. Have the system inspected and
repaired immediately.
Tires,Wheels and Alignment Operation
Be alert to any vibration of the steering wheel or the seats
at normal highway speeds. This may mean a wheel needs
to be balanced. Also, a pull right or left on a straight, level
road may show the need for a tire pressure adjustment or
a wheel alignment.
Steering System Operation
Be alert to changes in the steering action. An inspection
is needed when the steering wheel is hard to turn or has
too much free play, or if unusual sounds are noticed when
turning or parking.
Headlight Aim
Take note of the light pattern occasionally. Adjust the
headlights if the beams seem improperly aimed.
AT EACH FUEL FILL
A fluid loss in any (except windshield washer) system may
indicate a problem. Have the system inspected and re-
paired immediately.
Engine Oil Level
Check the oil level and add oil if necessary. The best time
to check the engine oil level is when the oil is warm.
1. After stopping the engine, wait a few minutes for
the oil to drain back to the oil pan.
2. Pull out the oil level indicator (dip stick).
3. Wipe it clean, and push the oil level indicator back
down all the way.
4. Pull out the oil level indicator and look at the oil lev-
el on it.
5. Add oil, if needed, to keep the oil level above the
MIN line and within the area labeled ”Operating
Range.” Avoid overfilling the engine, since this may
cause engine damage.
6. Push the indicator all the way back down into the
engine after taking the reading.If you check the oil level when the oil is cold, do not run the
engine first. The cold oil will not drain back to the pan fast
enough to give a true oil level reading.
Engine Coolant Level and Condition
Check the coolant level in the coolant reservoir tank and
add coolant if necessary. Inspect the coolant. Replace
dirty or rusty coolant.
Windshield Washer Fluid Level
Check the washer fluid level in the reservoir. Add fluid if
necessary.
AT LEAST MONTHLY
Tire And Wheel Inspection and Pressure
Check
Check the tires for abnormal wear or damage. Also check
for damaged wheels. Check the tire pressure when the
tires are cold (check the spare also, unless it is a stow-
away). Maintain the recommended pressures that are on
the tire placard that is in the glove box.
Light Operation
Check the operation of the license plate light, the head-
lights (including the high beams), the parking lights, the
fog lights, the taillight, the brake lights, the turn signals, the
backup lights and the hazard warning flasher.
Fluid Leak Check
Periodically inspect the surface beneath the vehicle for
water, oil, fuel or other fluids, after the vehicle has been
parked for a while. Water dripping from the air conditioning
system after use is normal. If you notice fuel leaks or
fumes, find the cause and correct it at once.
AT LEAST TWICE A YEAR
Power Steering System Reservoir Level
Check the power steering fluid level. Keep the power
steering fluid at the proper level. Refer to Section 6A, Pow-
er Steering System.
Brake Master Cylinder Reservoir Level
Check the fluid and keep it at the proper level. A low fluid
level can indicate worn disc brake pads which may need
to be serviced. Check the breather hole in the reservoir
cover to be free from dirt and check for an open passage.
Clutch Pedal Free Travel
Check clutch pedal free travel and adjust as necessary.
Measure the distance from the center of the clutch pedal
to the outer edge of the steering wheel with the clutch ped-
al not depressed. Then measure the distance from the
center of the clutch pedal to the outer edge of the steering
wheel with the clutch pedal fully depressed. The difference
between the two values must be greater than 130 mm
(5.19 inches).
Weather–Strip Lubrication
Apply a thin film silicone grease using a clean cloth.
Page 66 of 2643

1.4L/1.6L DOHC ENGINE MECHANICAL 1C1 – 23
DAEWOO V–121 BL4
12. Remove the all the vaccum hoses from the intake
manifold including brake booster vaccum hose.
13. Remove the ignition cables from the spark plugs.
14. Remove the direct ignition coil(DIS) and the bracket
from the cylinder head.
15. Remove the serpentine accessory drive belt by ro-
tating the tensioner pulley bolt to clockwise using
DW110–080. Refer to Section 6B, Power Steering
Pump.
16. Remove the front passenger side tire. Refer to Sec-
tion 2E, Tires and Wheels.
17. Remove front wheel housing shield.
18. Remove the upper front timing belt cover bolts.
19. Remove the upper front timing belt cover.
20. Align the camshaft gear timing marks.
21. Remove the crank shaft pulley.
22. Remove the lower front timing belt cover bolts and
cover.
Page 71 of 2643

1C1 – 28I1.4L/1.6L DOHC ENGINE MECHANICAL
DAEWOO V–121 BL4
25. Install the timing belt.
26. Rotate the water pump clockwise using the timing
belt adjuster J–42492 to apply tension to the timing
belt.
Tighten
Tighten the water pump retaining bolts to 10 NSm (89
lb–in).
27. Check and adjust the timing belt tension. Refer to
”Timing Belt Check and Adjust” in this section.
28. Install the upper and lower front timing belt covers.
Tighten
Tighten the upper and lower front timing belt covers
bolts to 10 NSm (89 lb–in).
29. Install the crank shaft pulley bolt.
Tighten
Tighten the crank shaft pulley bolt to 95 NSm (70 lb–ft)
and retighten 30 degrees plus 15 degrees.
30. Install the serpentine accessory drive belt. Refer to
Section 6B, Power Steering Pump.
31. Connect the upper radiator hose to the thermostat
housing.
32. Install the front wheel and splash shield. Refer to
Section 2E, Tires and Wheels.
33. Install the air cleaner housing.
Tighten
Tighten the air cleaner housing bolts to 10 NSm (89 lb–
in).
34. Connect the breather tube to the cam shaft cover.
35. Install the crank shaft pulley bolt.
36. Connect the MAT sensor connector.
37. Connect the intake manifold pressure sensor, in-
take air temperature sensor and coolant tempera-
ture sensor connector.
Page 74 of 2643

1.4L/1.6L DOHC ENGINE MECHANICAL 1C1 – 31
DAEWOO V–121 BL4
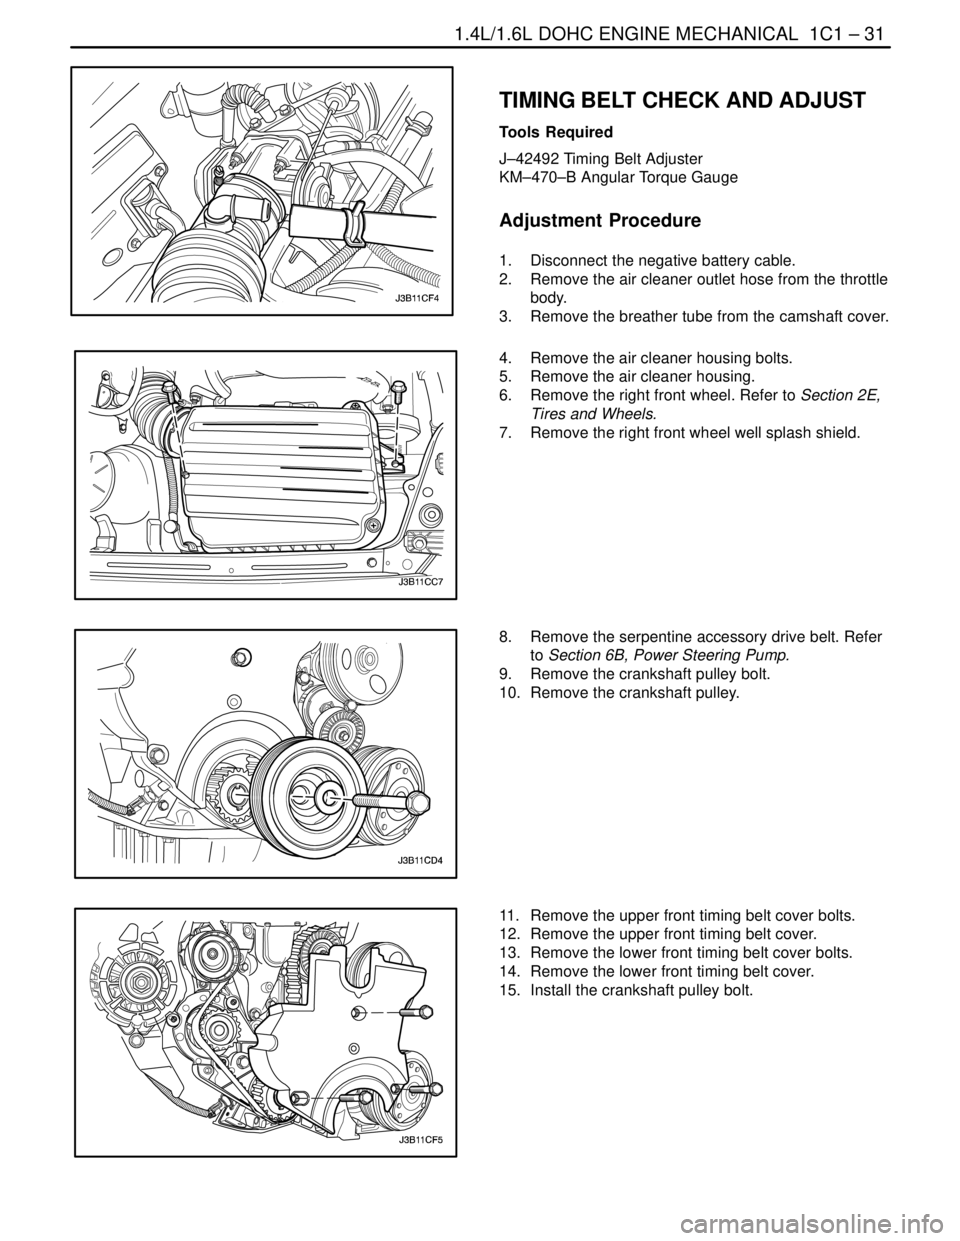
TIMING BELT CHECK AND ADJUST
Tools Required
J–42492 Timing Belt Adjuster
KM–470–B Angular Torque Gauge
Adjustment Procedure
1. Disconnect the negative battery cable.
2. Remove the air cleaner outlet hose from the throttle
body.
3. Remove the breather tube from the camshaft cover.
4. Remove the air cleaner housing bolts.
5. Remove the air cleaner housing.
6. Remove the right front wheel. Refer to Section 2E,
Tires and Wheels.
7. Remove the right front wheel well splash shield.
8. Remove the serpentine accessory drive belt. Refer
to Section 6B, Power Steering Pump.
9. Remove the crankshaft pulley bolt.
10. Remove the crankshaft pulley.
11. Remove the upper front timing belt cover bolts.
12. Remove the upper front timing belt cover.
13. Remove the lower front timing belt cover bolts.
14. Remove the lower front timing belt cover.
15. Install the crankshaft pulley bolt.
Page 76 of 2643

1.4L/1.6L DOHC ENGINE MECHANICAL 1C1 – 33
DAEWOO V–121 BL4
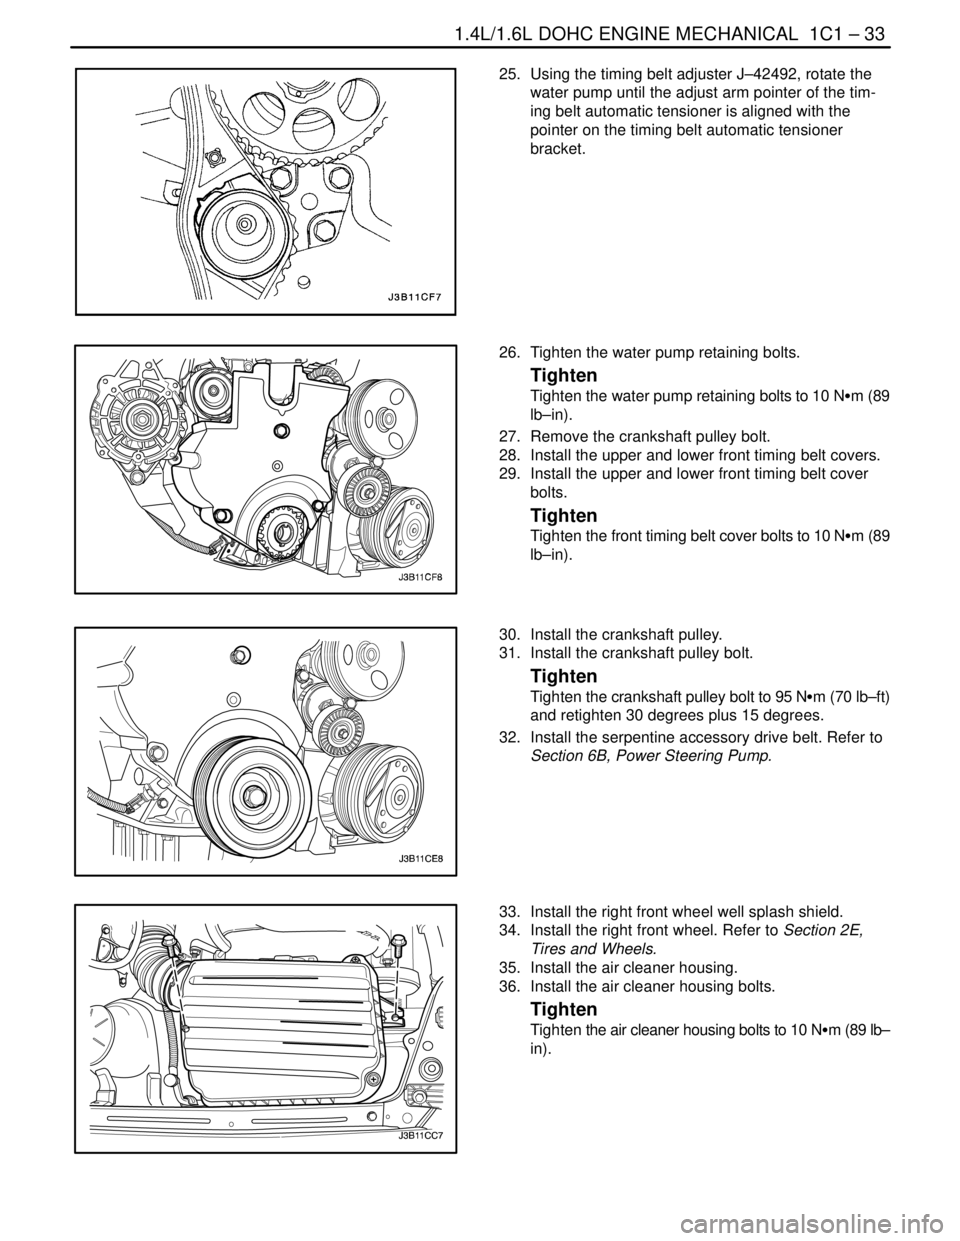
25. Using the timing belt adjuster J–42492, rotate the
water pump until the adjust arm pointer of the tim-
ing belt automatic tensioner is aligned with the
pointer on the timing belt automatic tensioner
bracket.
26. Tighten the water pump retaining bolts.
Tighten
Tighten the water pump retaining bolts to 10 NSm (89
lb–in).
27. Remove the crankshaft pulley bolt.
28. Install the upper and lower front timing belt covers.
29. Install the upper and lower front timing belt cover
bolts.
Tighten
Tighten the front timing belt cover bolts to 10 NSm (89
lb–in).
30. Install the crankshaft pulley.
31. Install the crankshaft pulley bolt.
Tighten
Tighten the crankshaft pulley bolt to 95 NSm (70 lb–ft)
and retighten 30 degrees plus 15 degrees.
32. Install the serpentine accessory drive belt. Refer to
Section 6B, Power Steering Pump.
33. Install the right front wheel well splash shield.
34. Install the right front wheel. Refer to Section 2E,
Tires and Wheels.
35. Install the air cleaner housing.
36. Install the air cleaner housing bolts.
Tighten
Tighten the air cleaner housing bolts to 10 NSm (89 lb–
in).
Page 77 of 2643

1C1 – 34I1.4L/1.6L DOHC ENGINE MECHANICAL
DAEWOO V–121 BL4
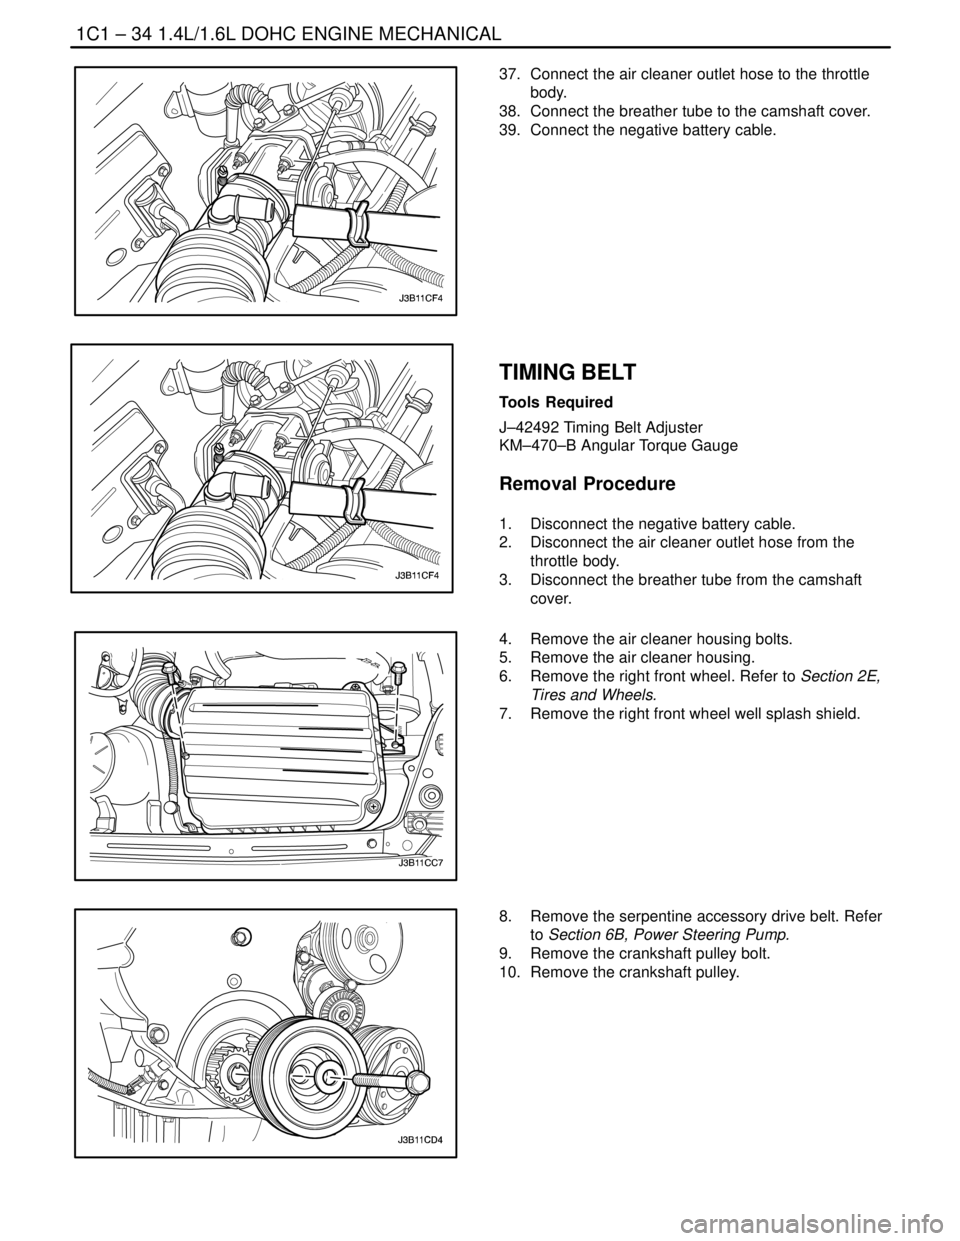
37. Connect the air cleaner outlet hose to the throttle
body.
38. Connect the breather tube to the camshaft cover.
39. Connect the negative battery cable.
TIMING BELT
Tools Required
J–42492 Timing Belt Adjuster
KM–470–B Angular Torque Gauge
Removal Procedure
1. Disconnect the negative battery cable.
2. Disconnect the air cleaner outlet hose from the
throttle body.
3. Disconnect the breather tube from the camshaft
cover.
4. Remove the air cleaner housing bolts.
5. Remove the air cleaner housing.
6. Remove the right front wheel. Refer to Section 2E,
Tires and Wheels.
7. Remove the right front wheel well splash shield.
8. Remove the serpentine accessory drive belt. Refer
to Section 6B, Power Steering Pump.
9. Remove the crankshaft pulley bolt.
10. Remove the crankshaft pulley.