2004 BMW 645CI COUPE&CONVERTIBLE towing
[x] Cancel search: towingPage 60 of 216
Driving
58 speed; thus, for example, a downshift
that would cause the engine to overrev
will not be executed by the system
>When the vehicle is stationary, the
transmission automatically downshifts
into first gear
>Shortly before dropping below a gear-
dependent minimum speed, the trans-
mission downshifts automatically even
without your intervention.
Malfunction
The warning lamp lights up and a
message appears on the Control
Display. There is a malfunction in
the transmission system. Avoid high loads.
While it will remain still possible to move
the selector lever to any desired position,
the transmission will revert to operation in
its default mode with only a limited number
of forward gears.
Have the system checked as soon as pos-
sible.
Information on jump-starting and towing
begins on page 185.
Overheating
The warning lamp lights up and a
message appears on the Control
Display. In addition, an acoustic
signal sounds. Overheating in the area of
the transmission. If possible, stop or drive
off quickly so that the system can cool
down.
Automatic transmission
with Steptronic*
In addition to the fully automatic mode, you
can also shift manually with Steptronic,
refer to page 59.
Selector-lever positions
P R N D M/S + –
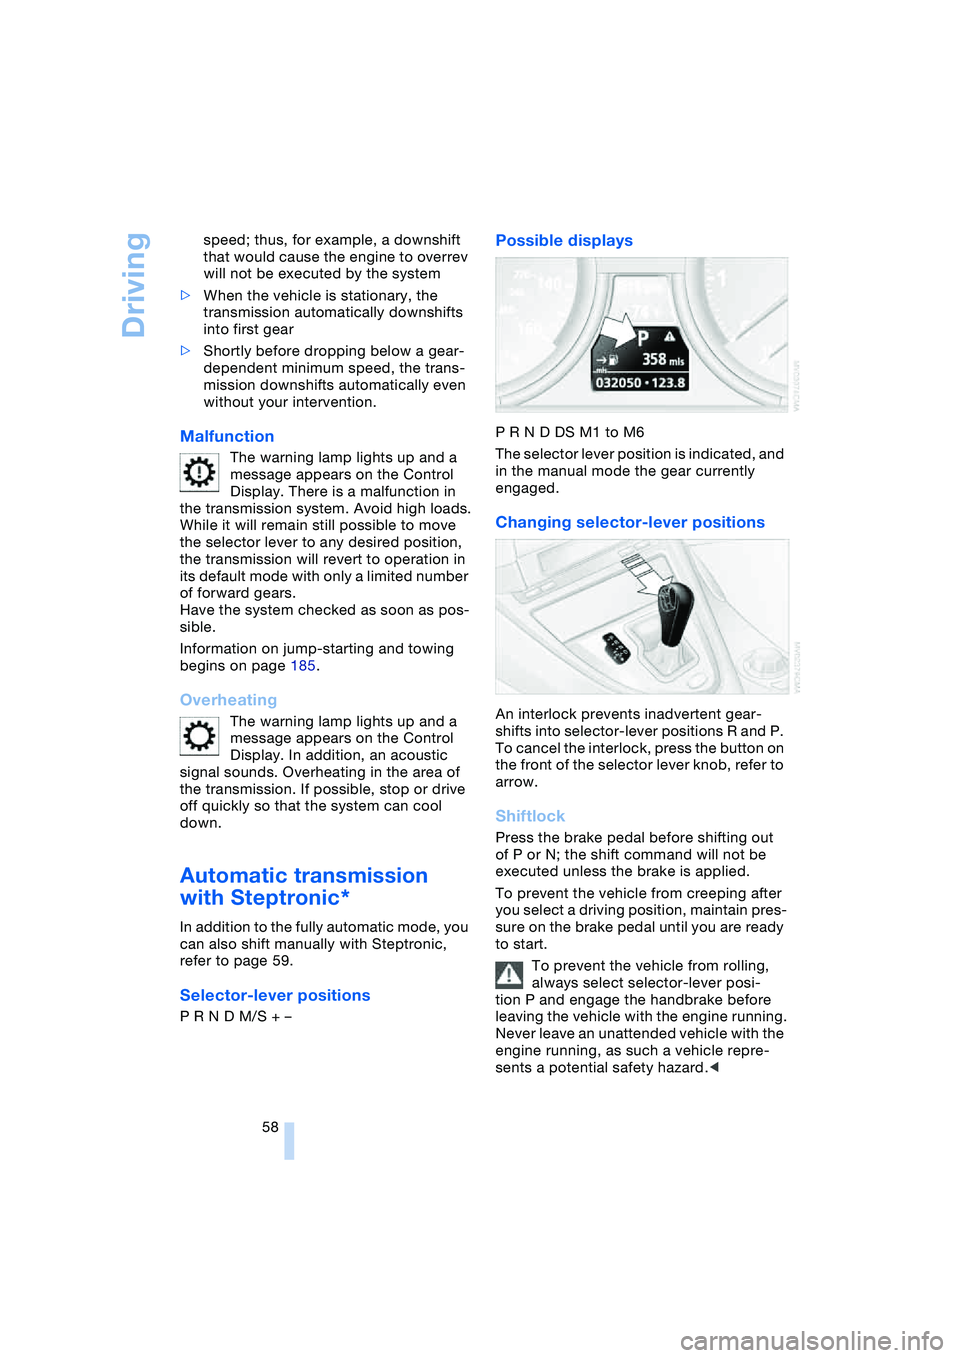
Possible displays
P R N D DS M1 to M6
The selector lever position is indicated, and
in the manual mode the gear currently
engaged.
Changing selector-lever positions
An interlock prevents inadvertent gear-
shifts into selector-lever positions R and P.
To cancel the interlock, press the button on
the front of the selector lever knob, refer to
arrow.
Shiftlock
Press the brake pedal before shifting out
of P or N; the shift command will not be
executed unless the brake is applied.
To prevent the vehicle from creeping after
you select a driving position, maintain pres-
sure on the brake pedal until you are ready
to start.
To prevent the vehicle from rolling,
always select selector-lever posi-
tion P and engage the handbrake before
leaving the vehicle with the engine running.
Never leave an unattended vehicle with the
engine running, as such a vehicle repre-
sents a potential safety hazard.<
Page 61 of 216
Controls
59Reference
At a glance
Driving tips
Communications
Navigation
Entertainment
Mobility
P Parking
Select only when the vehicle is completely
stationary. The rear wheels are blocked.
R Reverse
Select only when the vehicle is completely
stationary.
N Neutral
E.g. engage in car washes. The vehicle can
roll.
D Drive, automatic position
Position for normal vehicle operation.
All forward gears are available.
Under normal operating conditions, fuel
consumption is lowest when driving in
position D.
Kickdown
The kickdown mode provides maximum
acceleration:
Press the accelerator pedal beyond the
full-throttle resistance point.
M/S manual operation and
Sport program
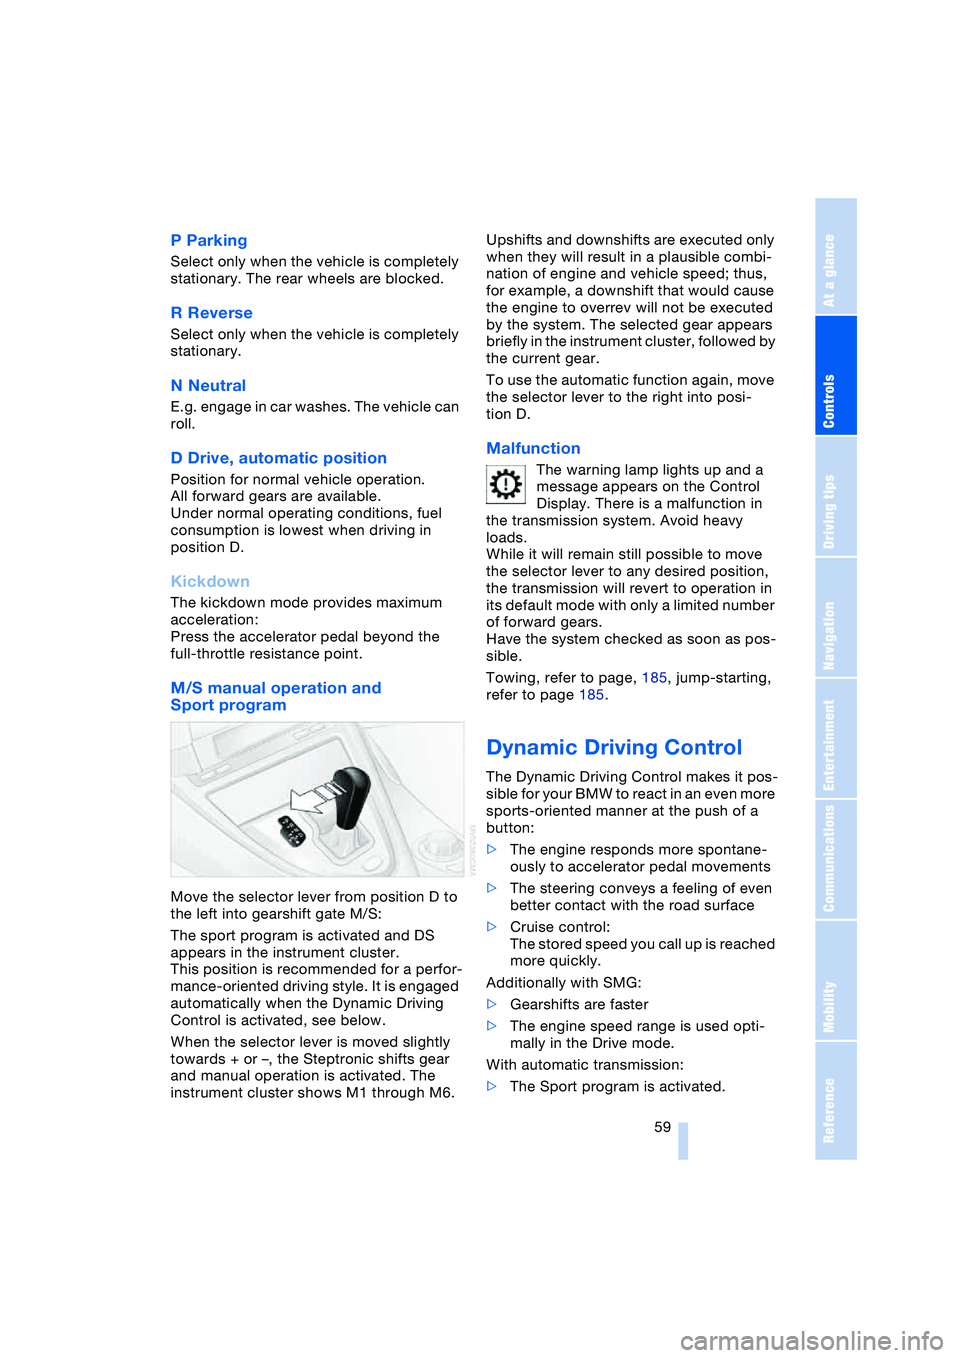
Move the selector lever from position D to
the left into gearshift gate M/S:
The sport program is activated and DS
appears in the instrument cluster.
This position is recommended for a perfor-
mance-oriented driving style. It is engaged
automatically when the Dynamic Driving
Control is activated, see below.
When the selector lever is moved slightly
towards + or –, the Steptronic shifts gear
and manual operation is activated. The
instrument cluster shows M1 through M6.Upshifts and downshifts are executed only
when they will result in a plausible combi-
nation of engine and vehicle speed; thus,
for example, a downshift that would cause
the engine to overrev will not be executed
by the system. The selected gear appears
briefly in the instrument cluster, followed by
the current gear.
To use the automatic function again, move
the selector lever to the right into posi-
tion D.
Malfunction
The warning lamp lights up and a
message appears on the Control
Display. There is a malfunction in
the transmission system. Avoid heavy
loads.
While it will remain still possible to move
the selector lever to any desired position,
the transmission will revert to operation in
its default mode with only a limited number
of forward gears.
Have the system checked as soon as pos-
sible.
Towing, refer to page, 185, jump-starting,
refer to page 185.
Dynamic Driving Control
The Dynamic Driving Control makes it pos-
sible for your BMW to react in an even more
sports-oriented manner at the push of a
button:
>The engine responds more spontane-
ously to accelerator pedal movements
>The steering conveys a feeling of even
better contact with the road surface
>Cruise control:
The stored speed you call up is reached
more quickly.
Additionally with SMG:
>Gearshifts are faster
>The engine speed range is used opti-
mally in the Drive mode.
With automatic transmission:
>The Sport program is activated.
Page 106 of 216
Things to remember when driving
104
Mobile communication devices in
vehicle
BMW advises against using mobile
communication devices, e.g. portable
phones, in the inside of the vehicle without
a direct connection to an external antenna.
Otherwise, the vehicle electronics and
mobile communication device can influ-
ence one another. It is not ensured that the
waves emitted during transmission are led
out of the vehicle interior.<
Cargo loading
To avoid loading the tires beyond
their approved carrying capacity,
never overload the vehicle. Overloading
can lead to overheating and increases the
rate at which damage develops inside the
tires. The ultimate result can assume the
form of a sudden air loss.<
Determining loading limit
1.Locate the following statement on your
vehicle's placard
*:
The combined weight of occu-
pants and cargo should never
exceed XXX lbs. or YYY kg, as other-
wise the vehicle may be damaged and
unstable driving conditions may
result.<
2.Determine the combined weight of the
driver and passengers that will be riding
in your vehicle
3.Subtract the combined weight of the
driver and passengers from XXX lbs. or
YYY kg4.The resulting figure equals the available
amount of cargo and luggage load
capacity.
For example, if the XXX amount equals
1400 lbs. and there will be five 150-lbs.
passengers in your vehicle, the amount
of available cargo and luggage load
capacity is 650 lbs.:
1400 lbs. minus 750 lbs. = 650 lbs.
5.Determine the combined weight of lug-
gage and cargo being loaded on the
vehicle. That weight may not safely
exceed the available cargo and luggage
load capacity calculated in step 4
6.If your vehicle will be towing a trailer,
part of the load from your trailer will be
transferred to your vehicle. Consult the
manual for transporting a trailer to
determine how this may reduce the
available cargo and luggage load
capacity of your vehicle.
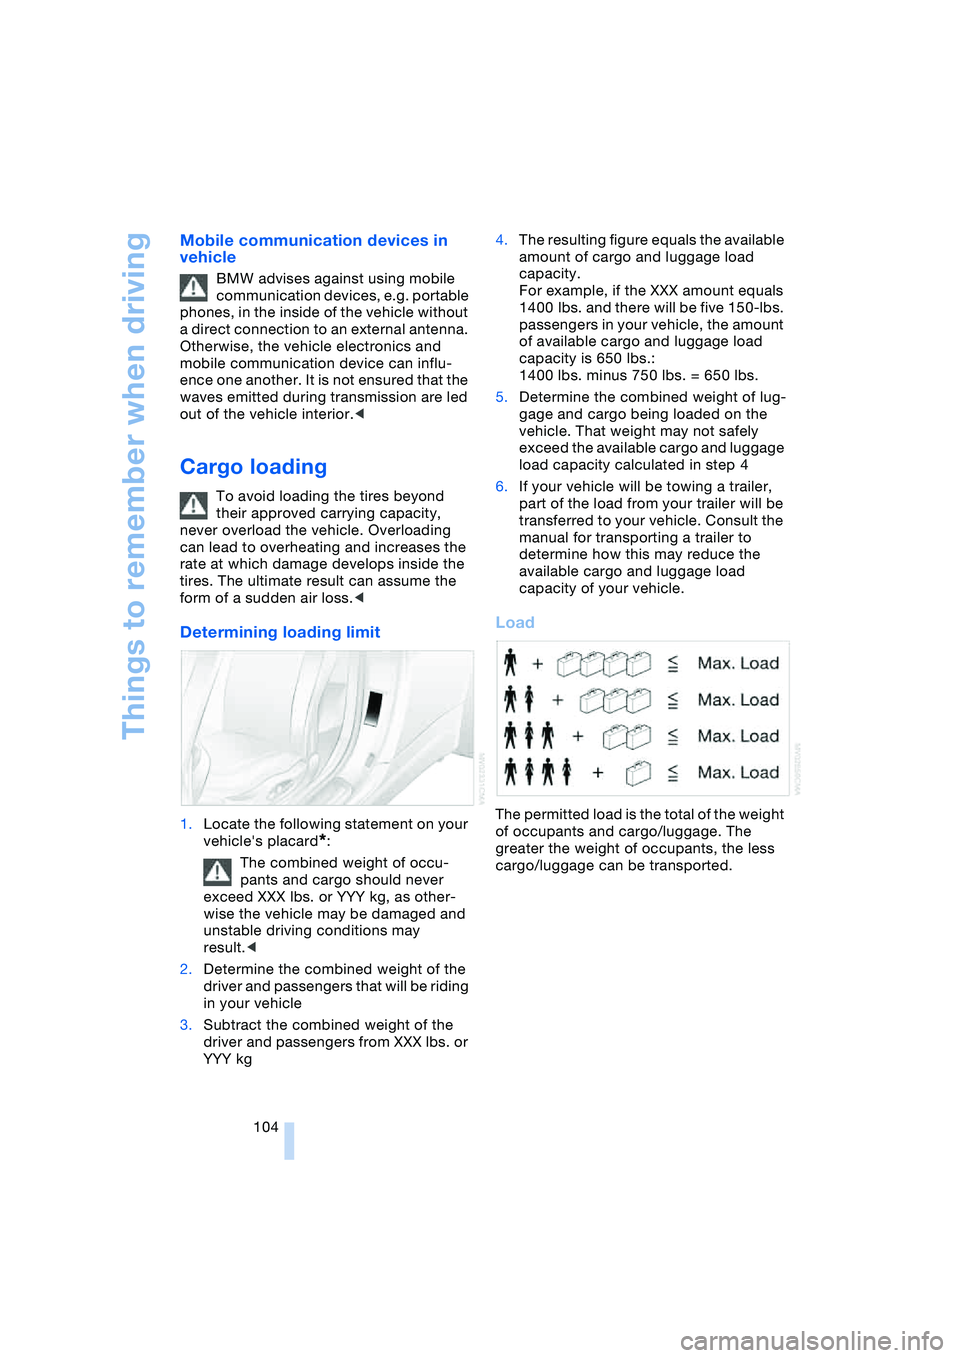
Load
The permitted load is the total of the weight
of occupants and cargo/luggage. The
greater the weight of occupants, the less
cargo/luggage can be transported.
Page 107 of 216
Driving tips
105Reference
At a glance
Controls
Communications
Navigation
Entertainment
Mobility
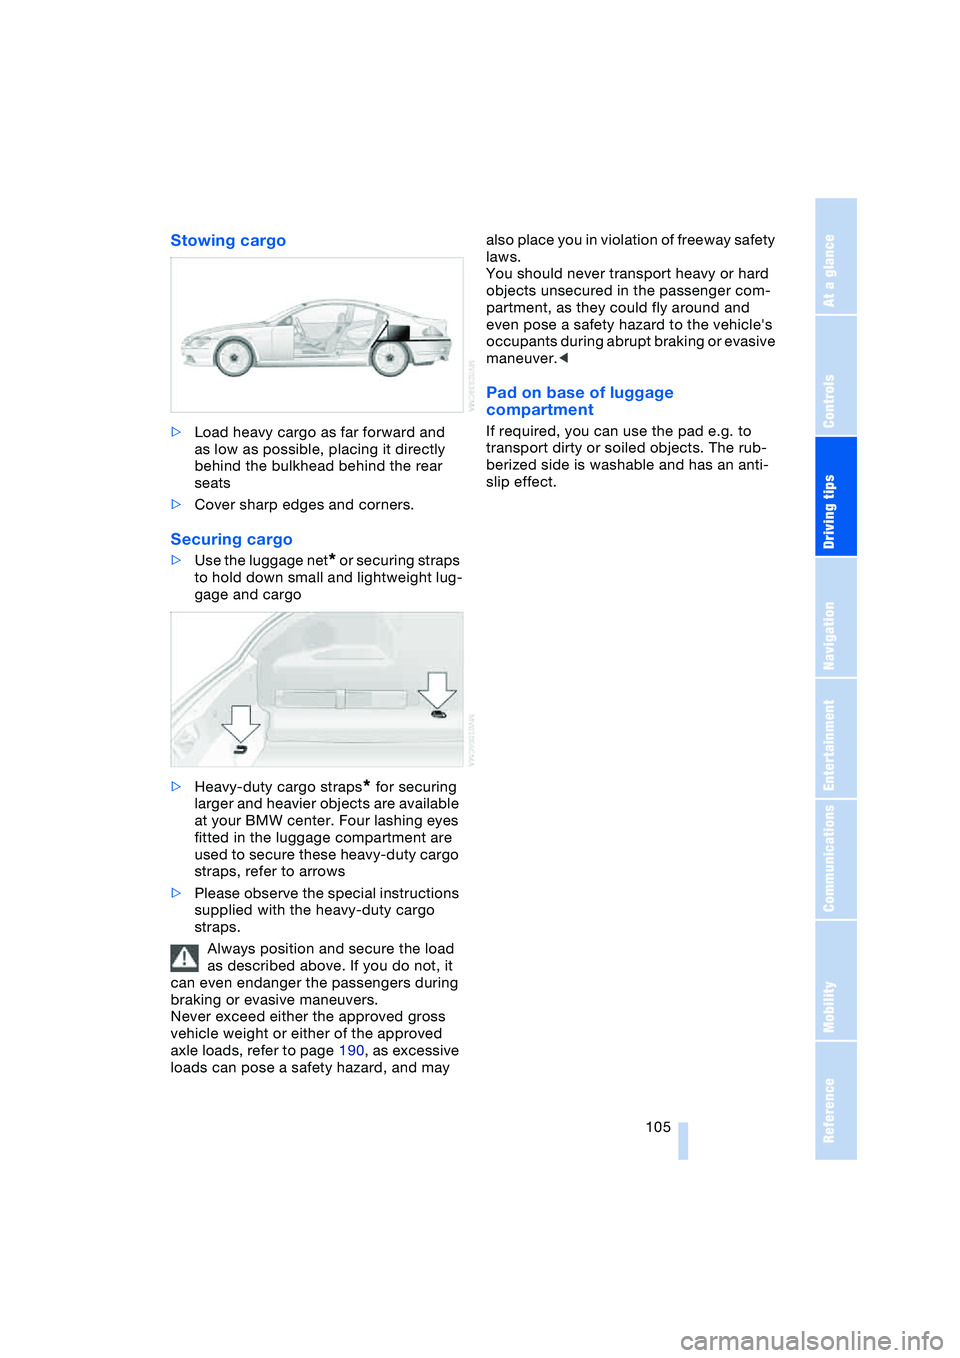
Stowing cargo
>Load heavy cargo as far forward and
as low as possible, placing it directly
behind the bulkhead behind the rear
seats
>Cover sharp edges and corners.
Securing cargo
>Use the luggage net* or securing straps
to hold down small and lightweight lug-
gage and cargo
>Heavy-duty cargo straps
* for securing
larger and heavier objects are available
at your BMW center. Four lashing eyes
fitted in the luggage compartment are
used to secure these heavy-duty cargo
straps, refer to arrows
>Please observe the special instructions
supplied with the heavy-duty cargo
straps.
Always position and secure the load
as described above. If you do not, it
can even endanger the passengers during
braking or evasive maneuvers.
Never exceed either the approved gross
vehicle weight or either of the approved
axle loads, refer to page 190, as excessive
loads can pose a safety hazard, and may also place you in violation of freeway safety
laws.
You should never transport heavy or hard
objects unsecured in the passenger com-
partment, as they could fly around and
even pose a safety hazard to the vehicle's
occupants during abrupt braking or evasive
maneuver.<
Pad on base of luggage
compartment
If required, you can use the pad e.g. to
transport dirty or soiled objects. The rub-
berized side is washable and has an anti-
slip effect.
Page 187 of 216
Mobility
185Reference
At a glance
Controls
Driving tips
Communications
Navigation
Entertainment
Preparing
1.Check whether the battery of the other
vehicle has a voltage of 12 Volts and
approximately the same capacitance
in Ah. This information can be found on
the battery
2.Switch off the engine of the vehicle pro-
viding assistance
3.Switch off any consumer units in both
vehicles.
There must not be any contact
between the bodies of the two vehi-
cles, as otherwise there is a danger of
shorting.<
Connecting jumper cables
To avoid personal injury from sparks,
always observe this sequence when
connecting jumper cables.<
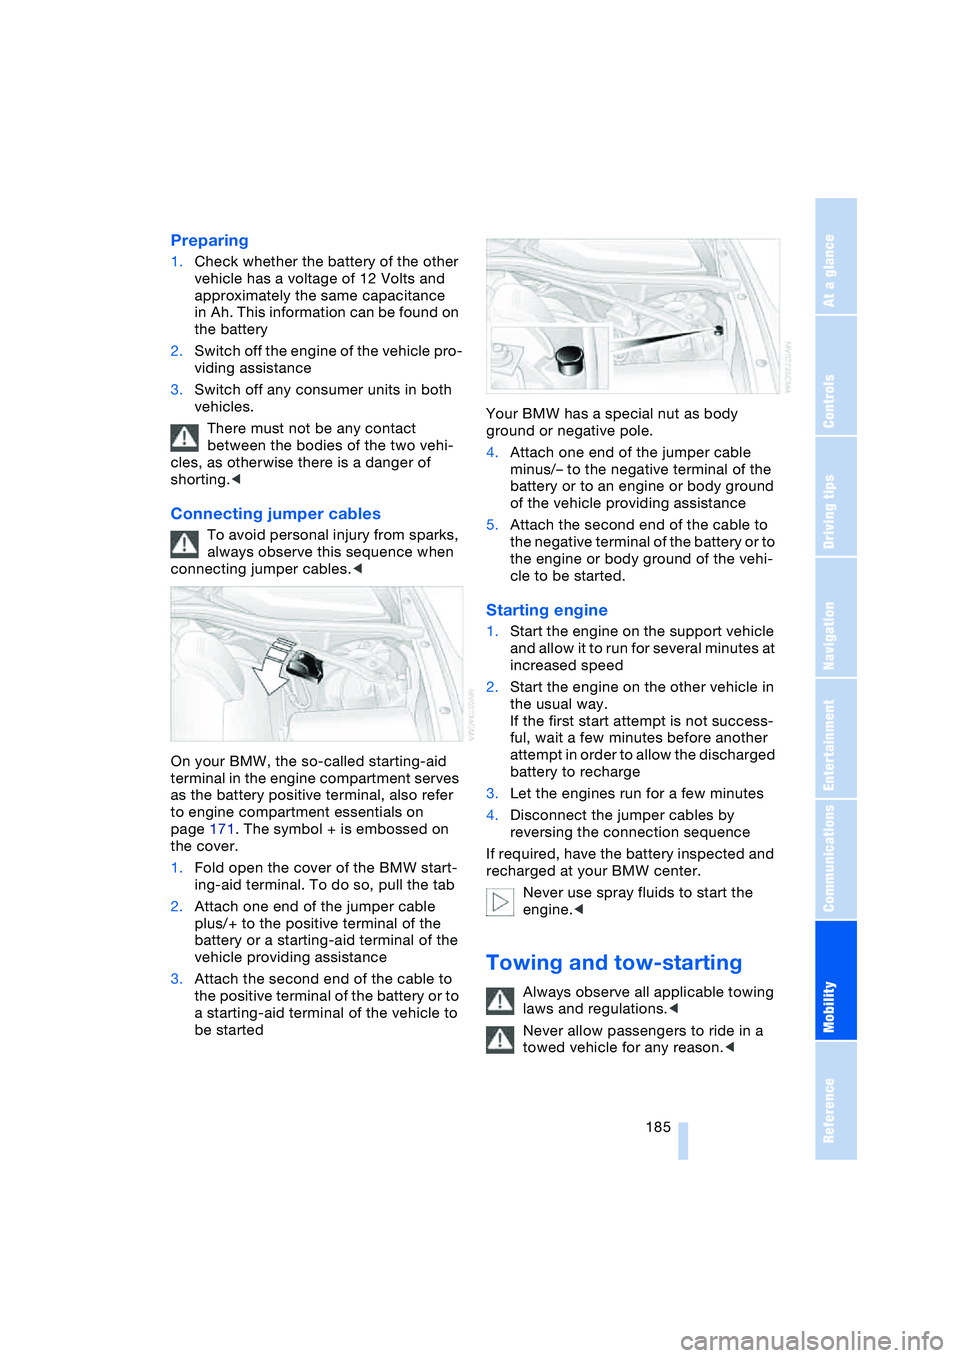
On your BMW, the so-called starting-aid
terminal in the engine compartment serves
as the battery positive terminal, also refer
to engine compartment essentials on
page 171. The symbol + is embossed on
the cover.
1.Fold open the cover of the BMW start-
ing-aid terminal. To do so, pull the tab
2.Attach one end of the jumper cable
plus/+ to the positive terminal of the
battery or a starting-aid terminal of the
vehicle providing assistance
3.Attach the second end of the cable to
the positive terminal of the battery or to
a starting-aid terminal of the vehicle to
be startedYour BMW has a special nut as body
ground or negative pole.
4.Attach one end of the jumper cable
minus/– to the negative terminal of the
battery or to an engine or body ground
of the vehicle providing assistance
5.Attach the second end of the cable to
the negative terminal of the battery or to
the engine or body ground of the vehi-
cle to be started.
Starting engine
1.Start the engine on the support vehicle
and allow it to run for several minutes at
increased speed
2.Start the engine on the other vehicle in
the usual way.
If the first start attempt is not success-
ful, wait a few minutes before another
attempt in order to allow the discharged
battery to recharge
3.Let the engines run for a few minutes
4.Disconnect the jumper cables by
reversing the connection sequence
If required, have the battery inspected and
recharged at your BMW center.
Never use spray fluids to start the
engine.<
Towing and tow-starting
Always observe all applicable towing
laws and regulations.<
Never allow passengers to ride in a
towed vehicle for any reason.<
Page 188 of 216
Giving and receiving assistance
186
Using tow fitting
The threaded tow fitting is stored in the tool
kit mounted on the inside of the luggage
compartment under the floor mat, refer to
page 178, and should always remain in the
vehicle. It can be screwed in at the front or
rear of the BMW.
To avoid damage to the tow fitting
and the vehicle, observe the follow-
ing: only use the tow fitting that comes with
the vehicle and screw it in as far as possi-
ble. Only use the tow fitting to tow on the
roadway. Avoid heavy lateral loading of the
tow fitting, e.g. do not lift the vehicle by the
tow fitting.<
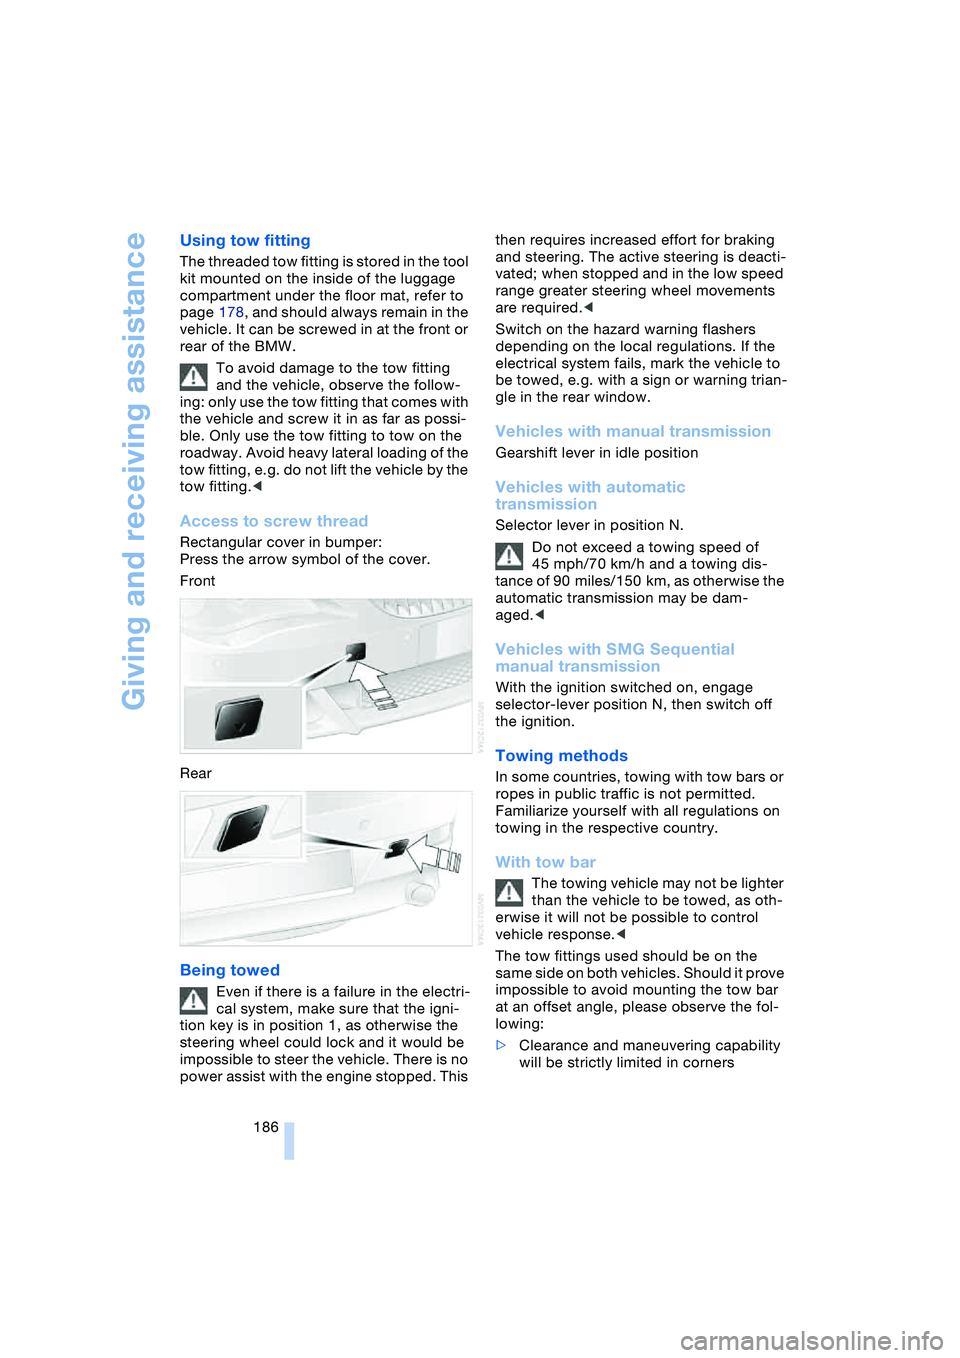
Access to screw thread
Rectangular cover in bumper:
Press the arrow symbol of the cover.
Front
Rear
Being towed
Even if there is a failure in the electri-
cal system, make sure that the igni-
tion key is in position 1, as otherwise the
steering wheel could lock and it would be
impossible to steer the vehicle. There is no
power assist with the engine stopped. This then requires increased effort for braking
and steering. The active steering is deacti-
vated; when stopped and in the low speed
range greater steering wheel movements
are required.<
Switch on the hazard warning flashers
depending on the local regulations. If the
electrical system fails, mark the vehicle to
be towed, e.g. with a sign or warning trian-
gle in the rear window.
Vehicles with manual transmission
Gearshift lever in idle position
Vehicles with automatic
transmission
Selector lever in position N.
Do not exceed a towing speed of
45 mph/70 km/h and a towing dis-
tance of 90 miles/150 km, as otherwise the
automatic transmission may be dam-
aged.<
Vehicles with SMG Sequential
manual transmission
With the ignition switched on, engage
selector-lever position N, then switch off
the ignition.
Towing methods
In some countries, towing with tow bars or
ropes in public traffic is not permitted.
Familiarize yourself with all regulations on
towing in the respective country.
With tow bar
The towing vehicle may not be lighter
than the vehicle to be towed, as oth-
erwise it will not be possible to control
vehicle response.<
The tow fittings used should be on the
same side on both vehicles. Should it prove
impossible to avoid mounting the tow bar
at an offset angle, please observe the fol-
lowing:
>Clearance and maneuvering capability
will be strictly limited in corners
Page 189 of 216
Mobility
187Reference
At a glance
Controls
Driving tips
Communications
Navigation
Entertainment
>When mounted at an angle, the tow bar
will exert lateral forces, tending to push
the vehicle sideways.
Secure the tow bar on the tow fitting
only. Otherwise damage could result
on other vehicle parts.<
With tow-rope
When starting off in the towing vehicle,
make sure that the tow-rope is taut.
To avoid jerking and the associated
stresses on vehicle components
when towing, always use nylon ropes or
nylon straps. Secure the tow rope on the
tow fitting only. Otherwise damage could
result on other vehicle parts.<
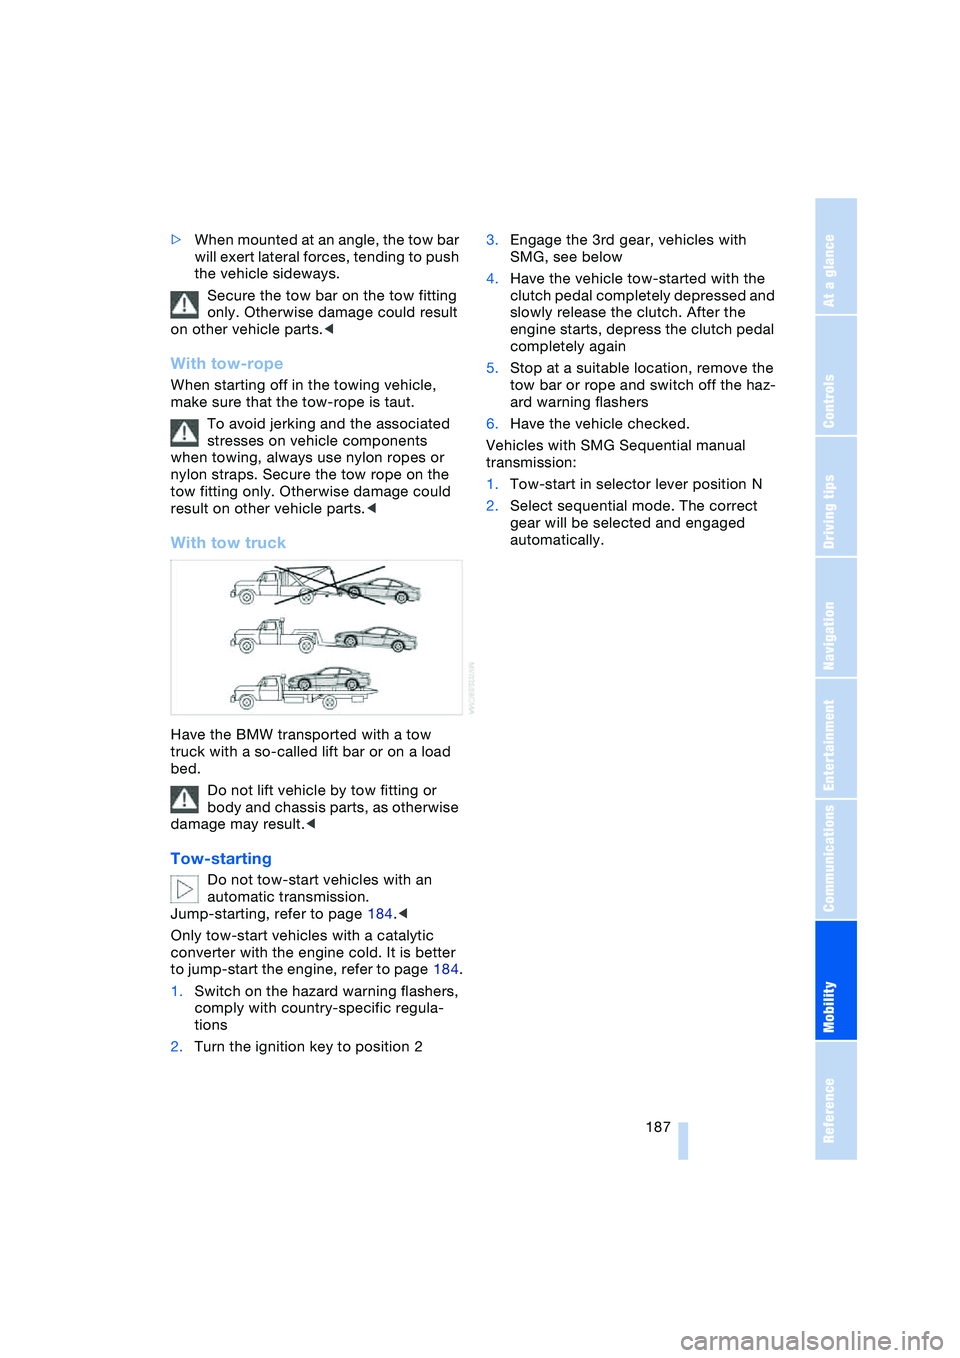
With tow truck
Have the BMW transported with a tow
truck with a so-called lift bar or on a load
bed.
Do not lift vehicle by tow fitting or
body and chassis parts, as otherwise
damage may result.<
Tow-starting
Do not tow-start vehicles with an
automatic transmission.
Jump-starting, refer to page 184.<
Only tow-start vehicles with a catalytic
converter with the engine cold. It is better
to jump-start the engine, refer to page 184.
1.Switch on the hazard warning flashers,
comply with country-specific regula-
tions
2.Turn the ignition key to position 23.Engage the 3rd gear, vehicles with
SMG, see below
4.Have the vehicle tow-started with the
clutch pedal completely depressed and
slowly release the clutch. After the
engine starts, depress the clutch pedal
completely again
5.Stop at a suitable location, remove the
tow bar or rope and switch off the haz-
ard warning flashers
6.Have the vehicle checked.
Vehicles with SMG Sequential manual
transmission:
1.Tow-start in selector lever position N
2.Select sequential mode. The correct
gear will be selected and engaged
automatically.
Page 200 of 216
Everything from A to Z
198 Automatic
– air distribution 89
– air volume 89
– cruise control 62
– curb monitor 45
– headlamp control 85
– service notification 156
– station search 131
– steering wheel
adjustment 49
– storing stations 132
Automatic car wash 102
– also refer to the Caring for
your vehicle brochure
Automatic climate
control 88
– automatic air
distribution 89
– convertible program 91
– settings using Control
Center 90
– switching off 90
"Automatic programs" 91
Automatic recirculated-air
control, AUC 89
Automatic transmission
with Steptronic 58
– convenience start 55
– Dynamic Driving
Control 59
– interlock 54
– kickdown 59
– selector lever interlock 58
– shiftlock 58
– starting engine 55
– towing 186
– tow-starting 187
– warning lamp 59
"Automatic ventilation" 92
AUTO program with
automatic climate
control 89
"Autostore" on the
radio 130, 132
"AUTO" with automatic
climate control 91
Average fuel
consumption 69
– setting units 72
Average speed 69"Avoid ferries" for
navigation 116
Avoid freeways for
navigation 116
"Avoid highways" for
navigation 116
Avoiding unintentional
alarms 33
"Avoid tollroads" for
navigation 116
Axle loads, refer to
Weights 190
"A - Z" 148
B
Backrests, refer to
Seats 43
Backup lamps, refer to
Reverse gear 56
– replacing the bulbs 180
Balance, refer to
Adjusting the tone 128
Balance adjustment in
audio mode
– right/left 128
Bass, refer to
Adjusting the tone 127
"Bass", refer to
Adjusting the tone 128
Battery 181
– in the remote control 26
– jump-starting 184
Being towed 186
Belts, refer to
Safety belts 47
Beverage holder, refer to
Cup holders 97
Black ice, refer to
Ice warning 64
Blower, refer to
Air volume 89
BMW Assist 155
– enabling 155
– services offered 156
BMW maintenance
system 174
"BMW Service" 157
"BMW Service
settings" 155Bore, refer to
Engine data 190
Bottle holder, refer to
Cup holders 97
Brake Assistant, refer to
DBC Dynamic Brake
Control 78
Brake fluid 173
– warning lamp 173
Brake Force Display 80
Brake hydraulic
system 173
Brake lamps
– replacing the bulbs 180
– two-stage brake lamps 80
Brake pads 173
– break-in procedure 102
Brake pedal, refer to
Brakes 103
Brake rotors 103
Brakes 103
– ABS Antilock Brake
System 76
– brake fluid 173
– Brake Force Display 80
– brake pads 102, 173
– break-in procedure 102
– handbrake 55
Brake system 102
– brake fluid level 173
– brake pads 173
– brake rotors 103
– break-in procedure 102
– warning lamp 13, 78, 173
Brake wear warning
– brake pads 173
– warning lamp 173
Breakdown assistance 156
Breakdown services, refer
to Roadside
Assistance 184
Breaking-in the clutch 102
Breaking-in the
differential 102
Break-in procedures 102
"Brightness" 72
Buttons on the steering
wheel 11