2004 BMW 645CI COUPE&CONVERTIBLE change time
[x] Cancel search: change timePage 21 of 216
At a glance
19Reference
Controls
Driving tips
Communications
Navigation
Entertainment
Mobility
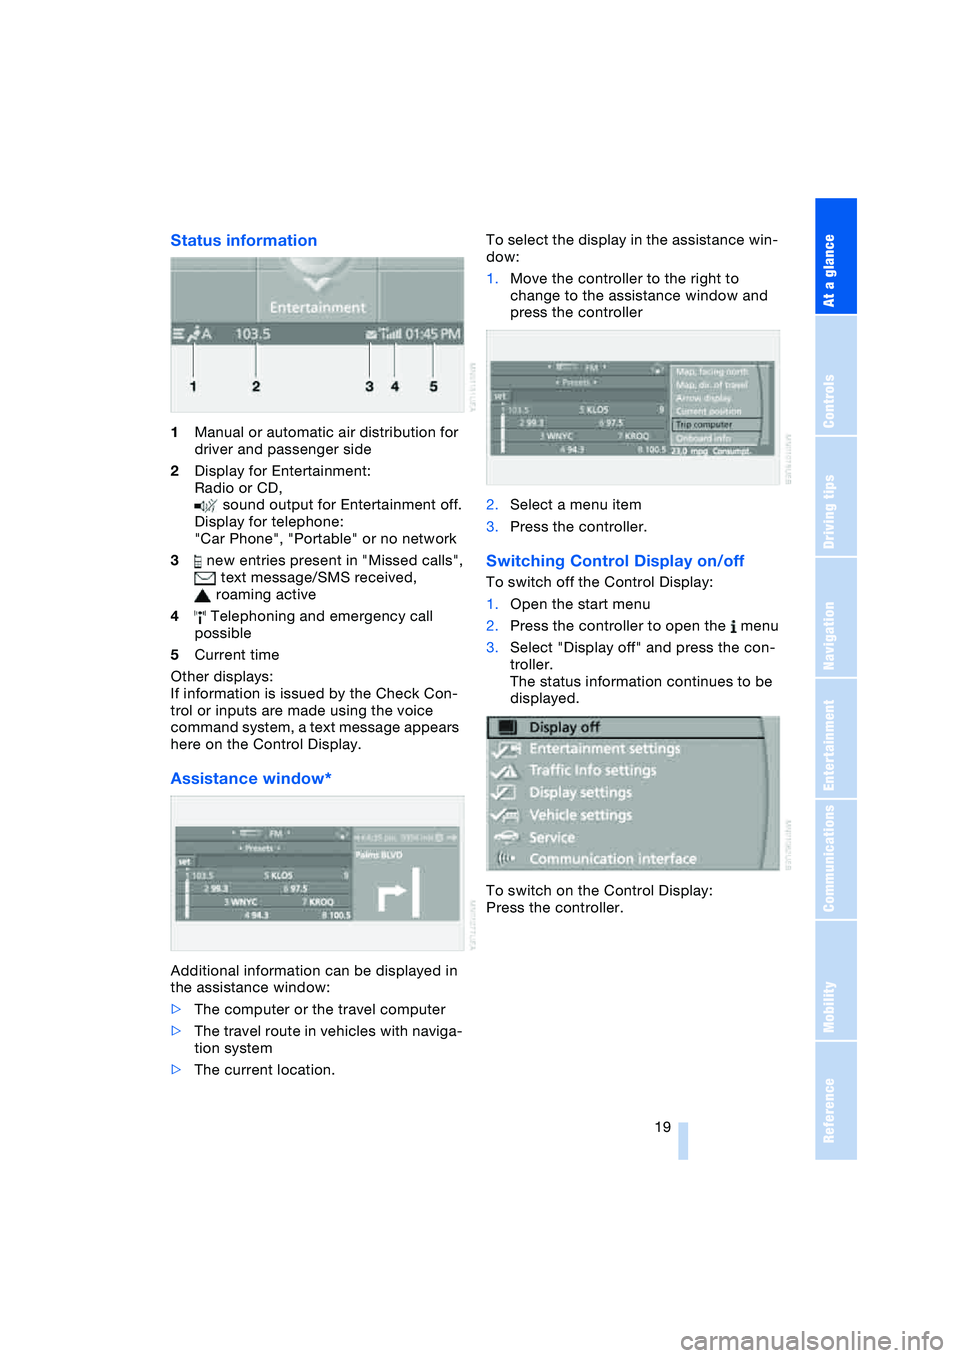
Status information
1Manual or automatic air distribution for
driver and passenger side
2Display for Entertainment:
Radio or CD,
sound output for Entertainment off.
Display for telephone:
"Car Phone", "Portable" or no network
3 new entries present in "Missed calls",
text message/SMS received,
roaming active
4 Telephoning and emergency call
possible
5Current time
Other displays:
If information is issued by the Check Con-
trol or inputs are made using the voice
command system, a text message appears
here on the Control Display.
Assistance window*
Additional information can be displayed in
the assistance window:
>The computer or the travel computer
>The travel route in vehicles with naviga-
tion system
>The current location.To select the display in the assistance win-
dow:
1.Move the controller to the right to
change to the assistance window and
press the controller
2.Select a menu item
3.Press the controller.
Switching Control Display on/off
To switch off the Control Display:
1.Open the start menu
2.Press the controller to open the menu
3.Select "Display off" and press the con-
troller.
The status information continues to be
displayed.
To switch on the Control Display:
Press the controller.
Page 66 of 216
Everything under control
64
Everything under control
Odometer, outside
temperature display, clock
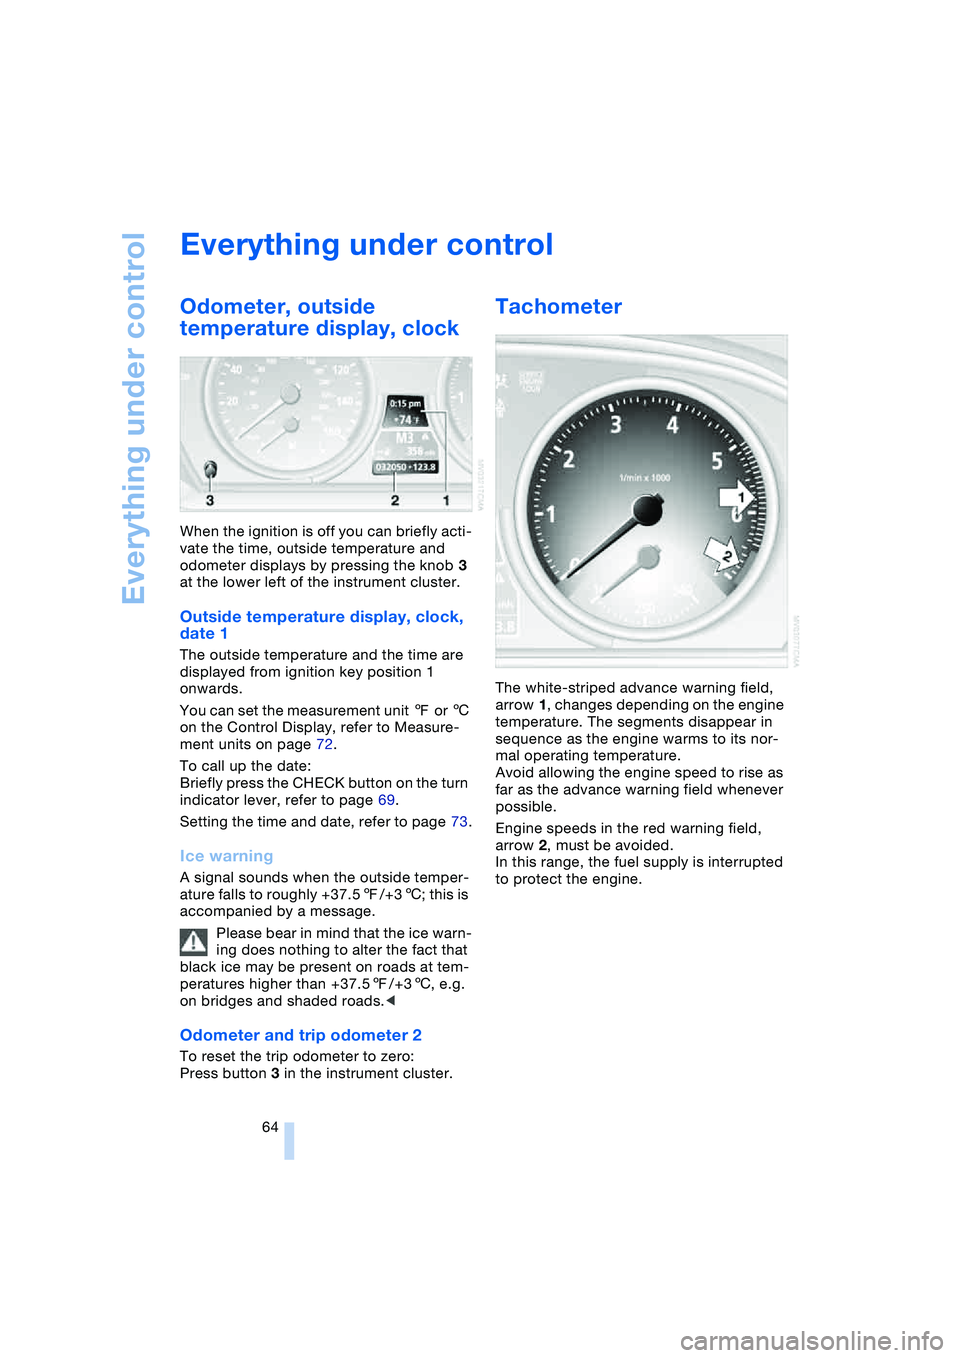
When the ignition is off you can briefly acti-
vate the time, outside temperature and
odometer displays by pressing the knob 3
at the lower left of the instrument cluster.
Outside temperature display, clock,
date 1
The outside temperature and the time are
displayed from ignition key position 1
onwards.
You can set the measurement unit 7 or 6
on the Control Display, refer to Measure-
ment units on page 72.
To call up the date:
Briefly press the CHECK button on the turn
indicator lever, refer to page 69.
Setting the time and date, refer to page 73.
Ice warning
A signal sounds when the outside temper-
ature falls to roughly +37.57/+36; this is
accompanied by a message.
Please bear in mind that the ice warn-
ing does nothing to alter the fact that
black ice may be present on roads at tem-
peratures higher than +37.57/+36, e.g.
on bridges and shaded roads.<
Odometer and trip odometer 2
To reset the trip odometer to zero:
Press button 3 in the instrument cluster.
Tachometer
The white-striped advance warning field,
arrow 1, changes depending on the engine
temperature. The segments disappear in
sequence as the engine warms to its nor-
mal operating temperature.
Avoid allowing the engine speed to rise as
far as the advance warning field whenever
possible.
Engine speeds in the red warning field,
arrow 2, must be avoided.
In this range, the fuel supply is interrupted
to protect the engine.
Page 72 of 216
Everything under control
70 >Trip computer,
suitable e.g. for a vacation trip.
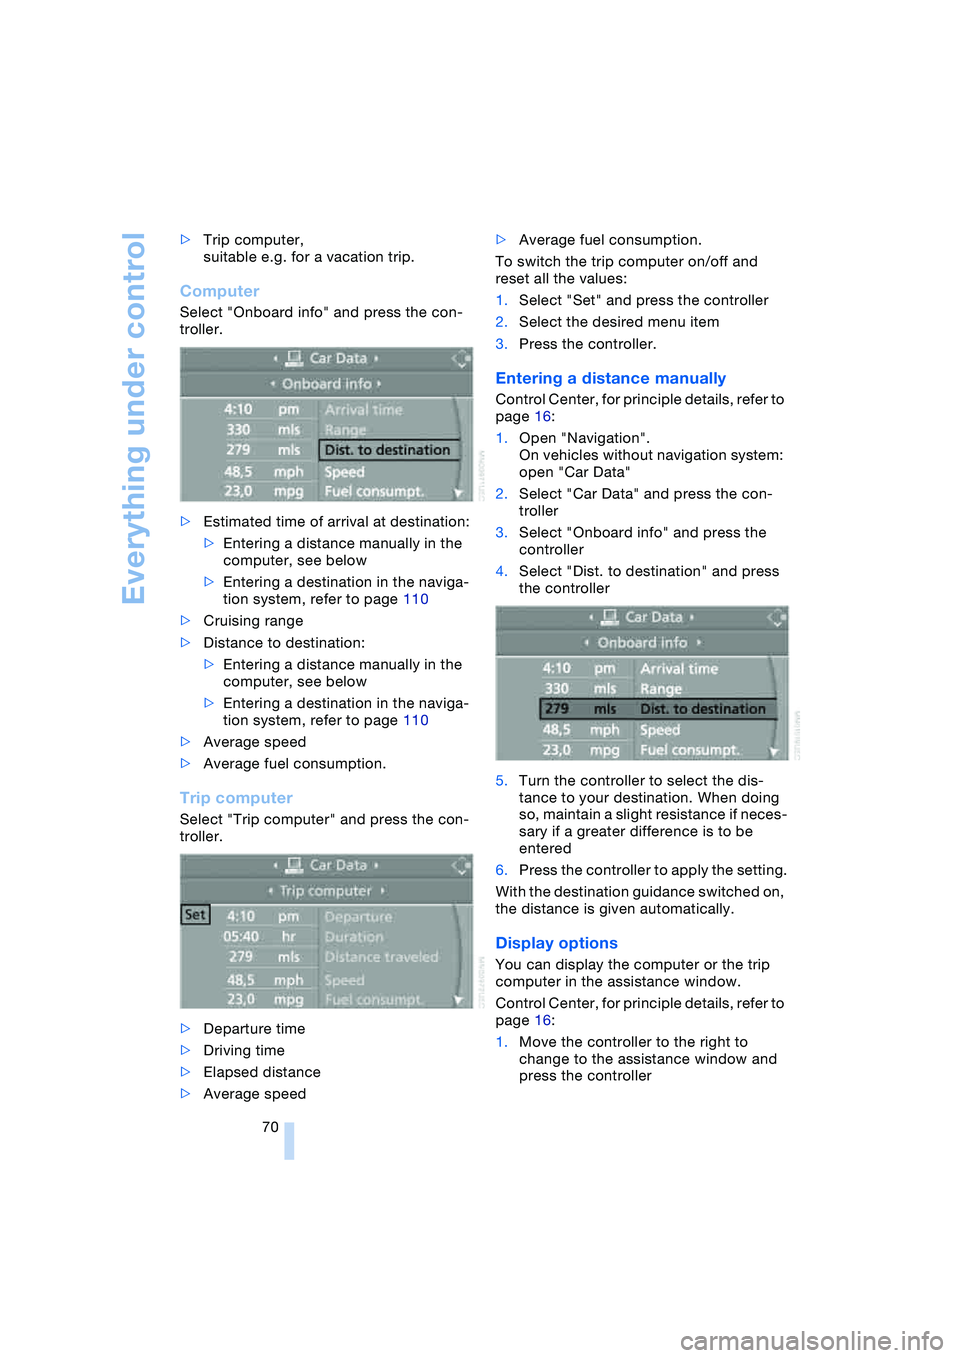
Computer
Select "Onboard info" and press the con-
troller.
>Estimated time of arrival at destination:
>Entering a distance manually in the
computer, see below
>Entering a destination in the naviga-
tion system, refer to page 110
>Cruising range
>Distance to destination:
>Entering a distance manually in the
computer, see below
>Entering a destination in the naviga-
tion system, refer to page 110
>Average speed
>Average fuel consumption.
Trip computer
Select "Trip computer" and press the con-
troller.
>Departure time
>Driving time
>Elapsed distance
>Average speed>Average fuel consumption.
To switch the trip computer on/off and
reset all the values:
1.Select "Set" and press the controller
2.Select the desired menu item
3.Press the controller.
Entering a distance manually
Control Center, for principle details, refer to
page 16:
1.Open "Navigation".
On vehicles without navigation system:
open "Car Data"
2.Select "Car Data" and press the con-
troller
3.Select "Onboard info" and press the
controller
4.Select "Dist. to destination" and press
the controller
5.Turn the controller to select the dis-
tance to your destination. When doing
so, maintain a slight resistance if neces-
sary if a greater difference is to be
entered
6.Press the controller to apply the setting.
With the destination guidance switched on,
the distance is given automatically.
Display options
You can display the computer or the trip
computer in the assistance window.
Control Center, for principle details, refer to
page 16:
1.Move the controller to the right to
change to the assistance window and
press the controller
Page 74 of 216
Everything under control
72
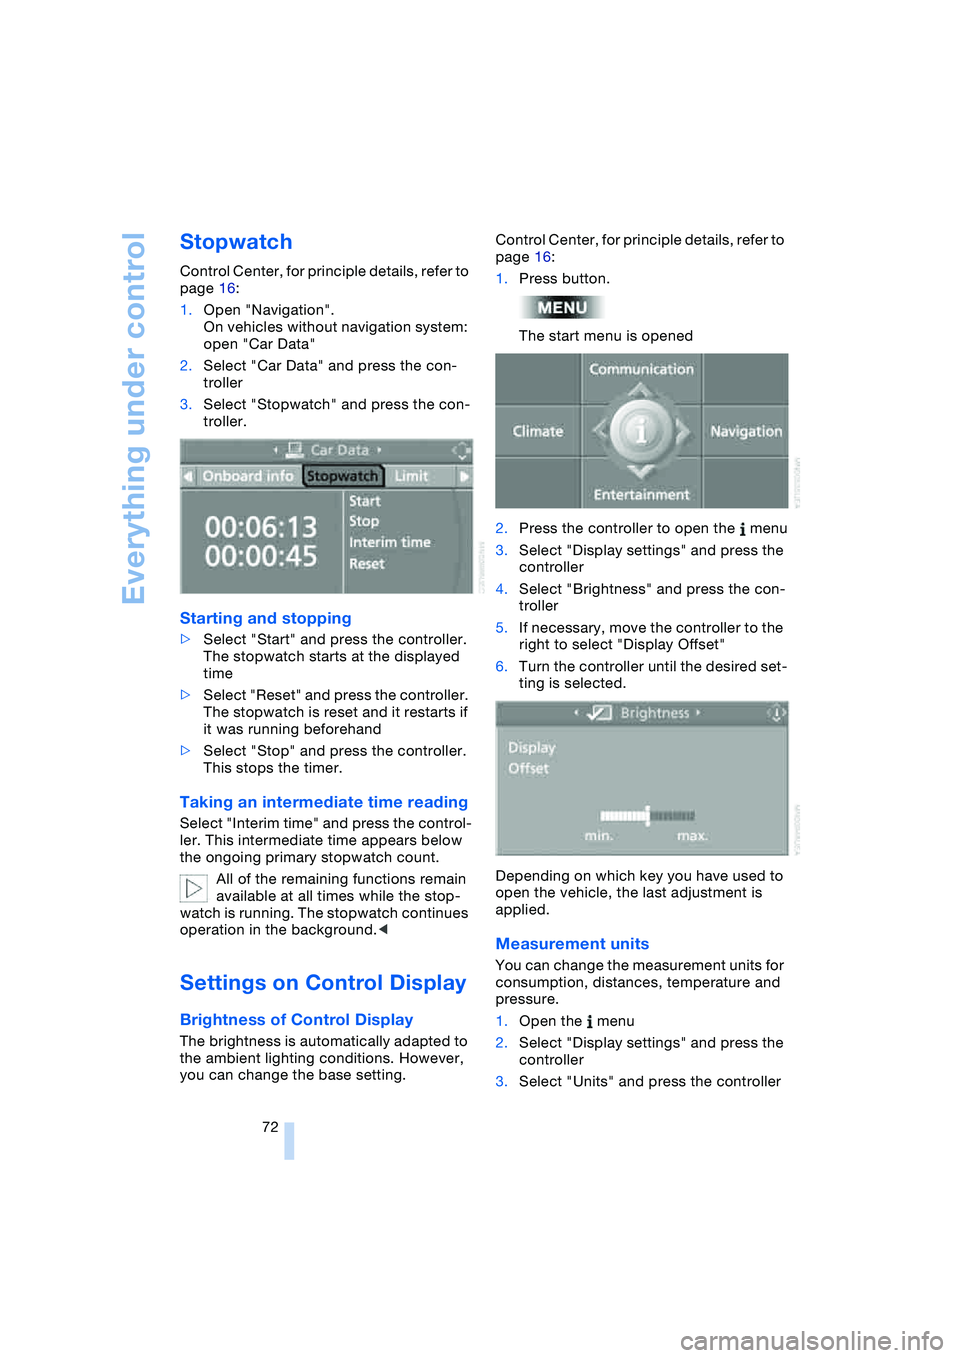
Stopwatch
Control Center, for principle details, refer to
page 16:
1.Open "Navigation".
On vehicles without navigation system:
open "Car Data"
2.Select "Car Data" and press the con-
troller
3.Select "Stopwatch" and press the con-
troller.
Starting and stopping
>Select "Start" and press the controller.
The stopwatch starts at the displayed
time
>Select "Reset" and press the controller.
The stopwatch is reset and it restarts if
it was running beforehand
>Select "Stop" and press the controller.
This stops the timer.
Taking an intermediate time reading
Select "Interim time" and press the control-
ler. This intermediate time appears below
the ongoing primary stopwatch count.
All of the remaining functions remain
available at all times while the stop-
watch is running. The stopwatch continues
operation in the background.<
Settings on Control Display
Brightness of Control Display
The brightness is automatically adapted to
the ambient lighting conditions. However,
you can change the base setting.Control Center, for principle details, refer to
page 16:
1.Press button.
The start menu is opened
2.Press the controller to open the menu
3.Select "Display settings" and press the
controller
4.Select "Brightness" and press the con-
troller
5.If necessary, move the controller to the
right to select "Display Offset"
6.Turn the controller until the desired set-
ting is selected.
Depending on which key you have used to
open the vehicle, the last adjustment is
applied.
Measurement units
You can change the measurement units for
consumption, distances, temperature and
pressure.
1.Open the menu
2.Select "Display settings" and press the
controller
3.Select "Units" and press the controller
Page 78 of 216
Technology for comfort, convenience and safety
76 indicate the presence of objects in green
before they are close enough to generate a
signal tone.
Control Center, for principle details, refer to
page 16:
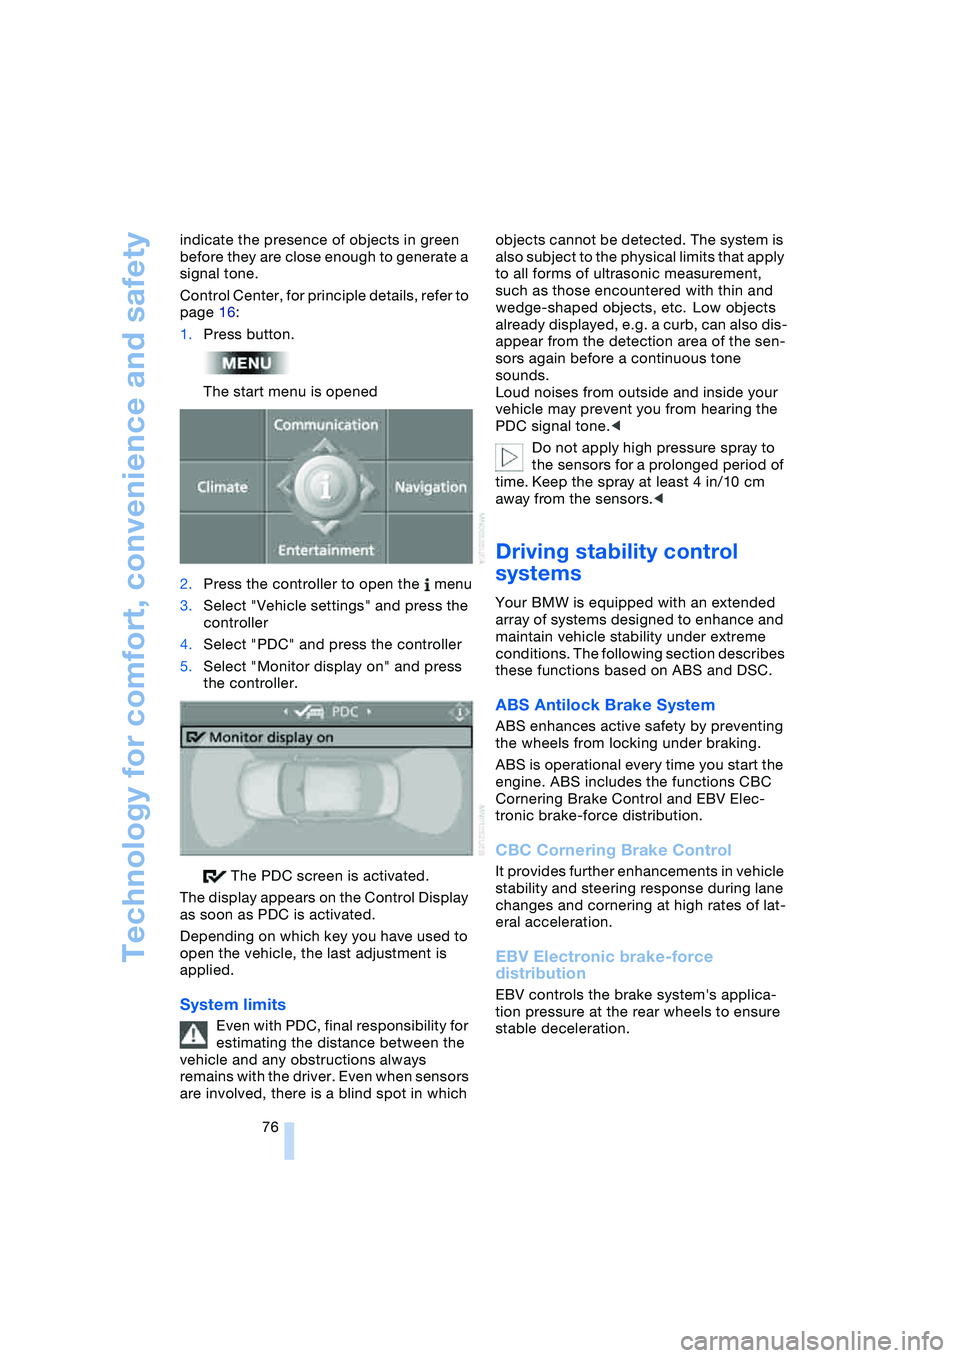
1.Press button.
The start menu is opened
2.Press the controller to open the menu
3.Select "Vehicle settings" and press the
controller
4.Select "PDC" and press the controller
5.Select "Monitor display on" and press
the controller.
The PDC screen is activated.
The display appears on the Control Display
as soon as PDC is activated.
Depending on which key you have used to
open the vehicle, the last adjustment is
applied.
System limits
Even with PDC, final responsibility for
estimating the distance between the
vehicle and any obstructions always
remains with the driver. Even when sensors
are involved, there is a blind spot in which objects cannot be detected. The system is
also subject to the physical limits that apply
to all forms of ultrasonic measurement,
such as those encountered with thin and
wedge-shaped objects, etc. Low objects
already displayed, e.g. a curb, can also dis-
appear from the detection area of the sen-
sors again before a continuous tone
sounds.
Loud noises from outside and inside your
vehicle may prevent you from hearing the
PDC signal tone.<
Do not apply high pressure spray to
the sensors for a prolonged period of
time. Keep the spray at least 4 in/10 cm
away from the sensors.<
Driving stability control
systems
Your BMW is equipped with an extended
array of systems designed to enhance and
maintain vehicle stability under extreme
conditions. The following section describes
these functions based on ABS and DSC.
ABS Antilock Brake System
ABS enhances active safety by preventing
the wheels from locking under braking.
ABS is operational every time you start the
engine. ABS includes the functions CBC
Cornering Brake Control and EBV Elec-
tronic brake-force distribution.
CBC Cornering Brake Control
It provides further enhancements in vehicle
stability and steering response during lane
changes and cornering at high rates of lat-
eral acceleration.
EBV Electronic brake-force
distribution
EBV controls the brake system's applica-
tion pressure at the rear wheels to ensure
stable deceleration.
Page 87 of 216
Controls
85Reference
At a glance
Driving tips
Communications
Navigation
Entertainment
Mobility
Lamps
Parking lamps/low beams
Parking lamps
With the switch in this position, the
front, rear and side vehicle lighting
is switched on. You can use the
parking lamps for parking. For lighting on
one side for parking as an additional fea-
ture, refer to page 86.
Low beams
When you switch off the ignition
with the headlamps on, the head-
lamps go out, and only the parking
lamps remain on.
Pathway lighting
After parking the vehicle and switching off
the headlamps, operating the headlamp
flasher activates the low beams. You can
set the duration on the Control Display or
deactivate the function.
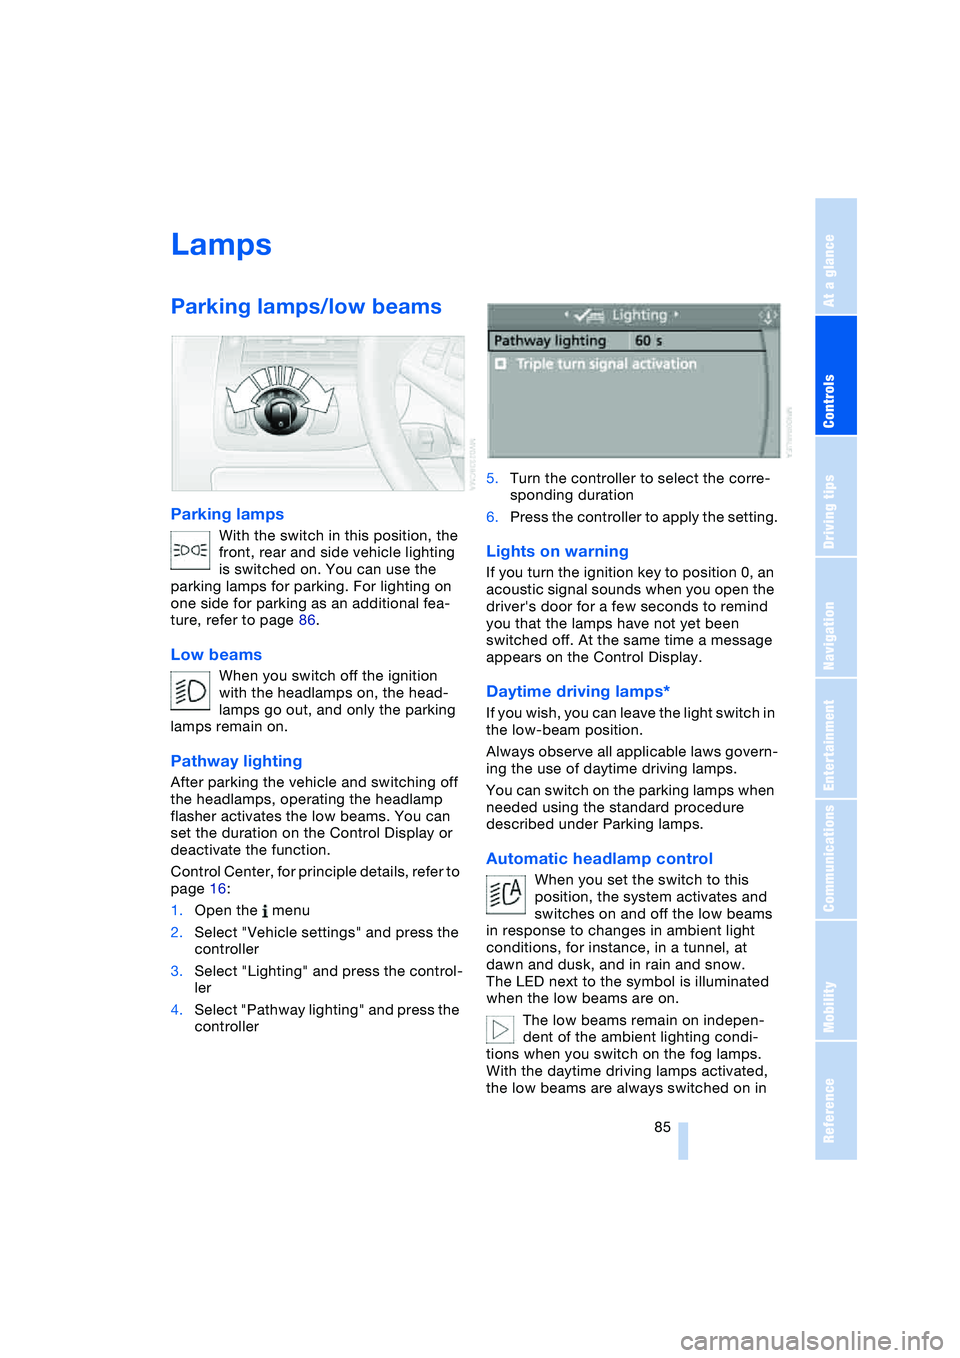
Control Center, for principle details, refer to
page 16:
1.Open the menu
2.Select "Vehicle settings" and press the
controller
3.Select "Lighting" and press the control-
ler
4.Select "Pathway lighting" and press the
controller5.Turn the controller to select the corre-
sponding duration
6.Press the controller to apply the setting.
Lights on warning
If you turn the ignition key to position 0, an
acoustic signal sounds when you open the
driver's door for a few seconds to remind
you that the lamps have not yet been
switched off. At the same time a message
appears on the Control Display.
Daytime driving lamps*
If you wish, you can leave the light switch in
the low-beam position.
Always observe all applicable laws govern-
ing the use of daytime driving lamps.
You can switch on the parking lamps when
needed using the standard procedure
described under Parking lamps.
Automatic headlamp control
When you set the switch to this
position, the system activates and
switches on and off the low beams
in response to changes in ambient light
conditions, for instance, in a tunnel, at
dawn and dusk, and in rain and snow.
The LED next to the symbol is illuminated
when the low beams are on.
The low beams remain on indepen-
dent of the ambient lighting condi-
tions when you switch on the fog lamps.
With the daytime driving lamps activated,
the low beams are always switched on in
Page 96 of 216
Practical interior accessories
94
Practical interior accessories
Integrated universal remote
control*
The concept
The integrated universal remote control
replaces up to three different hand-held
transmitters for various items of radio-con-
trolled equipment such as door openers
and house alarm systems. The integrated
universal remote control registers and
stores signals from the original hand-held
transmitters.
The signal of an original hand-held trans-
mitter can be programmed on one of the
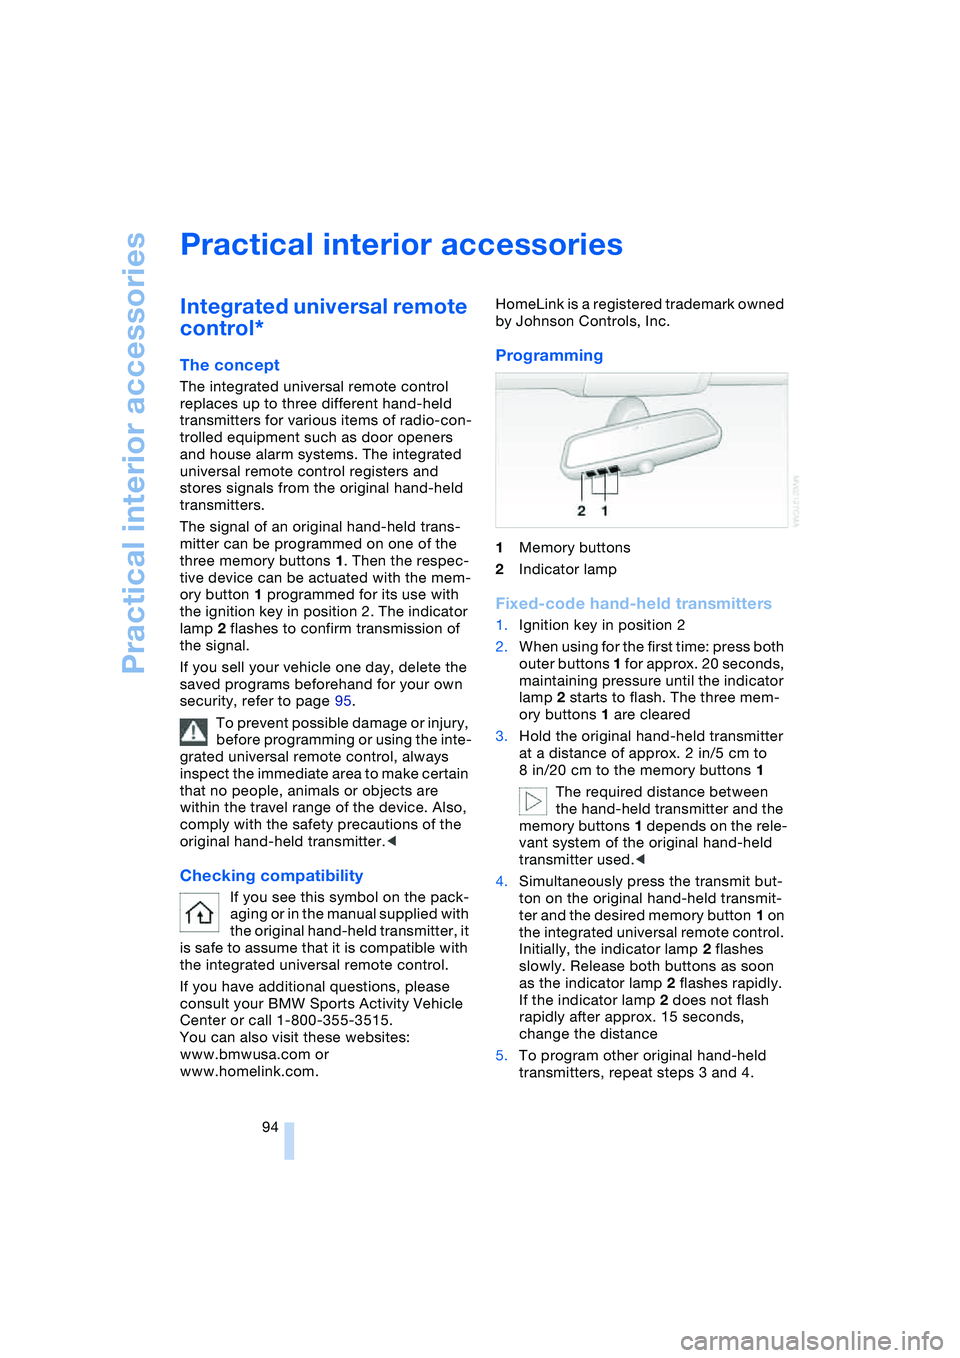
three memory buttons 1. Then the respec-
tive device can be actuated with the mem-
ory button 1 programmed for its use with
the ignition key in position 2. The indicator
lamp 2 flashes to confirm transmission of
the signal.
If you sell your vehicle one day, delete the
saved programs beforehand for your own
security, refer to page 95.
To prevent possible damage or injury,
before programming or using the inte-
grated universal remote control, always
inspect the immediate area to make certain
that no people, animals or objects are
within the travel range of the device. Also,
comply with the safety precautions of the
original hand-held transmitter.<
Checking compatibility
If you see this symbol on the pack-
aging or in the manual supplied with
the original hand-held transmitter, it
is safe to assume that it is compatible with
the integrated universal remote control.
If you have additional questions, please
consult your BMW Sports Activity Vehicle
Center or call 1-800-355-3515.
You can also visit these websites:
www.bmwusa.com or
www.homelink.com. HomeLink is a registered trademark owned
by Johnson Controls, Inc.
Programming
1Memory buttons
2Indicator lamp
Fixed-code hand-held transmitters
1.Ignition key in position 2
2.When using for the first time: press both
outer buttons 1 for approx. 20 seconds,
maintaining pressure until the indicator
lamp 2 starts to flash. The three mem-
ory buttons 1 are cleared
3.Hold the original hand-held transmitter
at a distance of approx. 2 in/5 cm to
8 in/20 cm to the memory buttons 1
The required distance between
the hand-held transmitter and the
memory buttons 1 depends on the rele-
vant system of the original hand-held
transmitter used.<
4.Simultaneously press the transmit but-
ton on the original hand-held transmit-
ter and the desired memory button 1 on
the integrated universal remote control.
Initially, the indicator lamp 2 flashes
slowly. Release both buttons as soon
as the indicator lamp 2 flashes rapidly.
If the indicator lamp 2 does not flash
rapidly after approx. 15 seconds,
change the distance
5.To program other original hand-held
transmitters, repeat steps 3 and 4.
Page 120 of 216
Destination guidance
118
Destination guidance
Starting destination
guidance
Control Center, for principle details, refer to
page 16:
1.Select "Navigation" and press the con-
troller
2.Select the destination from the destina-
tion list and press the controller or enter
a new destination, refer to page 110
3.Select "Start guidance" and press the
controller.
The destination guidance is started.
indicates the current destination.
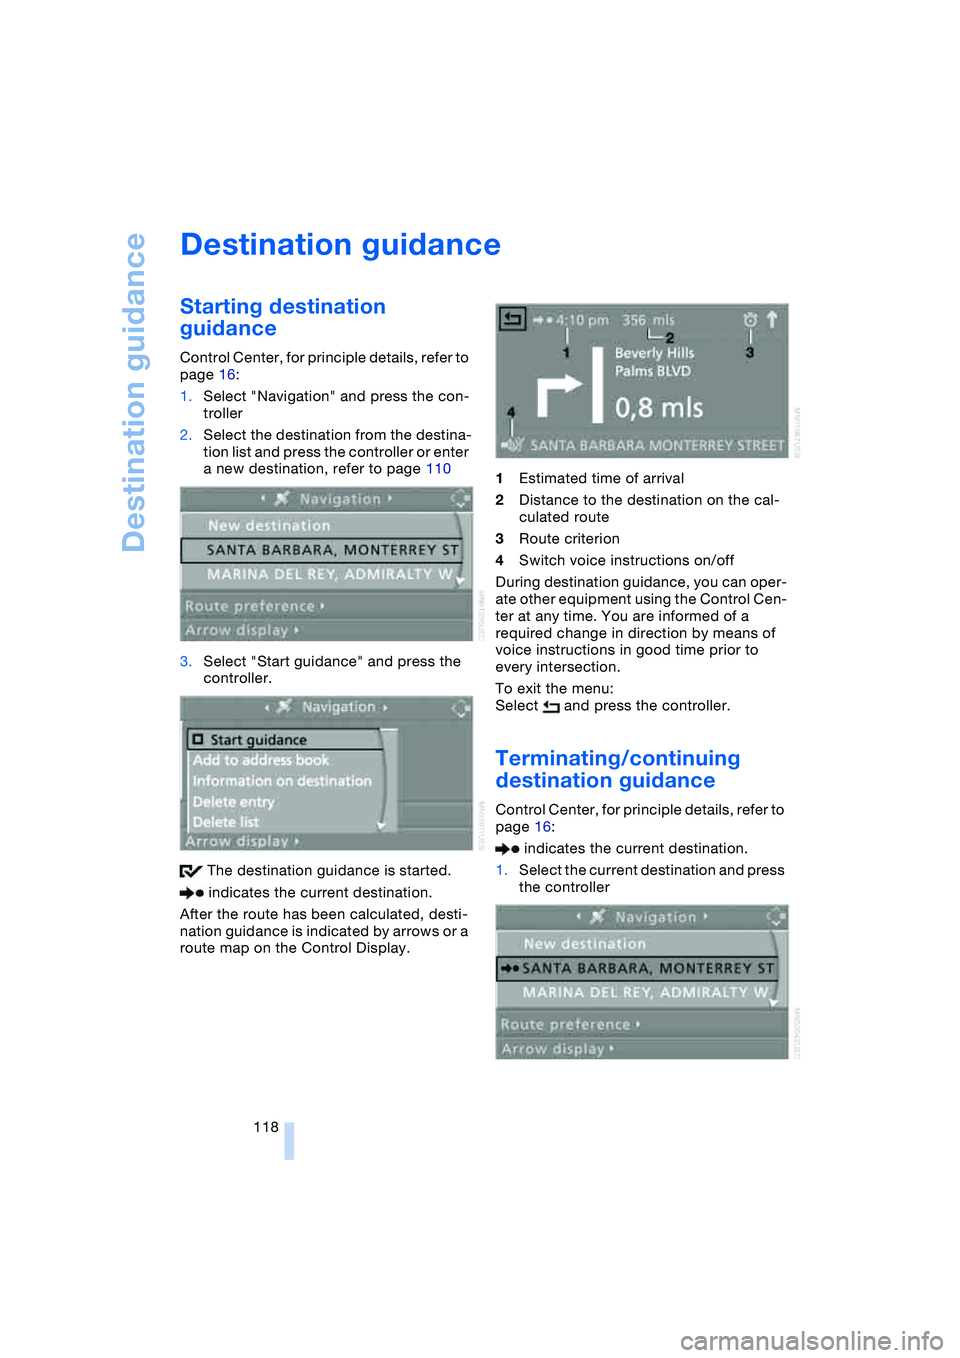
After the route has been calculated, desti-
nation guidance is indicated by arrows or a
route map on the Control Display.1Estimated time of arrival
2Distance to the destination on the cal-
culated route
3Route criterion
4Switch voice instructions on/off
During destination guidance, you can oper-
ate other equipment using the Control Cen-
ter at any time. You are informed of a
required change in direction by means of
voice instructions in good time prior to
every intersection.
To exit the menu:
Select and press the controller.
Terminating/continuing
destination guidance
Control Center, for principle details, refer to
page 16:
indicates the current destination.
1.Select the current destination and press
the controller