2004 BMW 645CI COUPE&CONVERTIBLE steering
[x] Cancel search: steeringPage 128 of 216
On/off and tone
126
On/off and tone
The following equipment has shared con-
trols and setting options:
>Radio Business
>CD player
>CD changer
*.
Controls
The audio sources can be operated using:
>Buttons on the CD player
>Control Center
>Buttons on the steering wheel, refer to
page 11.
Buttons on CD player
The layout of the buttons can vary depend-
ing on your vehicle's equipment.
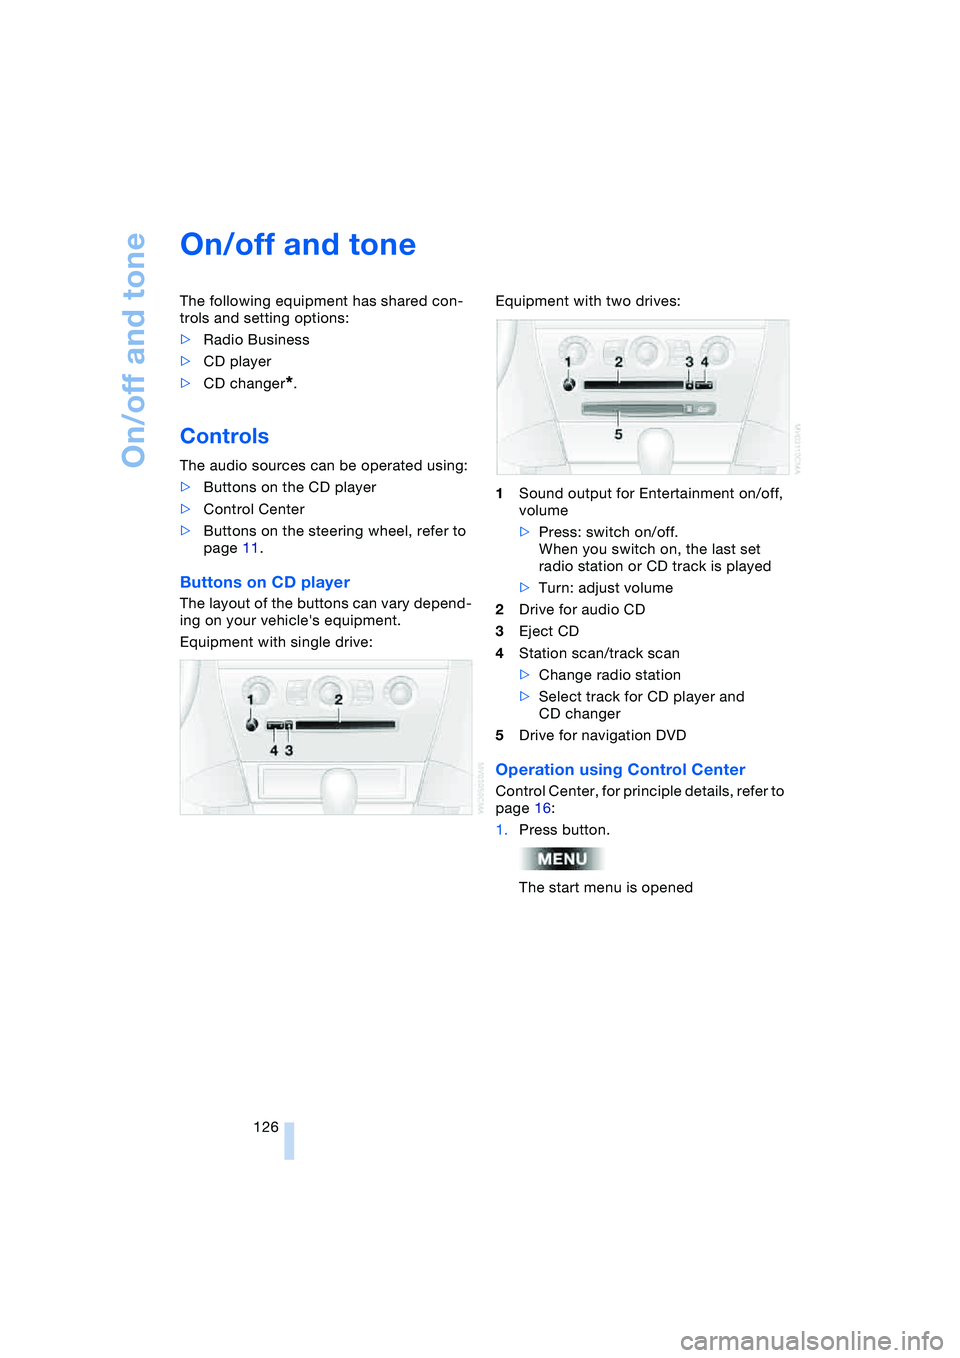
Equipment with single drive:Equipment with two drives:
1Sound output for Entertainment on/off,
volume
>Press: switch on/off.
When you switch on, the last set
radio station or CD track is played
>Turn: adjust volume
2Drive for audio CD
3Eject CD
4Station scan/track scan
>Change radio station
>Select track for CD player and
CD changer
5Drive for navigation DVD
Operation using Control Center
Control Center, for principle details, refer to
page 16:
1.Press button.
The start menu is opened
Page 147 of 216
145
Entertainment
Reference
At a glance
Controls
Driving tips Communications
Navigation
Mobility
Batteries
Never attempt to dismantle your
BMW portable phone or its battery.
Use only approved battery types – the
wrong battery can destroy your portable
phone.
To avoid possible short circuits, after
removing a battery you should never allow
it to come into contact with metallic sur-
faces of any kind.<
Disposing of used batteries
Return used batteries to a recycling
collection point or to your BMW cen-
ter.<
Care instructions
You can find what you need to know about
caring for your portable phone in the Caring
for your vehicle brochure and in the sepa-
rate portable phone Owner's Manual.
Operating options
You can operate the BMW portable phone*
with:
>The steering wheel, refer to page 11
>The Control Center, refer to page 146
>Voice control, refer to page 151.
Telephoning with car phone:
BMW Assist calls
You can use the car phone via the hands-
free system for BMW Assist calls.
When the status information "Car Phone" is
displayed in "Communication", only BMW
Assist calls are possible.
Activating the
BMW portable phone*
Requirements for portable phones with
SIM card:
>Enter a Personal Identification Number,
PIN, if necessary
>Remove all keypad locks, refer to sepa-
rate Owner's Manual.
Before starting off, place the BMW portable
phone in the cradle. If a connection to
BMW Assist has been established, you
cannot use the BMW portable phone until
this connection has been terminated.
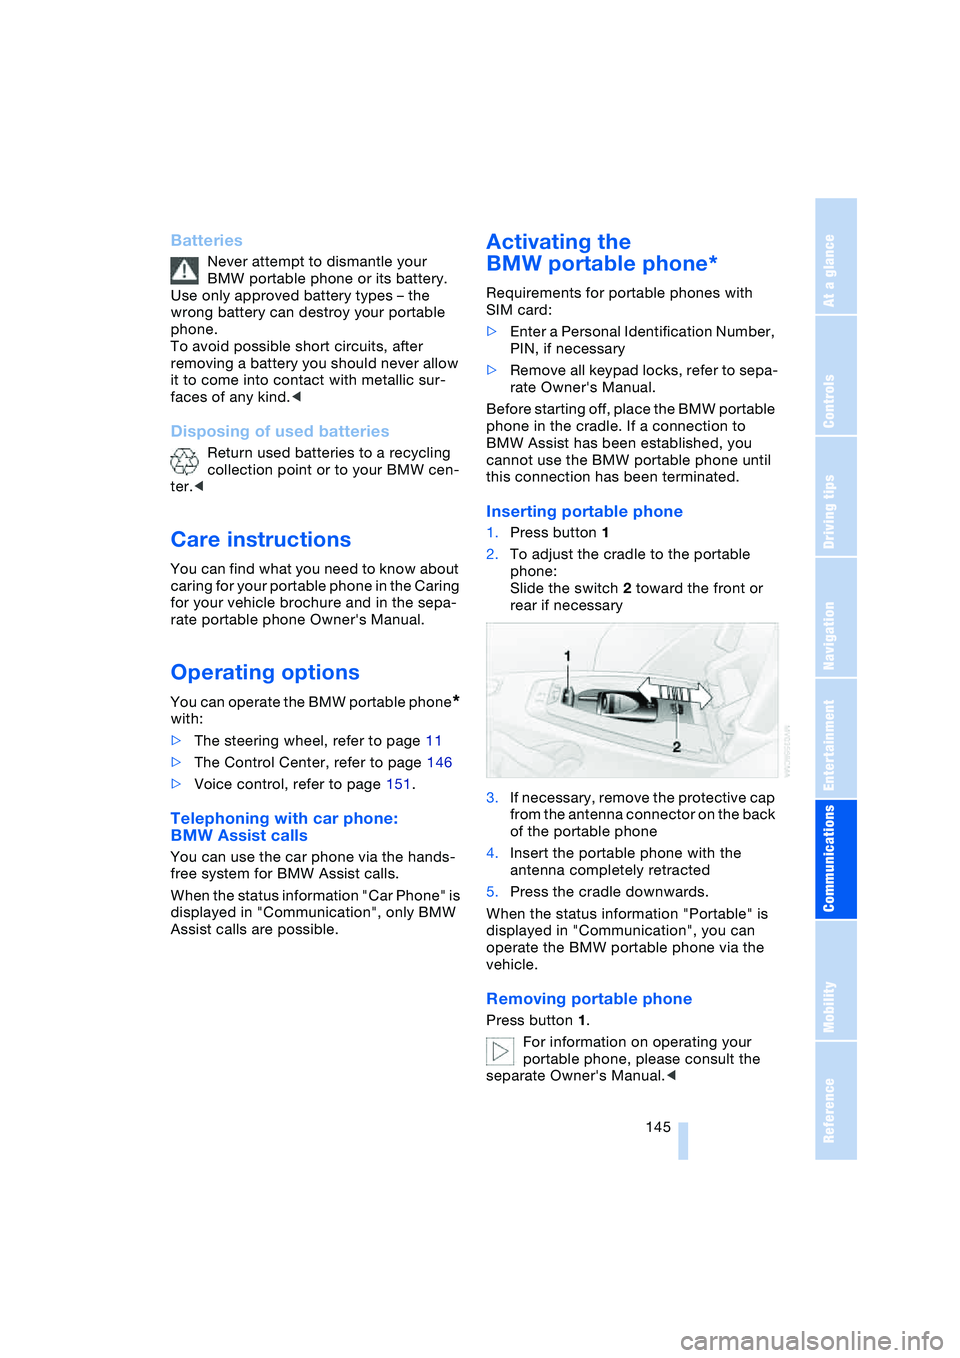
Inserting portable phone
1.Press button 1
2.To adjust the cradle to the portable
phone:
Slide the switch 2 toward the front or
rear if necessary
3.If necessary, remove the protective cap
from the antenna connector on the back
of the portable phone
4.Insert the portable phone with the
antenna completely retracted
5.Press the cradle downwards.
When the status information "Portable" is
displayed in "Communication", you can
operate the BMW portable phone via the
vehicle.
Removing portable phone
Press button 1.
For information on operating your
portable phone, please consult the
separate Owner's Manual.<
Page 148 of 216
Telephoning
146
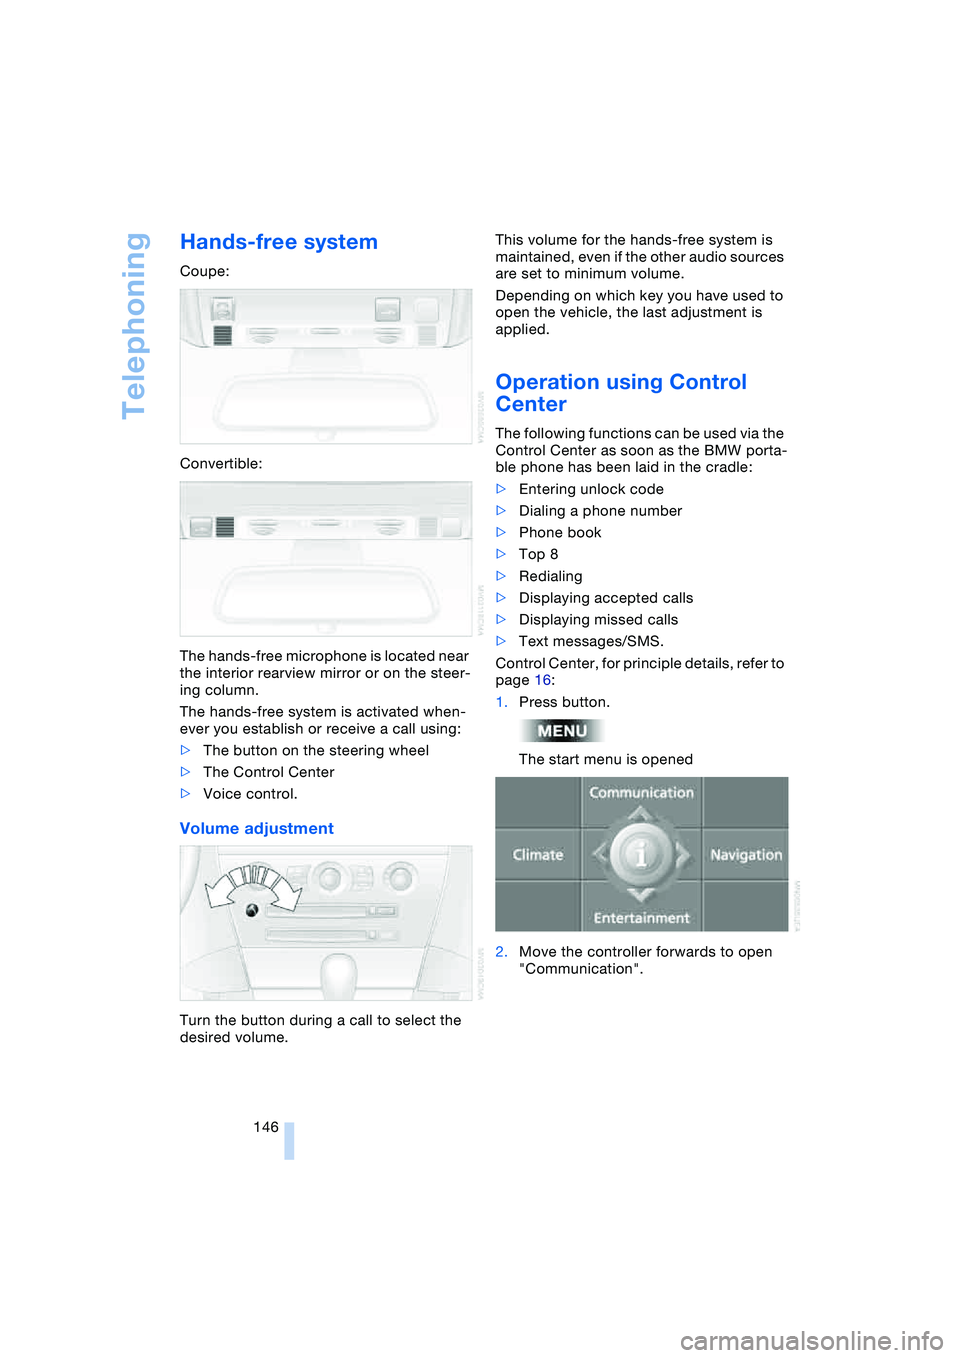
Hands-free system
Coupe:
Convertible:
The hands-free microphone is located near
the interior rearview mirror or on the steer-
ing column.
The hands-free system is activated when-
ever you establish or receive a call using:
>The button on the steering wheel
>The Control Center
>Voice control.
Volume adjustment
Turn the button during a call to select the
desired volume.This volume for the hands-free system is
maintained, even if the other audio sources
are set to minimum volume.
Depending on which key you have used to
open the vehicle, the last adjustment is
applied.
Operation using Control
Center
The following functions can be used via the
Control Center as soon as the BMW porta-
ble phone has been laid in the cradle:
>Entering unlock code
>Dialing a phone number
>Phone book
>Top 8
>Redialing
>Displaying accepted calls
>Displaying missed calls
>Text messages/SMS.
Control Center, for principle details, refer to
page 16:
1.Press button.
The start menu is opened
2.Move the controller forwards to open
"Communication".
Page 153 of 216
151
Entertainment
Reference
At a glance
Controls
Driving tips Communications
Navigation
Mobility
To close the text message:
Move the controller forwards to select
and press the controller.
Calling sender
1.Select the desired text message and
press the controller.
The text message is displayed
2.Select "Options" and press the control-
ler
3.Select "Call sender" and press the con-
troller.
The selected sender is called.
Deleting text messages/SMS
1.Select the desired text message and
press the controller.
The text message is displayed
2.Select "Options" and press the control-
ler
3.Select "Delete" and press the control-
ler.
The text message of the portable phone
is deleted.
Operation by voice control*
The concept
You can operate your portable phone with-
out having to remove your hands from the
steering wheel. The system operates on
the basis of voice commands that you learn
easily after using them a few times. In addi-
tion, you are also supported by instructions
or questions.
Symbols usedVoice commands
In ignition key position 2:
1.Briefly press the button on the steer-
ing wheel.
A sound signal indicates operating
readiness
2.Speak voice commands.
To have the system list the voice com-
mands possible in each case:
Canceling operation via voice
control
Briefly press the button on the steering
wheel
or
In dialogs where text of any kind can be
spoken, e.g. a name, canceling is only pos-
sible using the button. Voice control dia-
log is automatically interrupted when an
incoming call is received.
Voice commands
In addition to the commands described in
this Owner's Manual, alternative com-
mands are often possible for the same
functions, e.g.:
Digits from zero to nine are understood.
You can say each digit individually or group
them into a sequence of three to five digits
to speed up the process.
{...} Identifies voice commands.
{{...}} Identifies instructions generated
by the system.
{Help}.
{Cancel}.
{Dial name} or {Name}.
Page 154 of 216
Telephoning
152
An example: dialing a phone number
Start the dialog:
Briefly press the button on the steering
wheel.
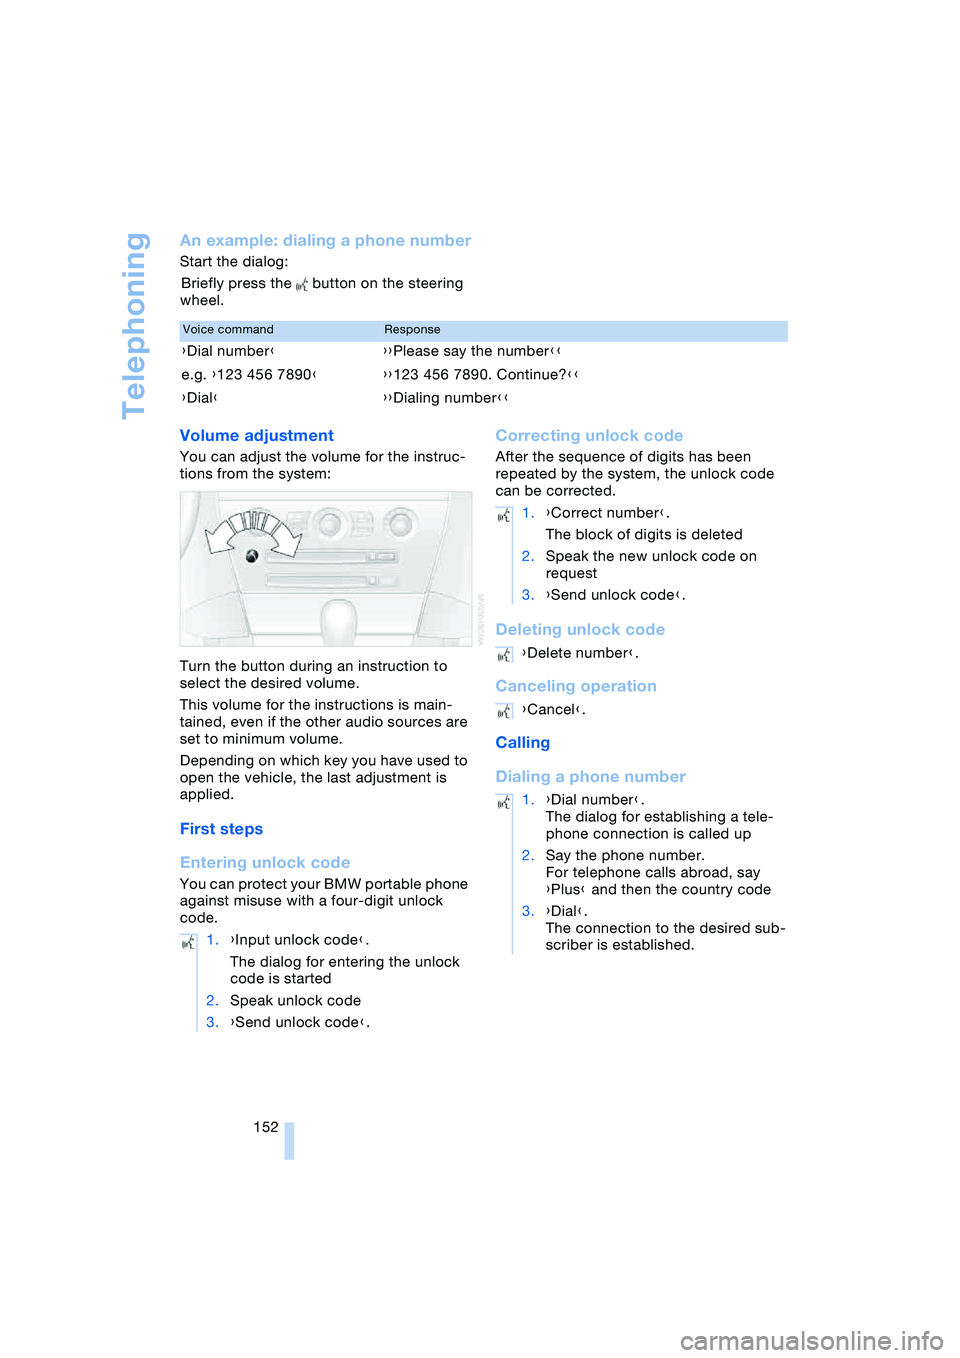
Volume adjustment
You can adjust the volume for the instruc-
tions from the system:
Turn the button during an instruction to
select the desired volume.
This volume for the instructions is main-
tained, even if the other audio sources are
set to minimum volume.
Depending on which key you have used to
open the vehicle, the last adjustment is
applied.
First steps
Entering unlock code
You can protect your BMW portable phone
against misuse with a four-digit unlock
code.
Correcting unlock code
After the sequence of digits has been
repeated by the system, the unlock code
can be corrected.
Deleting unlock code
Canceling operation
Calling
Dialing a phone number
Voice commandResponse
{Dial number}{{Please say the number}}
e.g. {123 456 7890}{{123 456 7890. Continue?}}
{Dial}{{Dialing number}}
1.{Input unlock code}.
The dialog for entering the unlock
code is started
2.Speak unlock code
3.{Send unlock code}.
1.{Correct number}.
The block of digits is deleted
2.Speak the new unlock code on
request
3.{Send unlock code}.
{Delete number}.
{Cancel}.
1.{Dial number}.
The dialog for establishing a tele-
phone connection is called up
2.Say the phone number.
For telephone calls abroad, say
{Plus} and then the country code
3.{Dial}.
The connection to the desired sub-
scriber is established.
Page 170 of 216
Wheels and tires
168
Run-flat tires
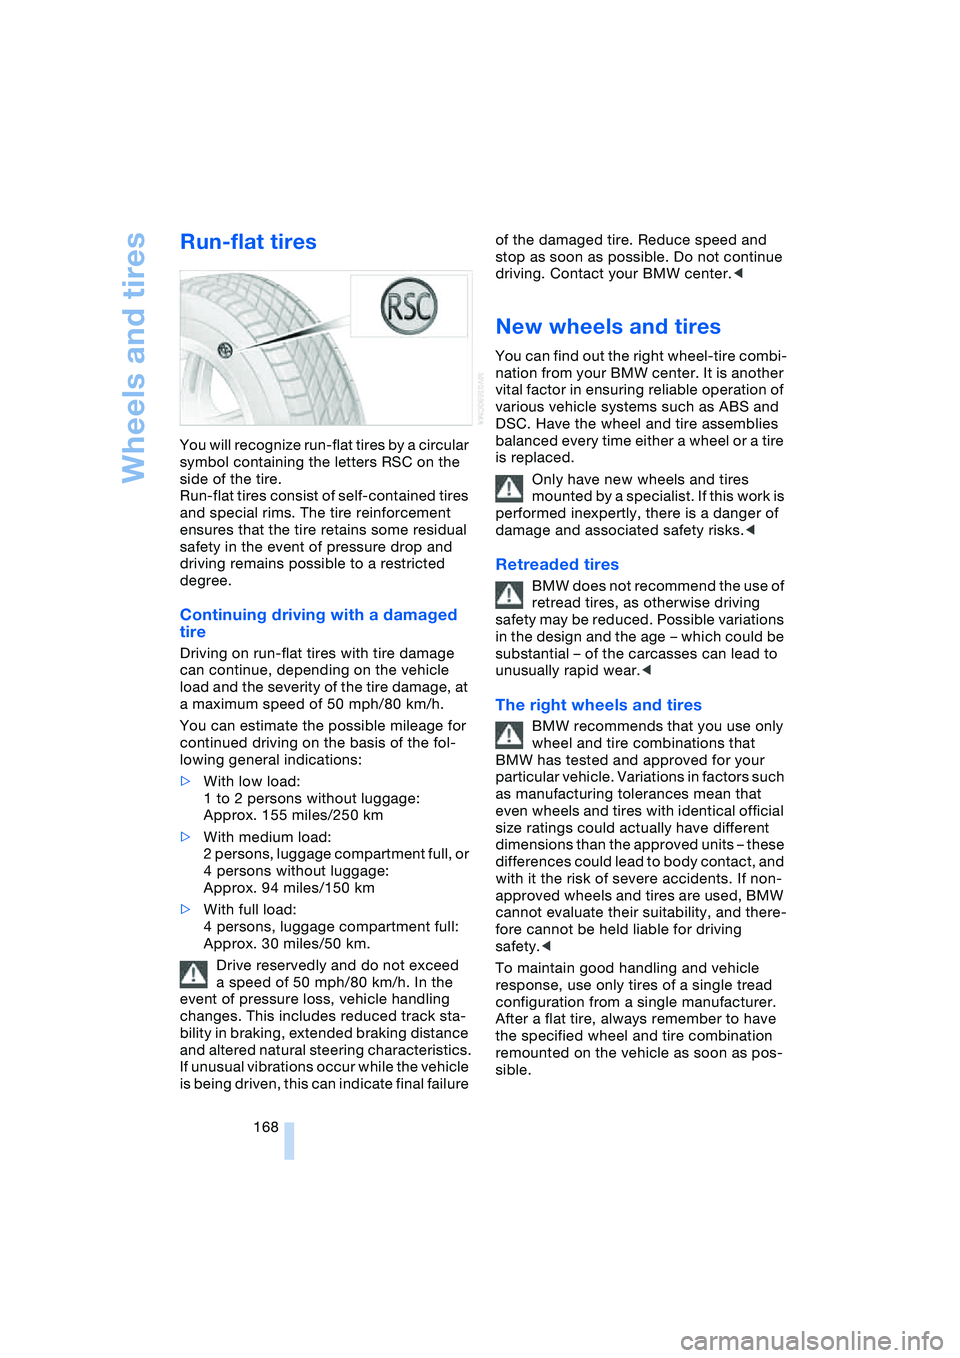
You will recognize run-flat tires by a circular
symbol containing the letters RSC on the
side of the tire.
Run-flat tires consist of self-contained tires
and special rims. The tire reinforcement
ensures that the tire retains some residual
safety in the event of pressure drop and
driving remains possible to a restricted
degree.
Continuing driving with a damaged
tire
Driving on run-flat tires with tire damage
can continue, depending on the vehicle
load and the severity of the tire damage, at
a maximum speed of 50 mph/80 km/h.
You can estimate the possible mileage for
continued driving on the basis of the fol-
lowing general indications:
>With low load:
1 to 2 persons without luggage:
Approx. 155 miles/250 km
>With medium load:
2 persons, luggage compartment full, or
4 persons without luggage:
Approx. 94 miles/150 km
>With full load:
4 persons, luggage compartment full:
Approx. 30 miles/50 km.
Drive reservedly and do not exceed
a speed of 50 mph/80 km/h. In the
event of pressure loss, vehicle handling
changes. This includes reduced track sta-
bility in braking, extended braking distance
and altered natural steering characteristics.
If unusual vibrations occur while the vehicle
is being driven, this can indicate final failure of the damaged tire. Reduce speed and
stop as soon as possible. Do not continue
driving. Contact your BMW center.<
New wheels and tires
You can find out the right wheel-tire combi-
nation from your BMW center. It is another
vital factor in ensuring reliable operation of
various vehicle systems such as ABS and
DSC. Have the wheel and tire assemblies
balanced every time either a wheel or a tire
is replaced.
Only have new wheels and tires
mounted by a specialist. If this work is
performed inexpertly, there is a danger of
damage and associated safety risks.<
Retreaded tires
BMW does not recommend the use of
retread tires, as otherwise driving
safety may be reduced. Possible variations
in the design and the age – which could be
substantial – of the carcasses can lead to
unusually rapid wear.<
The right wheels and tires
BMW recommends that you use only
wheel and tire combinations that
BMW has tested and approved for your
particular vehicle. Variations in factors such
as manufacturing tolerances mean that
even wheels and tires with identical official
size ratings could actually have different
dimensions than the approved units – these
differences could lead to body contact, and
with it the risk of severe accidents. If non-
approved wheels and tires are used, BMW
cannot evaluate their suitability, and there-
fore cannot be held liable for driving
safety.<
To maintain good handling and vehicle
response, use only tires of a single tread
configuration from a single manufacturer.
After a flat tire, always remember to have
the specified wheel and tire combination
remounted on the vehicle as soon as pos-
sible.
Page 181 of 216
Mobility
179Reference
At a glance
Controls
Driving tips
Communications
Navigation
Entertainment
High beams, parking lamps
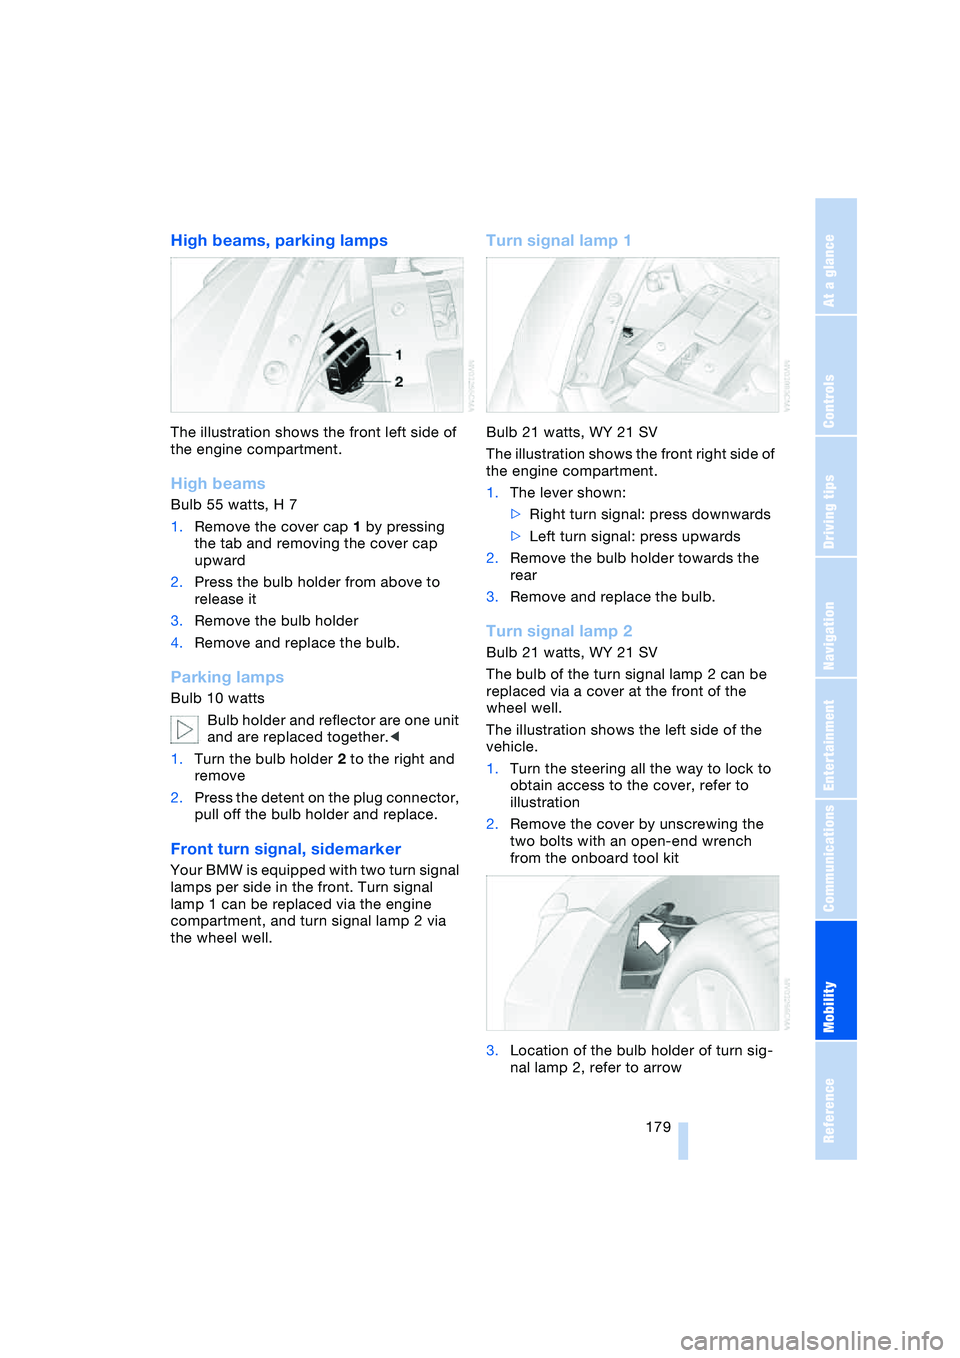
The illustration shows the front left side of
the engine compartment.
High beams
Bulb 55 watts, H 7
1.Remove the cover cap 1 by pressing
the tab and removing the cover cap
upward
2.Press the bulb holder from above to
release it
3.Remove the bulb holder
4.Remove and replace the bulb.
Parking lamps
Bulb 10 watts
Bulb holder and reflector are one unit
and are replaced together.<
1.Turn the bulb holder 2 to the right and
remove
2.Press the detent on the plug connector,
pull off the bulb holder and replace.
Front turn signal, sidemarker
Your BMW is equipped with two turn signal
lamps per side in the front. Turn signal
lamp 1 can be replaced via the engine
compartment, and turn signal lamp 2 via
the wheel well.
Turn signal lamp 1
Bulb 21 watts, WY 21 SV
The illustration shows the front right side of
the engine compartment.
1.The lever shown:
>Right turn signal: press downwards
>Left turn signal: press upwards
2.Remove the bulb holder towards the
rear
3.Remove and replace the bulb.
Turn signal lamp 2
Bulb 21 watts, WY 21 SV
The bulb of the turn signal lamp 2 can be
replaced via a cover at the front of the
wheel well.
The illustration shows the left side of the
vehicle.
1.Turn the steering all the way to lock to
obtain access to the cover, refer to
illustration
2.Remove the cover by unscrewing the
two bolts with an open-end wrench
from the onboard tool kit
3.Location of the bulb holder of turn sig-
nal lamp 2, refer to arrow
Page 184 of 216
Replacing components
182 >Active steering
The system is deactivated and has to be
initialized, refer to page 80. Until then,
greater steering wheel movement is
required
>Seat, mirror and steering wheel
memory
The position must be newly stored,
refer to page 44
>Time and date
The settings must be updated, refer to
page 73
>Radio
Radio stations have to be stored again,
refer to page 132
>Navigation system
Wait to see what happens with the
functional capability, refer to page 122.
Fuses
Never attempt to repair a blown fuse,
and do not replace a defective fuse
with a substitute of another color or amper-
age rating, as this could lead to overloading
of the wiring, ultimately resulting in a fire in
the vehicle.<
Information on the fuse assignment is
located below the bracket for the onboard
tool kit, see below.
In glove compartment
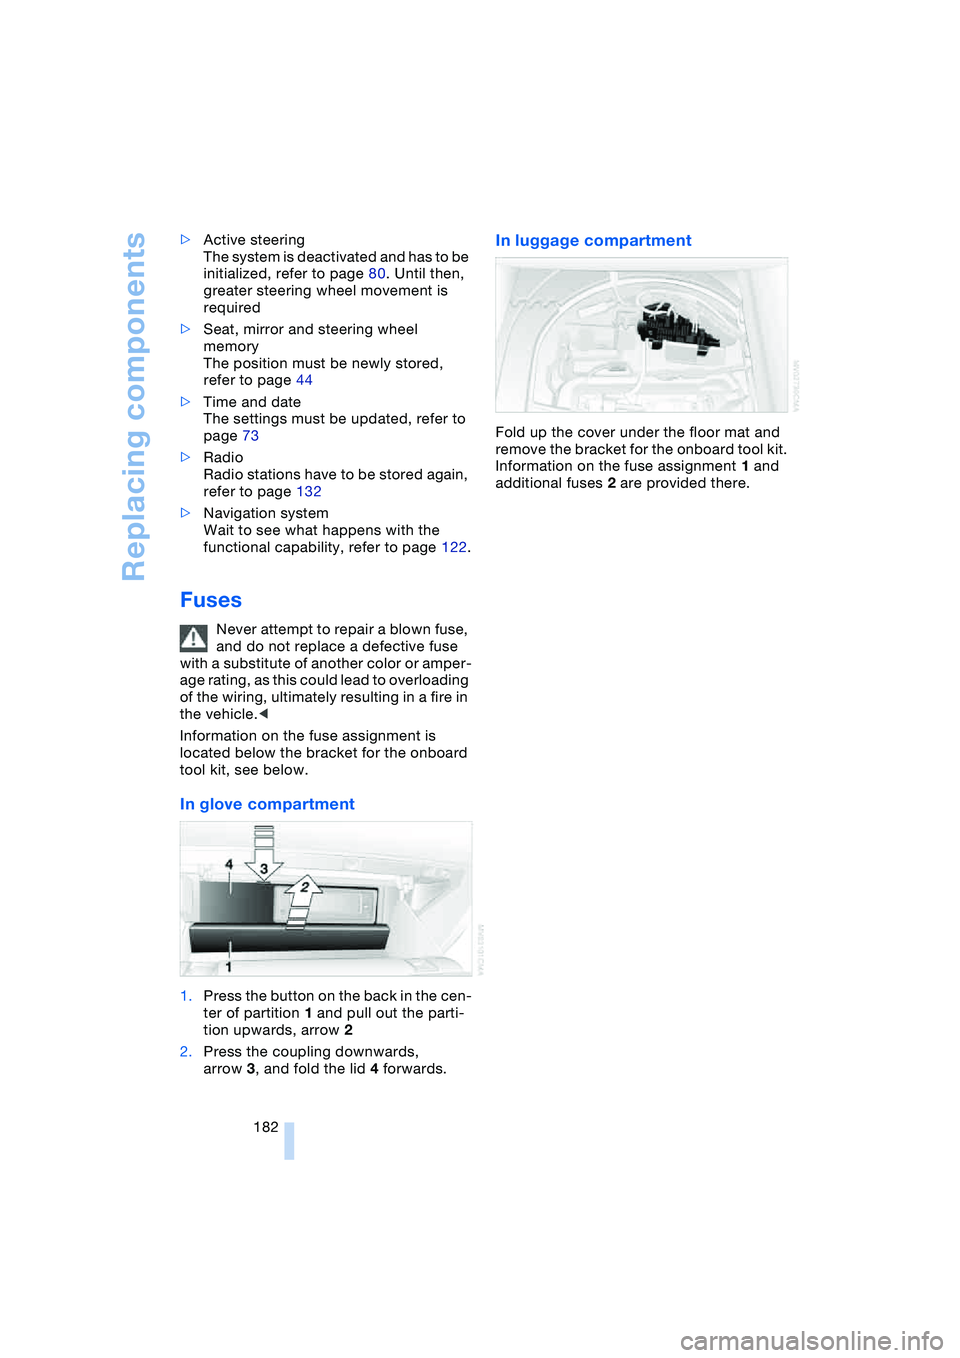
1.Press the button on the back in the cen-
ter of partition 1 and pull out the parti-
tion upwards, arrow 2
2.Press the coupling downwards,
arrow 3, and fold the lid 4 forwards.
In luggage compartment
Fold up the cover under the floor mat and
remove the bracket for the onboard tool kit.
Information on the fuse assignment 1 and
additional fuses 2 are provided there.