2004 BMW 645CI COUPE&CONVERTIBLE steering
[x] Cancel search: steeringPage 64 of 216
Driving
62 Deactivate the rain sensor when
passing through an automatic car
wash. Failure to do so could result in dam-
age caused by undesired wiper activa-
tion.<
Washer fluid
Washer fluid antifreeze is flammable.
Always keep it well away from sparks
and open flames, and store it in tightly
closed containers well out of the reach of
children. Always observe the instructions
for use provided on the containers.<
Washer fluid reservoir
Capacity approx. 5.3 US quarts/5 liters
Fill with water and – if required – with a
washer antifreeze, according to manufac-
turer's recommendations.
In order to keep to the mixture ratio,
mix the washer fluid before filling.<
Cruise control
The concept
The cruise control is available for use at
speeds of approx. 20 mph/30 km/h and
higher. The vehicle maintains and stores
the speed that you set using the lever
mounted on the steering column.
Do not use the cruise control when
driving on winding roads, in heavy
traffic or in poor road conditions – e.g.
snow, rain, ice, loose road surface – that do
not permit a constant speed.<
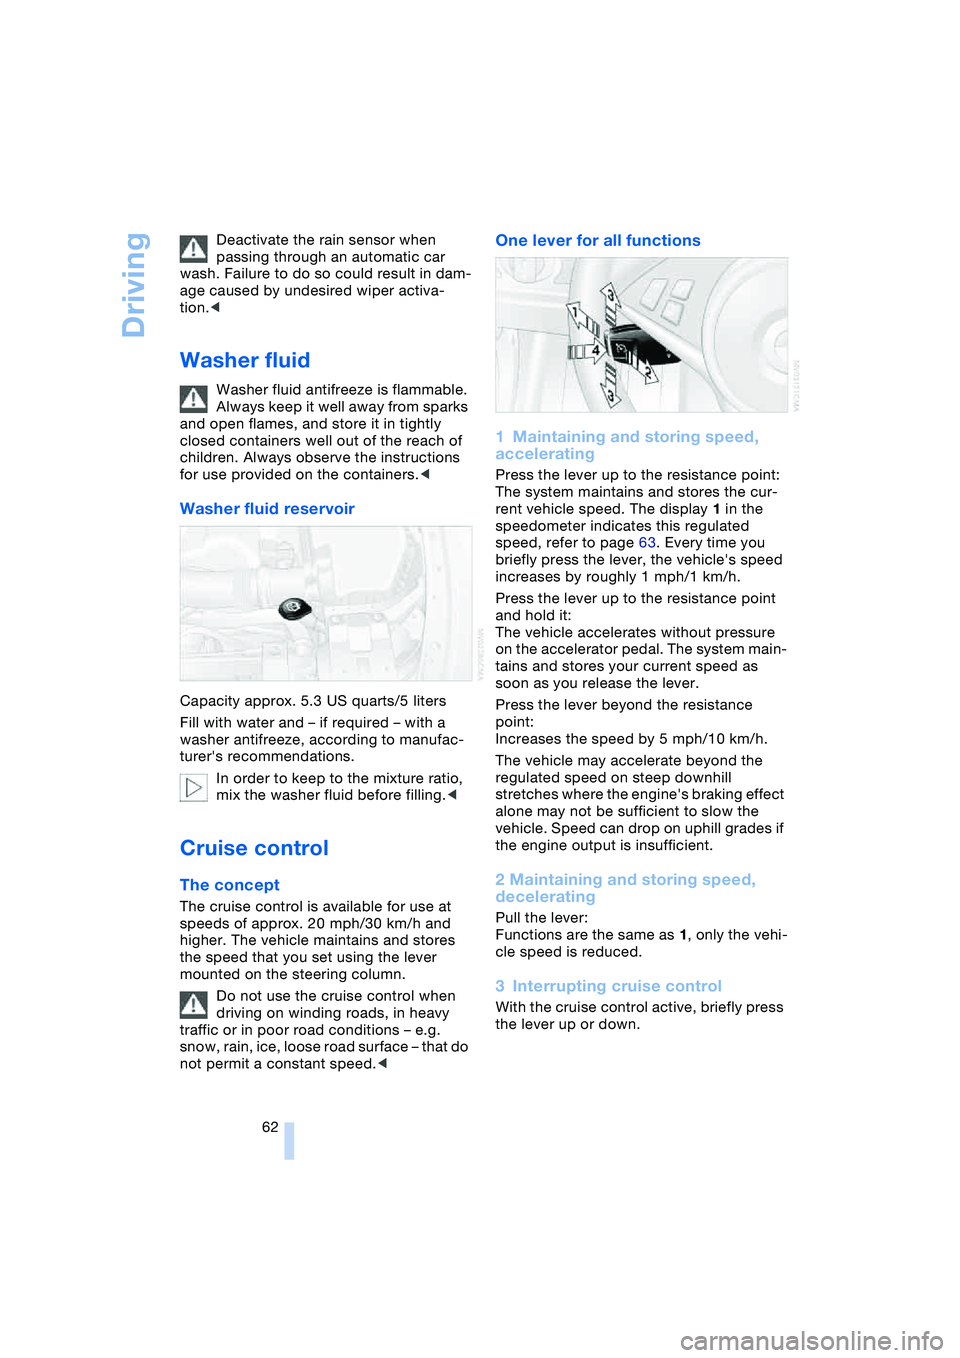
One lever for all functions
1Maintaining and storing speed,
accelerating
Press the lever up to the resistance point:
The system maintains and stores the cur-
rent vehicle speed. The display 1 in the
speedometer indicates this regulated
speed, refer to page 63. Every time you
briefly press the lever, the vehicle's speed
increases by roughly 1 mph/1 km/h.
Press the lever up to the resistance point
and hold it:
The vehicle accelerates without pressure
on the accelerator pedal. The system main-
tains and stores your current speed as
soon as you release the lever.
Press the lever beyond the resistance
point:
Increases the speed by 5 mph/10 km/h.
The vehicle may accelerate beyond the
regulated speed on steep downhill
stretches where the engine's braking effect
alone may not be sufficient to slow the
vehicle. Speed can drop on uphill grades if
the engine output is insufficient.
2 Maintaining and storing speed,
decelerating
Pull the lever:
Functions are the same as 1, only the vehi-
cle speed is reduced.
3Interrupting cruise control
With the cruise control active, briefly press
the lever up or down.
Page 78 of 216
Technology for comfort, convenience and safety
76 indicate the presence of objects in green
before they are close enough to generate a
signal tone.
Control Center, for principle details, refer to
page 16:
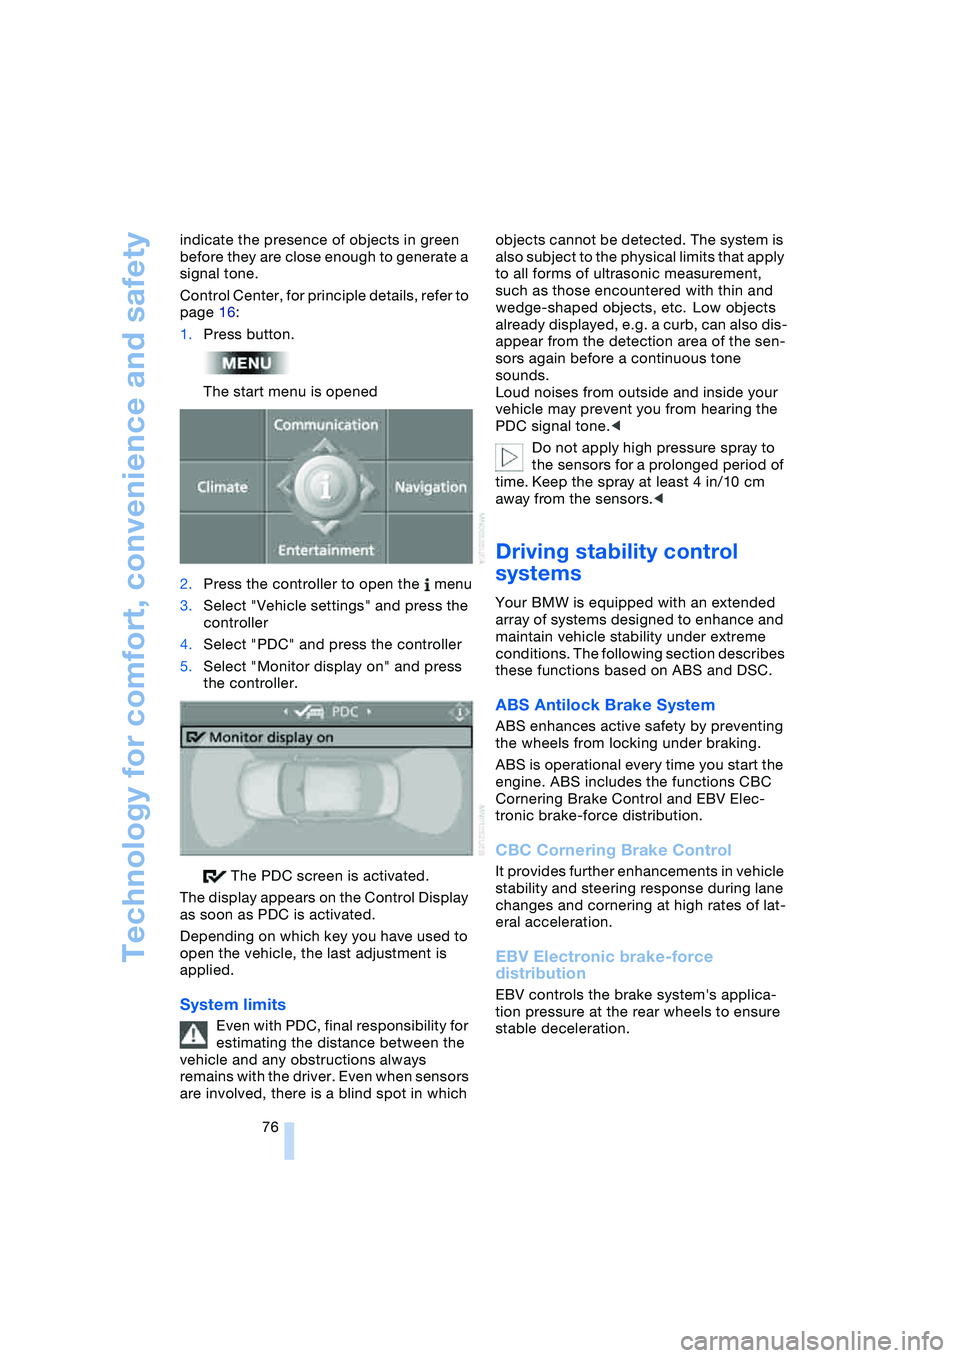
1.Press button.
The start menu is opened
2.Press the controller to open the menu
3.Select "Vehicle settings" and press the
controller
4.Select "PDC" and press the controller
5.Select "Monitor display on" and press
the controller.
The PDC screen is activated.
The display appears on the Control Display
as soon as PDC is activated.
Depending on which key you have used to
open the vehicle, the last adjustment is
applied.
System limits
Even with PDC, final responsibility for
estimating the distance between the
vehicle and any obstructions always
remains with the driver. Even when sensors
are involved, there is a blind spot in which objects cannot be detected. The system is
also subject to the physical limits that apply
to all forms of ultrasonic measurement,
such as those encountered with thin and
wedge-shaped objects, etc. Low objects
already displayed, e.g. a curb, can also dis-
appear from the detection area of the sen-
sors again before a continuous tone
sounds.
Loud noises from outside and inside your
vehicle may prevent you from hearing the
PDC signal tone.<
Do not apply high pressure spray to
the sensors for a prolonged period of
time. Keep the spray at least 4 in/10 cm
away from the sensors.<
Driving stability control
systems
Your BMW is equipped with an extended
array of systems designed to enhance and
maintain vehicle stability under extreme
conditions. The following section describes
these functions based on ABS and DSC.
ABS Antilock Brake System
ABS enhances active safety by preventing
the wheels from locking under braking.
ABS is operational every time you start the
engine. ABS includes the functions CBC
Cornering Brake Control and EBV Elec-
tronic brake-force distribution.
CBC Cornering Brake Control
It provides further enhancements in vehicle
stability and steering response during lane
changes and cornering at high rates of lat-
eral acceleration.
EBV Electronic brake-force
distribution
EBV controls the brake system's applica-
tion pressure at the rear wheels to ensure
stable deceleration.
Page 79 of 216
Controls
77Reference
At a glance
Driving tips
Communications
Navigation
Entertainment
Mobility
DSC Dynamic Stability Control
DSC optimizes vehicle stability during
acceleration and when starting from a full
stop, as well as optimizing traction. The
system recognizes any tendency for the
vehicle to assume an unstable attitude
such as oversteer or understeer; it then
counteracts this tendency with a combina-
tion of graduated reductions in engine
torque and selective braking intervention at
individual wheels. DSC provides optimal
stability within the limits defined by the
laws of physics.
The DSC is operational every time you start
the engine. DSC includes the functionality
of the DTC Dynamic Traction Control and
DBC Dynamic Brake Control, see below.
Indicator lamp
The indicator lamp goes out soon
after you start the engine.
The indicator lamp flashes:
DSC controls the drive and braking forces.
The indicator lamp stays lit:
DSC has been switched off via the button.
DTC Dynamic Traction Control
In special driving states, e.g. in deep snow,
DTC ensures maximum forward momen-
tum. The gain in forward momentum also
involves a reduction in driving stability.
DTC is active up to approx. 45 mph/
70 km/h, whereas DSC is only effective to
a limited degree.
You may find it useful to briefly activate
DTC under the following special circum-
stances:
>When rocking the vehicle and starting
off in deep snow or on loose road sur-
faces
>When ascending snow-covered hills,
and when driving in deep or on hard-
packed snow
>When driving with snow chains.
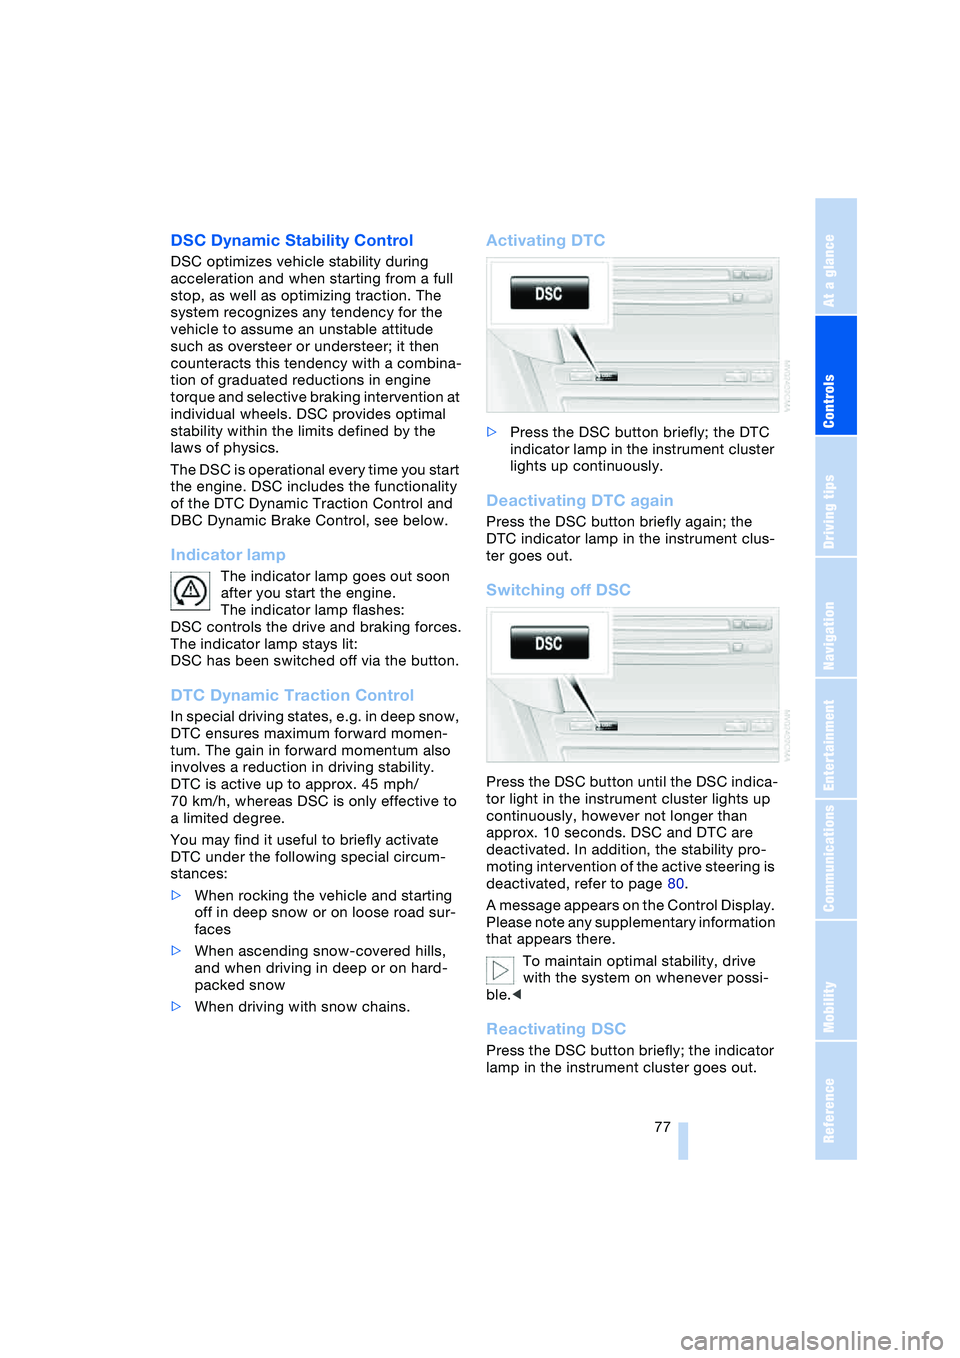
Activating DTC
>Press the DSC button briefly; the DTC
indicator lamp in the instrument cluster
lights up continuously.
Deactivating DTC again
Press the DSC button briefly again; the
DTC indicator lamp in the instrument clus-
ter goes out.
Switching off DSC
Press the DSC button until the DSC indica-
tor light in the instrument cluster lights up
continuously, however not longer than
approx. 10 seconds. DSC and DTC are
deactivated. In addition, the stability pro-
moting intervention of the active steering is
deactivated, refer to page 80.
A message appears on the Control Display.
Please note any supplementary information
that appears there.
To maintain optimal stability, drive
with the system on whenever possi-
ble.<
Reactivating DSC
Press the DSC button briefly; the indicator
lamp in the instrument cluster goes out.
Page 82 of 216
Technology for comfort, convenience and safety
80
Report of a flat tire
The warning lamp lights up in red
and a message appears on the
Control Display. In addition, an
acoustic signal sounds. There is a flat tire
or extensive inflation pressure loss.
1.Cautiously reduce the vehicle speed to
below 50 mph/80 km/h. Avoid sudden
braking and steering maneuvers. Do
not exceed a vehicle speed of 50 mph/
80 km/h
Due to the reinforcement on the
side walls of the run-flat tires,
inflation pressure loss can not usually
be recognized from the outside, refer to
Run-flat tires on page 168.<
2.To continue driving, comply with the
instructions for driving with damaged
tires on page 168.
Malfunction
The warning lamp lights up yellow
and a message appears on the
Control Display. The Flat Tire Moni-
tor has a malfunction or has failed. Have
the system checked as soon as possible.
Active steering*
The concept
The active steering is a system that actively
varies the steering angle of the front wheels
in relation to the steering wheel move-
ments.
When you are driving in the low road speed
range, e.g. in a town or when parking, the
steering angle of the wheels is reinforced,
i.e. the steering becomes very direct.
In the higher speed range, on the other
hand, the steering angle of the wheels is
reduced more and more. This improves the
handling capability of your BMW over the
entire speed range.
In critical situations, the system can make
targeted changes to the steering angle pro-
vided by the driver and thus stabilize the
vehicle before the driver intervenes.
Malfunction
The fixed warning lamp lights up.
The active steering is no longer
operational. In the low speed range,
greater steering wheel movement is neces-
sary. Have the system checked.
If the warning lamp lights up during the first
engine starting following a power supply
interruption, the system must be activated
with initialization.
Initializing system
1.Start the engine
2.With the vehicle stationary, turn the
steering wheel from the straight-ahead
position to the left as far as it will go and
then back to the straight-ahead position
3.Switch off the engine.
When you start the engine again, all the
functions of the active steering are avail-
able once again.
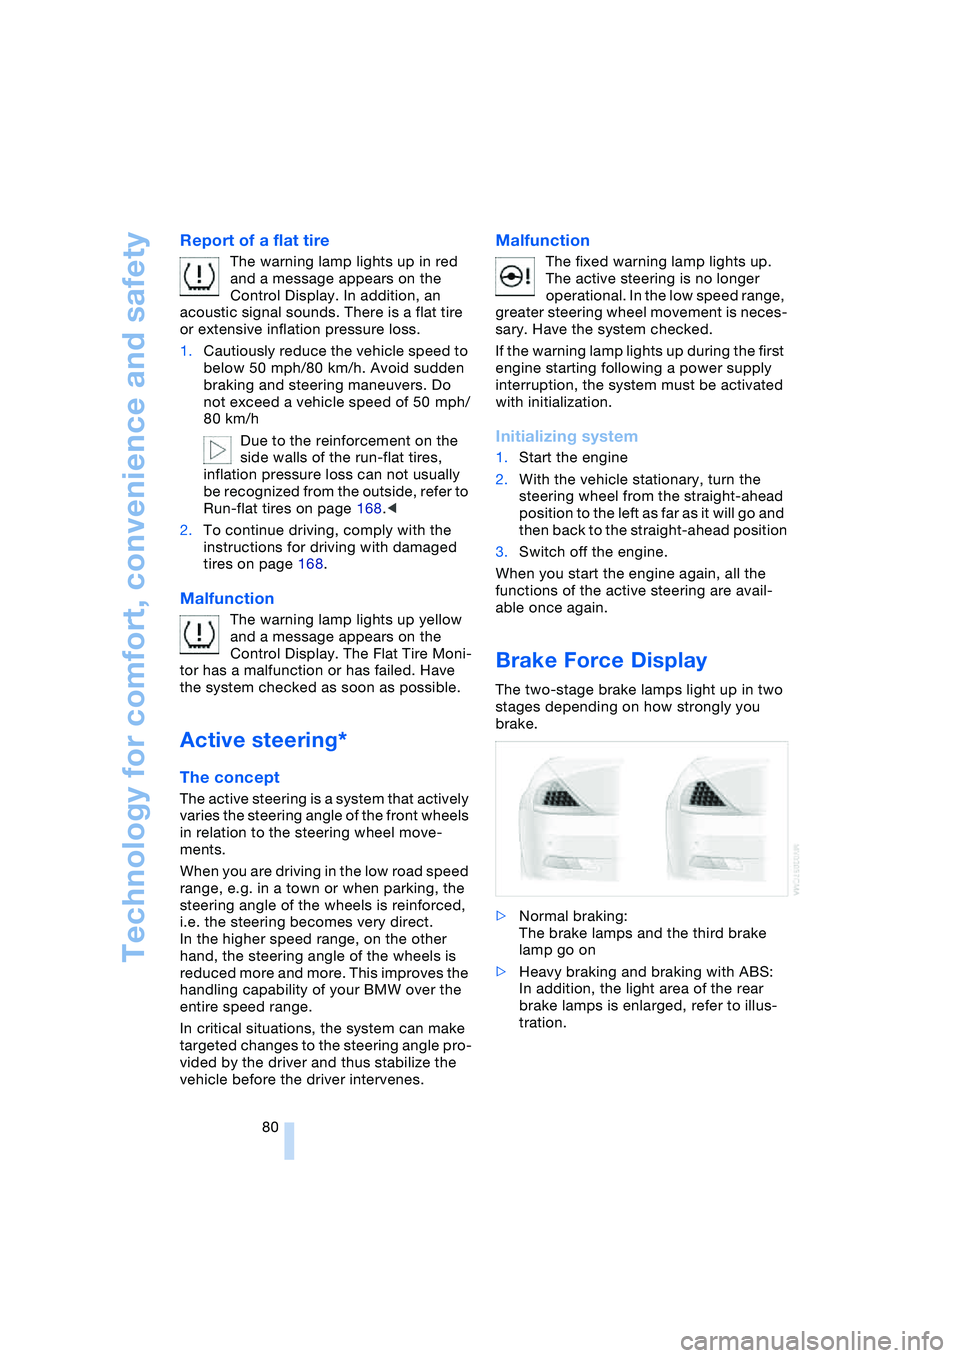
Brake Force Display
The two-stage brake lamps light up in two
stages depending on how strongly you
brake.
>Normal braking:
The brake lamps and the third brake
lamp go on
>Heavy braking and braking with ABS:
In addition, the light area of the rear
brake lamps is enlarged, refer to illus-
tration.
Page 83 of 216
Controls
81Reference
At a glance
Driving tips
Communications
Navigation
Entertainment
Mobility
Airbags
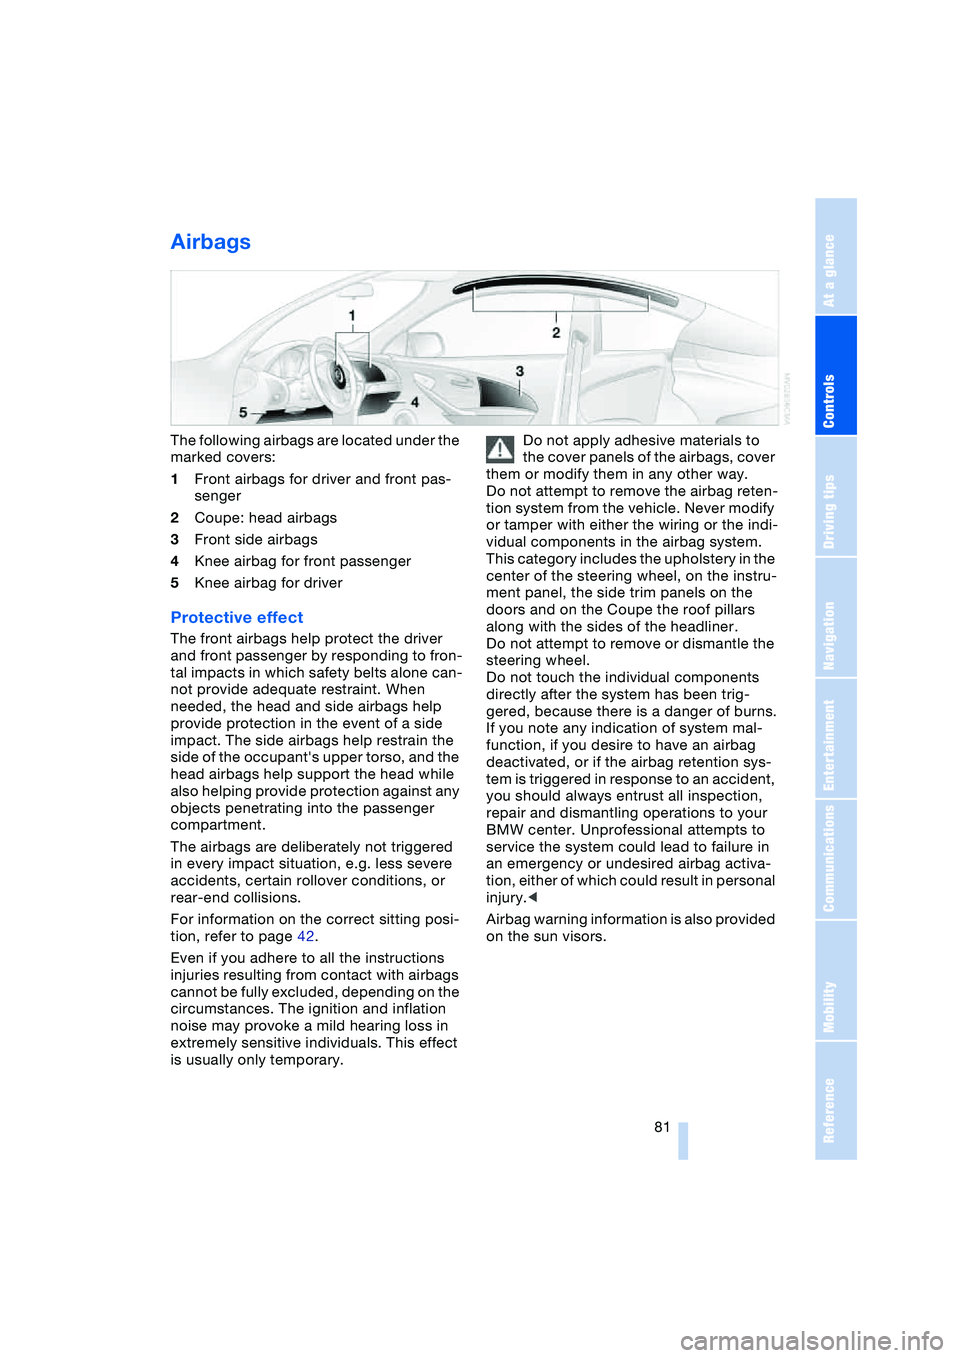
The following airbags are located under the
marked covers:
1Front airbags for driver and front pas-
senger
2Coupe: head airbags
3Front side airbags
4Knee airbag for front passenger
5Knee airbag for driver
Protective effect
The front airbags help protect the driver
and front passenger by responding to fron-
tal impacts in which safety belts alone can-
not provide adequate restraint. When
needed, the head and side airbags help
provide protection in the event of a side
impact. The side airbags help restrain the
side of the occupant's upper torso, and the
head airbags help support the head while
also helping provide protection against any
objects penetrating into the passenger
compartment.
The airbags are deliberately not triggered
in every impact situation, e.g. less severe
accidents, certain rollover conditions, or
rear-end collisions.
For information on the correct sitting posi-
tion, refer to page 42.
Even if you adhere to all the instructions
injuries resulting from contact with airbags
cannot be fully excluded, depending on the
circumstances. The ignition and inflation
noise may provoke a mild hearing loss in
extremely sensitive individuals. This effect
is usually only temporary.Do not apply adhesive materials to
the cover panels of the airbags, cover
them or modify them in any other way.
Do not attempt to remove the airbag reten-
tion system from the vehicle. Never modify
or tamper with either the wiring or the indi-
vidual components in the airbag system.
This category includes the upholstery in the
center of the steering wheel, on the instru-
ment panel, the side trim panels on the
doors and on the Coupe the roof pillars
along with the sides of the headliner.
Do not attempt to remove or dismantle the
steering wheel.
Do not touch the individual components
directly after the system has been trig-
gered, because there is a danger of burns.
If you note any indication of system mal-
function, if you desire to have an airbag
deactivated, or if the airbag retention sys-
tem is triggered in response to an accident,
you should always entrust all inspection,
repair and dismantling operations to your
BMW center. Unprofessional attempts to
service the system could lead to failure in
an emergency or undesired airbag activa-
tion, either of which could result in personal
injury.<
Airbag warning information is also provided
on the sun visors.
Page 88 of 216
Lamps
86 this switch position with the ignition key in
position 2.<
The automatic headlamp control can-
not serve as a substitute for your per-
sonal judgment in determining when the
lamps should be switched on in response
to ambient lighting conditions. For exam-
ple, the system cannot detect fog. To avoid
safety risks, you should always switch on
the lamps manually under these condi-
tions.<
Adaptive Head Light*
The concept
Adaptive Head Light is a variable headlamp
control system that enables better illumina-
tion of the road surface. Depending on the
steering angle and other assumptions, the
light from the headlamp follows the course
of the road.
Activating Adaptive Head Light
In ignition key position 2, turn the
light switch to the position 'Auto-
matic headlamp control', refer to
page 85.
So that oncoming traffic is not dazzled,
Adaptive Head Light is
>not active when the vehicle is reversing
>only active toward passenger's side
when stopped.
Malfunction
The LED beside the symbol for automatic
headlamp control flashes. The Adaptive
Head Light has a malfunction or has failed.
Have the system checked as soon as pos-
sible.
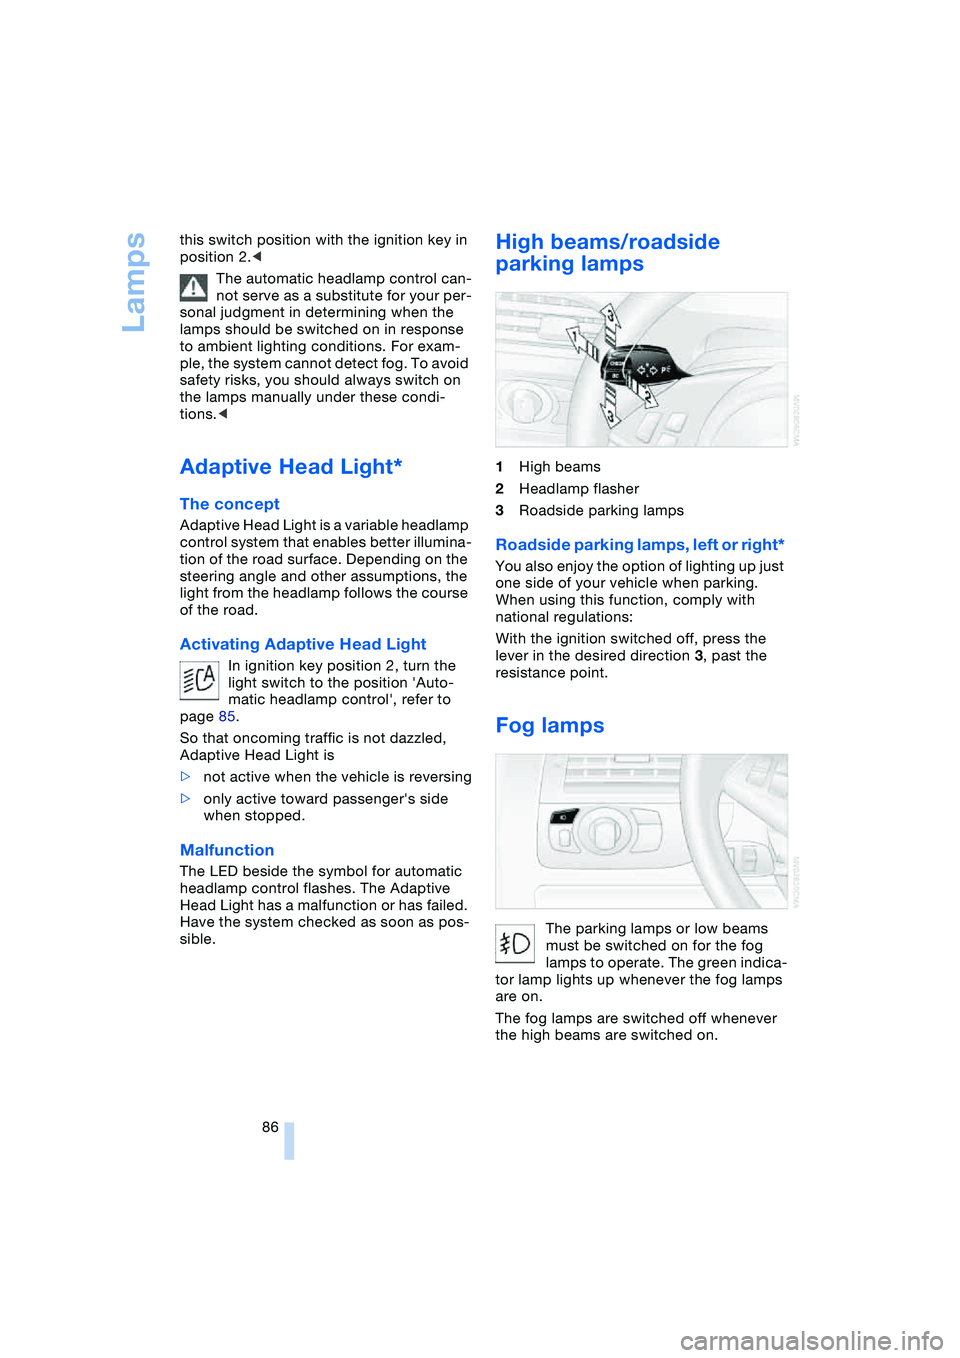
High beams/roadside
parking lamps
1High beams
2Headlamp flasher
3Roadside parking lamps
Roadside parking lamps, left or right*
You also enjoy the option of lighting up just
one side of your vehicle when parking.
When using this function, comply with
national regulations:
With the ignition switched off, press the
lever in the desired direction 3, past the
resistance point.
Fog lamps
The parking lamps or low beams
must be switched on for the fog
lamps to operate. The green indica-
tor lamp lights up whenever the fog lamps
are on.
The fog lamps are switched off whenever
the high beams are switched on.
Page 105 of 216
Driving tips
103Reference
At a glance
Controls
Communications
Navigation
Entertainment
Mobility
road surface. This phenomenon is referred
to as hydroplaning, and is characterized
by a partial or complete loss of contact
between the tires and the road surface, ulti-
mately undermining your ability to steer
and brake the vehicle.<
The risk of hydroplaning increases as the
tread depth of the tires decreases, also
refer to Tire tread on page 167.
Driving through water
Do not drive through water on the
road if it is deeper than 1 ft/30 cm,
and then only at walking speed at the most.
Otherwise, the vehicle's engine, the electri-
cal systems and the transmission may be
damaged.<
Braking safely
Your BMW is equipped with ABS as stan-
dard. The best way to achieve optimized
braking response from the ABS is to apply
maximum pressure to the brake pedal in
situations where this is required: panic
stops. Since the vehicle maintains steering
responsiveness, you can nevertheless
avoid possible obstacles with a minimum
of steering effort.
Pulsation at the brake pedal combines with
sounds from the hydraulic circuits to indi-
cate to the driver that ABS is in its active
mode.
Do not drive with your foot resting on
the brake pedal. Even light but con-
sistent pedal pressure can lead to high
temperatures, brake wear and possibly
even brake failure.<
Driving in wet conditions
While driving in wet conditions and in
heavy rain, it is a good idea to apply light
pressure to the brake pedal every few
miles. Monitor traffic conditions to ensure
that this maneuver does not endanger
other road users. The heat generated in this
process helps dry the pads and rotors to
ensure that full braking efficiency will then
be available when you need it.
Hills
To prevent overheating and thus
reduced efficiency of the brake sys-
tem, downshift to a gear in which only min-
imal brake applications are needed when
descending long or steep downhill
stretches. Even light but consistent pedal
pressure can lead to high temperatures,
brake wear and possibly even brake fail-
ure.<
You can further enhance the engine's brak-
ing effect by selecting a lower gear in the
automatic transmission's manual mode,
downshifting as far as first gear on
extremely steep stretches, refer to
page 59. This strategy helps you avoid
placing excessive loads on the brake sys-
tem.
Never drive with the clutch pressed
or allow the vehicle to coast with the
transmission in Neutral – or with the engine
switched off – there is no engine braking
when the transmission is in Neutral, and no
power assist for brakes and steering when
the engine is not running.
Never allow floor mats, carpets or any other
objects to protrude into the area around the
accelerator and brake pedals and obstruct
their movement.<
Corrosion on brake rotors
When the vehicle is driven only occasion-
ally, during extended periods when the
vehicle is not used at all, and in operating
conditions where brake applications are
less frequent, there is an increased ten-
dency for corrosion to form on rotors, while
contaminants accumulate on the brake
pads. This occurs because the minimum
pressure which must be exerted by the
pads during brake applications to clean the
rotors is not reached.
Should corrosion form on the brake rotors,
the brakes will tend to respond with a pul-
sating effect that even extended applica-
tion will fail to cure.
Page 121 of 216
Navigation
Driving tips
119Reference
At a glance
Controls
Communications
Entertainment
Mobility
2.Select "Start guidance" and press the
controller.
The destination guidance is switched
off.
When you park the vehicle before reaching
the entered destination, upon restarting
you will see the question "Continue guid-
ance to dest.?".
To restart destination guidance:
Select "Yes" and press the controller.
Destination guidance
through voice instructions
Switching voice instructions on/off
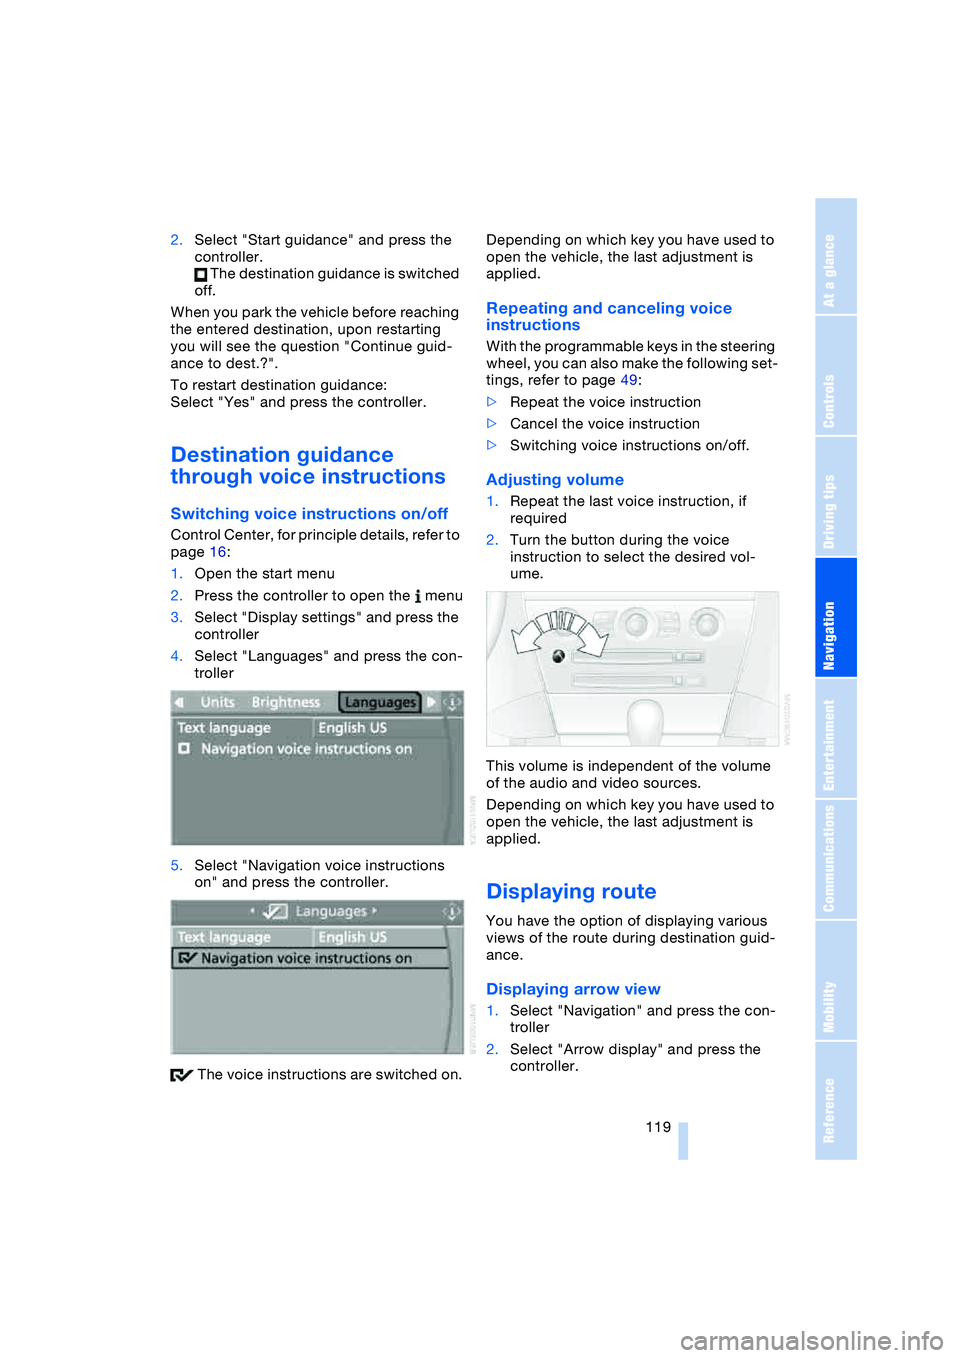
Control Center, for principle details, refer to
page 16:
1.Open the start menu
2.Press the controller to open the menu
3.Select "Display settings" and press the
controller
4.Select "Languages" and press the con-
troller
5.Select "Navigation voice instructions
on" and press the controller.
The voice instructions are switched on.Depending on which key you have used to
open the vehicle, the last adjustment is
applied.
Repeating and canceling voice
instructions
With the programmable keys in the steering
wheel, you can also make the following set-
tings, refer to page 49:
>Repeat the voice instruction
>Cancel the voice instruction
>Switching voice instructions on/off.
Adjusting volume
1.Repeat the last voice instruction, if
required
2.Turn the button during the voice
instruction to select the desired vol-
ume.
This volume is independent of the volume
of the audio and video sources.
Depending on which key you have used to
open the vehicle, the last adjustment is
applied.
Displaying route
You have the option of displaying various
views of the route during destination guid-
ance.
Displaying arrow view
1.Select "Navigation" and press the con-
troller
2.Select "Arrow display" and press the
controller.