2004 BMW 525I SEDAN tow
[x] Cancel search: towPage 58 of 220
Driving
56 Shifting from M/S to the selector-lever
positions P, R and N is only possible by
going through D.
Malfunctions
Indicator lamp
If the indicator lamp lights up, a
malfunction has occurred in the
transmission system.
While it will remain still possible to move
the selector lever to any desired position,
the transmission will revert to operation in
its default mode with only a limited number
of forward gears.
If this happens, avoid extreme engine loads
and consult the nearest BMW center.
Information on jump-starting and towing
begins on page 192.
Turn signal indicators/
headlamp flasher
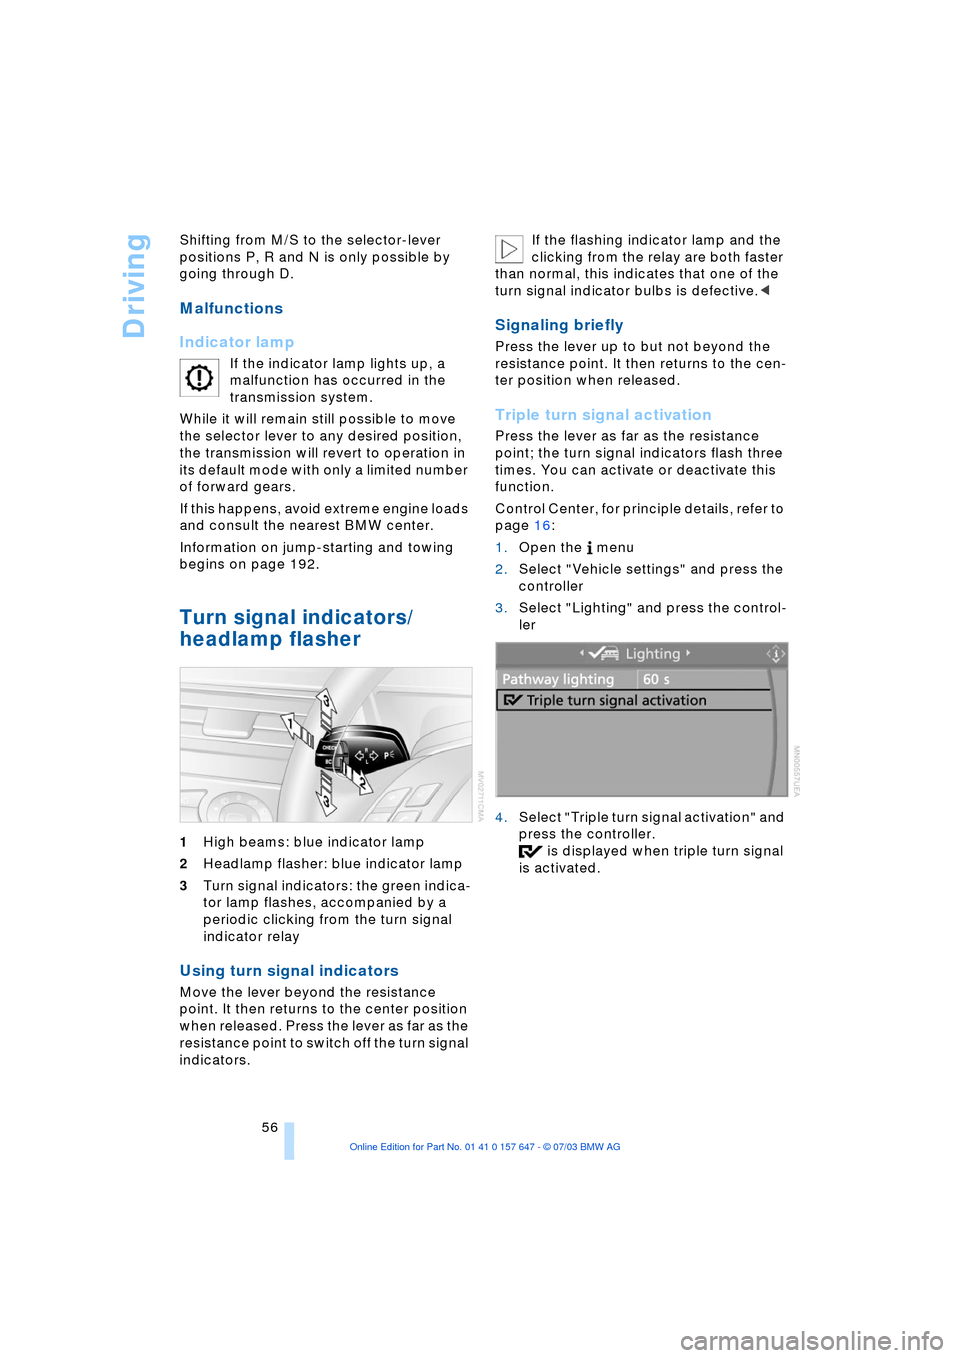
1High beams: blue indicator lamp
2Headlamp flasher: blue indicator lamp
3Turn signal indicators: the green indica-
tor lamp flashes, accompanied by a
periodic clicking from the turn signal
indicator relay
Using turn signal indicators
Move the lever beyond the resistance
point. It then returns to the center position
when released. Press the lever as far as the
resistance point to switch off the turn signal
indicators. If the flashing indicator lamp and the
clicking from the relay are both faster
than normal, this indicates that one of the
turn signal indicator bulbs is defective.<
Signaling briefly
Press the lever up to but not beyond the
resistance point. It then returns to the cen-
ter position when released.
Triple turn signal activation
Press the lever as far as the resistance
point; the turn signal indicators flash three
times. You can activate or deactivate this
function.
Control Center, for principle details, refer to
page 16:
1.Open the menu
2.Select "Vehicle settings" and press the
controller
3.Select "Lighting" and press the control-
ler
4.Select "Triple turn signal activation" and
press the controller.
is displayed when triple turn signal
is activated.
Page 84 of 220
Technology for comfort, convenience and safety
82
System malfunctions
Indicator lamp
The symbol in the instrument clus-
ter lights up yellow and a message
appears on the Control Display.
Please contact your BMW center.
Please note any supplementary information
that appears on the Control Display.
Active steering*
The concept
The active steering is a system that actively
varies the steering angle of the front wheels
in relation to the steering wheel move-
ments.
When you are driving in the low road speed
range, e.g. in a town or when parking, the
steering angle is reinforced, i.e. the steer-
ing becomes very direct and significantly
improves the handling capability of your
BMW.
In the higher road speed range, on the
other hand, the steering angle is reduced,
also optimizing the handling capability.
In critical situations, the system can make
targeted changes to the steering angle pro-
vided by the driver and thus stabilize the
vehicle before the driver intervenes.
Indicator lamp
The indicator lamp lights up perma-
nently: malfunction in the system.
Please have the system inspected
at your BMW center.
Conventional steering efficiency remains
available without limitations.
Brake Force Display
The Brake Force Display indicates the
intensity with which you are applying your
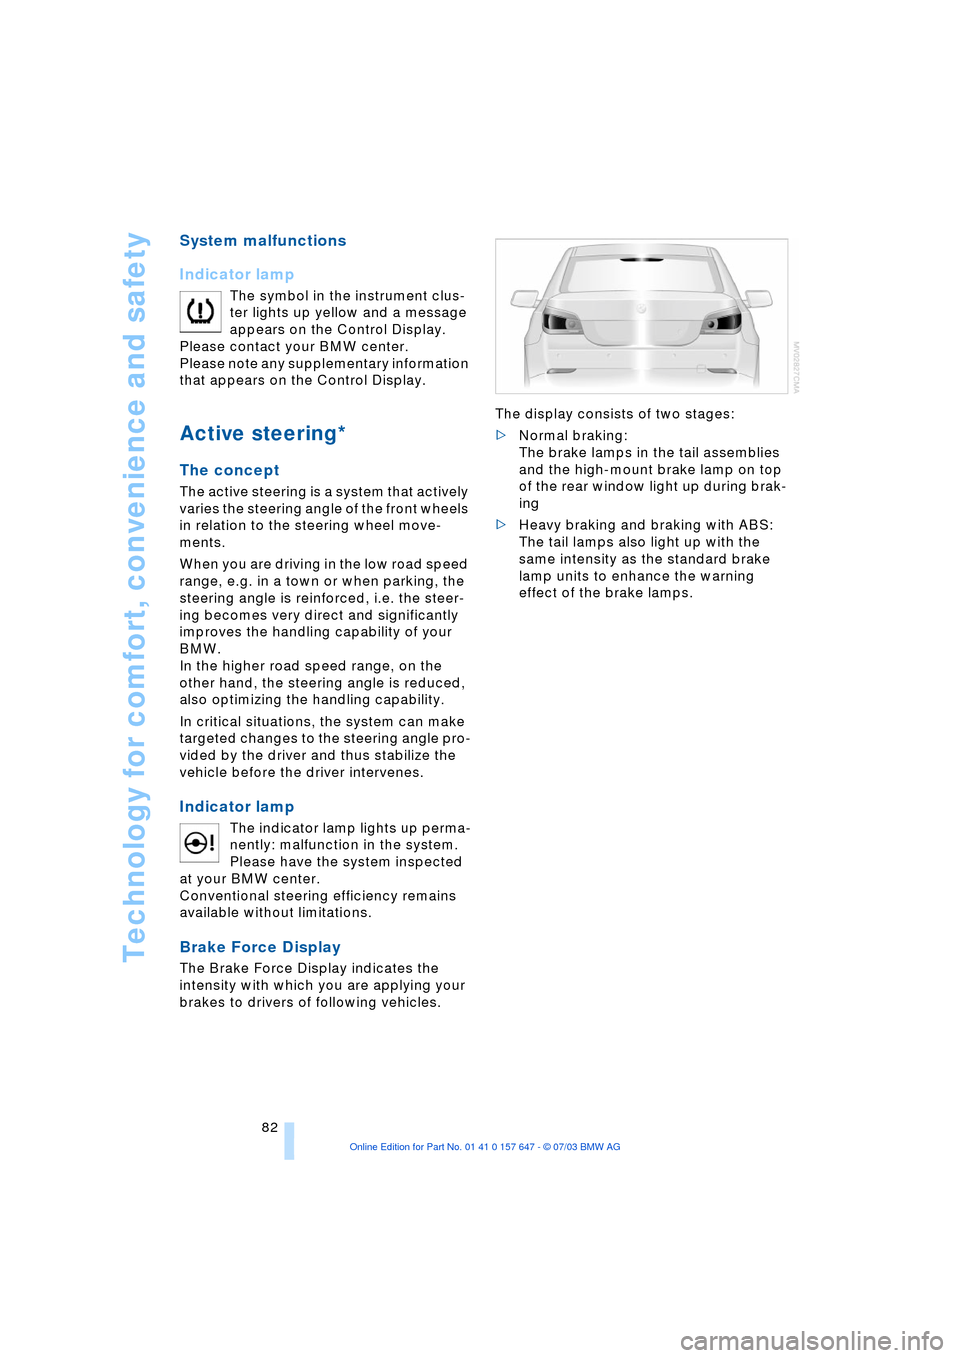
brakes to drivers of following vehicles. The display consists of two stages:
>Normal braking:
The brake lamps in the tail assemblies
and the high-mount brake lamp on top
of the rear window light up during brak-
ing
>Heavy braking and braking with ABS:
The tail lamps also light up with the
same intensity as the standard brake
lamp units to enhance the warning
effect of the brake lamps.
Page 92 of 220
A congenial climate
90
A congenial climate
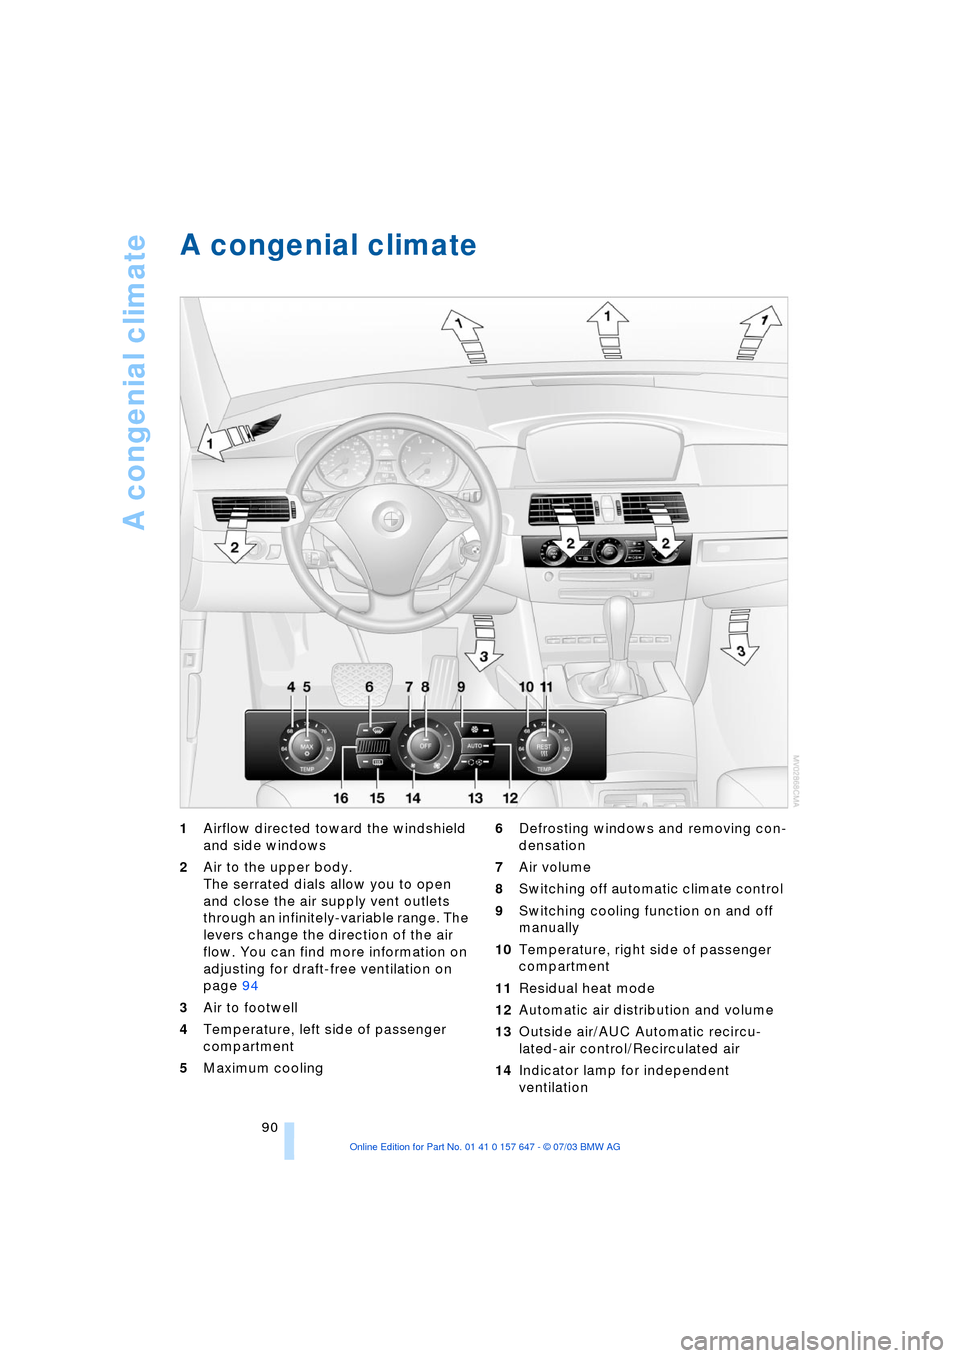
1Airflow directed toward the windshield
and side windows
2Air to the upper body.
The serrated dials allow you to open
and close the air supply vent outlets
through an infinitely-variable range. The
levers change the direction of the air
flow. You can find more information on
adjusting for draft-free ventilation on
page 94
3Air to footwell
4Temperature, left side of passenger
compartment
5Maximum cooling 6Defrosting windows and removing con-
densation
7Air volume
8Switching off automatic climate control
9Switching cooling function on and off
manually
10Temperature, right side of passenger
compartment
11Residual heat mode
12Automatic air distribution and volume
13Outside air/AUC Automatic recircu-
lated-air control/Recirculated air
14Indicator lamp for independent
ventilation
Page 93 of 220
Controls
91Reference
At a glance
Driving tips
Communications
Navigation
Entertainment
Mobility
>Activation time set:
The indicator lamp lights up
>Independent ventilation switched
on:
The indicator lamp flashes
15Rear window defroster
16Air grill for interior temperature sensor,
please keep clear and unobstructed
All other setting options for the automatic
climate control can be found in the "Cli-
mate" menu and in the menu on the Con-
trol Display, as of page 92.
The current setting for air distribution is dis-
played on the Control Display.
A congenial climate
To use the automatic function, press the
AUTO button. Select an interior tempera-
ture you find pleasant.
The following section contains more
detailed information on the available set-
ting options.
The cooling function is only possible with
the engine running.
Automatic air distribution and supply
The AUTO program adjusts the
air distribution to the wind-
shield and side windows,
towards the upper body and footwell as
well as the air volume, while also using your
preselected temperature setting as the
basis for adjusting the interior climate to
adapt to external influences: summer, win-
ter.
The cooling function comes on automati-
cally when you select the AUTO program.
At the same time, a condensation sensor
controls the program in such a way that
window condensation is prevented as far
as possible.
Adjusting temperature
You can turn to select the
desired temperatures for the
driver and passenger sides.
The figures on the display pro-
vide a general indication of inte-rior temperature. A pleasant adjustment is
727/226. When you start the vehicle, the
system ensures that the selected tempera-
ture is achieved as quickly as possible. It
then maintains this temperature, regard-
less of the season.
Defrosting windows and removing
condensation
This program quickly removes
ice and condensation from the
windshield and front side win-
dows.
Adjusting the air volume manually
You can adjust the air volume
by turning. You can reactivate
the automatic mode for the air
volume with the AUTO button.
Switching cooling function on and off
manually
The cooling function cools and
dehumidifies the incoming air
before also reheating it as
required, according to the temperature set-
ting. Depending on the weather, the wind-
shield may fog over briefly when the engine
is started.
The cooling function comes on automati-
cally when you select the AUTO program.
Maximum cooling
This program quickly provides
maximum cooling.
The system switches to the
recirculated-air mode and the
air flows at maximum air volume only from
the vent outlets for the upper body area.
For this reason you should ensure that
these vent outlets are open before select-
ing this program.
Outside air/AUC Automatic
recirculated-air control/
Recirculated air
You can respond to unpleasant
odors or pollutants in the imme-
diate environment by tempo-
Page 95 of 220
Controls
93Reference
At a glance
Driving tips
Communications
Navigation
Entertainment
Mobility
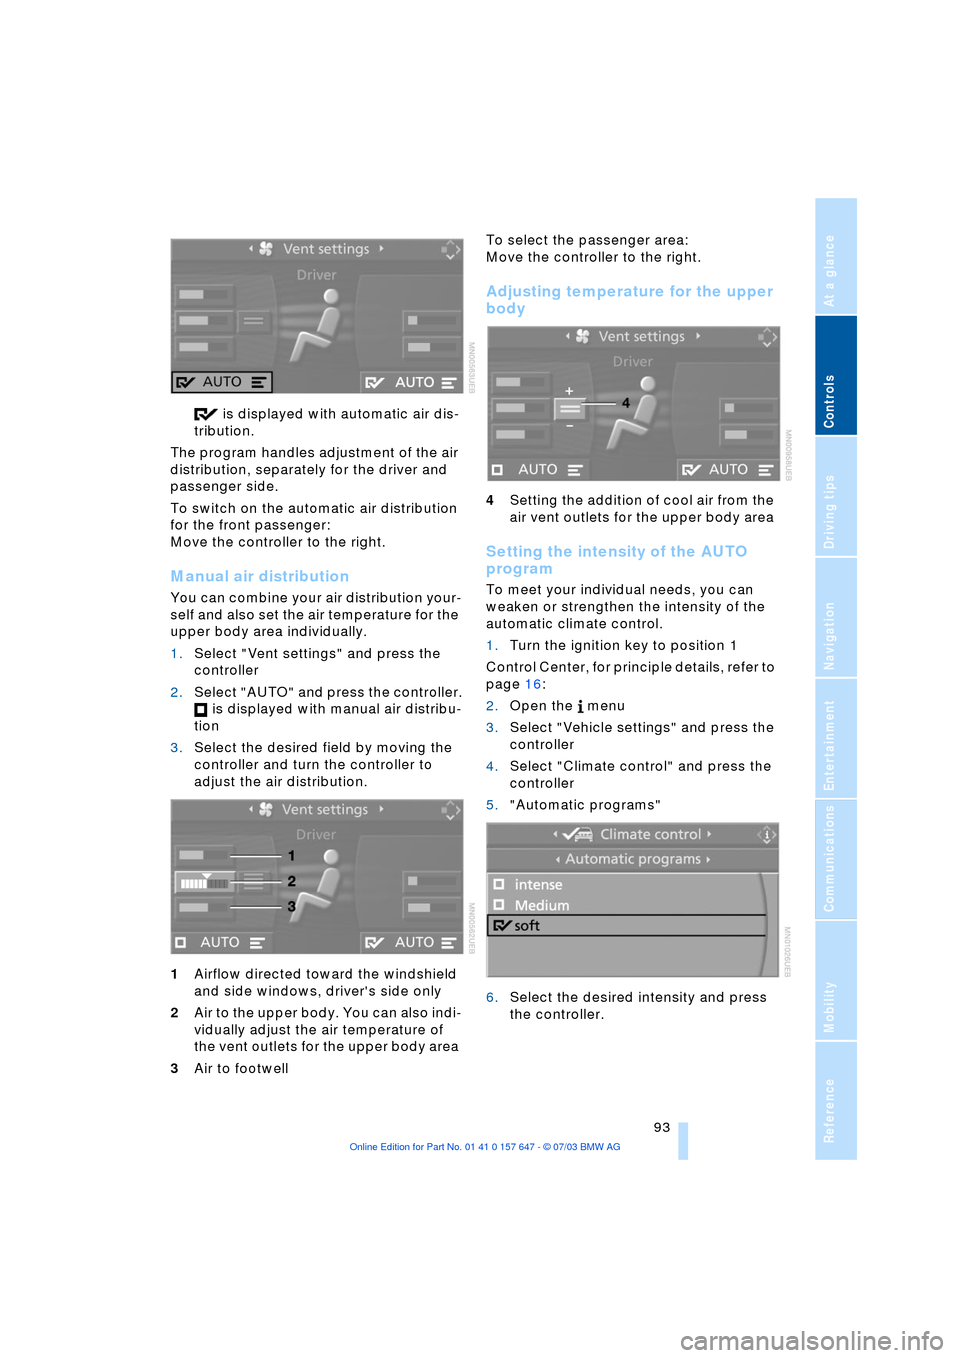
is displayed with automatic air dis-
tribution.
The program handles adjustment of the air
distribution, separately for the driver and
passenger side.
To switch on the automatic air distribution
for the front passenger:
Move the controller to the right.
Manual air distribution
You can combine your air distribution your-
self and also set the air temperature for the
upper body area individually.
1.Select "Vent settings" and press the
controller
2.Select "AUTO" and press the controller.
is displayed with manual air distribu-
tion
3.Select the desired field by moving the
controller and turn the controller to
adjust the air distribution.
1Airflow directed toward the windshield
and side windows, driver's side only
2Air to the upper body. You can also indi-
vidually adjust the air temperature of
the vent outlets for the upper body area
3Air to footwell To select the passenger area:
Move the controller to the right.
Adjusting temperature for the upper
body
4Setting the addition of cool air from the
air vent outlets for the upper body area
Setting the intensity of the AUTO
program
To meet your individual needs, you can
weaken or strengthen the intensity of the
automatic climate control.
1.Turn the ignition key to position 1
Control Center, for principle details, refer to
page 16:
2.Open the menu
3.Select "Vehicle settings" and press the
controller
4.Select "Climate control" and press the
controller
5."Automatic programs"
6.Select the desired intensity and press
the controller.
Page 96 of 220
A congenial climate
94
Front ventilation
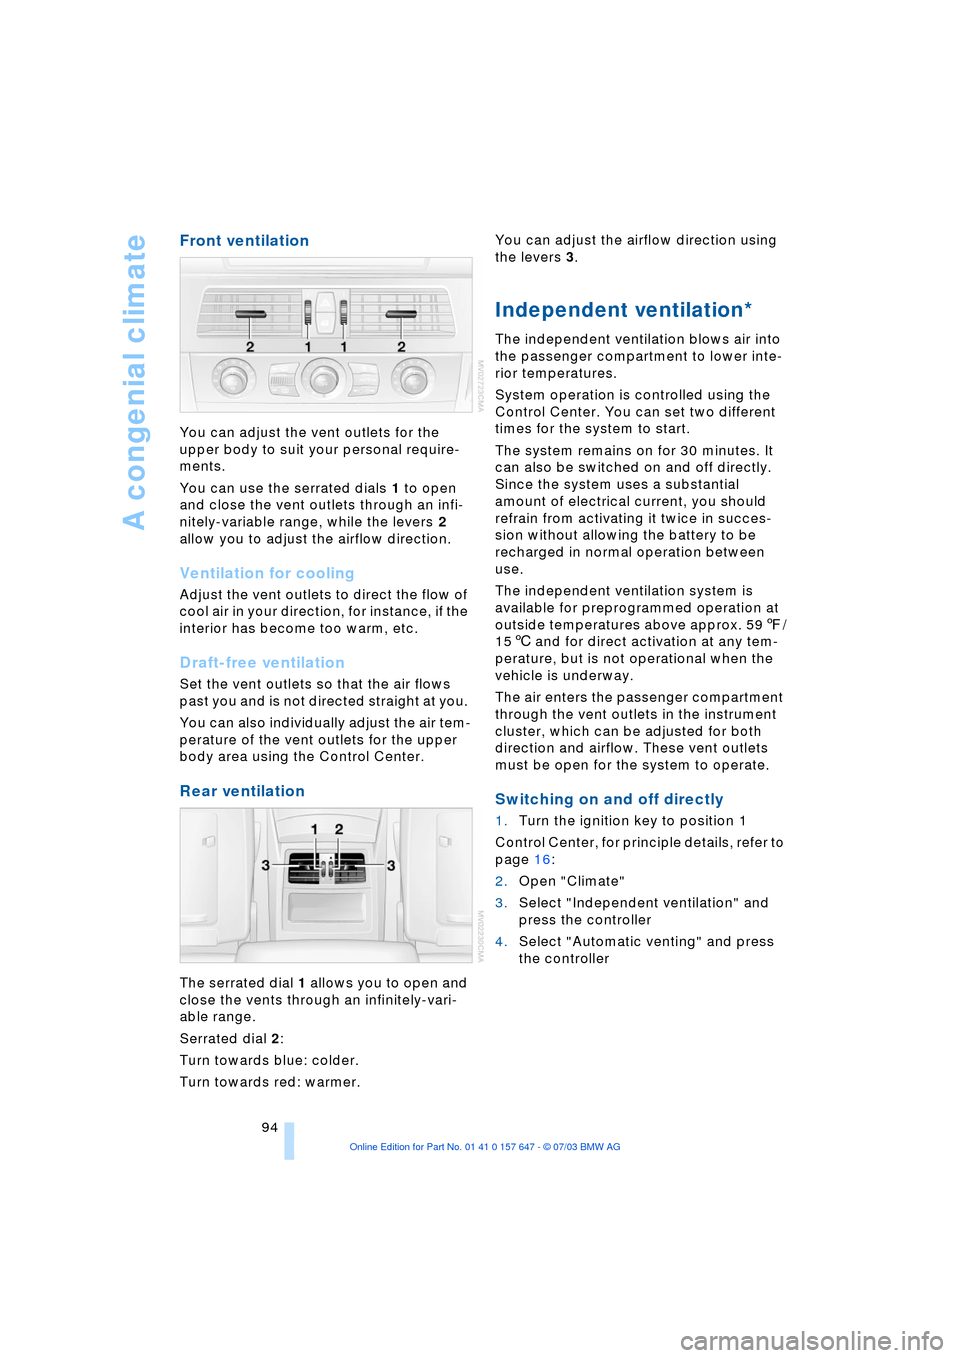
You can adjust the vent outlets for the
upper body to suit your personal require-
ments.
You can use the serrated dials 1 to open
and close the vent outlets through an infi-
nitely-variable range, while the levers 2
allow you to adjust the airflow direction.
Ventilation for cooling
Adjust the vent outlets to direct the flow of
cool air in your direction, for instance, if the
interior has become too warm, etc.
Draft-free ventilation
Set the vent outlets so that the air flows
past you and is not directed straight at you.
You can also individually adjust the air tem-
perature of the vent outlets for the upper
body area using the Control Center.
Rear ventilation
The serrated dial 1 allows you to open and
close the vents through an infinitely-vari-
able range.
Serrated dial 2:
Turn towards blue: colder.
Turn towards red: warmer. You can adjust the airflow direction using
the levers 3.
Independent ventilation*
The independent ventilation blows air into
the passenger compartment to lower inte-
rior temperatures.
System operation is controlled using the
Control Center. You can set two different
times for the system to start.
The system remains on for 30 minutes. It
can also be switched on and off directly.
Since the system uses a substantial
amount of electrical current, you should
refrain from activating it twice in succes-
sion without allowing the battery to be
recharged in normal operation between
use.
The independent ventilation system is
available for preprogrammed operation at
outside temperatures above approx. 597/
156 and for direct activation at any tem-
perature, but is not operational when the
vehicle is underway.
The air enters the passenger compartment
through the vent outlets in the instrument
cluster, which can be adjusted for both
direction and airflow. These vent outlets
must be open for the system to operate.
Switching on and off directly
1.Turn the ignition key to position 1
Control Center, for principle details, refer to
page 16:
2.Open "Climate"
3.Select "Independent ventilation" and
press the controller
4.Select "Automatic venting" and press
the controller
Page 103 of 220
Controls
101Reference
At a glance
Driving tips
Communications
Navigation
Entertainment
Mobility
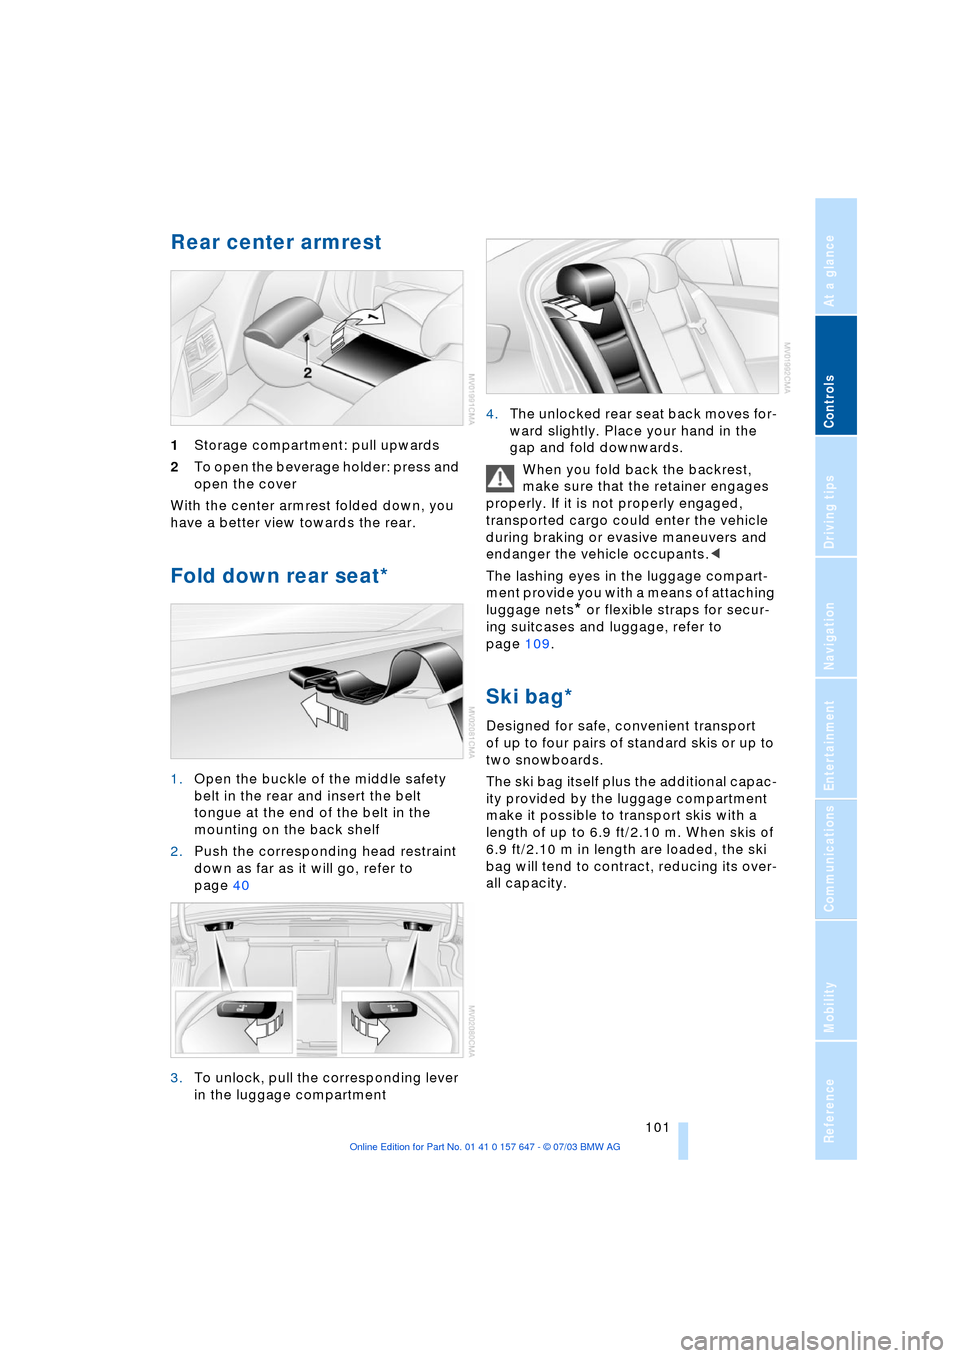
Rear center armrest
1Storage compartment: pull upwards
2To open the beverage holder: press and
open the cover
With the center armrest folded down, you
have a better view towards the rear.
Fold down rear seat*
1.Open the buckle of the middle safety
belt in the rear and insert the belt
tongue at the end of the belt in the
mounting on the back shelf
2.Push the corresponding head restraint
down as far as it will go, refer to
page 40
3.To unlock, pull the corresponding lever
in the luggage compartment 4.The unlocked rear seat back moves for-
ward slightly. Place your hand in the
gap and fold downwards.
When you fold back the backrest,
make sure that the retainer engages
properly. If it is not properly engaged,
transported cargo could enter the vehicle
during braking or evasive maneuvers and
endanger the vehicle occupants.<
The lashing eyes in the luggage compart-
ment provide you with a means of attaching
luggage nets
* or flexible straps for secur-
ing suitcases and luggage, refer to
page 109.
Ski bag*
Designed for safe, convenient transport
of up to four pairs of standard skis or up to
two snowboards.
The ski bag itself plus the additional capac-
ity provided by the luggage compartment
make it possible to transport skis with a
length of up to 6.9 ft/2.10 m. When skis of
6.9 ft/2.10 m in length are loaded, the ski
bag will tend to contract, reducing its over-
all capacity.
Page 110 of 220
Things to remember when driving
108 For your own safety: use only brake
pads that BMW has approved for your
particular vehicle model. As BMW cannot
assess the suitability of other brake pads
for use on your vehicle, we are unable to
assume continued responsibility for the
vehicle's operating safety if non-approved
pads are installed.<
Mobile communication in the vehicle
BMW recommends using mobile communi-
cation devices, e.g. portable phones, in the
interior of the vehicle with a suitable exter-
nal antenna. Otherwise, the vehicle elec-
tronics and mobile communication device
can influence one another.
Loading
To avoid loading the tires beyond
their approved carrying capacity,
never overload the vehicle. Overloading
can lead to overheating and increases the
rate at which damage develops inside the
tires. The ultimate result can assume the
form of a sudden air loss.<
Determining loading limit
1.Locate the following statement on the
driver's door pillar
*:
The combined weight of occu-
pants and cargo should never
exceed XXX kg or YYY lbs, as otherwise
the vehicle may be damaged and unsta-
ble driving conditions may result.<
2.Determine the combined weight of the
driver and passengers that will be riding
in your vehicle 3.Subtract the combined weight of the
driver and passengers from XXX kilo-
grams or YYY pounds
4.The resulting figure equals the available
amount of cargo and luggage load
capacity.
For example, if the XXX amount equals
1,400 lbs. and there will be five 150-lbs.
passengers in your vehicle, the amount
of available cargo and luggage load
capacity is 650 lbs.:
1,400 lbs. minus 750 lbs. = 650 lbs.
5.Determine the combined weight of lug-
gage and cargo being loaded on the
vehicle. That weight must not exceed
the available cargo and luggage load
capacity calculated in step 4
6.If your vehicle will be towing a trailer,
part of the load from your trailer will be
transferred to your vehicle. Consult the
manual for transporting a trailer to
determine how this may reduce the
available cargo and luggage load
capacity of your vehicle.
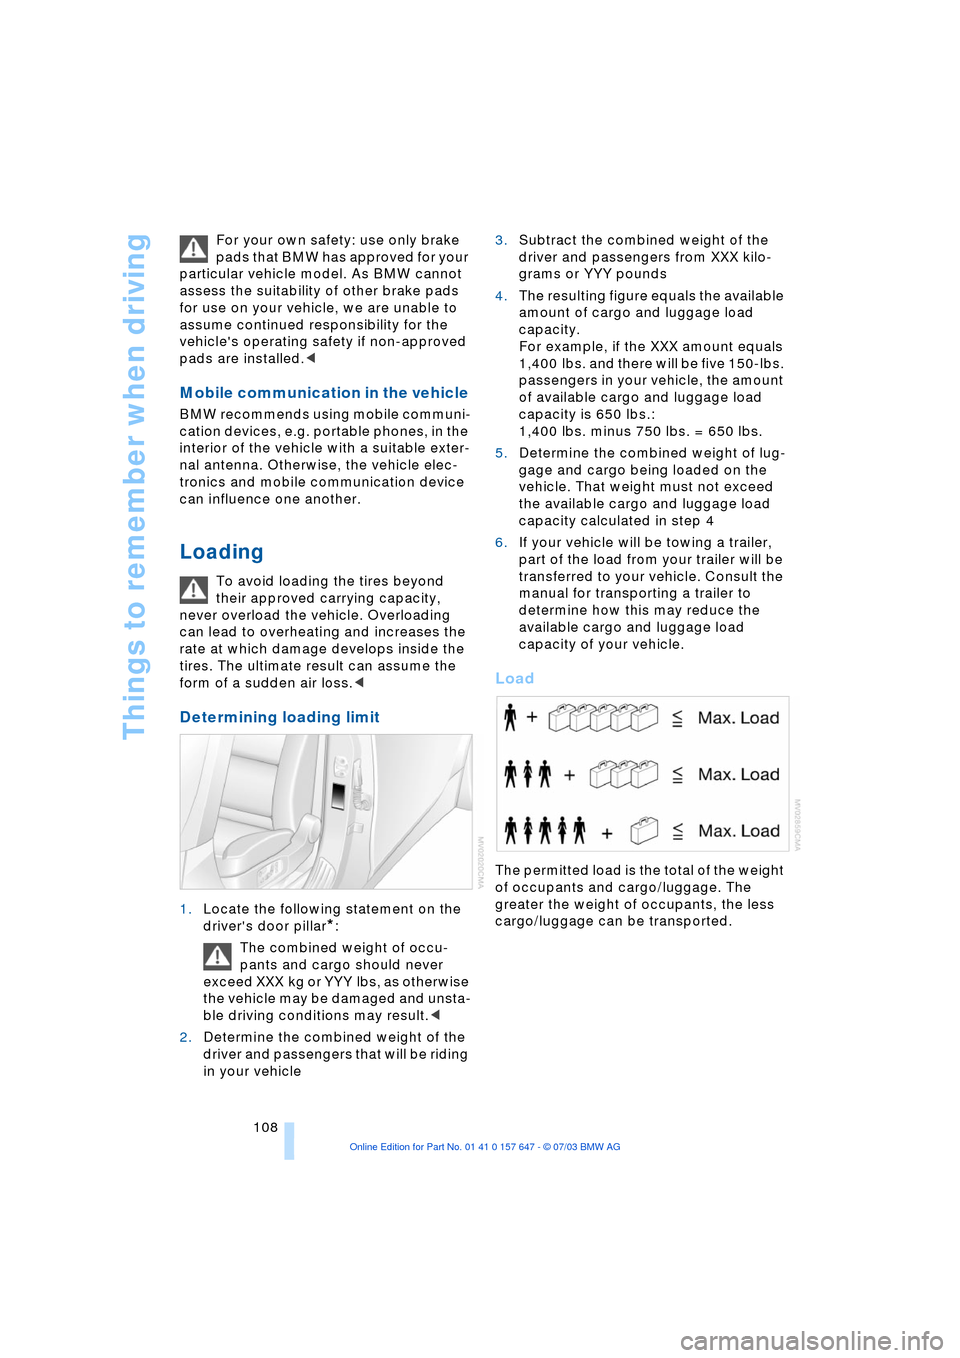
Load
The permitted load is the total of the weight
of occupants and cargo/luggage. The
greater the weight of occupants, the less
cargo/luggage can be transported.