2004 BMW 525I SEDAN tire size
[x] Cancel search: tire sizePage 102 of 220

Practical interior accessories
100
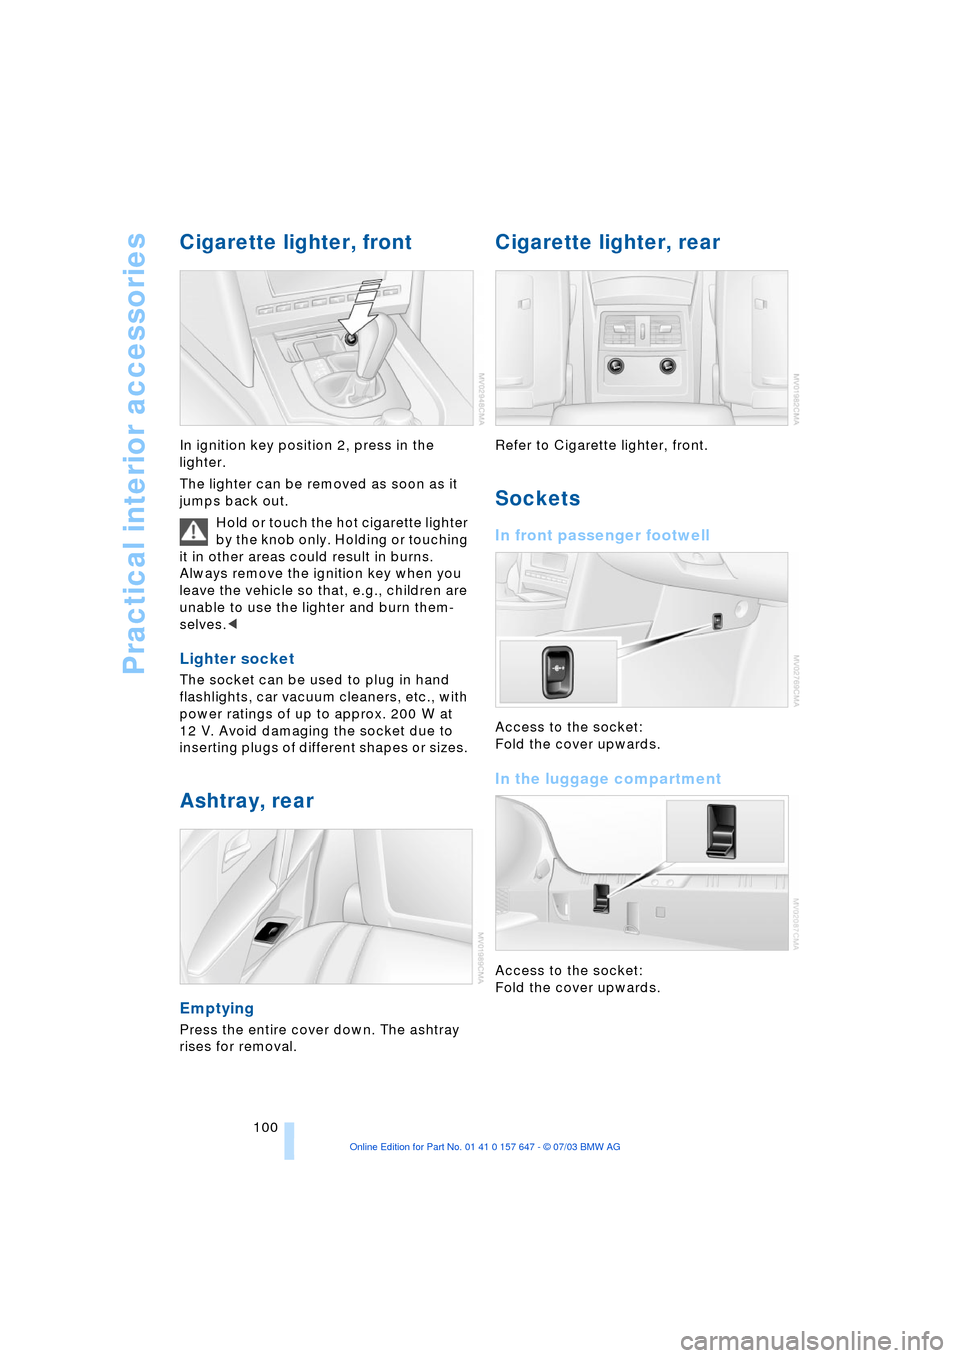
Cigarette lighter, front
In ignition key position 2, press in the
lighter.
The lighter can be removed as soon as it
jumps back out.
Hold or touch the hot cigarette lighter
by the knob only. Holding or touching
it in other areas could result in burns.
Always remove the ignition key when you
leave the vehicle so that, e.g., children are
unable to use the lighter and burn them-
selves.<
Lighter socket
The socket can be used to plug in hand
flashlights, car vacuum cleaners, etc., with
power ratings of up to approx. 200 W at
12 V. Avoid damaging the socket due to
inserting plugs of different shapes or sizes.
Ashtray, rear
Emptying
Press the entire cover down. The ashtray
rises for removal.
Cigarette lighter, rear
Refer to Cigarette lighter, front.
Sockets
In front passenger footwell
Access to the socket:
Fold the cover upwards.
In the luggage compartment
Access to the socket:
Fold the cover upwards.
Page 172 of 220

Wheels and tires
170
Wheels and tires
Tire inflation pressure
Information for your safety
It is not merely the tire's service life, but
also driving comfort and Ð to a great extent
Ð driving safety that depend on the condi-
tion of the tires and the maintenance of the
specified tire pressure.
Check and if necessary adjust tire
inflation pressures regularly, also on
the compact wheel, at least every two
weeks and before beginning a longer trip. If
you fail to observe this precaution you may
be driving on tires with incorrect tire pres-
sures, a condition that cannot only com-
promise your vehicle's driving stability, but
also lead to tire damage and the risk of an
accident.
Do not drive with deflated, i.e. flat tires,
except run-flat tires. A flat tire will seriously
impair your vehicle's handling and braking
response. Attempts to drive on a flat tire
can lead to loss of control over the vehi-
cle.<
Checking the pressure
Only check tire inflation pressure when the
tires are cold. This means after a maximum
of 1.25 miles/2 km driving or when the
vehicle has been parked for at least
2 hours. When tires are warm, the tire infla-
tion pressure increases.
After correcting the inflation pressure(s),
always reinitialize the Flat Tire Monitor,
refer to page 81.
Inflation pressure for original tires
The inflation pressures for your standard
tires are visible on the door post when you
open the driver's door.
Inflation pressure for other tire sizes
The tables on the next pages provide all the
correct inflation pressures for the specified
tire sizes at ambient temperature.
For correct identification of the right
tire inflation pressure for your tires,
observe the specifications for the corre-
sponding tire size.<
Page 173 of 220

Mobility
171Reference
At a glance
Controls
Driving tips
Communications
Navigation
Entertainment
525i/530i
Tire size Pressure specifications in psi/kPa
All pressure specifications in
the table are indicated in psi/
kilopascal with cold tires.
Cold = ambient temperature
225/50 R 17 94 V M+S
225/50 R 17 94 W
245/40 R 18 93 W
225/55 R 16 95 Q,T,H M+S
225/50 R 17 94 Q,T,H M+S
Only 525i:
225/55 R 16 95 V M+S
225/55 R 16 95 V 29/200 35/240 36/250 44/300
245/45 R 17 95 W
245/45 R 17 95 V M+S 29/200 32/220 33/230 41/280
Front: 245/40 R 18 93 W 29/200 - 36/250 -
Rear: 275/35 R 18 95 W - 32/220 - 41/280
Front: 245/35 R 19 89 Y 29/200 - 33/230 -
Rear: 275/30 R 19 92 Y - 32/220 - 41/280
Compact wheel:
T 135/80 R 17 102 M61/420
More details on the permitted load and weights can be found on page 200.
Page 174 of 220

Wheels and tires
172
545i
Tire identification marks
Knowledge of the labeling on the side of
the tire makes it easier to identify and
choose the right tires.
Tire size
Speed letter
Q = up to 100 mph160 km/h
T = up to 118 mph190 km/h
H = up to 131 mph210 km/h
V = up to 150 mph/240 km/hW = up to 167 mph/270 km/h
Y = up to 186 mph/300 km/h
Tire Identification Number
Tires with DOT codes meet the guidelines
of the U.S. Department of Transport.
DOT code:
Tire age
The date of manufacture of the tires is
marked on the tires themselves:
DOT ... 3603 means that the tire was made
in the 36th week of 2003.
BMW recommends that you replace all
tires after 6 years at the latest, indepen-
Tire size Pressure specifications in psi/kPa
All pressure specifications in
the table are indicated in psi/
kilopascal with cold tires.
Cold = ambient temperature
225/50 R 17 94 V M+S
225/50 R 17 94 W
245/40 R 18 93 Y
225/50 R 17 94 Q,T,H M+S32/220 38/260 38/260 45/310
245/45 R 17 95 W
245/45 R 17 95 V M+S29/200 35/240 35/240 42/290
Front: 245/40 R 18 93 Y 32/220 - 38/260 -
Rear: 275/35 R 18 95 Y - 35/240 - 42/290
Front: 245/35 R 19 89 Y 32/220 - 38/260 -
Rear: 275/30 R 19 92 Y - 35/240 - 42/290
Compact wheel:
T 135/80 R 17 102 M61/420
More details on the permitted load and weights can be found on page 200.
e.g.
Nominal width
in mm
Aspect ratio in X
Radial type
Rim diameter in inches
Load rating
(not on ZR tires)
Speed rating
(before R on ZR tires)205/60 R1591W
e.g.
Manufacturer code
for tire make
Tire size and
tire design
Tire ageDOT xxxx xxx 3602
Page 176 of 220

Wheels and tires
174 even when only small amounts of water are
present on the road surface.
As winter tires display a noticeable loss in
their ability to cope with cold-weather driv-
ing conditions once the tread wears to
below 0.16 in/4 mm, to ensure continued
safety you should always have such tires
replaced.
Wear indicators at the tread-groove base,
refer to arrow, are distributed over the tire's
circumference and are marked on the side
of the tire with TWI Ð Tread Wear Indicator.
These indicators signal at a tread depth of
0.063 in/1.6 mm that the legal wear limit
has been reached.
Tire damage
Unusual vibrations encountered dur-
ing normal vehicle operation can indi-
cate tire failure or some other vehicle
defect. This can, for example, be caused by
driving over curbs. These kinds of prob-
lems may also be signaled by other
changes in vehicle response, such as a
strong tendency to pull to the left or right.
Should this occur, respond by immediately
reducing your speed. Carefully proceed Ð
or have your vehicle towed Ð to the nearest
BMW center or tire dealer to have the
wheels or tires inspected. Tire damage,
extending to sudden and complete loss of
pressure in extreme cases, can pose a
potentially lethal safety hazard for the vehi-
cle's occupants and other road users
alike.<
Replacing wheels/tires
Unprofessional attempts by laymen to
service tires can lead to damage and
accidents. Have this work performed by
skilled professionals only. The technicians
at your BMW center will be glad to assist
you with the required professional knowl-
edge and specialized equipment.<
The correct combination of wheels and
tires is another vital factor in ensuring reli-
able operation of various vehicle systems
such as ABS and DSC.
Have the wheel and tire assemblies bal-
anced every time either a wheel or a tire is
replaced.
BMW does not recommend the use of
retreaded tires, as otherwise driving
safety may be reduced. Possible variations
in the design and the age Ð which could be
substantial Ð of the carcasses can lead to
unusually rapid wear.<
The right wheels and tires
BMW recommends that you use only
wheel and tire combinations that
BMW has tested and approved for your
particular vehicle. Variations in factors such
as manufacturing tolerances mean that
even wheels and tires with identical official
size ratings could actually have different
dimensions than the approved units Ð these
differences could lead to body contact, and
with it the risk of severe accidents. If non-
approved wheels and tires are used, BMW
cannot evaluate their suitability, and there-
fore cannot be held liable for driving
safety.<
To maintain good handling and vehicle
response, use only tires of a single tread
configuration from a single manufacturer.
After a flat tire, always remember to have
the specified wheel and tire combination
remounted on the vehicle as soon as pos-
sible.
Recommended tire brands
BMW tests certain tire brands for each tire
size, classifies them as road-safe and
Page 190 of 220

Replacing components
188 3.Loosen the lug bolts 1/2 a turn
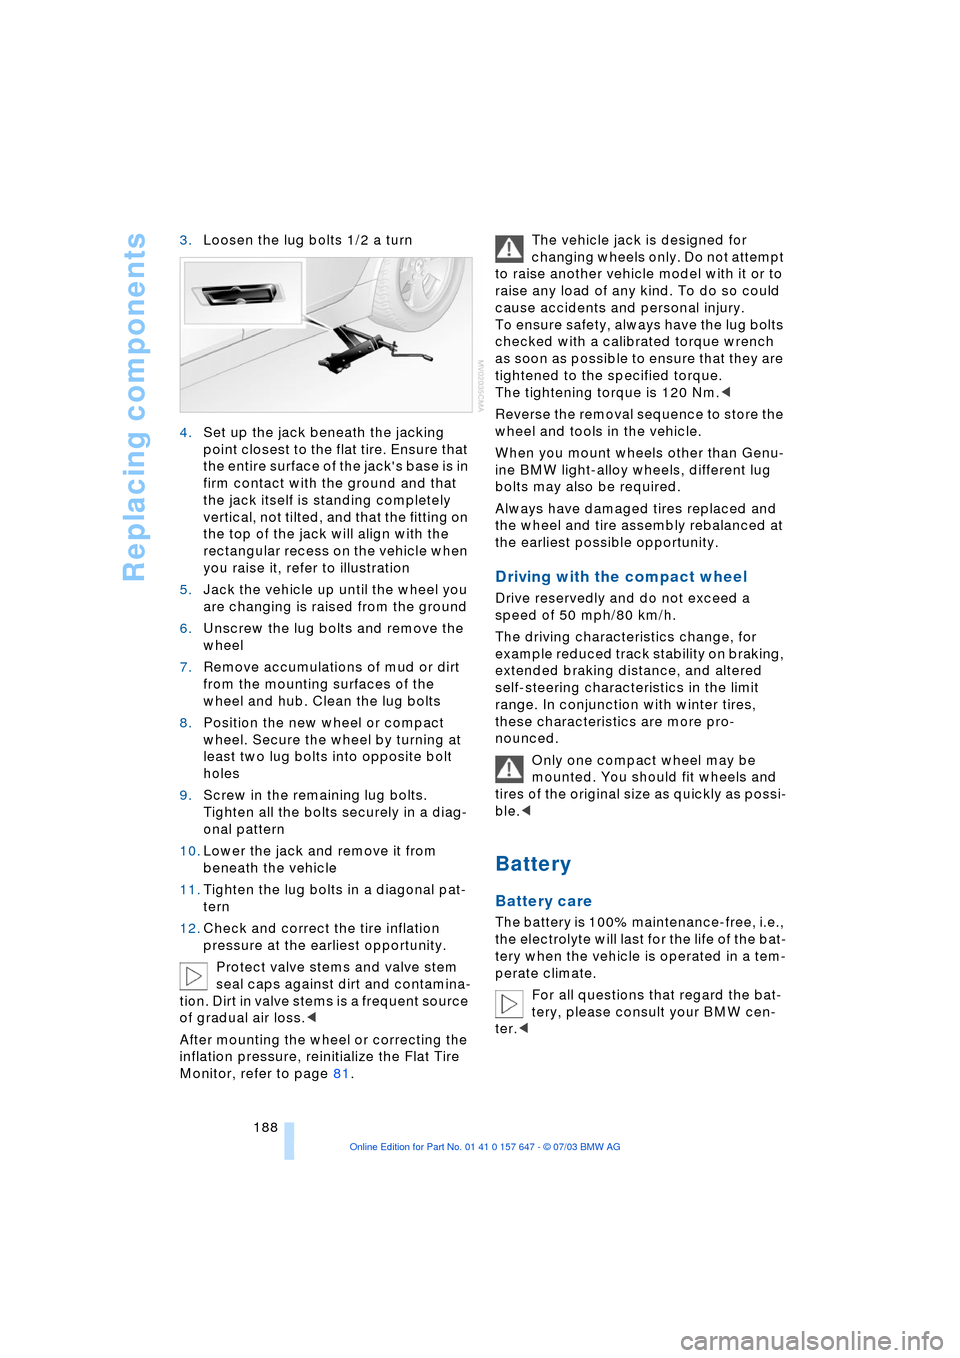
4.Set up the jack beneath the jacking
point closest to the flat tire. Ensure that
the entire surface of the jack's base is in
firm contact with the ground and that
the jack itself is standing completely
vertical, not tilted, and that the fitting on
the top of the jack will align with the
rectangular recess on the vehicle when
you raise it, refer to illustration
5.Jack the vehicle up until the wheel you
are changing is raised from the ground
6.Unscrew the lug bolts and remove the
wheel
7.Remove accumulations of mud or dirt
from the mounting surfaces of the
wheel and hub. Clean the lug bolts
8.Position the new wheel or compact
wheel. Secure the wheel by turning at
least two lug bolts into opposite bolt
holes
9.Screw in the remaining lug bolts.
Tighten all the bolts securely in a diag-
onal pattern
10.Lower the jack and remove it from
beneath the vehicle
11.Tighten the lug bolts in a diagonal pat-
tern
12.Check and correct the tire inflation
pressure at the earliest opportunity.
Protect valve stems and valve stem
seal caps against dirt and contamina-
tion. Dirt in valve stems is a frequent source
of gradual air loss.<
After mounting the wheel or correcting the
inflation pressure, reinitialize the Flat Tire
Monitor, refer to page 81.The vehicle jack is designed for
changing wheels only. Do not attempt
to raise another vehicle model with it or to
raise any load of any kind. To do so could
cause accidents and personal injury.
To ensure safety, always have the lug bolts
checked with a calibrated torque wrench
as soon as possible to ensure that they are
tightened to the specified torque.
The tightening torque is 120 Nm.<
Reverse the removal sequence to store the
wheel and tools in the vehicle.
When you mount wheels other than Genu-
ine BMW light-alloy wheels, different lug
bolts may also be required.
Always have damaged tires replaced and
the wheel and tire assembly rebalanced at
the earliest possible opportunity.
Driving with the compact wheel
Drive reservedly and do not exceed a
speed of 50 mph/80 km/h.
The driving characteristics change, for
example reduced track stability on braking,
extended braking distance, and altered
self-steering characteristics in the limit
range. In conjunction with winter tires,
these characteristics are more pro-
nounced.
Only one compact wheel may be
mounted. You should fit wheels and
tires of the original size as quickly as possi-
ble.<
Battery
Battery care
The battery is 100% maintenance-free, i.e.,
the electrolyte will last for the life of the bat-
tery when the vehicle is operated in a tem-
perate climate.
For all questions that regard the bat-
tery, please consult your BMW cen-
ter.<
Page 216 of 220

Everything from A to Z
214 TeleService 161
Ð enabling 161
Ð services offered 162
Temperature display
Ð ice warning 65
Ð outside temperature 65
Ð setting the units 74
"Terminate services" 165
"Text language" 74
The BMW Maintenance
System 181
Tightening torque, refer to
Tightening lug bolts 188
Tilt function, passenger-
side mirror 39
"Time" 74
"Time 1" for independent
ventilation 95
"Time 2" for independent
ventilation 95
Timer, refer to Preselecting
switch-on time 95
Tire pressure monitoring,
refer to Flat Tire
Monitor 80
Tire Quality Grading 173
Tires
Ð age 172
Ð changing 174
Ð condition 173
Ð damage 174
Ð flat 187
Ð inflation pressure 170
Ð pressure monitoring 80
Ð replacing 187
Ð run-flat 175
Ð size 172
Ð tread 173
Ð wear indicators 174
Tone control 131
Tone on locking/
unlocking 28
Tools, refer to Onboard tool
kit 184
"Top 8" for portable
phone 155
Torque 198
Ð lug bolts 188
Touch tone dialing 156
Tow fitting 193Towing
Ð with automatic
transmission 193
Ð with sequential manual
transmission SMG 193
Towing eye 193
Tow sockets for tow
fitting 194
Tracks
Ð random play
sequence 142, 146
Ð sample scan 142, 145
Track width, refer to
Dimensions 199
Traction Control System,
refer to DSC 78
Transmission
Ð automatic transmission
with Steptronic 54
Ð manual transmission 51
Ð Sequential manual
transmission SMG 51
Transporting children
safely 45
Transport securing device,
refer to Securing the
load 109
Tread depth, refer to Tire
tread 173
"Treble", audio
systems 132
"Trip computer" 72
Trip computer 71
Trip-distance counter, refer
to Trip odometer 65
"Triple turn signal
activation" 56
Trip odometer 65
Trunk lid, refer to Luggage
compartment lid 31
Turning circle, refer to
Dimensions 199
Turn signal indicators 56
Ð replacing the bulbs 185
U
Underbody protection,
refer to Caring for your
vehicle brochureUniform Tire Quality
Grading 173
"Units" 74
Units
Ð average fuel
consumption 74
Ð temperature 74
Universal garage-door
opener, refer to
Integrated universal
remote control 96
Universal remote
control 96
Unlock code 152
Unlocking
Ð engine hood 177
Ð from inside 30
Ð from outside 27
"Update services" 165
V
Valve stem seal caps 188
Vehicle
Ð battery 188
Ð care, refer to Caring for
your vehicle brochure
Ð dimensions 199
Ð loading 108
Ð parking 50
Ð washing, refer to Caring
for your vehicle brochure
Ð weights 200
Vehicle jack 187
Vehicle position 115
"Vehicle settings" 38
Ventilation 94
Ð draft-free 94
Ð front 94
Ð rear 94
Ventilation while parked 94
"Vent settings" 92
Vents of the automatic
climate control 90
Voice command system 20
Voice instructions for
navigation system 124
Ð muting 125
Ð repeating 125
Ð switching on/off 124
Ð volume 125