2004 BMW 525I SEDAN Fluid
[x] Cancel search: FluidPage 15 of 220

At a glance
13Reference
Controls
Driving tips
Communications
Navigation
Entertainment
Mobility
Indicator and warning
lamps
Technology that monitors itself
The indicator and warning lamps identified
by the
+ symbol are subjected to an oper-
ation check each time you switch on the
ignition or start the engine. They each light
up once for different periods of time.
When a malfunction occurs in a monitored
system, the corresponding lamp will either
fail to go out when the engine is started, or
it will come on again during normal driving.
For information on how you should respond
when this happens, please refer to the
pages indicated.
Colors
The indicator and warning lamps can light
up in different colors and combinations.
The following section explains the signifi-
cance of the individual colors as well as
how you should respond when they
appear.
>Red:
Stop immediately
or
important reminder
>Red and yellow:
Continue driving moderately
>Yellow:
Have checked soon
or
for your information
>Green or blue:
For your information.
Indicator and warning lamps of the
Check Control
Other indicator and warning lamps appear
in display 6 of the instrument cluster as
necessary, accompanied by supplemen-
tary text on the Control Display, refer to
Check Control, page 68. Turn signal indicators 56
Active steering
+82
Handbrake/brake fluid, brake
hydraulics/DBC Dynamic Brake
Control
+50/ 180/ 79
Handbrake/brake fluid, brake
hydraulics/DBC Dynamic Brake
Control for Canadian models
Airbags
+83
Service Engine Soon
+183
If the indicator lamp comes on
either continuously or intermit-
tently, this indicates a fault in the
emissions-related electronic sys-
tems. Although the vehicle
remains operational, you should
have the systems checked by your
BMW center at the earliest possi-
ble opportunity.
Service Engine Soon indicator
lamp for Canadian models.
Front fog lamps 89
ABS Antilock Brake System
+77
DTC Dynamic Traction Control79
High beams/headlamp flasher 88
Please fasten safety belt
+40
DSC Dynamic Stability
Control
+78
Check Gas Cap168
lamp for US models
Page 59 of 220
Controls
57Reference
At a glance
Driving tips
Communications
Navigation
Entertainment
Mobility
Wiper system
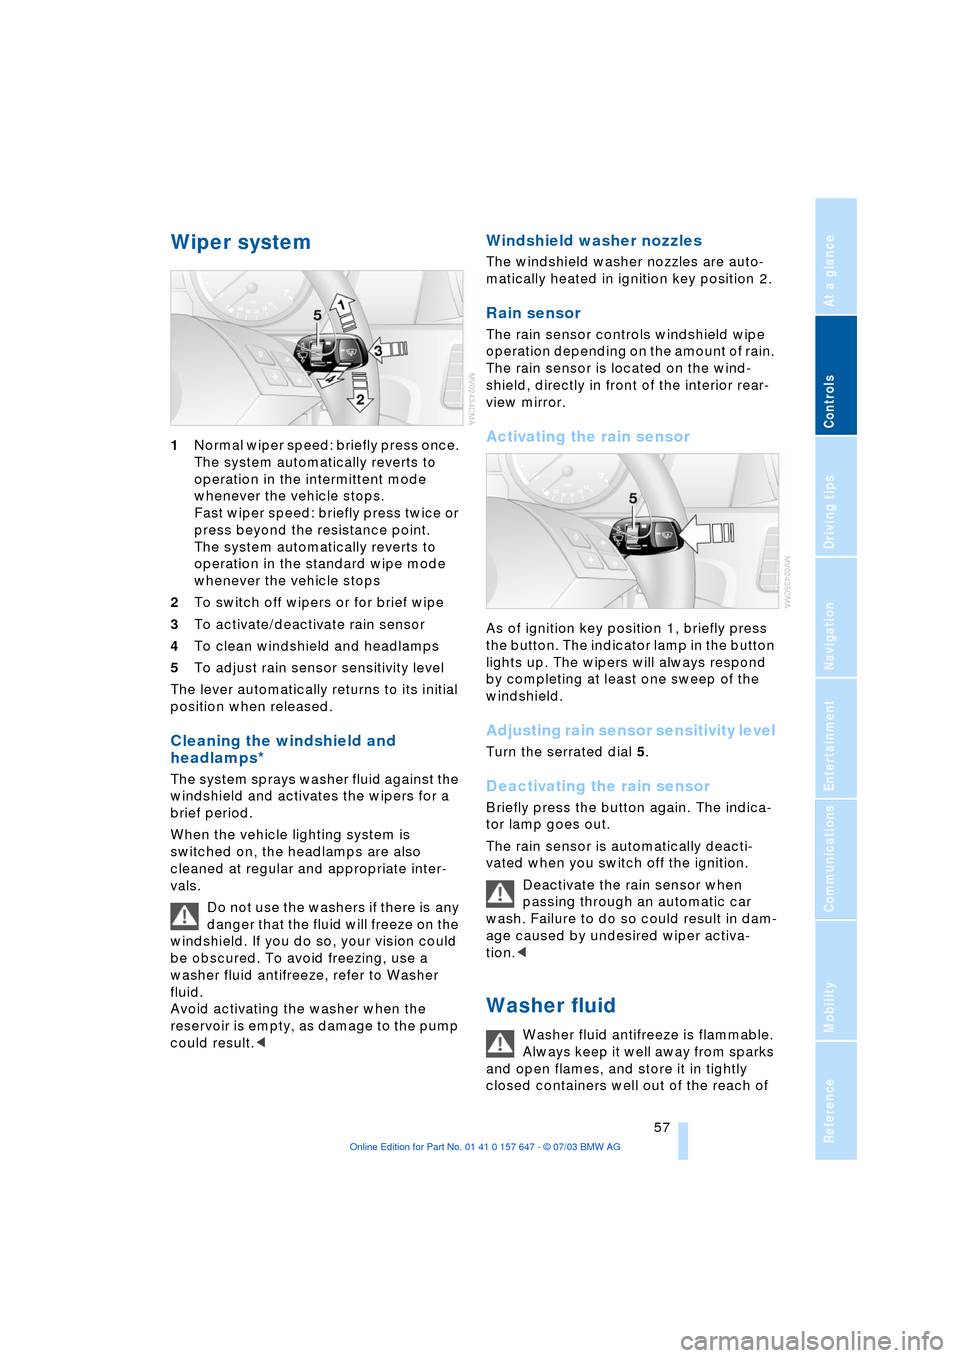
1Normal wiper speed: briefly press once.
The system automatically reverts to
operation in the intermittent mode
whenever the vehicle stops.
Fast wiper speed: briefly press twice or
press beyond the resistance point.
The system automatically reverts to
operation in the standard wipe mode
whenever the vehicle stops
2To switch off wipers or for brief wipe
3To activate/deactivate rain sensor
4To clean windshield and headlamps
5To adjust rain sensor sensitivity level
The lever automatically returns to its initial
position when released.
Cleaning the windshield and
headlamps*
The system sprays washer fluid against the
windshield and activates the wipers for a
brief period.
When the vehicle lighting system is
switched on, the headlamps are also
cleaned at regular and appropriate inter-
vals.
Do not use the washers if there is any
danger that the fluid will freeze on the
windshield. If you do so, your vision could
be obscured. To avoid freezing, use a
washer fluid antifreeze, refer to Washer
fluid.
Avoid activating the washer when the
reservoir is empty, as damage to the pump
could result.<
Windshield washer nozzles
The windshield washer nozzles are auto-
matically heated in ignition key position 2.
Rain sensor
The rain sensor controls windshield wipe
operation depending on the amount of rain.
The rain sensor is located on the wind-
shield, directly in front of the interior rear-
view mirror.
Activating the rain sensor
As of ignition key position 1, briefly press
the button. The indicator lamp in the button
lights up. The wipers will always respond
by completing at least one sweep of the
windshield.
Adjusting rain sensor sensitivity level
Turn the serrated dial 5.
Deactivating the rain sensor
Briefly press the button again. The indica-
tor lamp goes out.
The rain sensor is automatically deacti-
vated when you switch off the ignition.
Deactivate the rain sensor when
passing through an automatic car
wash. Failure to do so could result in dam-
age caused by undesired wiper activa-
tion.<
Washer fluid
Washer fluid antifreeze is flammable.
Always keep it well away from sparks
and open flames, and store it in tightly
closed containers well out of the reach of
Page 60 of 220
Driving
58 children. Always observe the instructions
for use provided on the containers.<
Washer fluid reservoir
Capacity: approx. 3.2 US quarts/3 liters for
the windshield washer system or approx.
5.3 US quarts/5 liters in conjunction with
headlamp washer system.
Fill with water and Ð if required Ð with a
washer antifreeze, according to manufac-
turer's recommendations.
In order to keep to the mixture ratio,
mix the washer fluid before filling.<
Cruise control*
The concept
The cruise control is available for use at
speeds of approx. 20 mph/30 km/h and
higher. The vehicle maintains and stores
the speed that you set using the lever
mounted on the steering column.
Do not use the cruise control when
driving on winding roads, in heavy
traffic or in poor road conditions Ð e.g.
snow, rain, ice, loose road surface Ð that do
not permit a constant speed.<
One lever for all functions
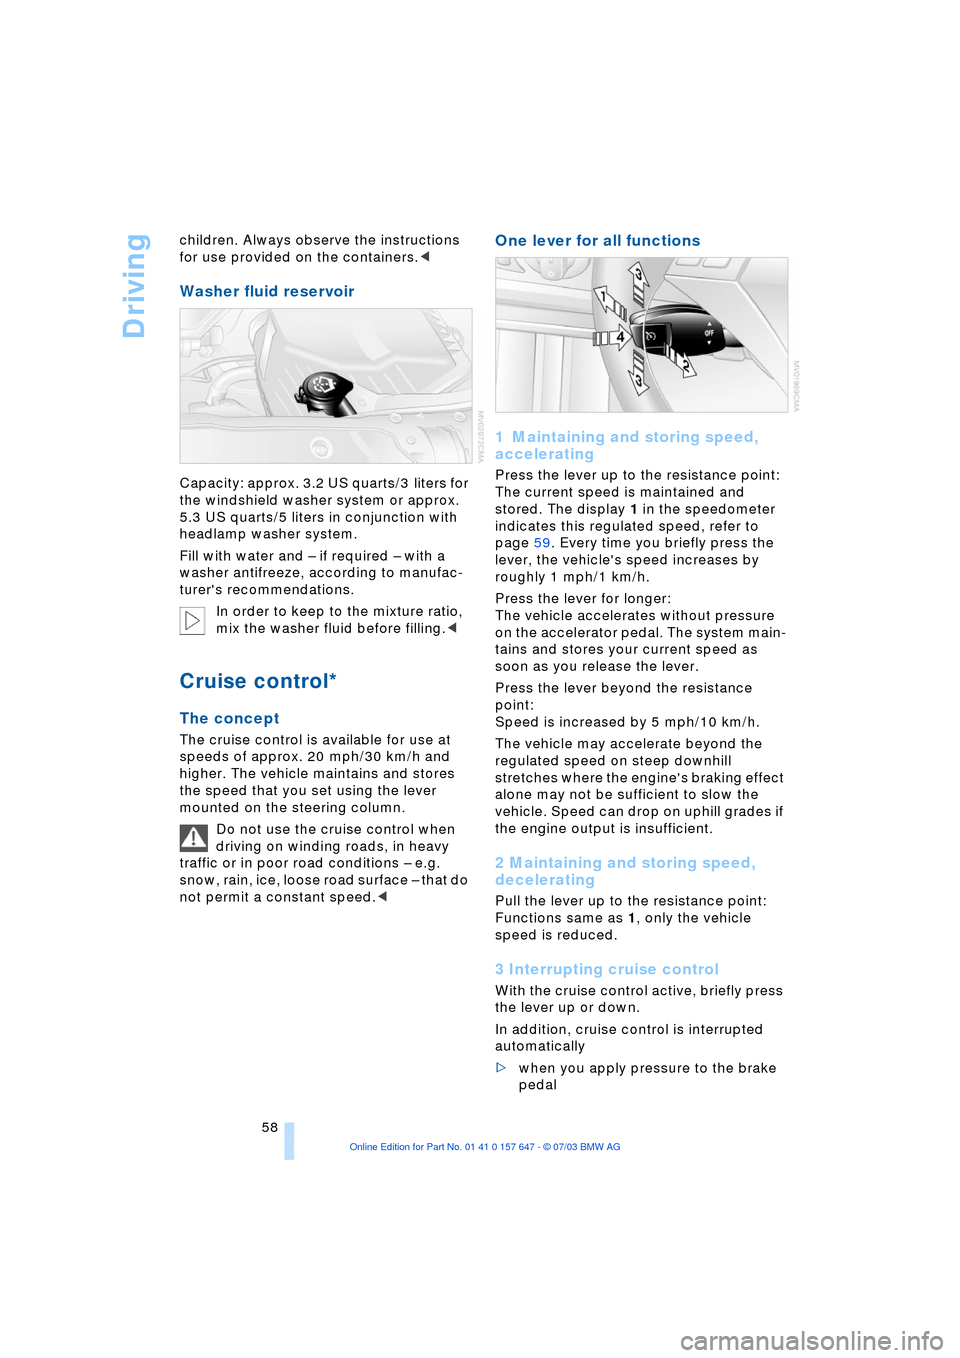
1 Maintaining and storing speed,
accelerating
Press the lever up to the resistance point:
The current speed is maintained and
stored. The display 1 in the speedometer
indicates this regulated speed, refer to
page 59. Every time you briefly press the
lever, the vehicle's speed increases by
roughly 1 mph/1 km/h.
Press the lever for longer:
The vehicle accelerates without pressure
on the accelerator pedal. The system main-
tains and stores your current speed as
soon as you release the lever.
Press the lever beyond the resistance
point:
Speed is increased by 5 mph/10 km/h.
The vehicle may accelerate beyond the
regulated speed on steep downhill
stretches where the engine's braking effect
alone may not be sufficient to slow the
vehicle. Speed can drop on uphill grades if
the engine output is insufficient.
2 Maintaining and storing speed,
decelerating
Pull the lever up to the resistance point:
Functions same as 1, only the vehicle
speed is reduced.
3 Interrupting cruise control
With the cruise control active, briefly press
the lever up or down.
In addition, cruise control is interrupted
automatically
>when you apply pressure to the brake
pedal
Page 180 of 220
Under the hood
178
Engine compartment
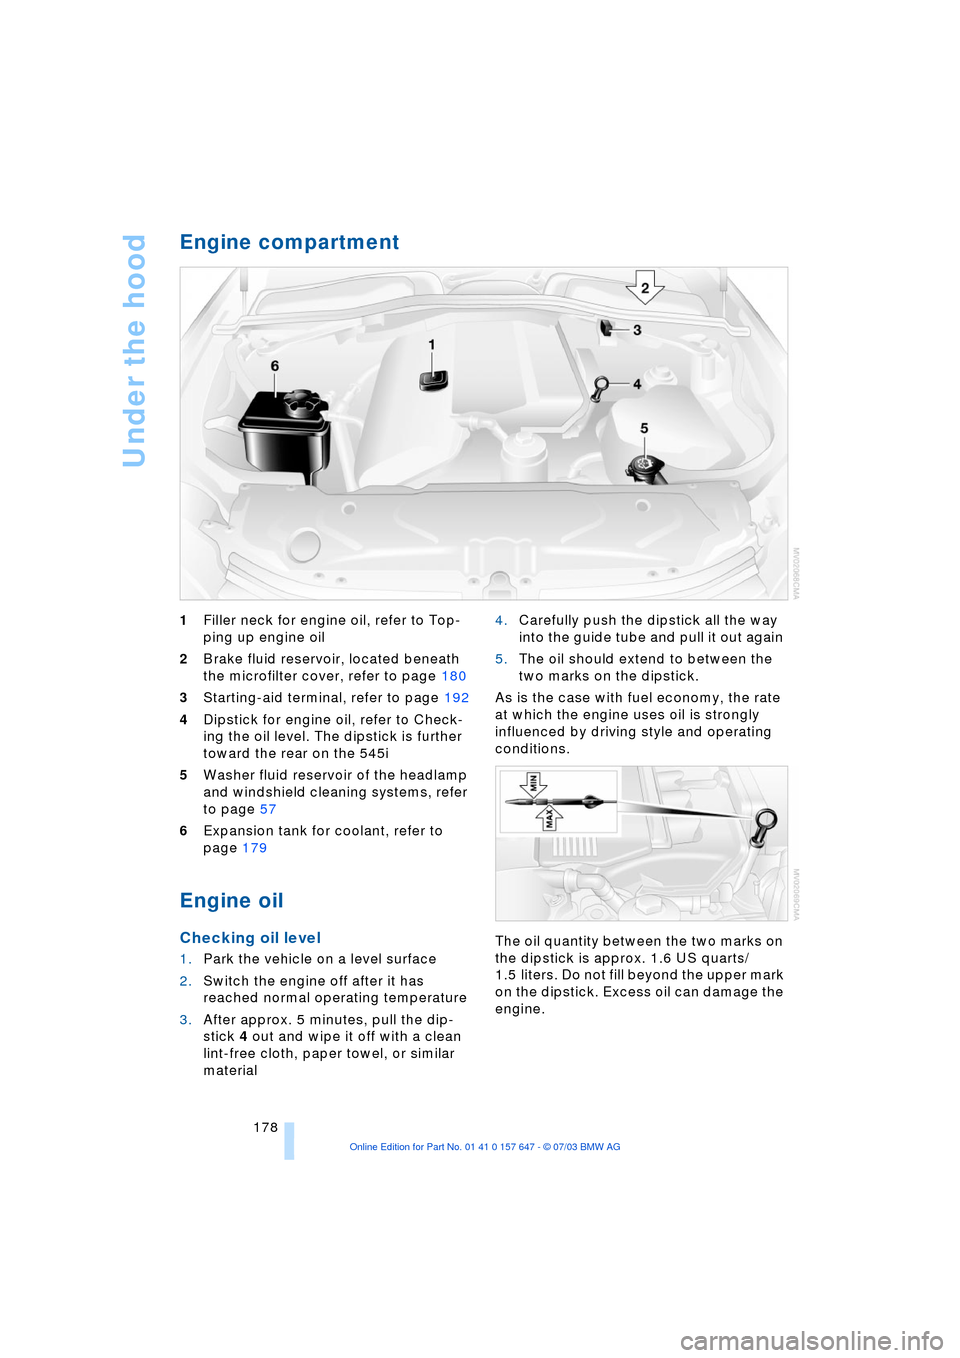
1Filler neck for engine oil, refer to Top-
ping up engine oil
2Brake fluid reservoir, located beneath
the microfilter cover, refer to page 180
3Starting-aid terminal, refer to page 192
4Dipstick for engine oil, refer to Check-
ing the oil level. The dipstick is further
toward the rear on the 545i
5Washer fluid reservoir of the headlamp
and windshield cleaning systems, refer
to page 57
6Expansion tank for coolant, refer to
page 179
Engine oil
Checking oil level
1.Park the vehicle on a level surface
2.Switch the engine off after it has
reached normal operating temperature
3.After approx. 5 minutes, pull the dip-
stick 4 out and wipe it off with a clean
lint-free cloth, paper towel, or similar
material 4.Carefully push the dipstick all the way
into the guide tube and pull it out again
5.The oil should extend to between the
two marks on the dipstick.
As is the case with fuel economy, the rate
at which the engine uses oil is strongly
influenced by driving style and operating
conditions.
The oil quantity between the two marks on
the dipstick is approx. 1.6 US quarts/
1.5 liters. Do not fill beyond the upper mark
on the dipstick. Excess oil can damage the
engine.
Page 182 of 220

Under the hood
180
Checking coolant level
Correct coolant level with the engine cold,
approx. +687/206:
1.Turn the cap of the expansion tank
counterclockwise to allow any accumu-
lated pressure to escape, then continue
turning to open
2.The coolant level is correct when the
coolant extends to between the MIN
and MAX marks on the filler neck, refer
to the diagram adjacent to the filler
neck
3.If the coolant is low, slowly add coolant
up to the specified level Ð do not overfill.
Brake fluid
The symbol lights up and a mes-
sage appears on the Control Dis-
play: the brake-fluid level in the
container is too low.
The brake fluid reservoir is located under
the microfilter housing trim panel on the
driver's side of the vehicle. To have brake
fluid added to the system, or to have the
source of any brake fluid loss traced and
rectified, please contact your BMW center,
which can also supply the factory-
approved Ð DOT 4 Ð brake fluids.
Brake fluid is hygroscopic: it absorbs
moisture from the atmosphere over
the course of time.
To ensure that the brake system continues
to provide safe and reliable performance,
remember to have the brake fluid changed
every 2 years at the latest, refer to page 66
and to the Service and Warranty Informa-
tion Booklet for US models or the Warranty and Service Guide Booklet for Canadian
models.
Brake fluid is toxic and also damages vehi-
cle paintwork. Always store these agents in
tightly-closed original containers kept well
away from the reach of children.
Do not spill the fluid and do not refill the
brake fluid reservoir to beyond the MAX
mark. Should it come into contact with hot
engine components, the brake fluid could
ignite and cause personal injury in the form
of burns.<
Always observe all applicable rules
and regulations for environmental
protection when disposing of used brake
fluid.<
Warning lamp for Canadian models.
Brake hydraulic systems
A low brake-fluid level combined with
longer-than-usual pedal travel could be a
sign that one of the brake system's hydrau-
lic circuits has failed.
Proceed to the nearest BMW center.
Remember that pedal travel may be
increased, and there may also be a sub-
stantial increase in the amount of pedal
pressure required to brake the vehicle.
Please adapt your driving style accord-
ingly.<
Page 183 of 220
Mobility
181Reference
At a glance
Controls
Driving tips
Communications
Navigation
Entertainment
Maintenance
The BMW Maintenance
System
The BMW Maintenance System is
designed to ensure that your vehicle will
continue to furnish consistent reliability
combined with optimal safety. The service
schedule also includes operations related
to the vehicle's comfort and convenience
features, such as replacement of the filters
for the inside air. The ultimate objective is
to ensure economical maintenance by pro-
viding the ideal service for your vehicle.
Should the day come when you decide to
sell your BMW, you will find that a complete
dealer service history is an asset of inesti-
mable value.
CBS Condition Based Service
CBS is a more advanced version of the Ser-
vice Interval Display. Sensors combine with
highly-specialized algorithms to supply
service information that reflects your vehi-
cle's actual operating conditions more pre-
cisely than ever before.
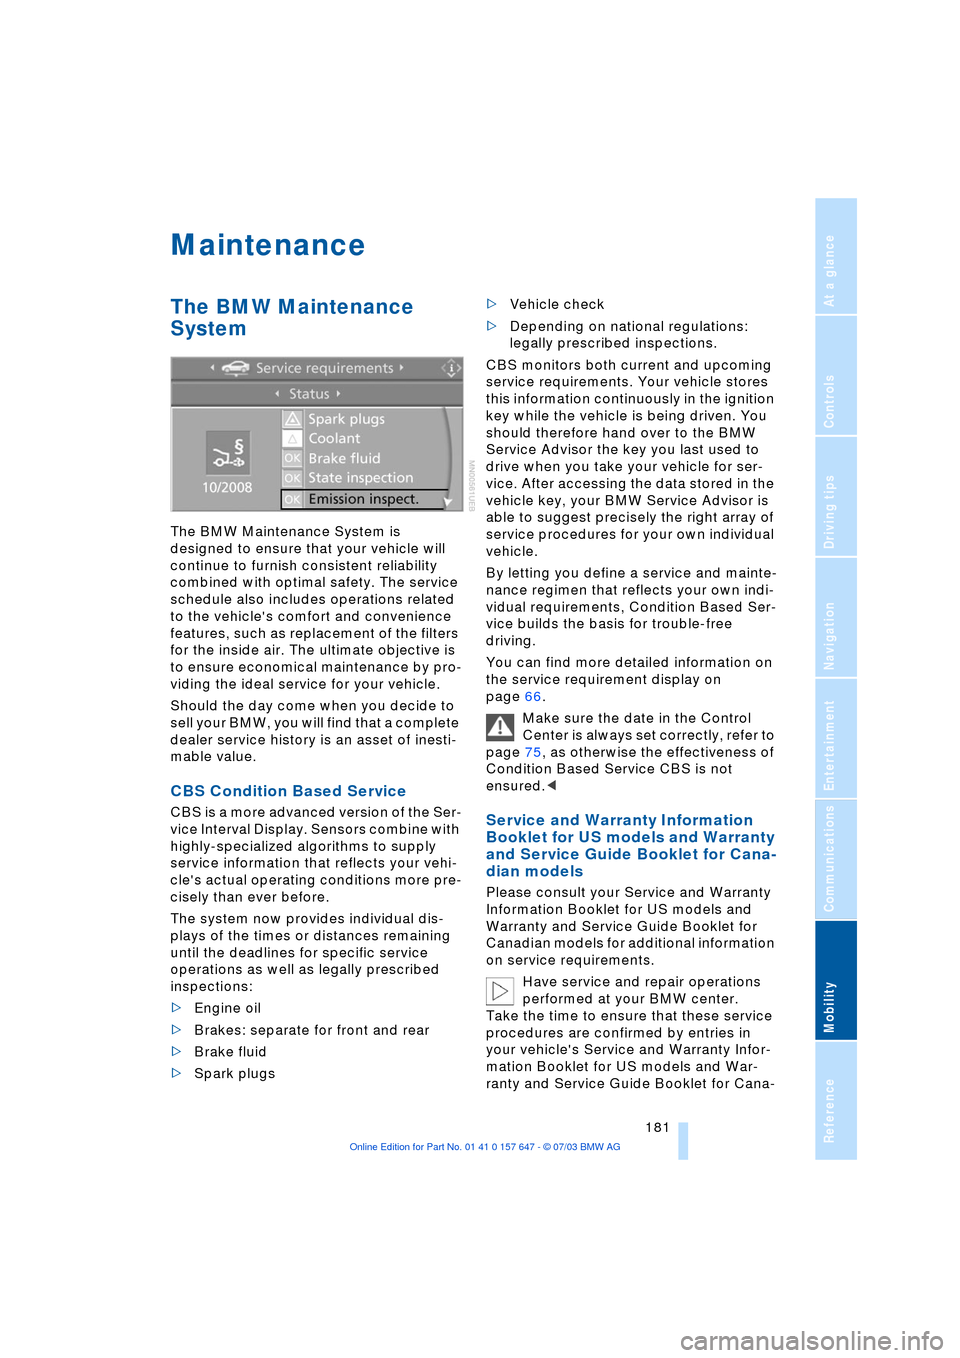
The system now provides individual dis-
plays of the times or distances remaining
until the deadlines for specific service
operations as well as legally prescribed
inspections:
>Engine oil
>Brakes: separate for front and rear
>Brake fluid
>Spark plugs >Vehicle check
>Depending on national regulations:
legally prescribed inspections.
CBS monitors both current and upcoming
service requirements. Your vehicle stores
this information continuously in the ignition
key while the vehicle is being driven. You
should therefore hand over to the BMW
Service Advisor the key you last used to
drive when you take your vehicle for ser-
vice. After accessing the data stored in the
vehicle key, your BMW Service Advisor is
able to suggest precisely the right array of
service procedures for your own individual
vehicle.
By letting you define a service and mainte-
nance regimen that reflects your own indi-
vidual requirements, Condition Based Ser-
vice builds the basis for trouble-free
driving.
You can find more detailed information on
the service requirement display on
page 66.
Make sure the date in the Control
Center is always set correctly, refer to
page 75, as otherwise the effectiveness of
Condition Based Service CBS is not
ensured.
and Service Guide Booklet for Cana-
dian models
Please consult your Service and Warranty
Information Booklet for US models and
Warranty and Service Guide Booklet for
Canadian models for additional information
on service requirements.
Have service and repair operations
performed at your BMW center.
Take the time to ensure that these service
procedures are confirmed by entries in
your vehicle's Service and Warranty Infor-
mation Booklet for US models and War-
ranty and Service Guide Booklet for Cana-
Page 195 of 220
Mobility
193Reference
At a glance
Controls
Driving tips
Communications
Navigation
Entertainment
5.Attach the second end of the cable to
the negative terminal of the battery or to
the engine or body ground of the vehi-
cle to be started.
Starting the engine
1.Start the engine on the support vehicle
and allow it to run for several minutes at
a fast idle
2.Start the engine on the other vehicle in
the usual way.
If the first start attempt is not success-
ful, wait a few minutes before another
attempt in order to allow the discharged
battery to recharge
3.Let the engines run for a few minutes
4.Disconnect the jumper cables by
reversing the connection sequence.
If required, have the battery inspected and
recharged at your BMW center.
Never use spray fluids to start the
engine.<
Towing
Always observe all applicable towing
laws and regulations.<
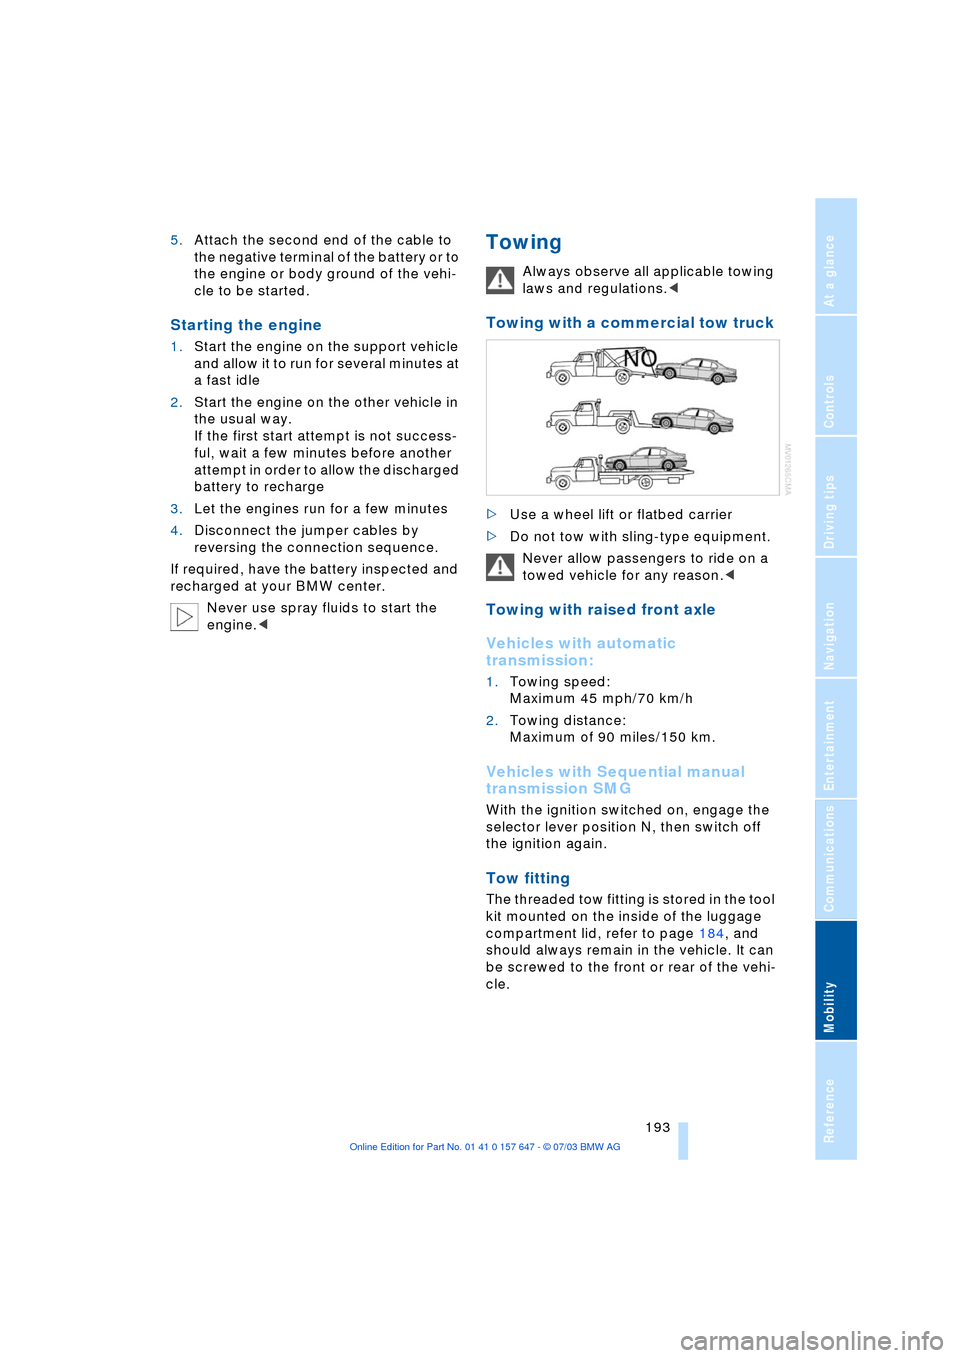
Towing with a commercial tow truck
>Use a wheel lift or flatbed carrier
>Do not tow with sling-type equipment.
Never allow passengers to ride on a
towed vehicle for any reason.<
Towing with raised front axle
Vehicles with automatic
transmission:
1.Towing speed:
Maximum 45 mph/70 km/h
2.Towing distance:
Maximum of 90 miles/150 km.
Vehicles with Sequential manual
transmission SMG
With the ignition switched on, engage the
selector lever position N, then switch off
the ignition again.
Tow fitting
The threaded tow fitting is stored in the tool
kit mounted on the inside of the luggage
compartment lid, refer to page 184, and
should always remain in the vehicle. It can
be screwed to the front or rear of the vehi-
cle.
Page 203 of 220
Reference 201
At a glance
Controls
Driving tips
Communications
Navigation
Entertainment
Mobility
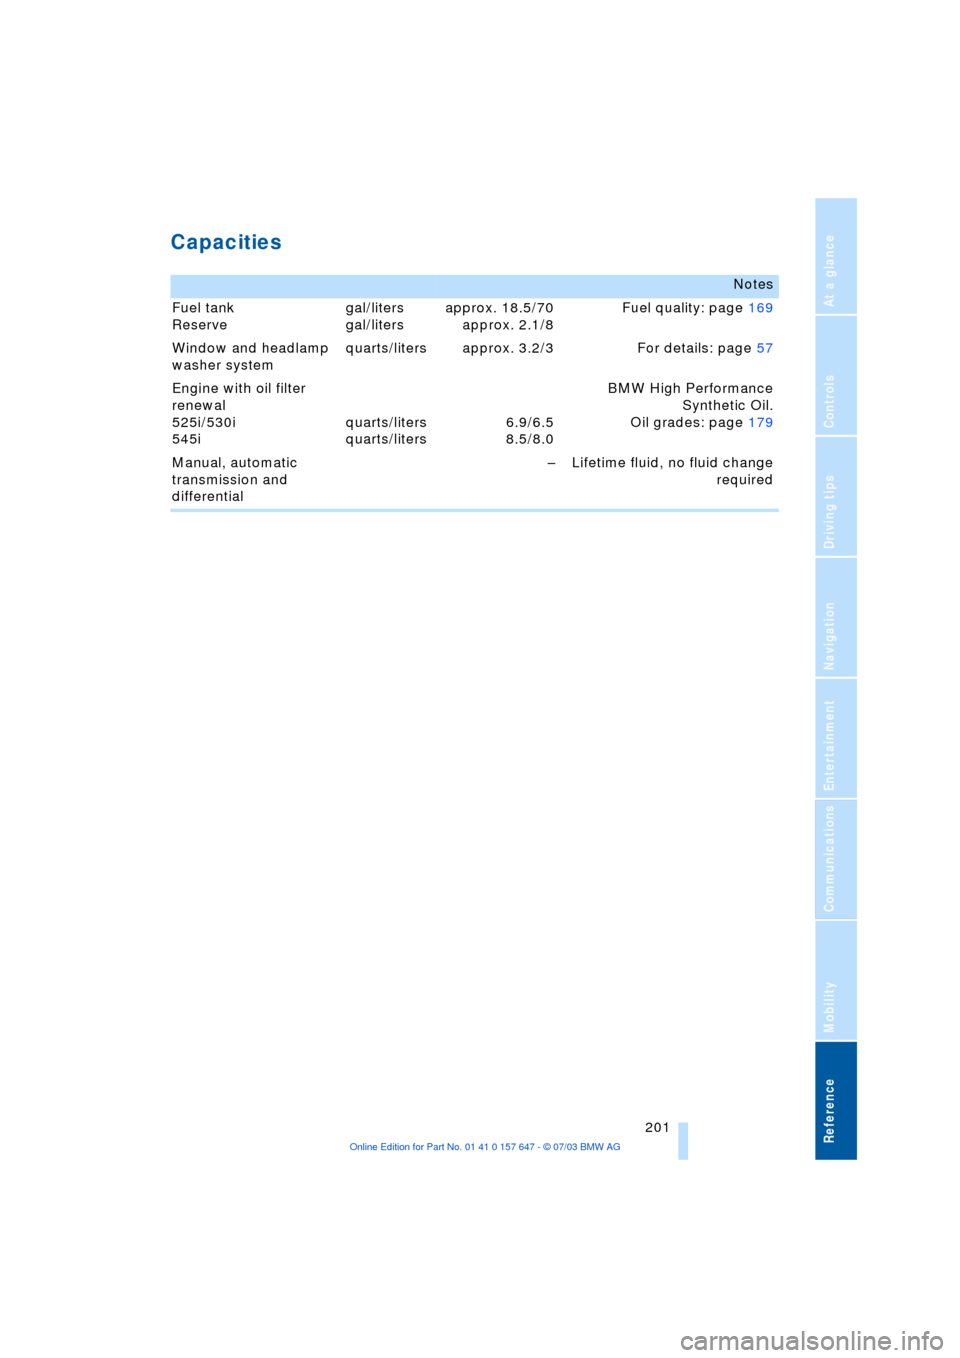
Capacities
Notes
Fuel tank
Reserve gal/liters
gal/litersapprox. 18.5/70
approx. 2.1/8Fuel quality: page 169
Window and headlamp
washer system quarts/liters approx. 3.2/3 For details: page 57
Engine with oil filter
renewal
525i/530i
545iquarts/liters
quarts/liters6.9/6.5
8.5/8.0BMW High Performance
Synthetic Oil.
Oil grades: page 179
Manual, automatic
transmission and
differential Ð Lifetime fluid, no fluid change
required